Workflow
I. Workflow
Similar to the workbench, for details, please refer to the workbench documentation.
II. Process Execution Records
Process execution records are used to record the execution status of workflows. Every time a workflow is executed, the system saves a corresponding execution record in the process execution records.
(Ⅰ) Filtering
1. Function Introduction
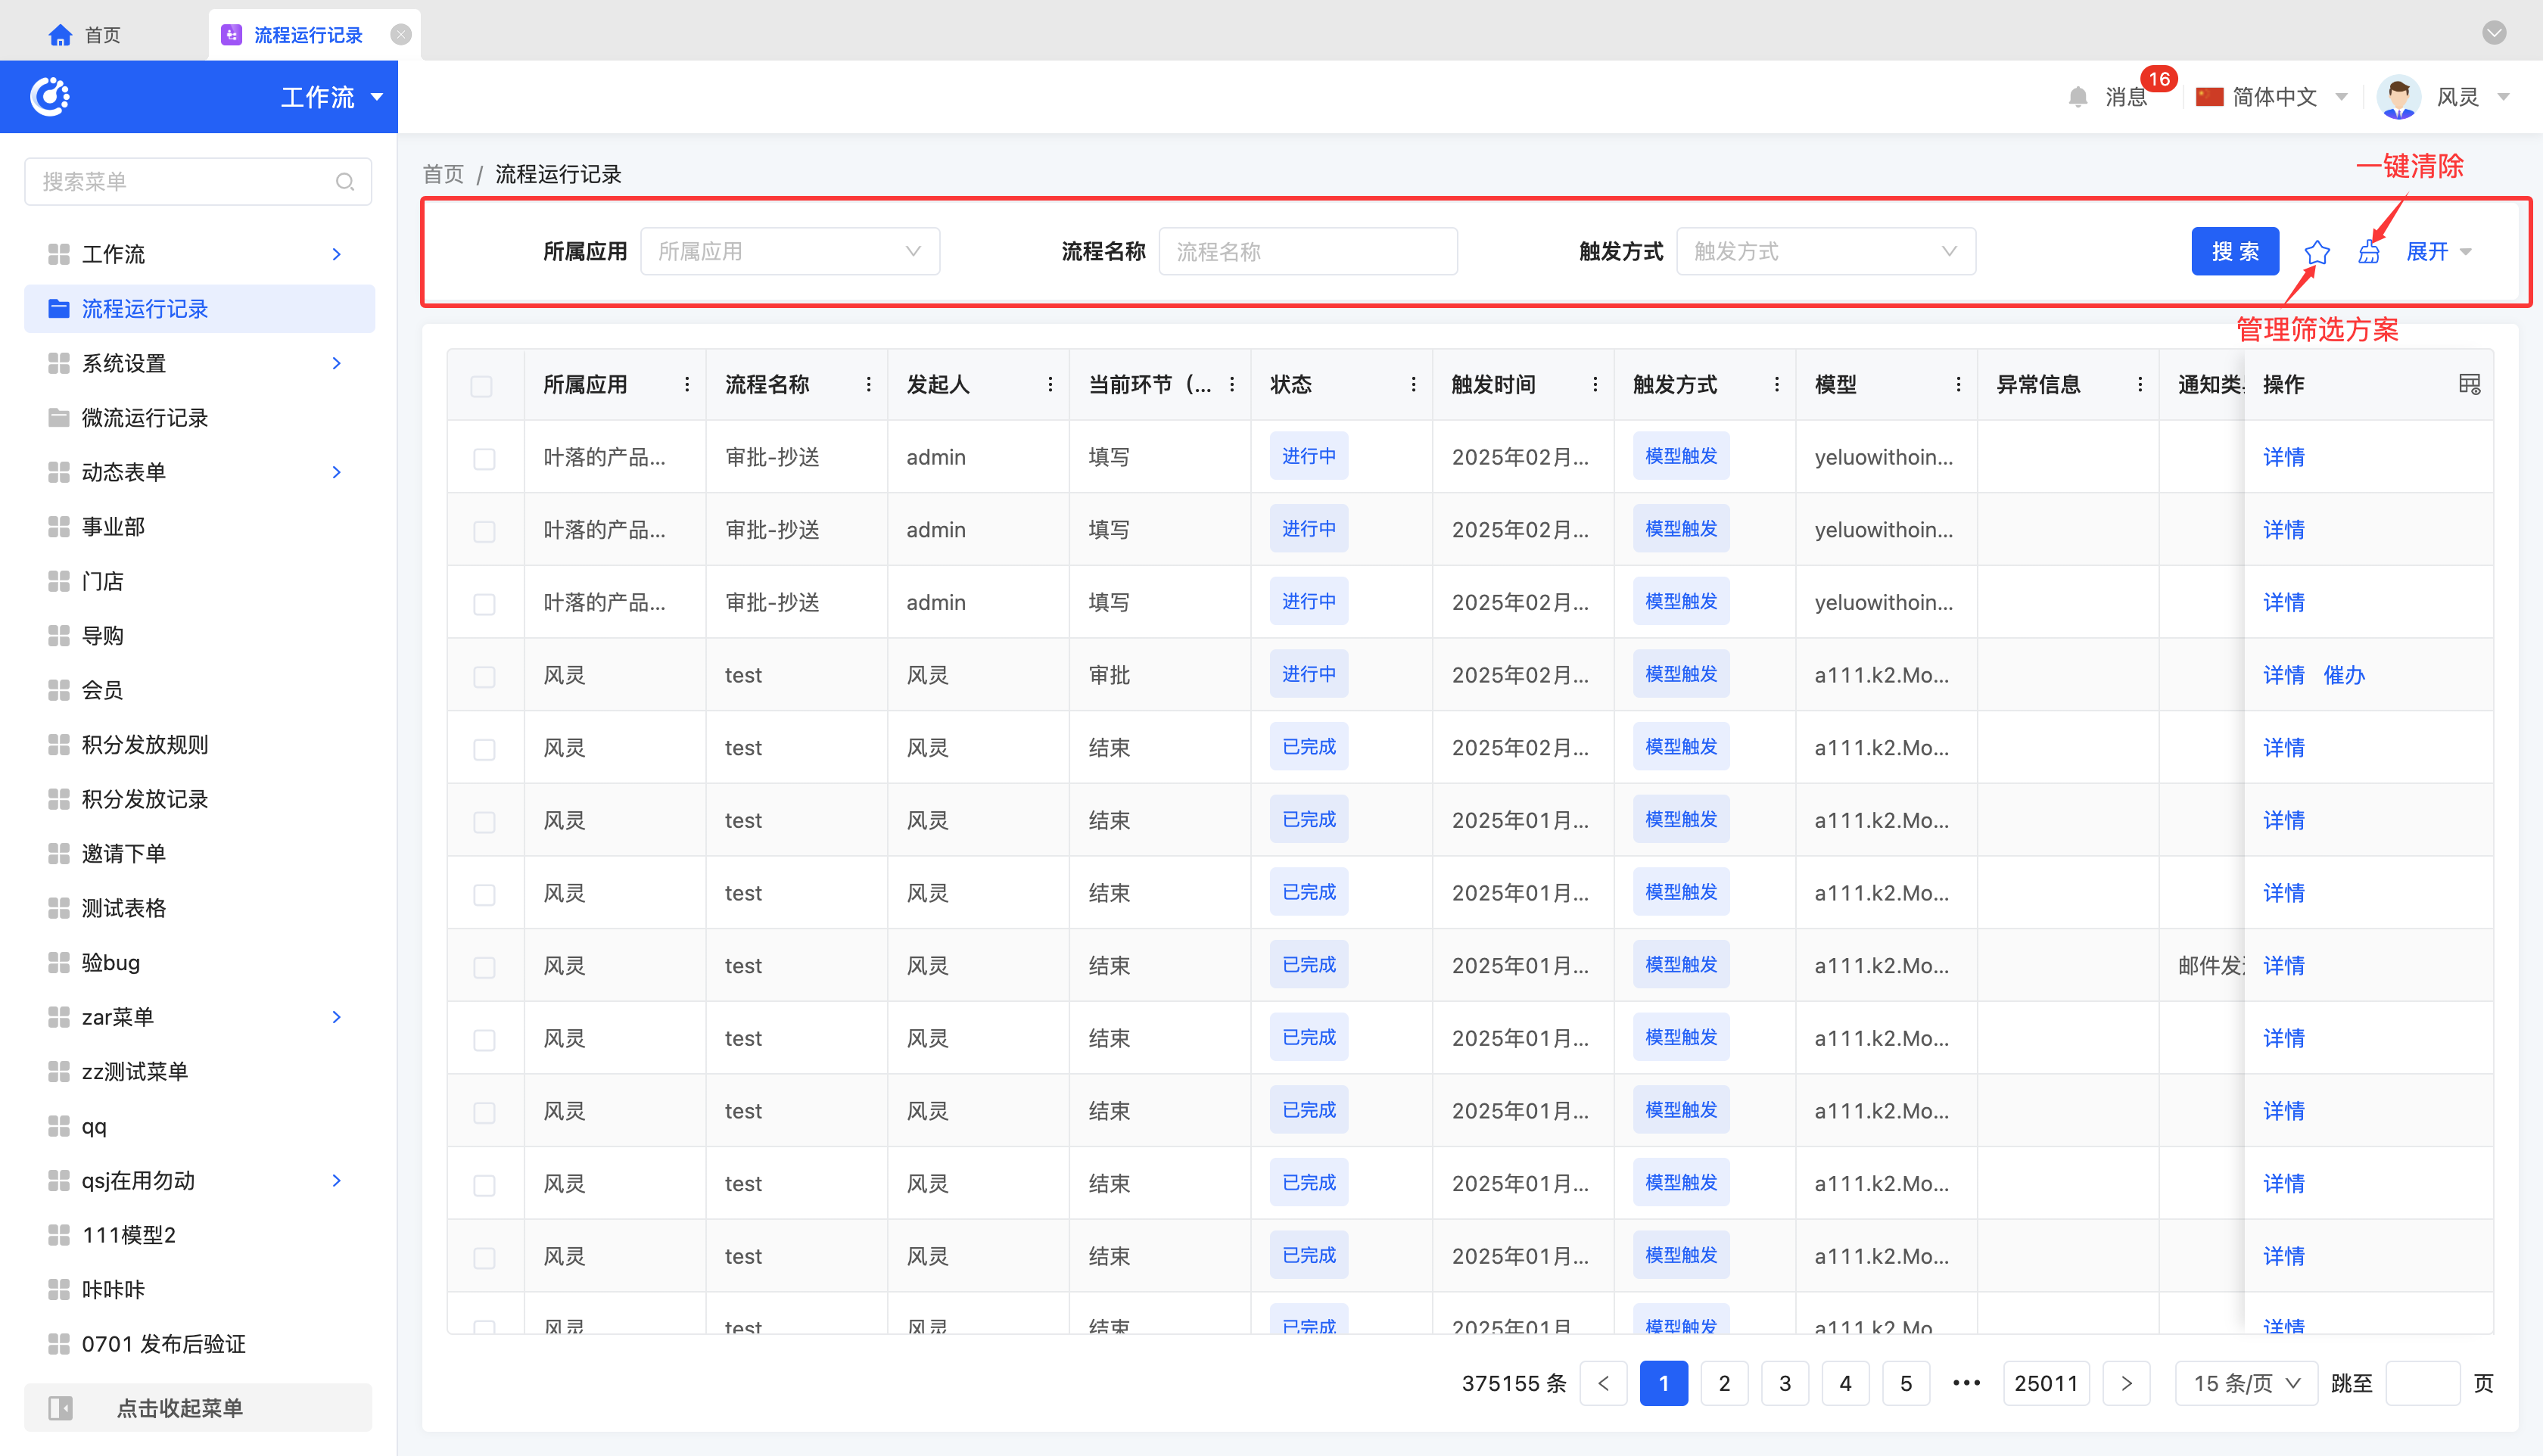
According to actual business requirements, you can customize the filtering conditions for process execution records. Under the current filtering conditions, the corresponding list of process execution records will be displayed, making it convenient to view different process execution records.
2. Operation Methods
- Filter: After selecting or entering conditions in the filtering area, click "Search" to filter the process execution records.
- Clear All at Once: Click the "Clear" icon to clear all conditions in the current filtering area at once.
- Manage Filtering Schemes: Move the mouse over the "Filtering Scheme" icon to manage filtering schemes.
- Add: After selecting or entering filtering conditions in the filtering area, click "Save Current Conditions". Enter the scheme name in the pop-up window to add the current combination of filtering conditions to the filtering scheme.
- Search: Enter the scheme name in the input box.
- Modify: After clicking "Manage Filtering Schemes", select a scheme in the pop-up window and click the scheme name to modify the scheme name.
- Delete: Select a scheme in the scheme list and click the "Delete" icon to delete the filtering scheme.
(Ⅱ) Details
1. Function Introduction
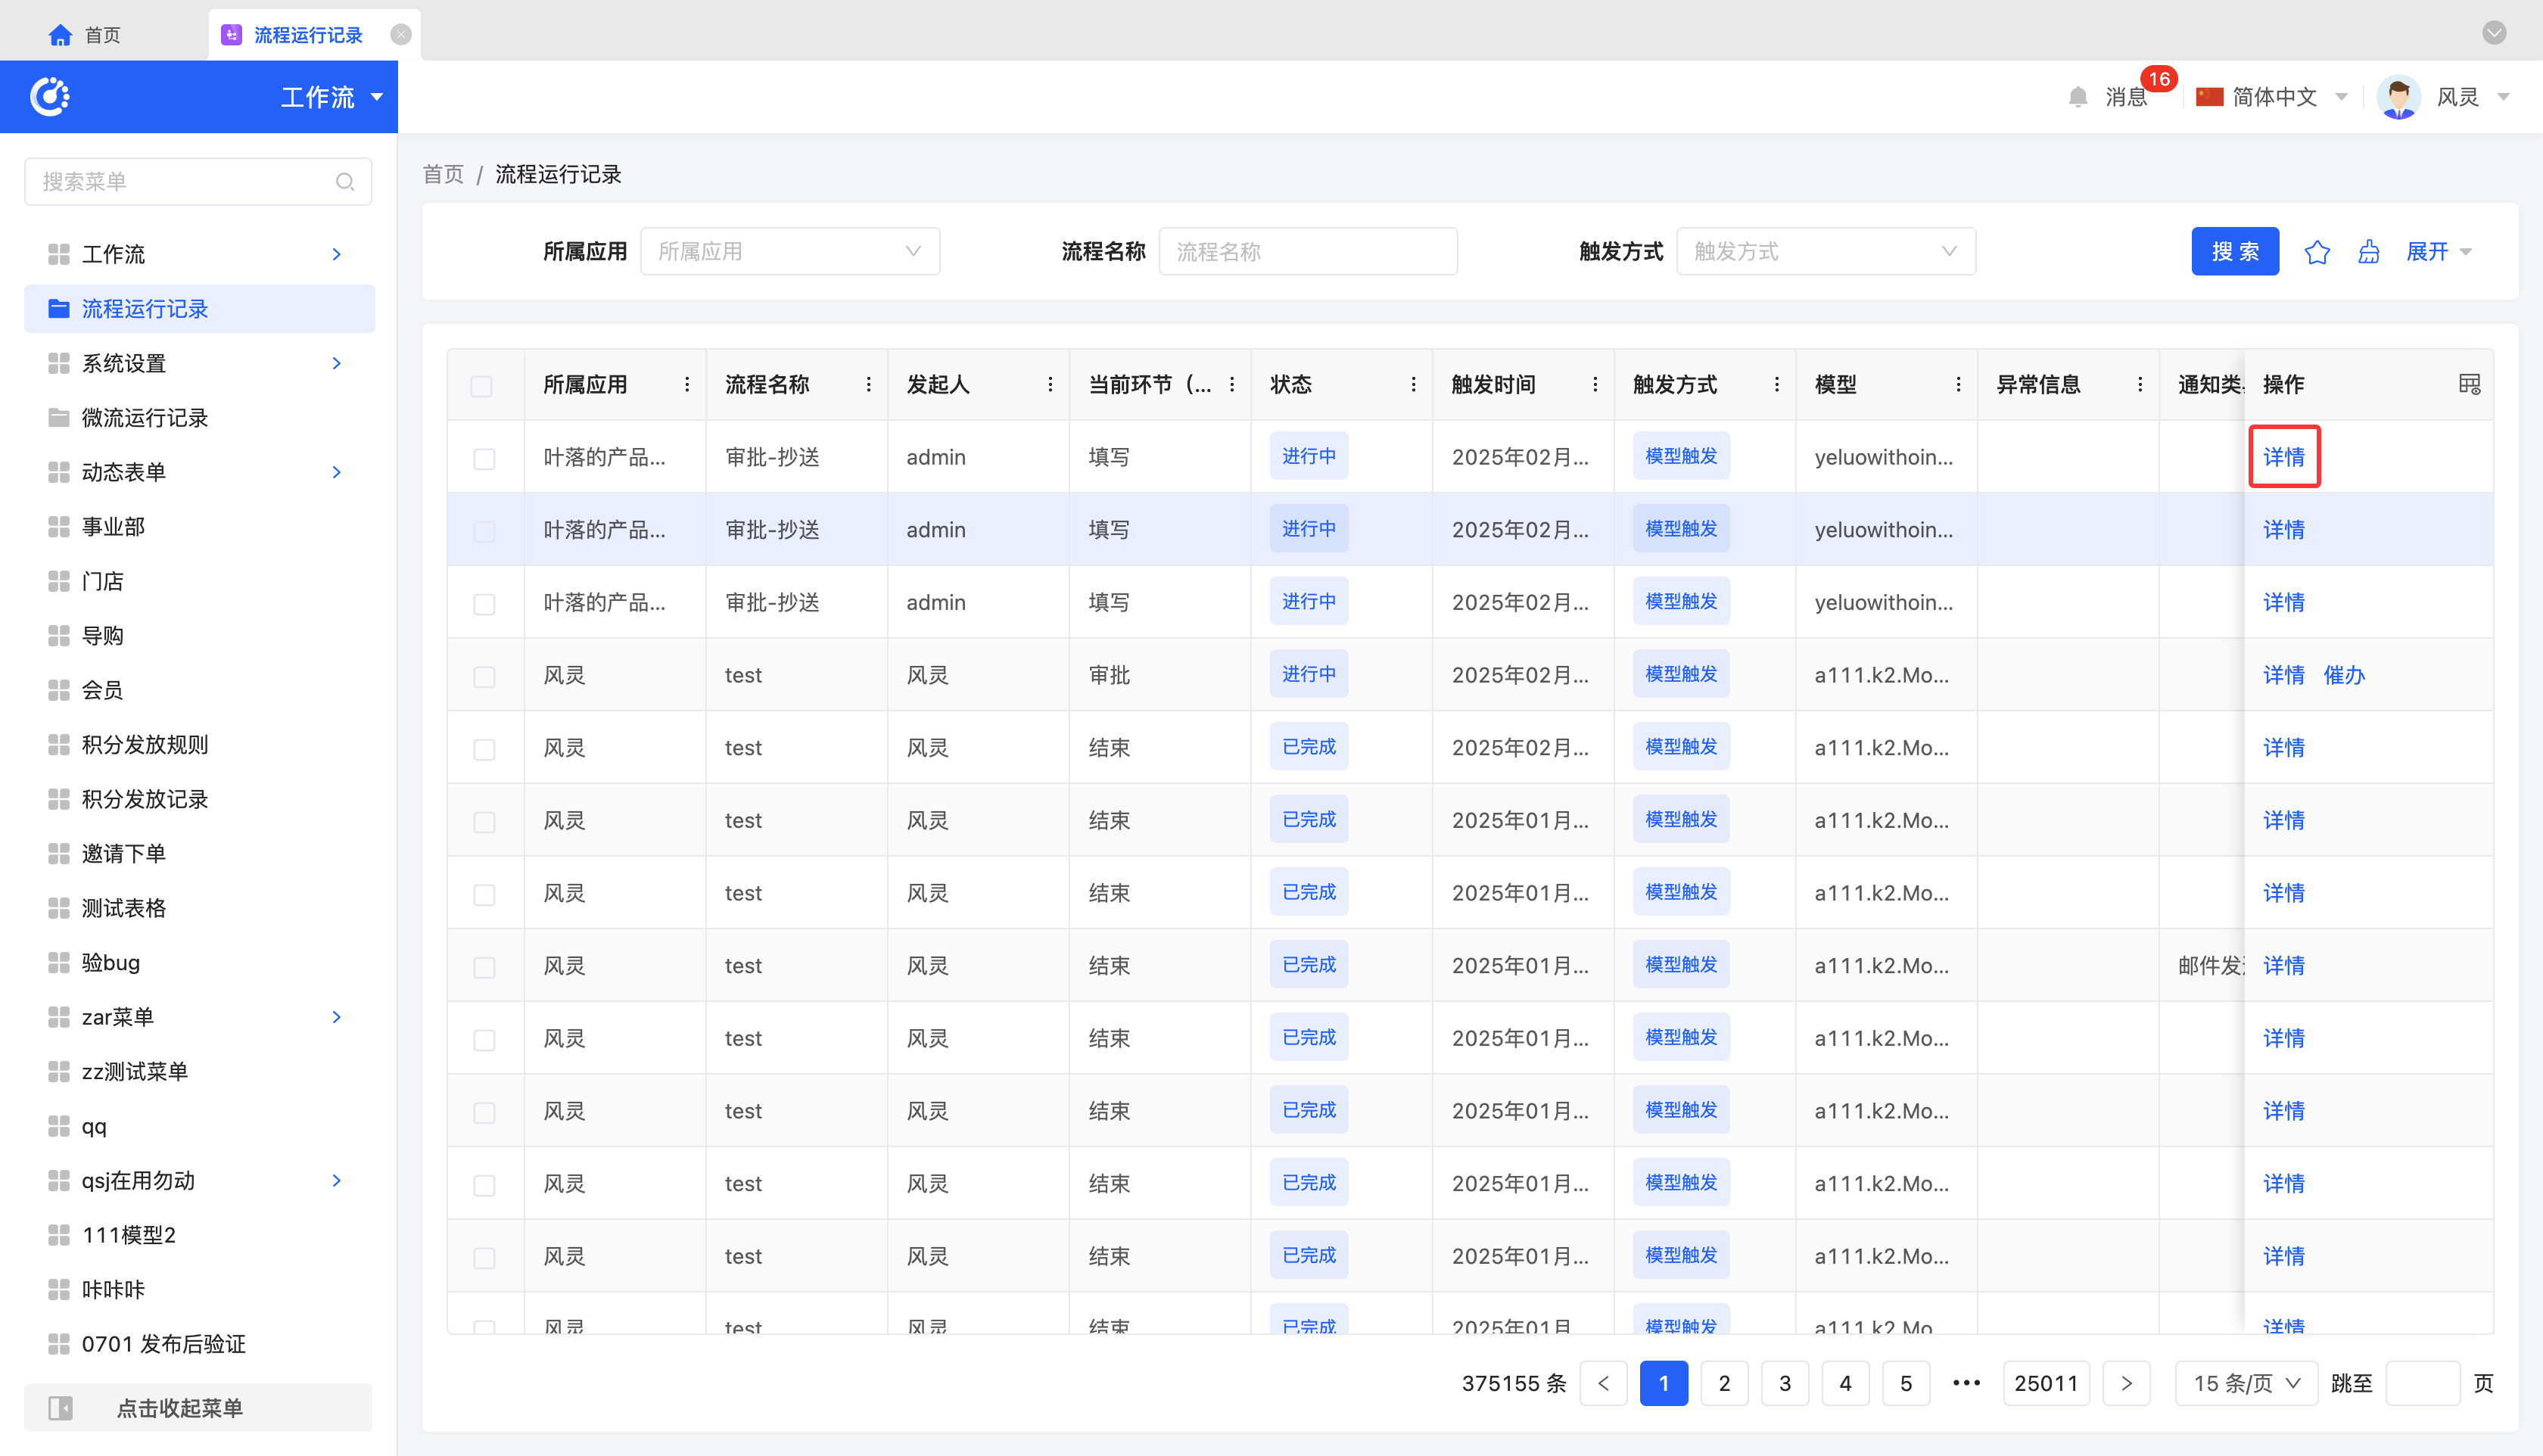
The system supports viewing the execution details of workflows. You can not only check the basic information of each node but also comprehensively understand the overall running status and detailed information of the workflow.
Tip
For workflows initiated by the currently logged-in user and still in the "In Progress" state, the user can initiate a reminder operation to speed up the process execution.
2. Operation Methods
- Click "Details" to jump to the process execution details page and view the detailed information of the workflow execution.
III. System Settings
(Ⅰ) SMS Channel Configuration
1. Function Introduction
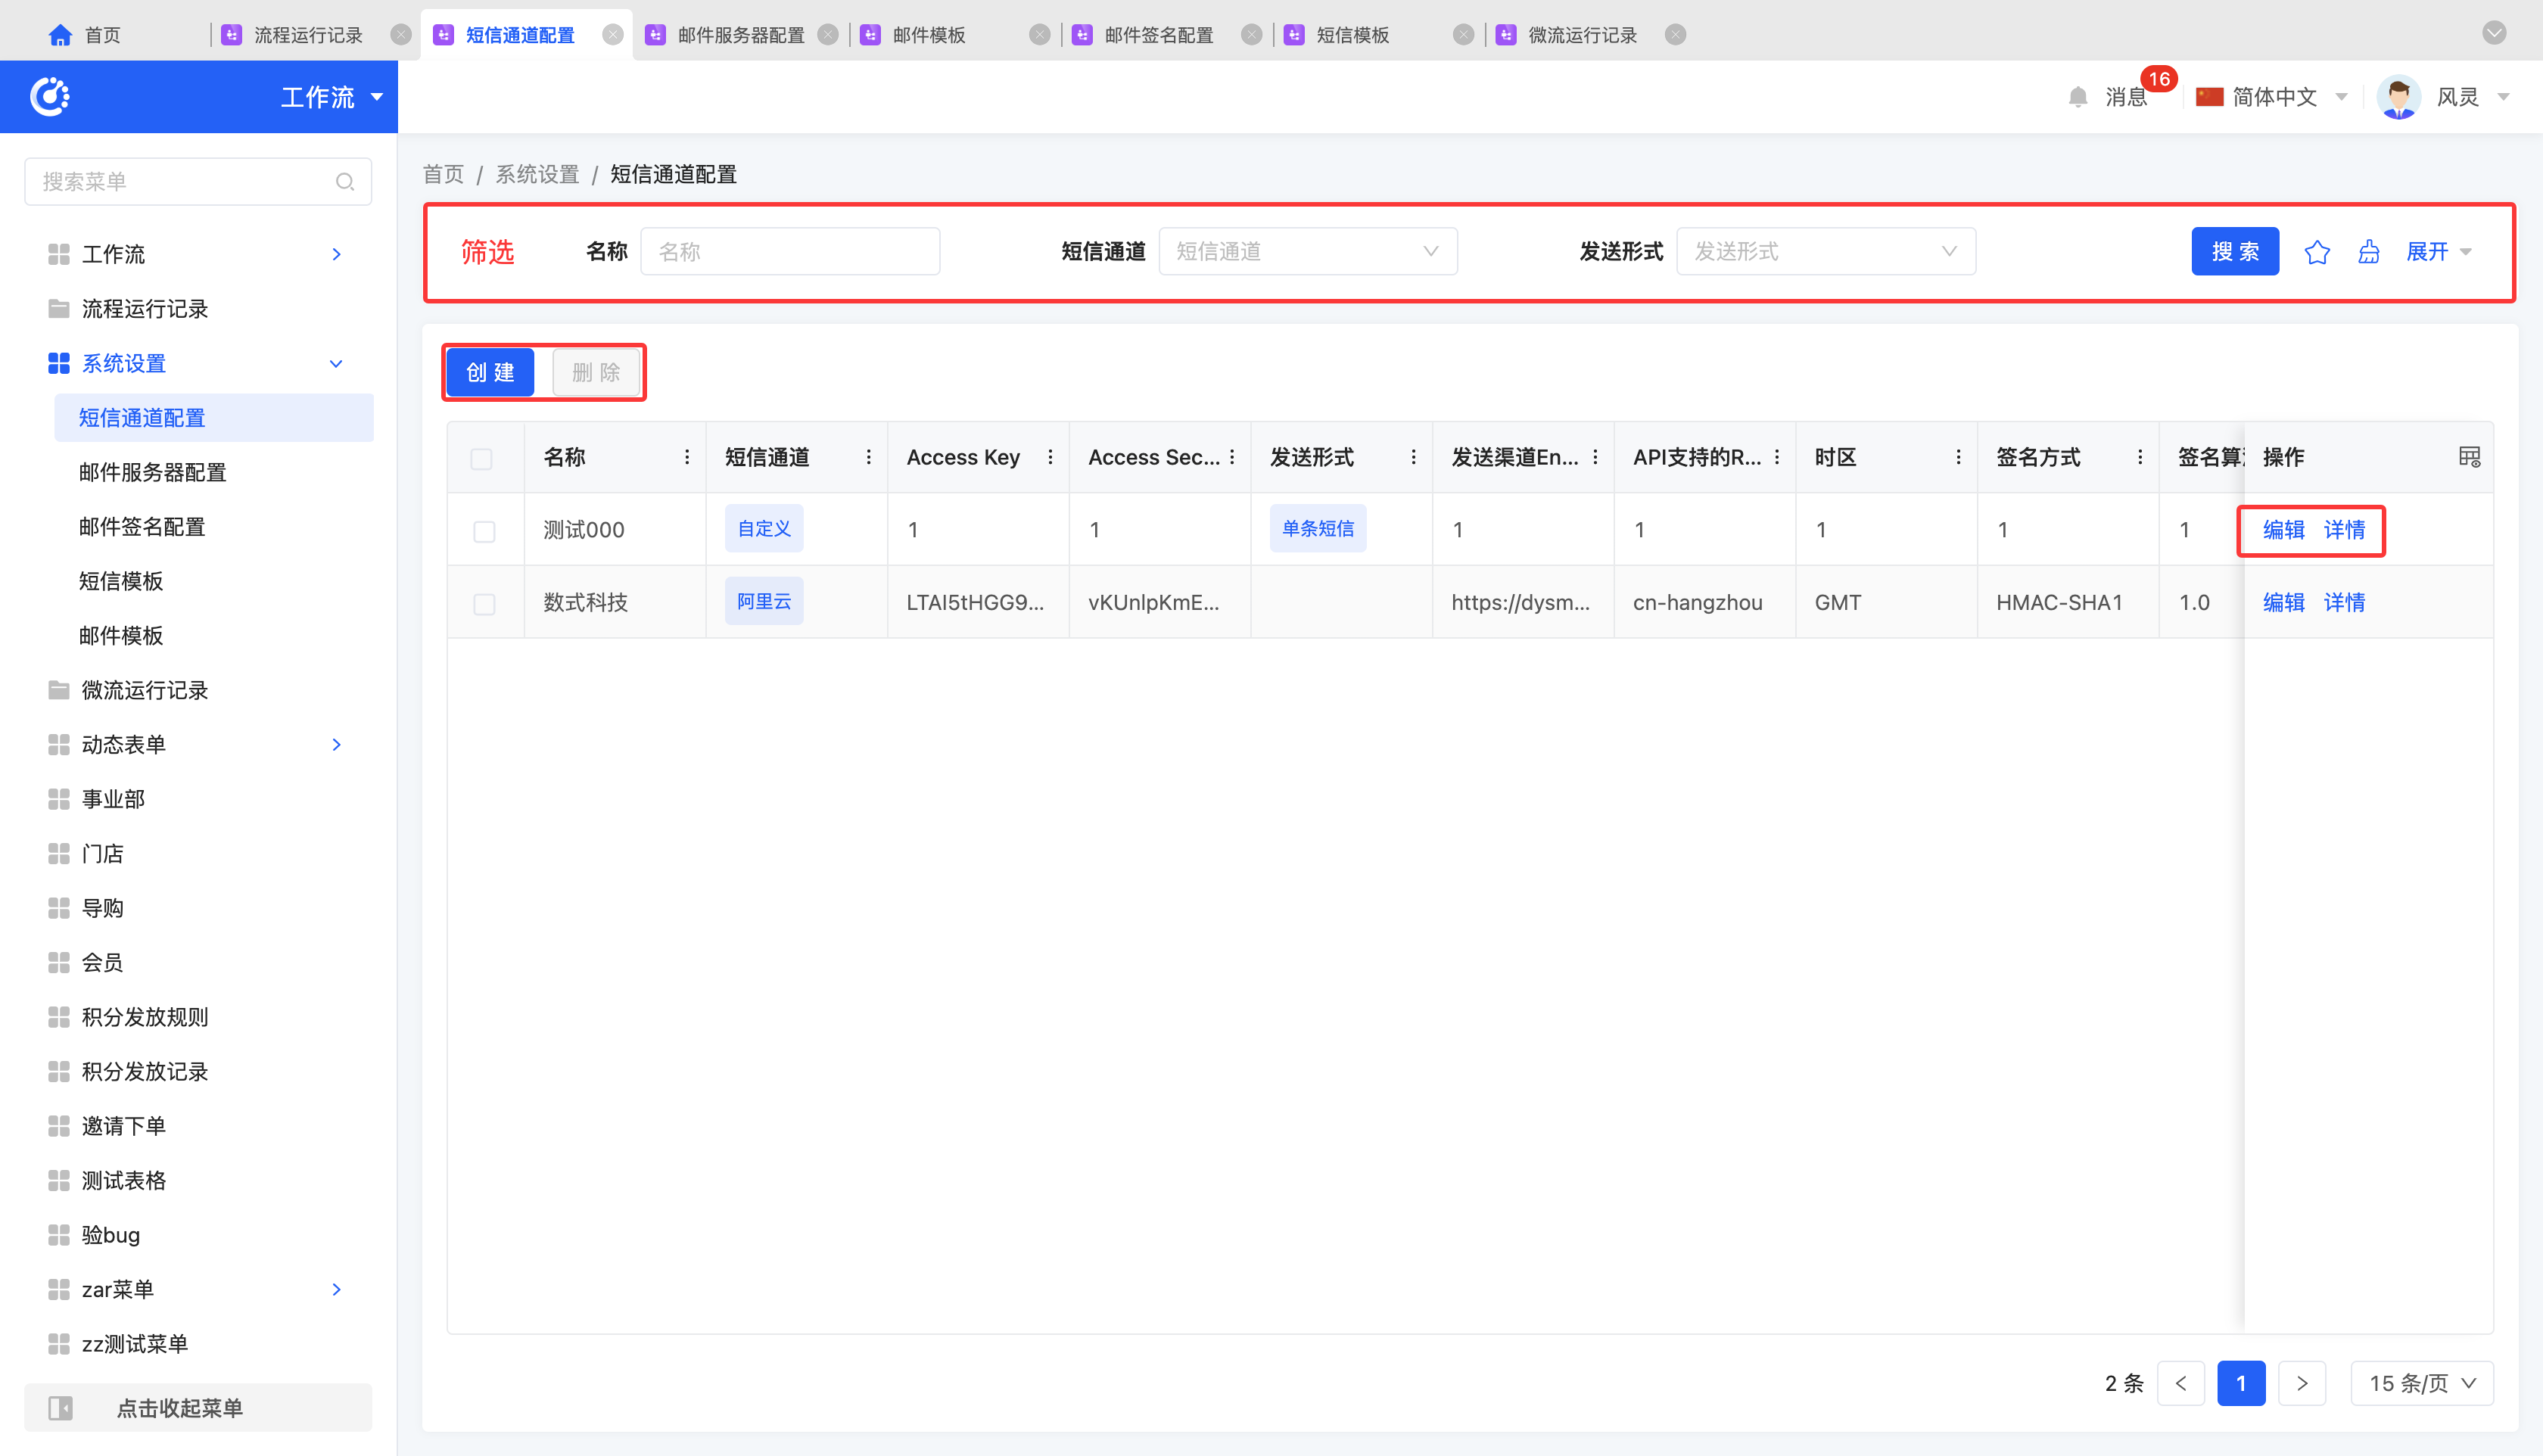
Due to the specific requirements of different versions, services, or business scenarios, different SMS channels may need to be selected when configuring SMS templates. To meet these flexible configuration requirements, we provide an SMS channel configuration management interface to ensure the accuracy and efficiency of SMS services.
2. Operation Methods
- Filter: Enter or select the corresponding filtering conditions according to actual scenario requirements to filter SMS channels.
- Add: Click "Create", enter the required configuration information and save to successfully create a new SMS channel.
- Edit: Click "Edit" to update or modify the relevant information of the SMS channel.
- Details: Click "Details" to view the detailed information of the selected SMS channel, including configuration parameters and status.
- Delete: Select an SMS channel and click "Delete" to delete the SMS channel.
(Ⅱ) Email Server Configuration
1. Function Introduction
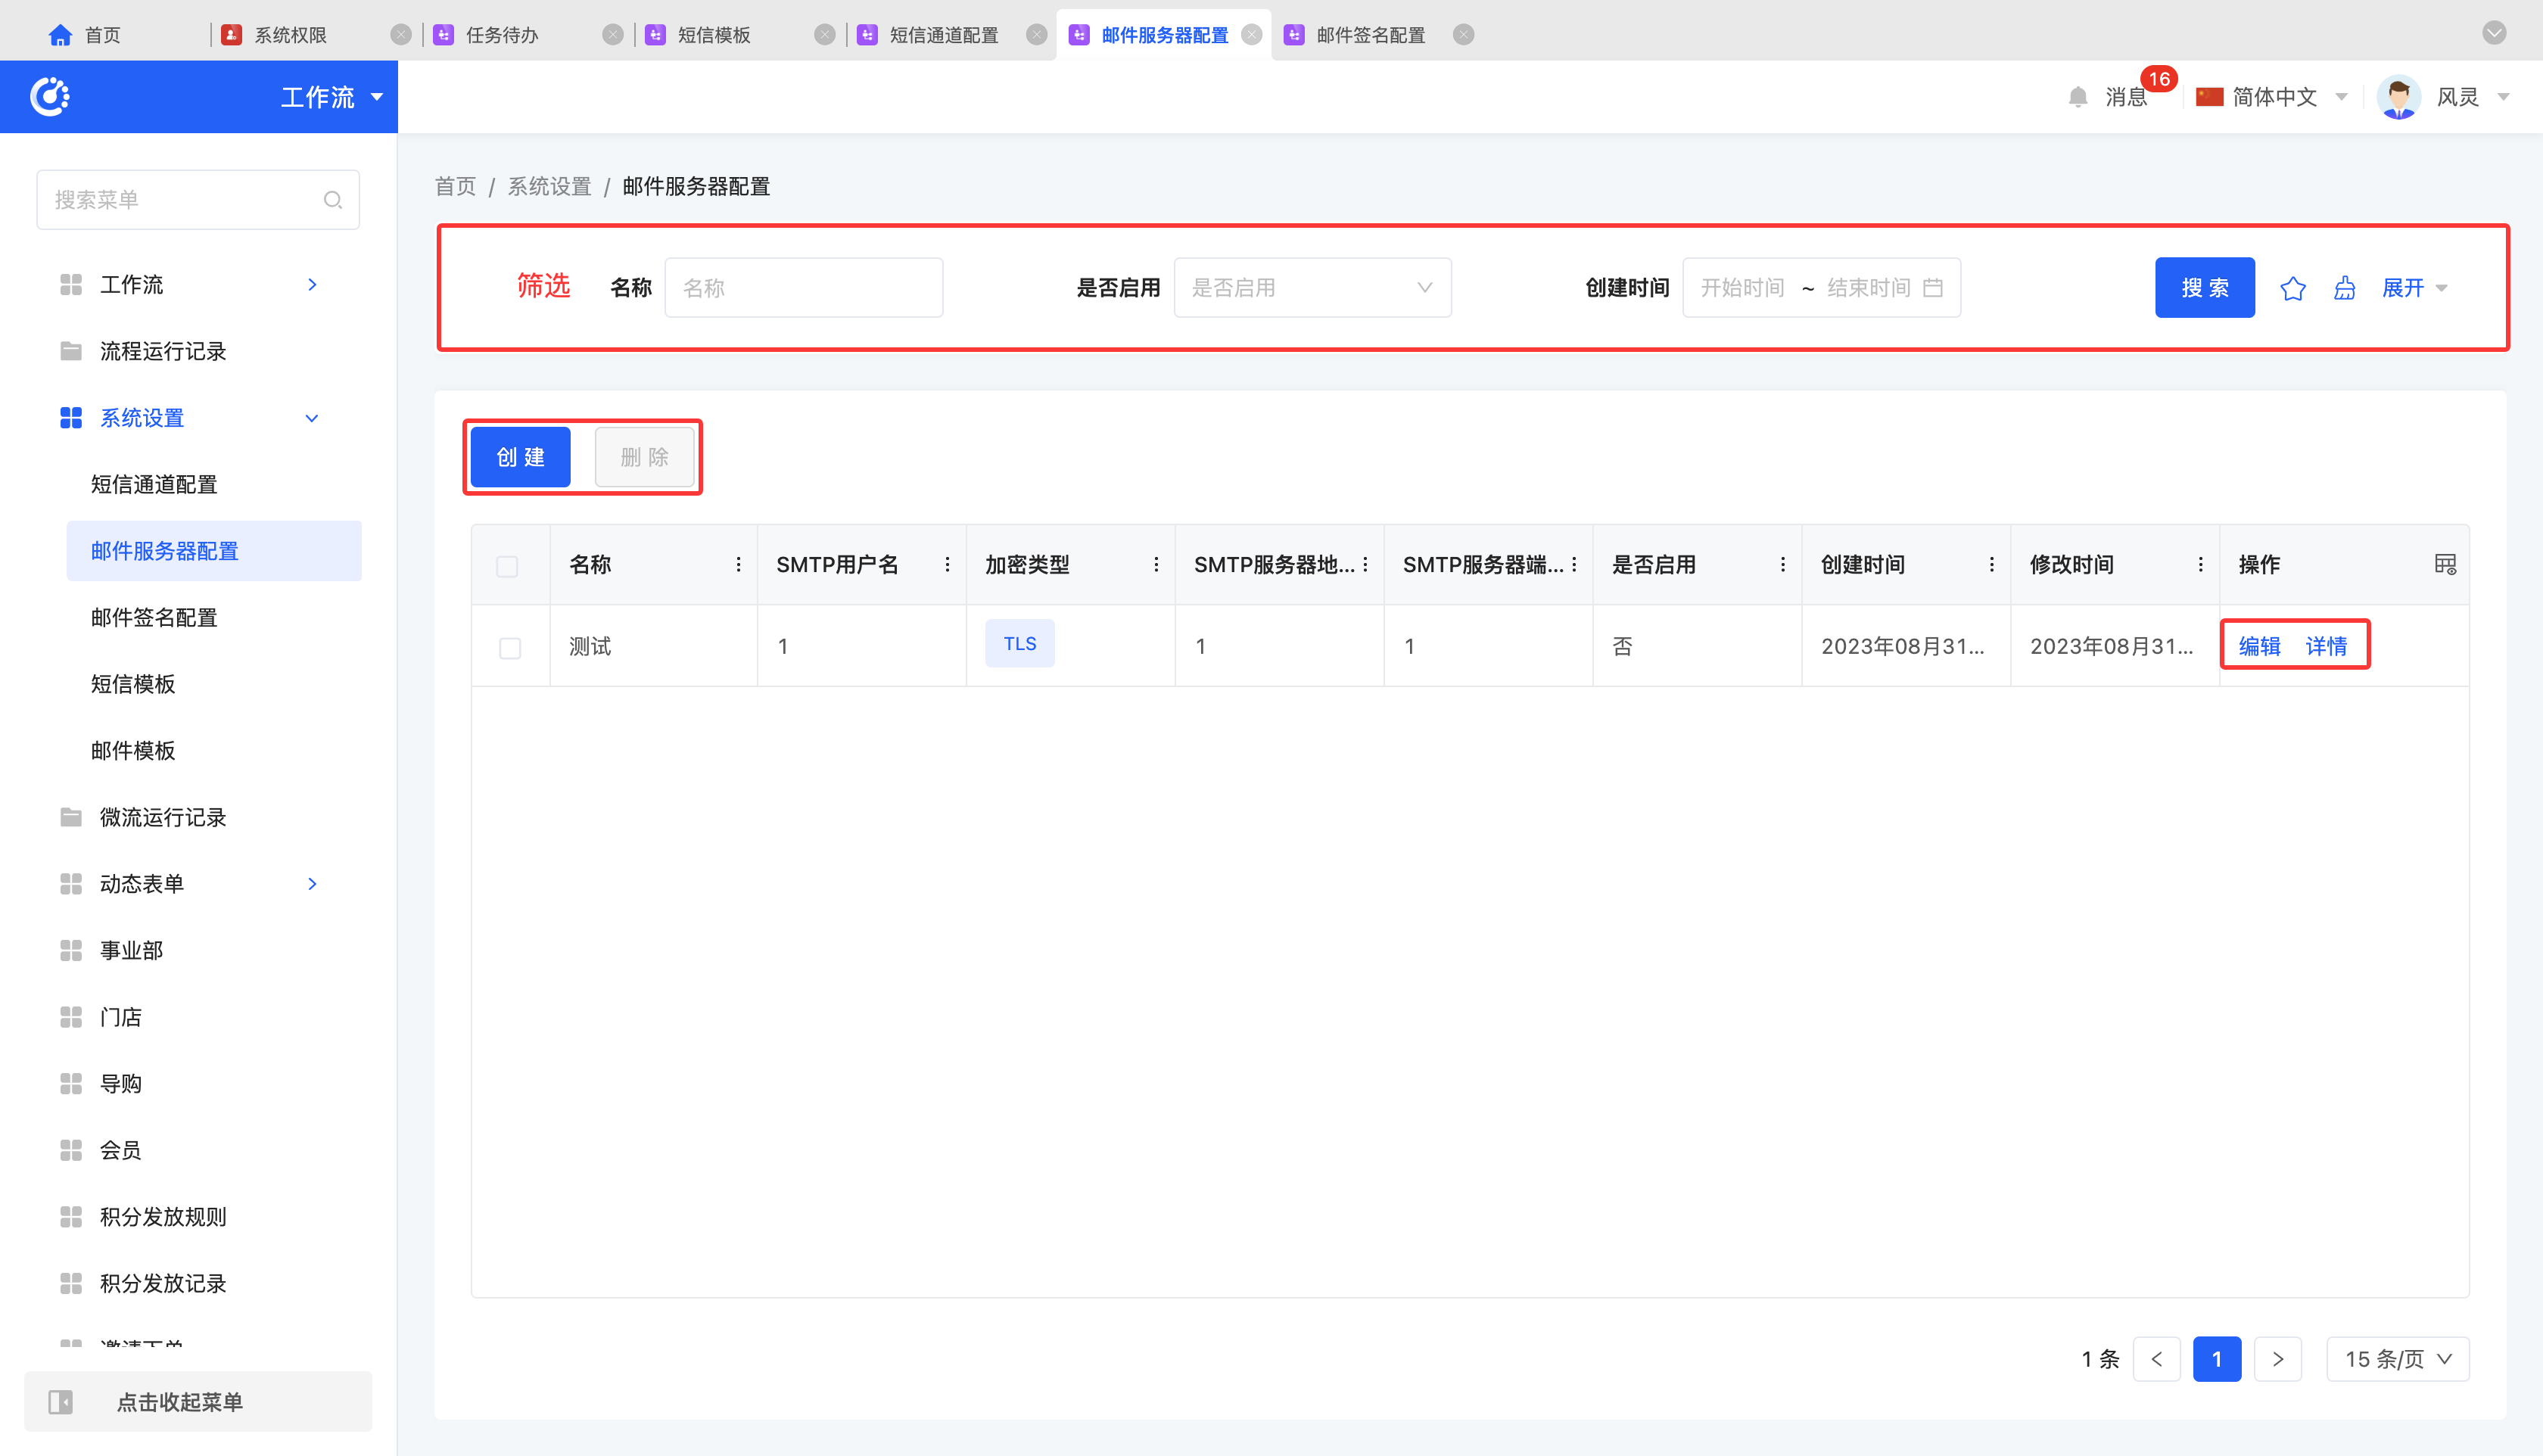
The system supports customizing email server configurations, allowing users to set various parameters of the email server according to actual needs to ensure that emails can be sent and received accurately and in a timely manner. Users can configure based on their own email service providers, server addresses, port numbers, etc., to meet the email sending requirements in different scenarios.
2. Operation Methods
- Filter: Enter or select the corresponding filtering conditions according to actual scenario requirements to filter email servers.
- Add: Click "Create", enter the required configuration information and save to successfully create a new email server.
- Edit: Click "Edit" to update or modify the relevant information of the email server.
- Details: Click "Details" to view the detailed information of the selected email server, including configuration parameters and status.
- Delete: Select an email server and click "Delete" to delete the email server.
(Ⅲ) Email Signature Configuration
1. Function Introduction
The system supports the email signature configuration function. Users can customize the email signature content, including text, images, links, and other elements, according to the corporate or personal brand image. By configuring the email signature, not only the professionalism of the email is improved, but also the brand recognition is enhanced, enabling recipients to quickly identify the email source and improve communication efficiency.
2. Operation Methods
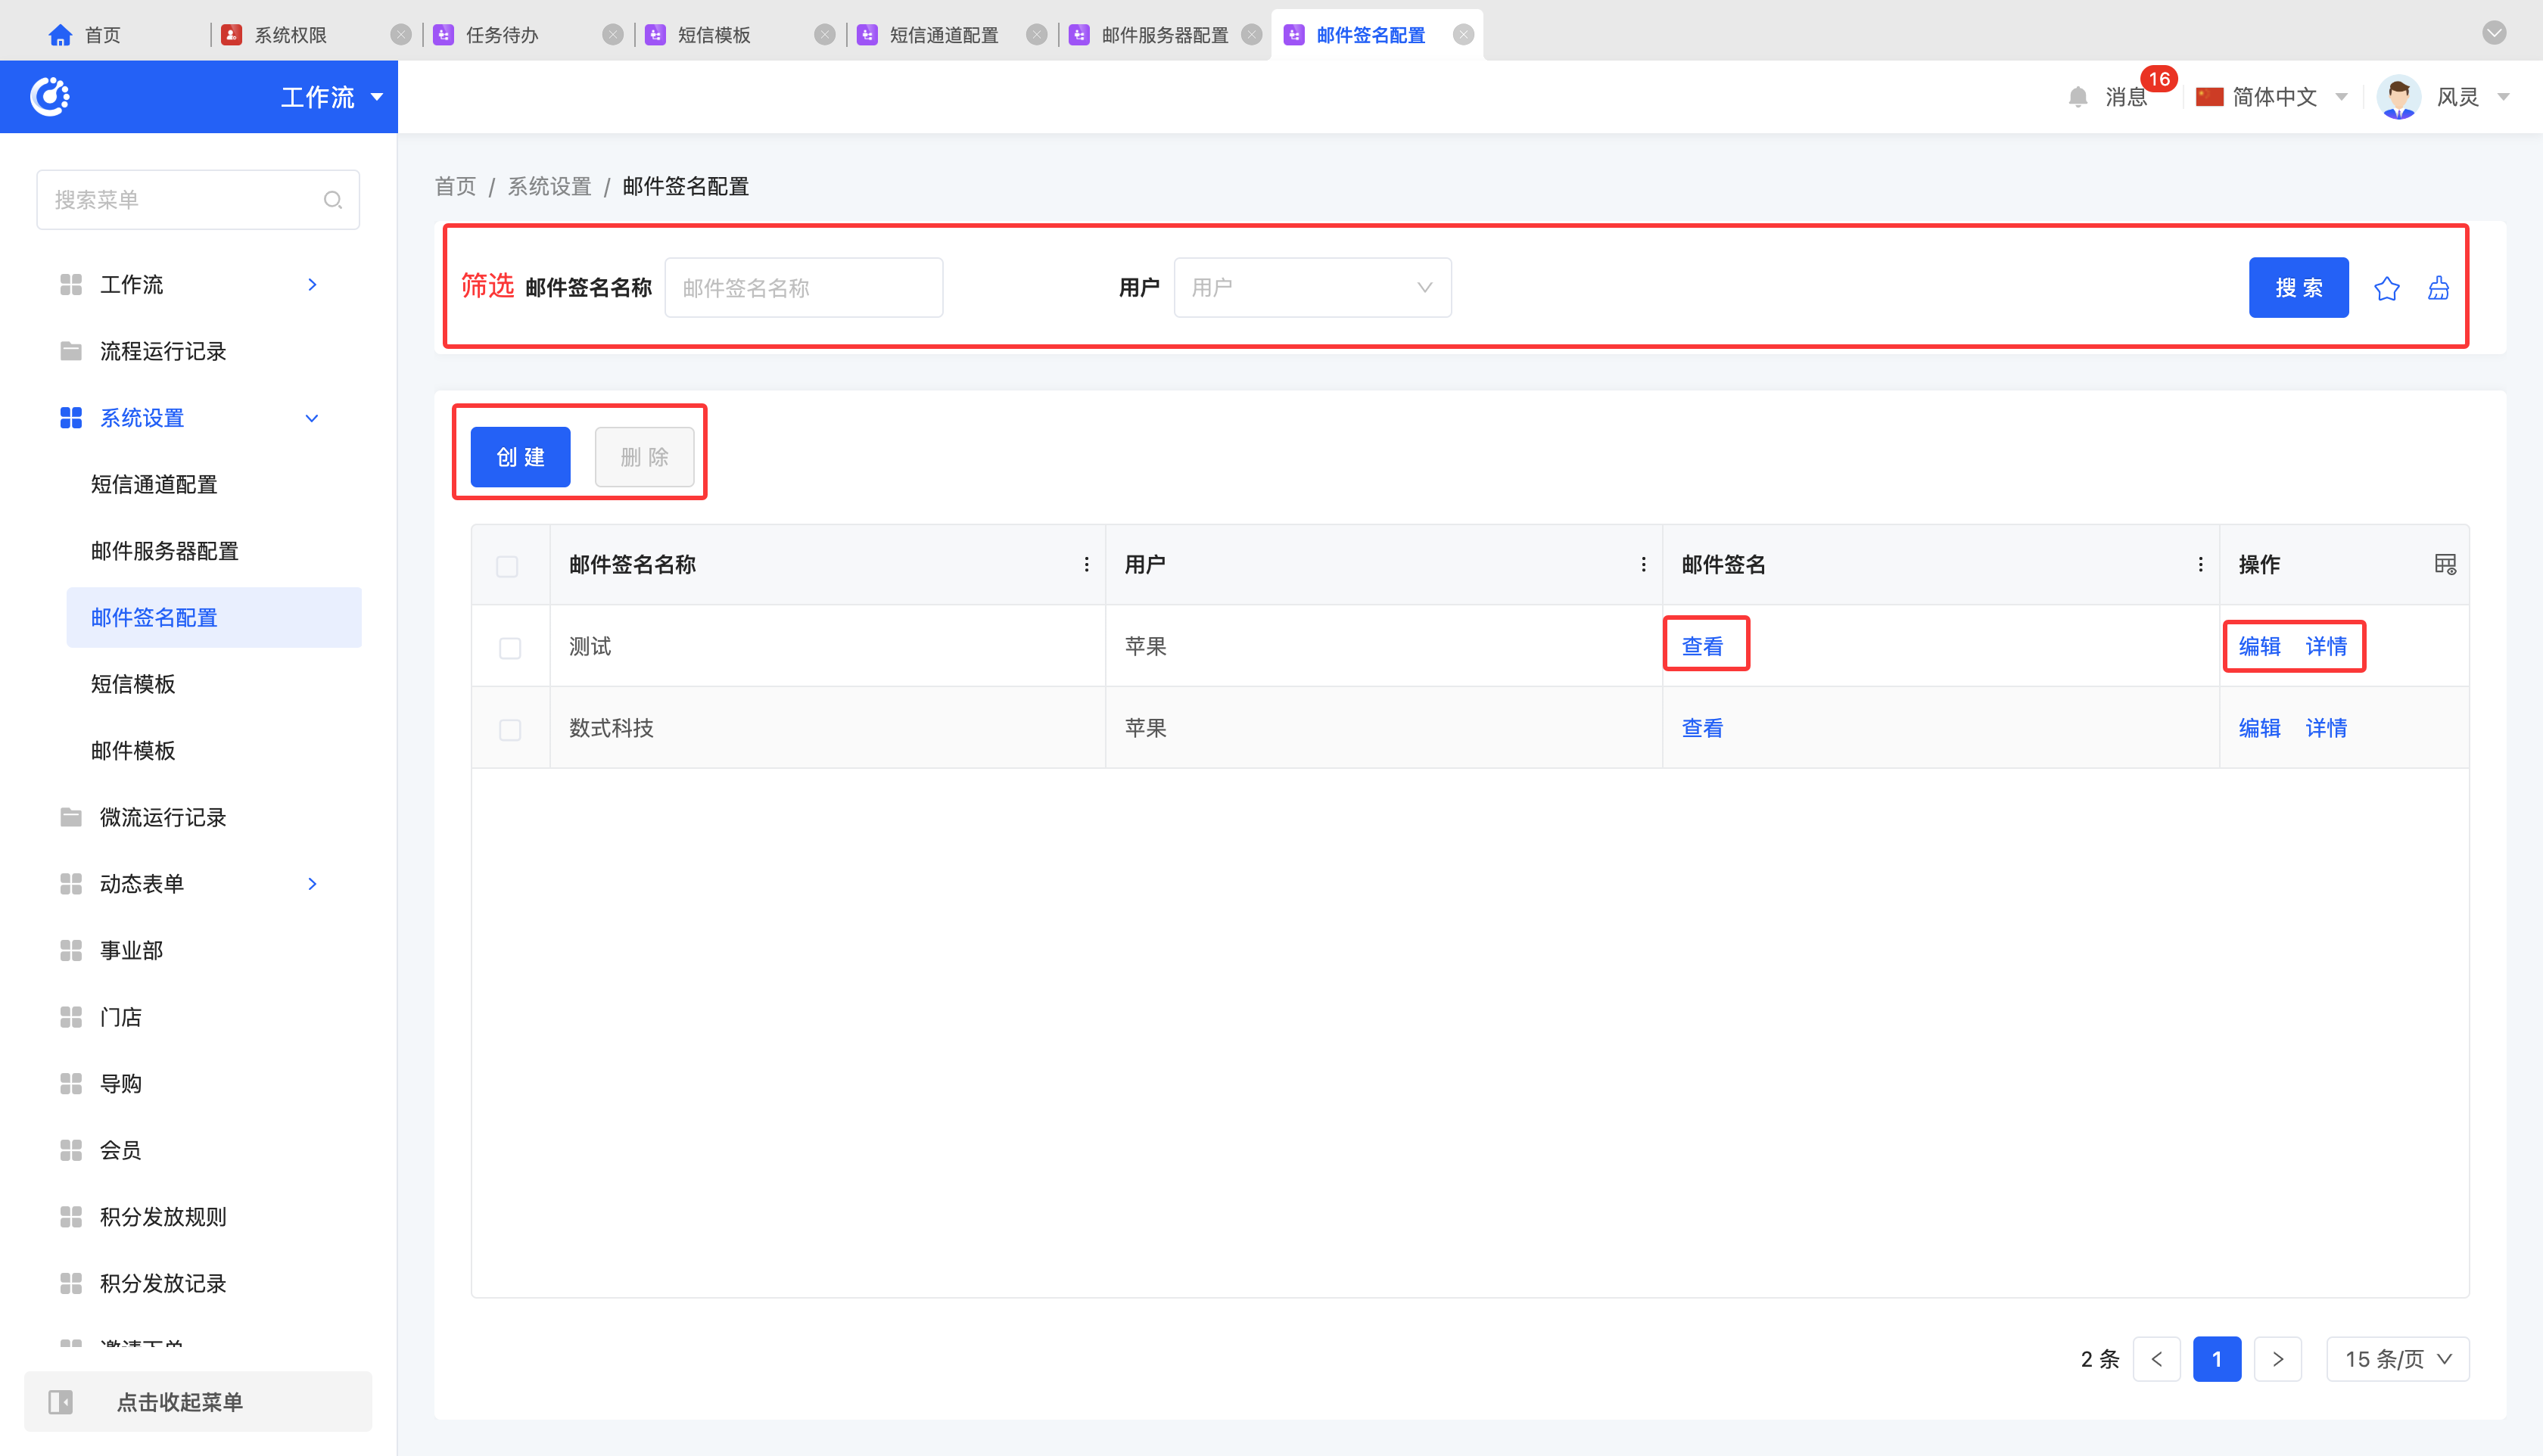
- Filter: Enter or select the corresponding filtering conditions according to actual scenario requirements to filter email signatures.
- Add: Click "Create", enter the required configuration information and save to successfully create a new email signature.
- View: Click "View" to view the selected email signature.
- Edit: Click "Edit" to update or modify the relevant information of the email signature.
- Details: Click "Details" to view the detailed information of the selected email signature, including configuration parameters and status.
- Delete: Select an email signature and click "Delete" to delete the email signature.
(Ⅳ) SMS Templates
1. Function Introduction
In the "SMS" nodes of workflows, micro - flows, and data processes, you can select the configured SMS templates for use.
2. Operation Methods
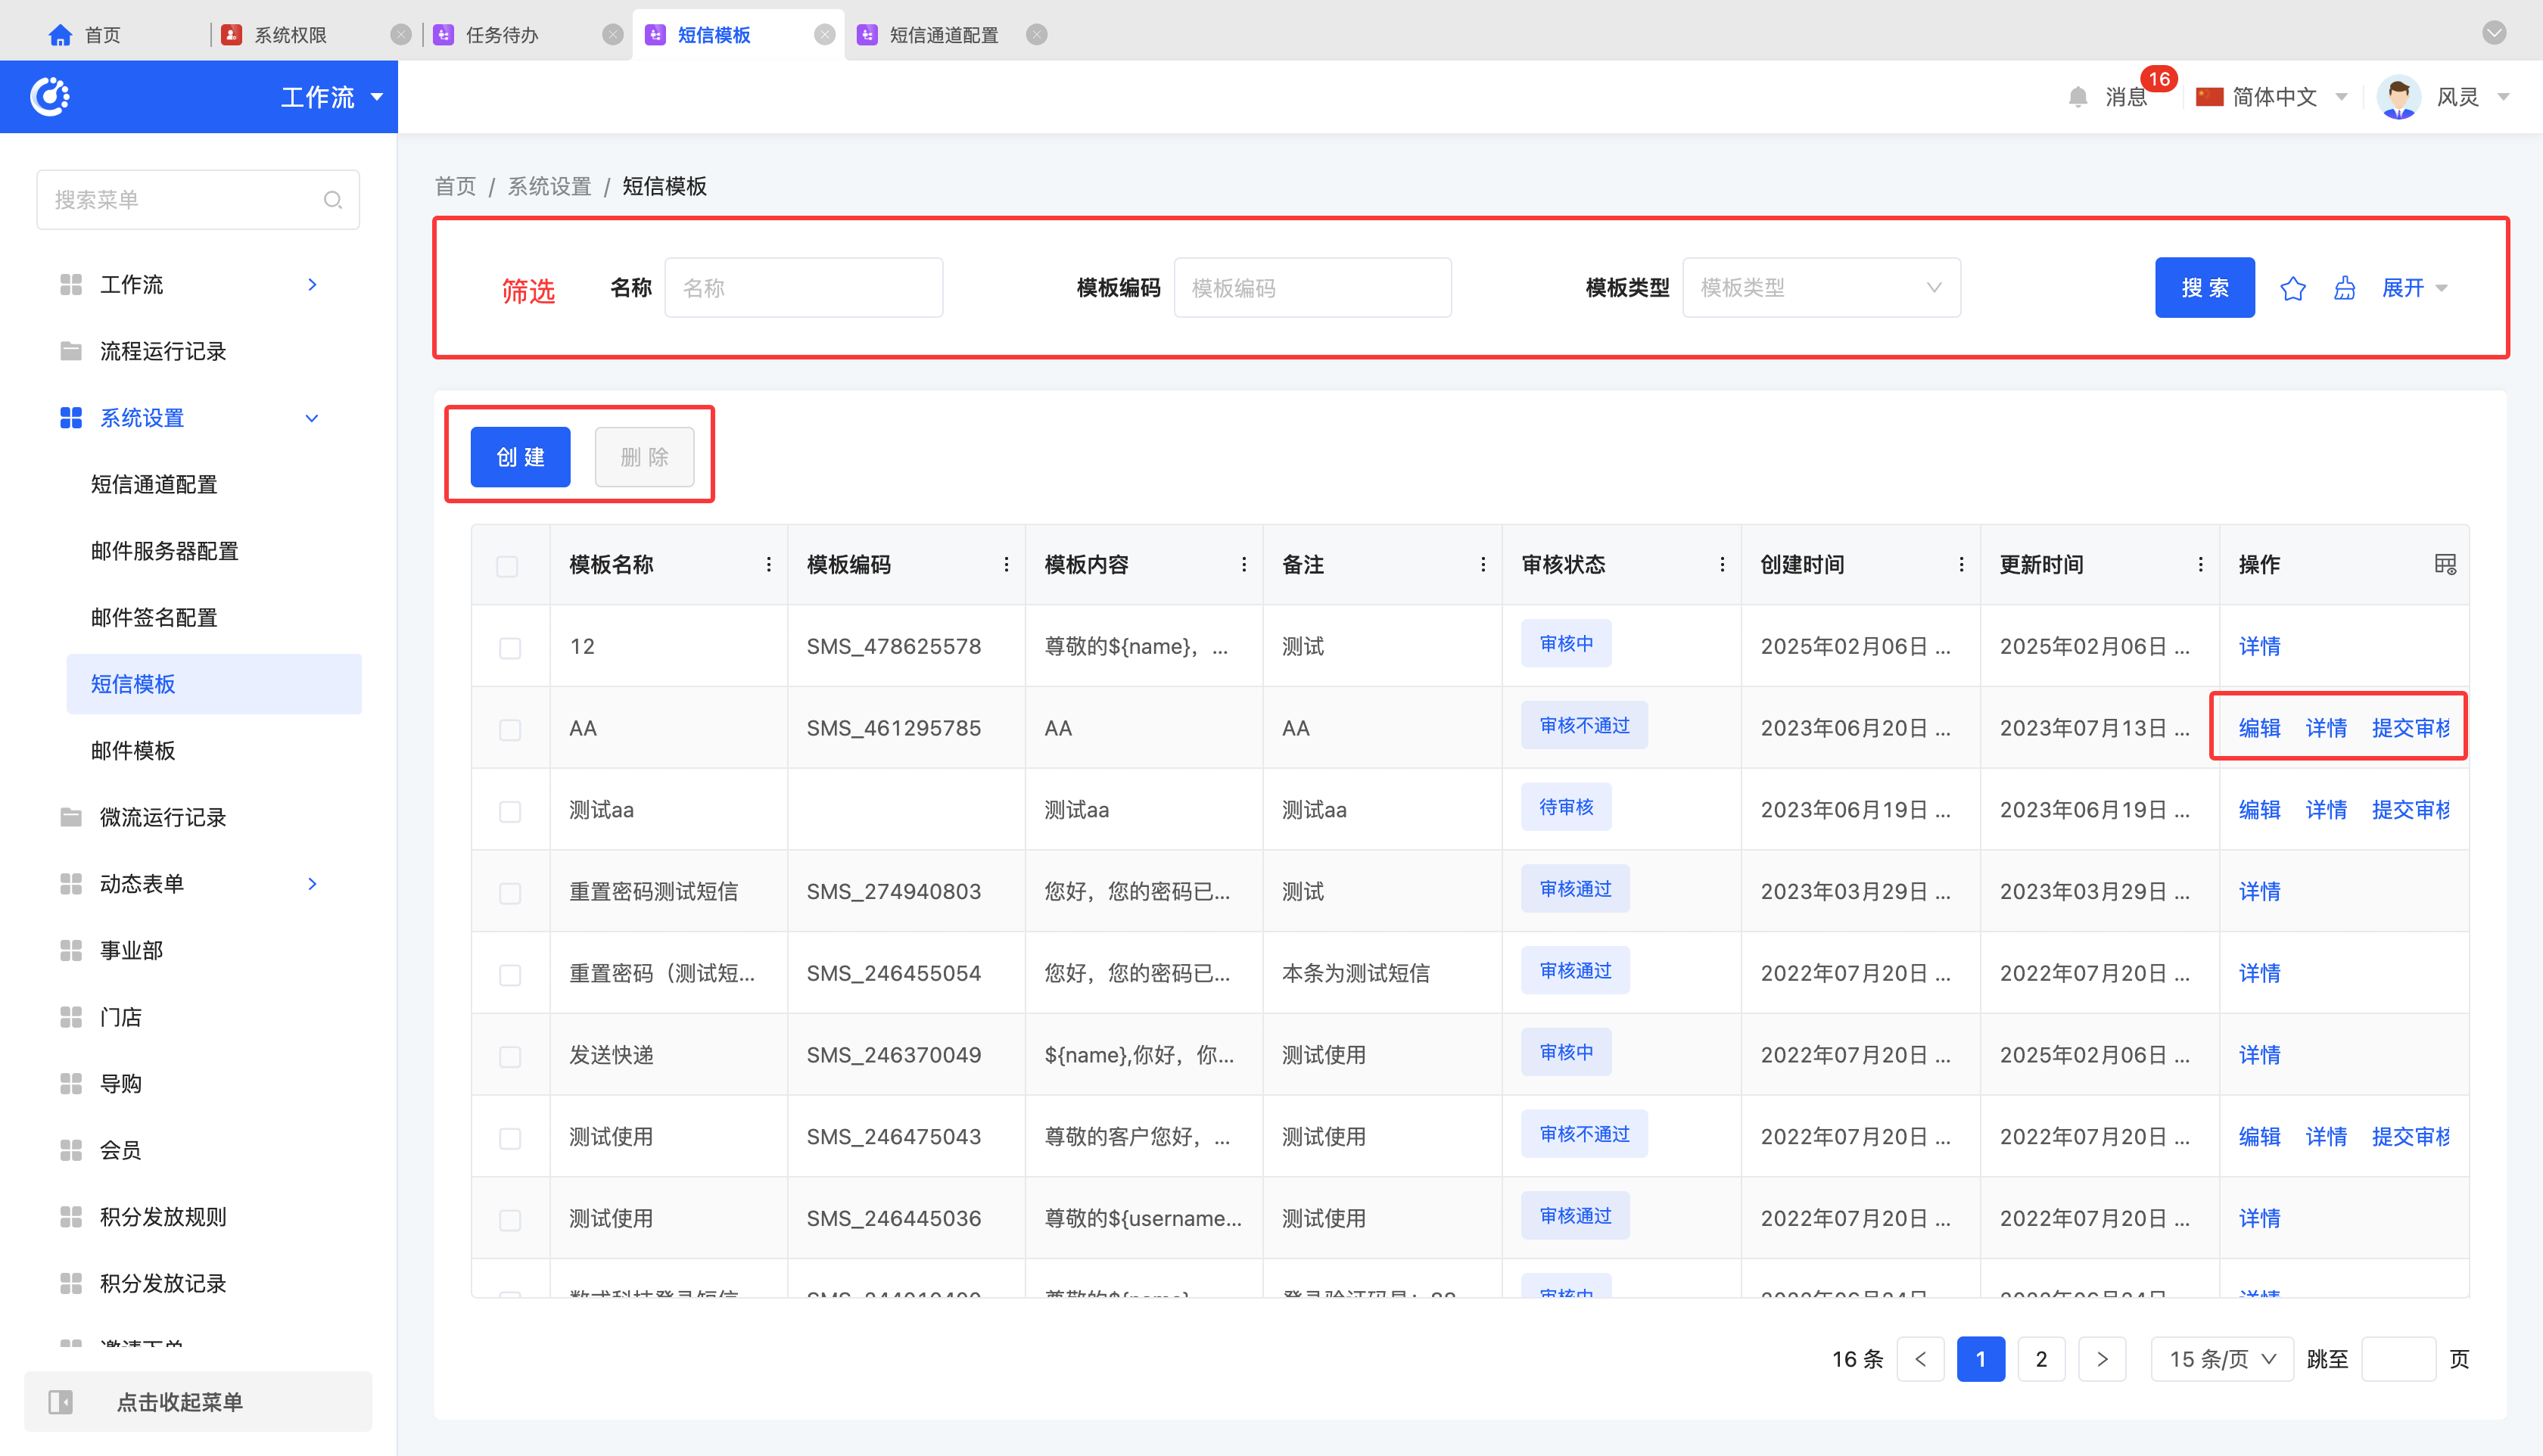
- Filter: Enter or select the corresponding filtering conditions according to actual scenario requirements to filter SMS templates.
- Add: Click "Create", enter the required configuration information and save to successfully create a new SMS template.
- Edit: Click "Edit" to update or modify the relevant information of the SMS template.
- Details: Click "Details" to view the detailed information of the selected SMS template, including configuration parameters and status.
- Delete: Select an SMS template and click "Delete" to delete the SMS template.
- Submit for Review: For SMS templates in the pending review state or that have failed the review, click "Submit for Review". After the review is approved, you can use the SMS node for relevant operations normally.
Note
For SMS templates that have been approved or are under review, editing or resubmitting for review is not allowed.
(Ⅴ) Email Templates
1. Function Introduction
The system supports custom email templates, allowing users to flexibly design email layouts, colors, and fonts according to brand, marketing, or communication needs, meeting diverse email sending requirements and improving email communication efficiency.
Note
Email templates are not directly applied in the designer but are used during the code - writing process.
2. Operation Methods
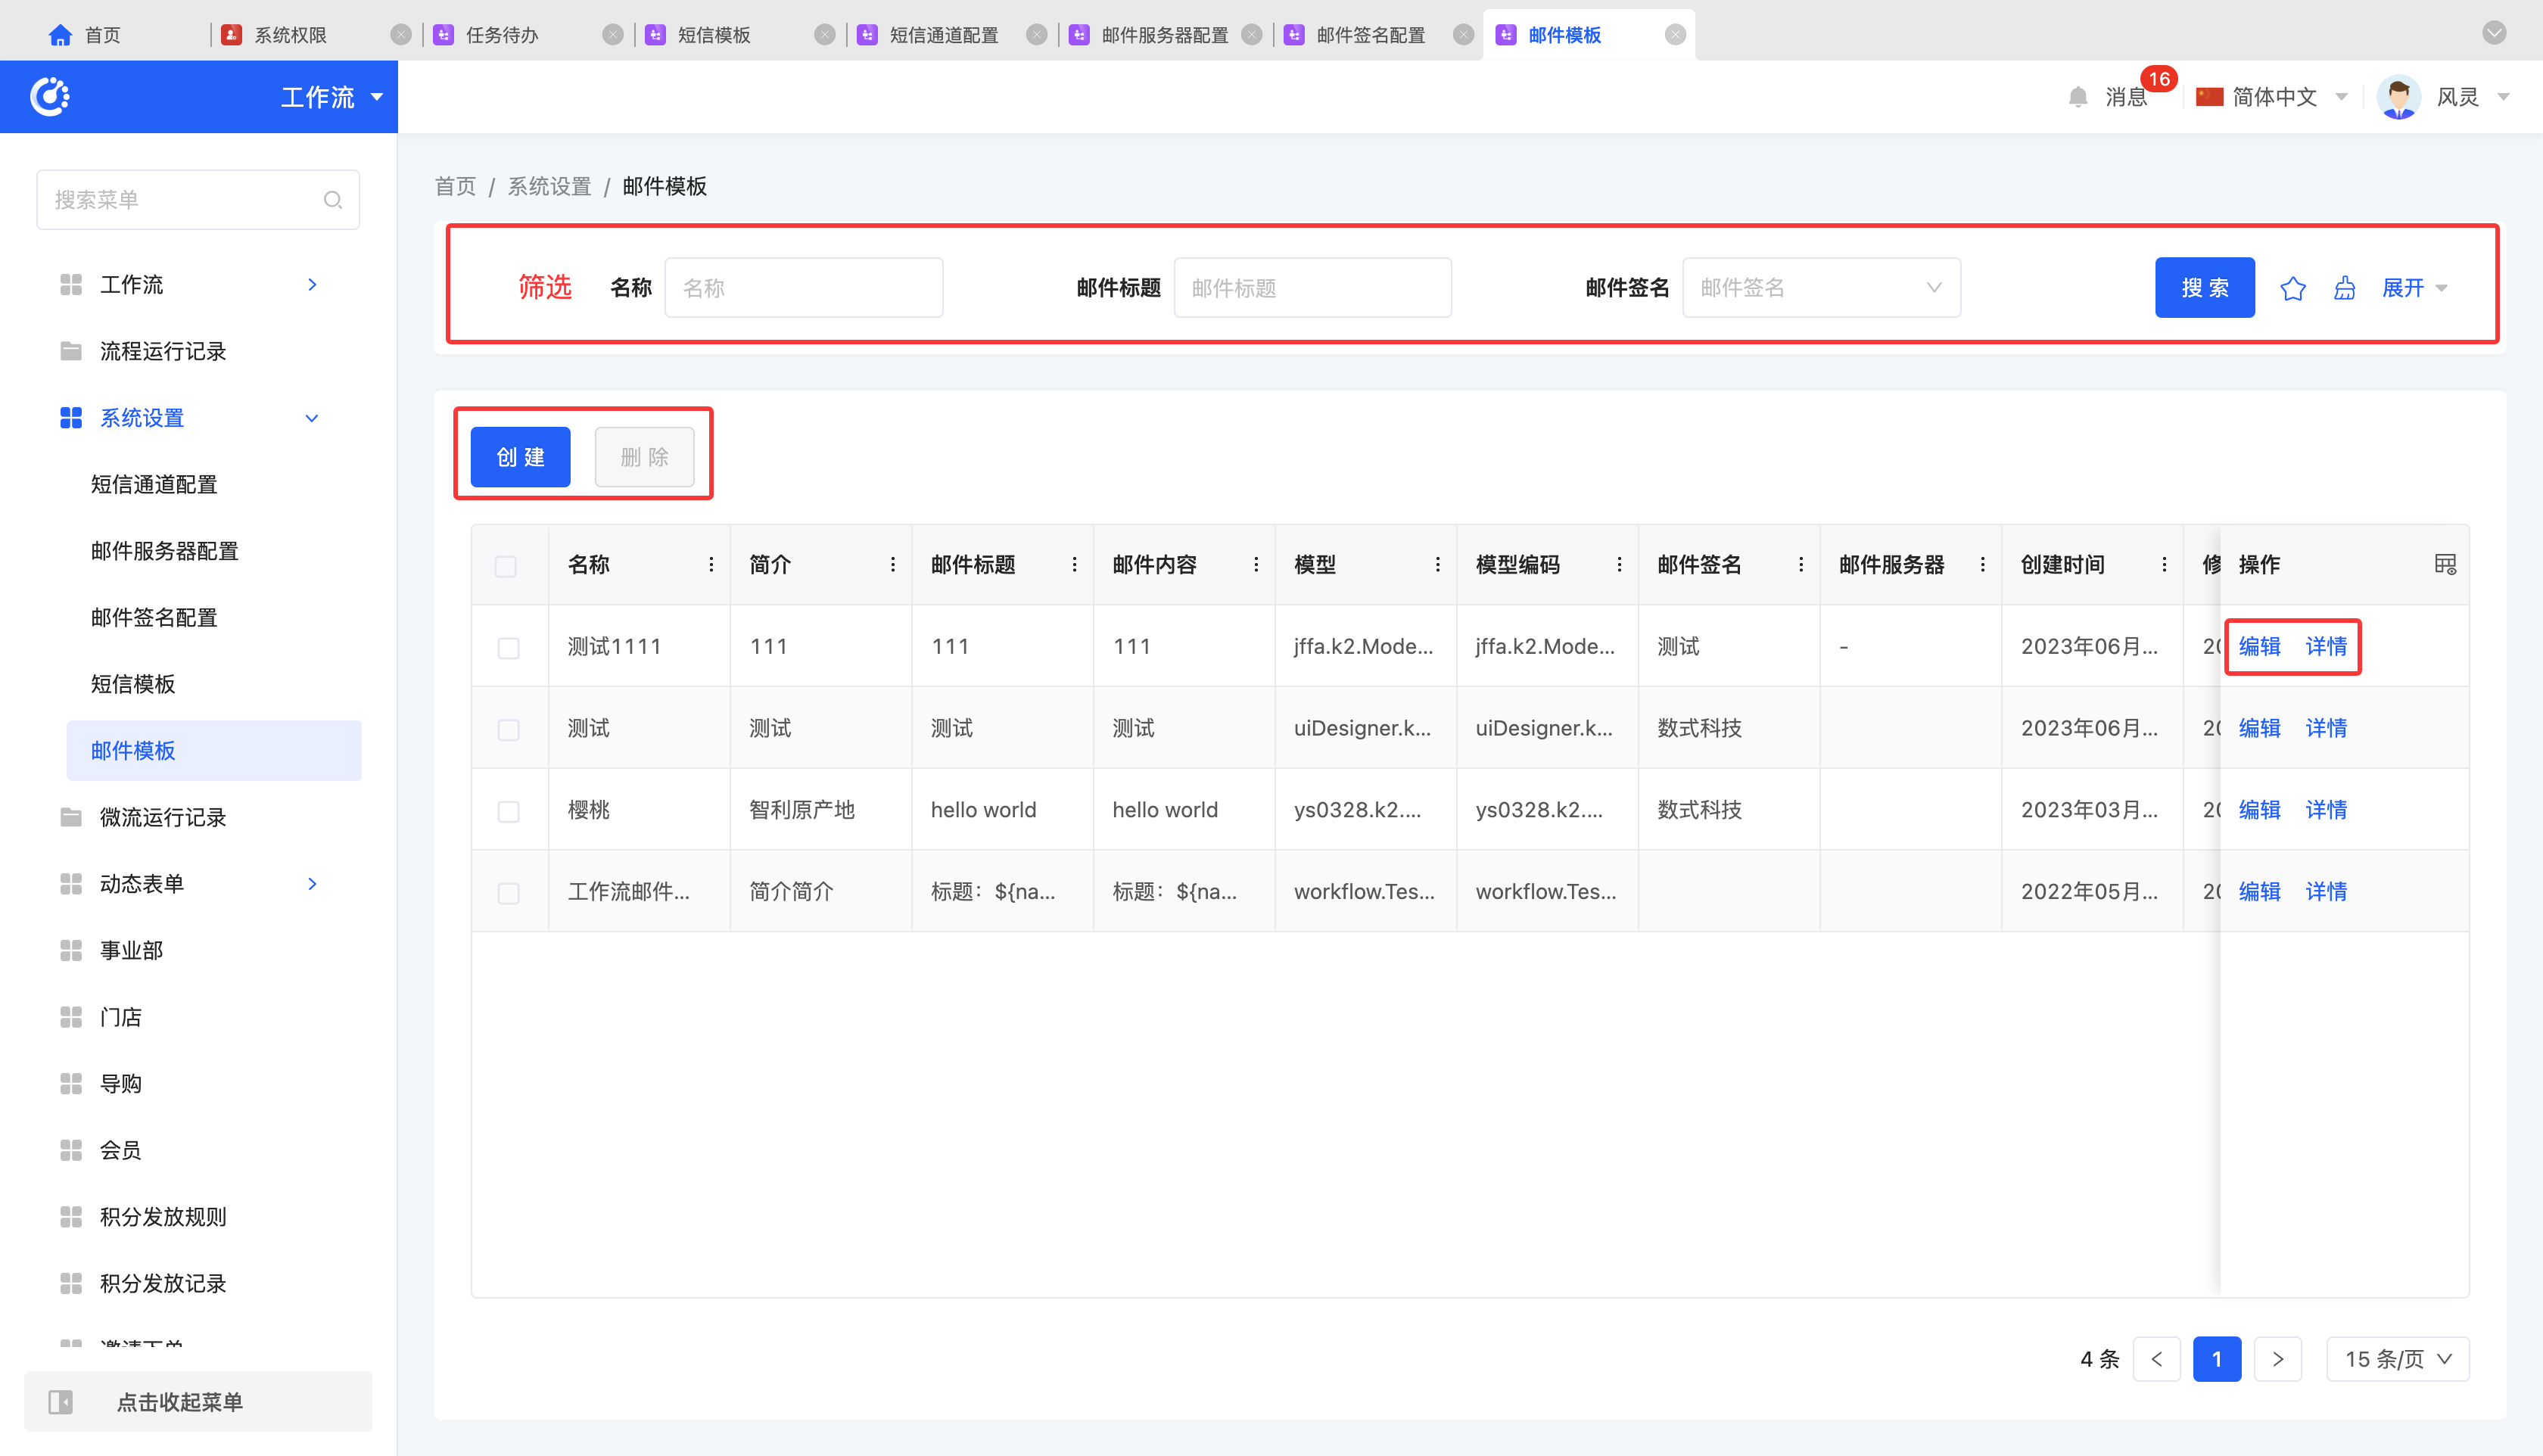
- Filter: Enter or select the corresponding filtering conditions according to actual scenario requirements to filter email templates.
- Add: Click "Create", enter the required configuration information and save to successfully create a new email template.
- Edit: Click "Edit" to update or modify the relevant information of the email template.
- Details: Click "Details" to view the detailed information of the selected email template, including configuration parameters and status.
- Delete: Select an email template and click "Delete" to delete the email template.
IV. Micro - flow Execution Records
Micro - flow execution records are used to record the execution status of micro - flows. Every time a micro - flow is executed, the system saves a corresponding execution record in the micro - flow execution records.
(Ⅰ) Filtering
1. Function Introduction
According to actual business requirements, you can customize the filtering conditions for micro - flow execution records. Under the current filtering conditions, the corresponding list of micro - flow execution records will be displayed, making it convenient to view different micro - flow execution records.
2. Operation Methods
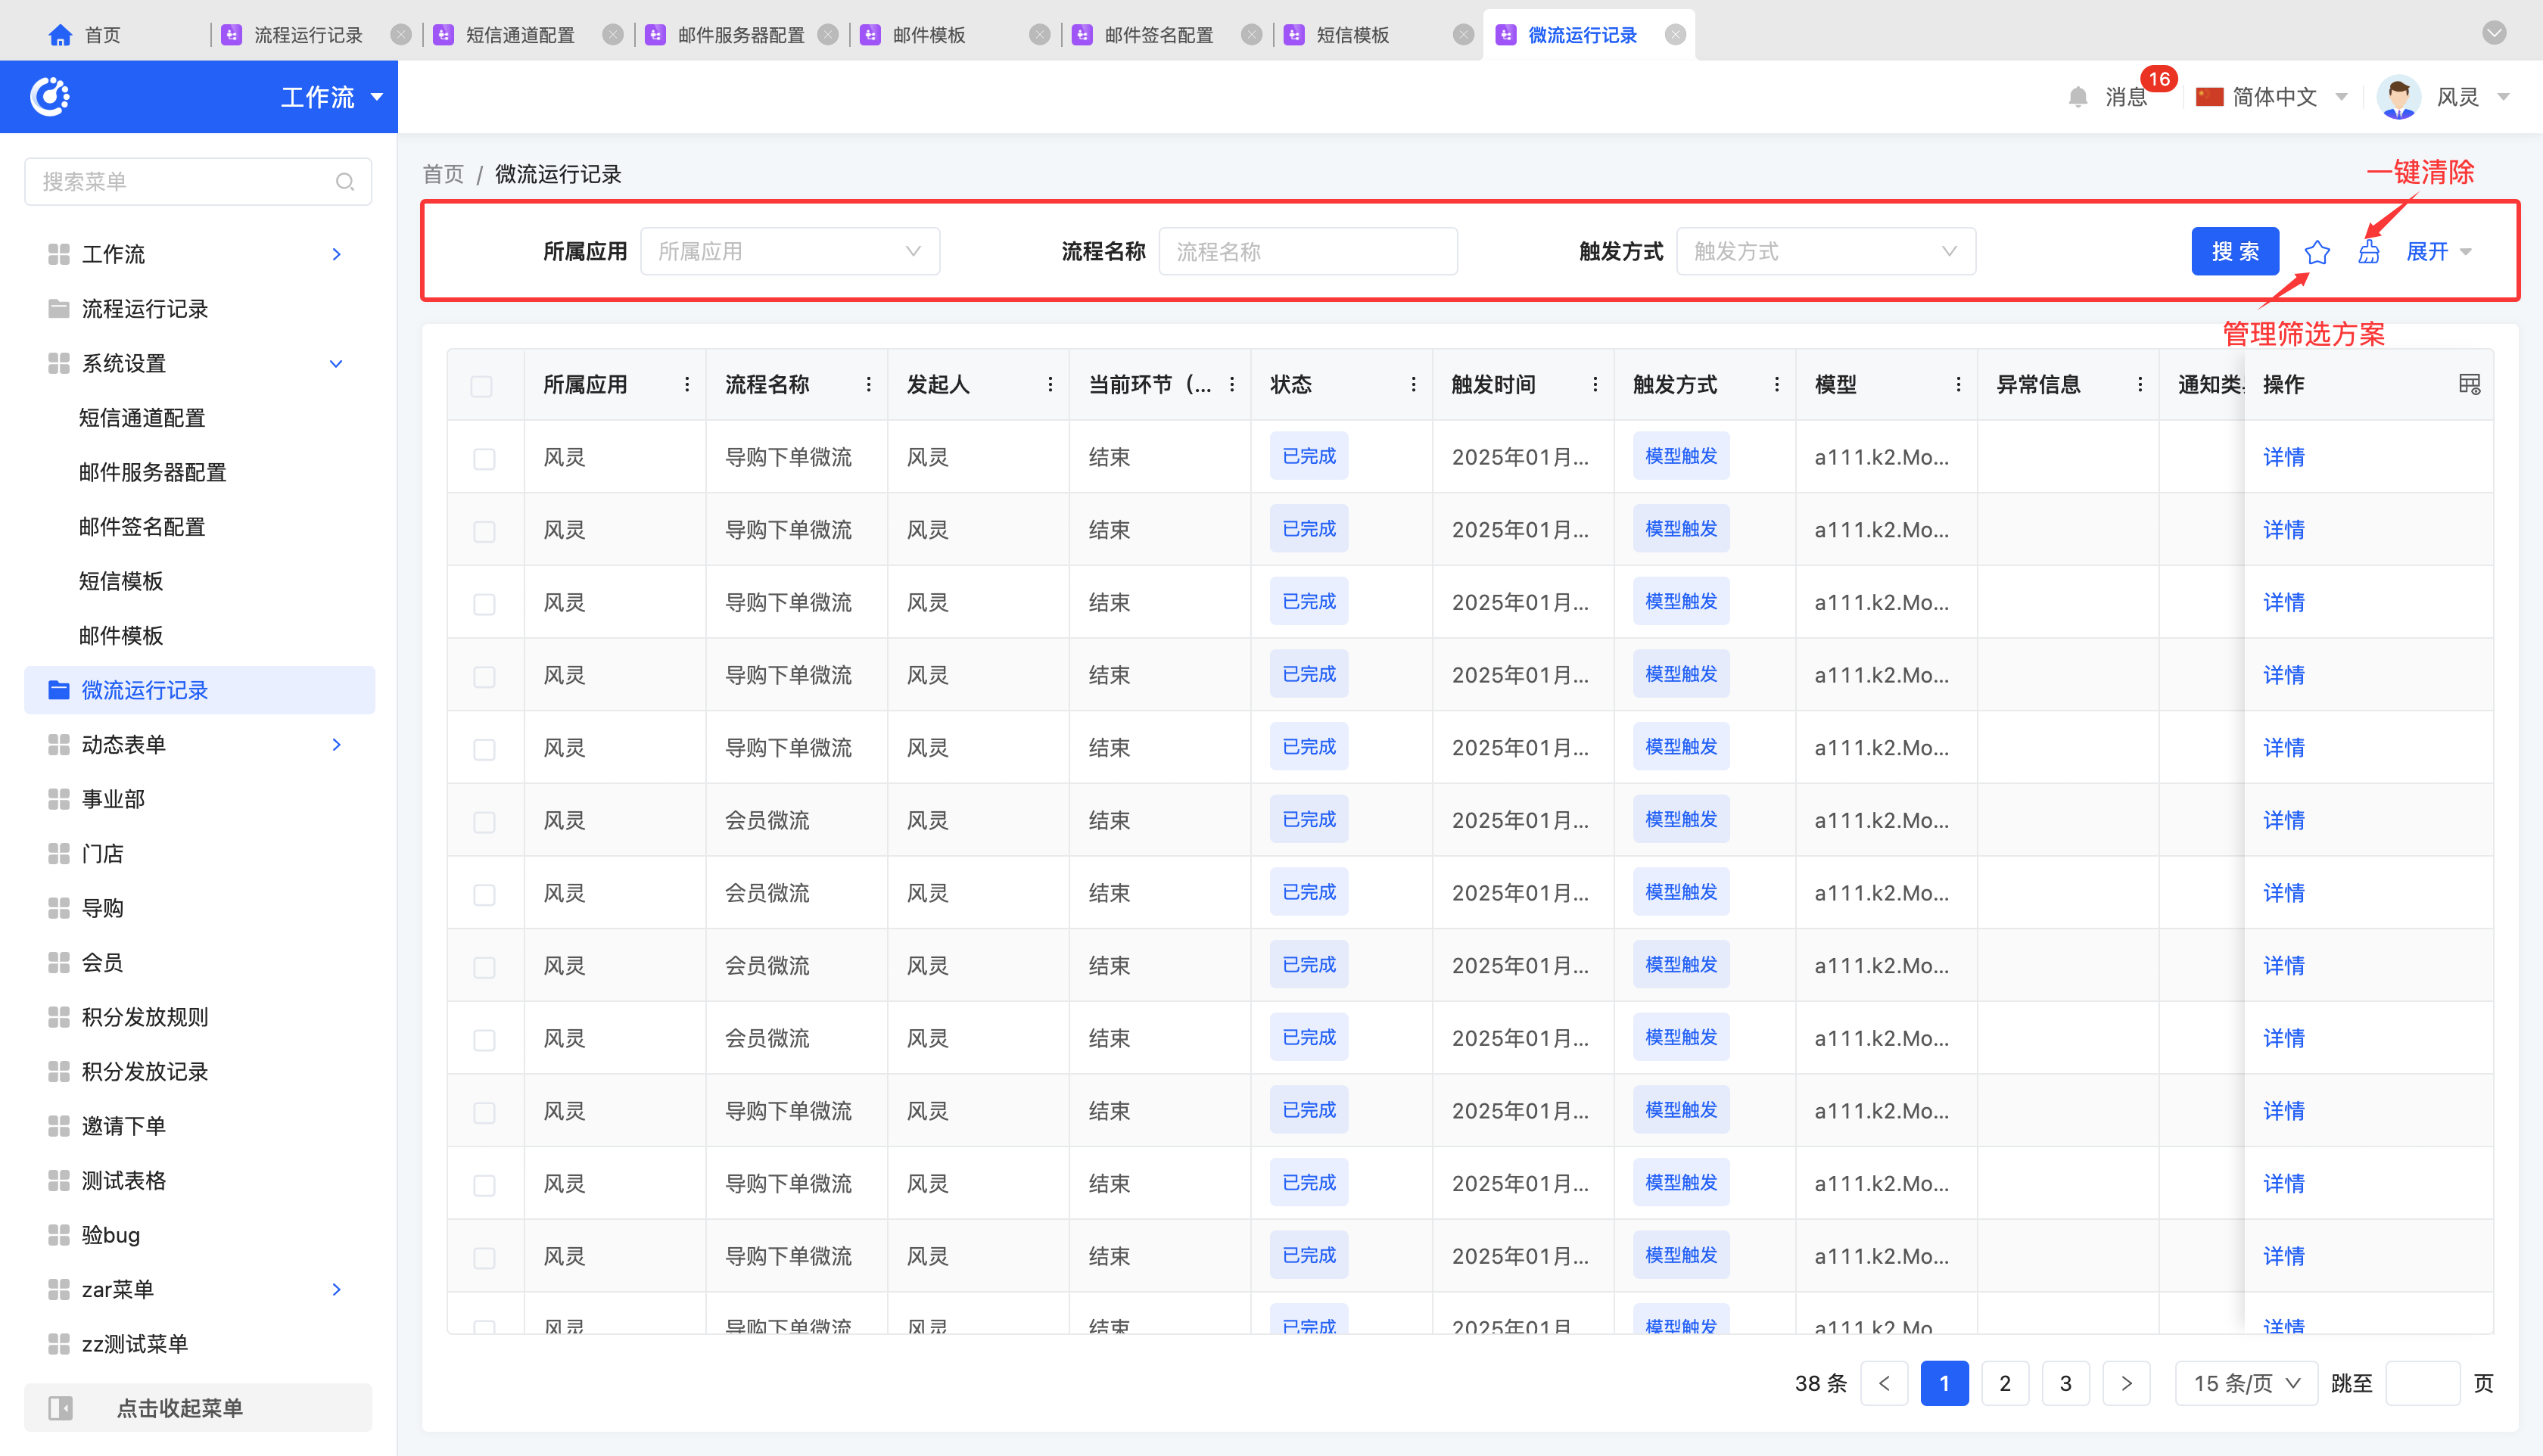
- Filter: After selecting or entering conditions in the filtering area, click "Search" to filter the micro - flow execution records.
- Clear All at Once: Click the "Clear" icon to clear all conditions in the current filtering area at once.
- Manage Filtering Schemes: Move the mouse over the "Filtering Scheme" icon to manage filtering schemes.
- Add: After selecting or entering filtering conditions in the filtering area, click "Save Current Conditions". Enter the scheme name in the pop - up window to add the current combination of filtering conditions to the filtering scheme.
- Search: Enter the scheme name in the input box.
- Modify: After clicking "Manage Filtering Schemes", select a scheme in the pop - up window and click the scheme name to modify the scheme name.
- Delete: Select a scheme in the scheme list and click the "Delete" icon to delete the filtering scheme.
(Ⅱ) Details
1. Function Introduction
The system supports viewing the execution details of micro - flows. You can not only check the basic information of each node but also comprehensively understand the overall running status and detailed information of the micro - flow.
2. Operation Methods
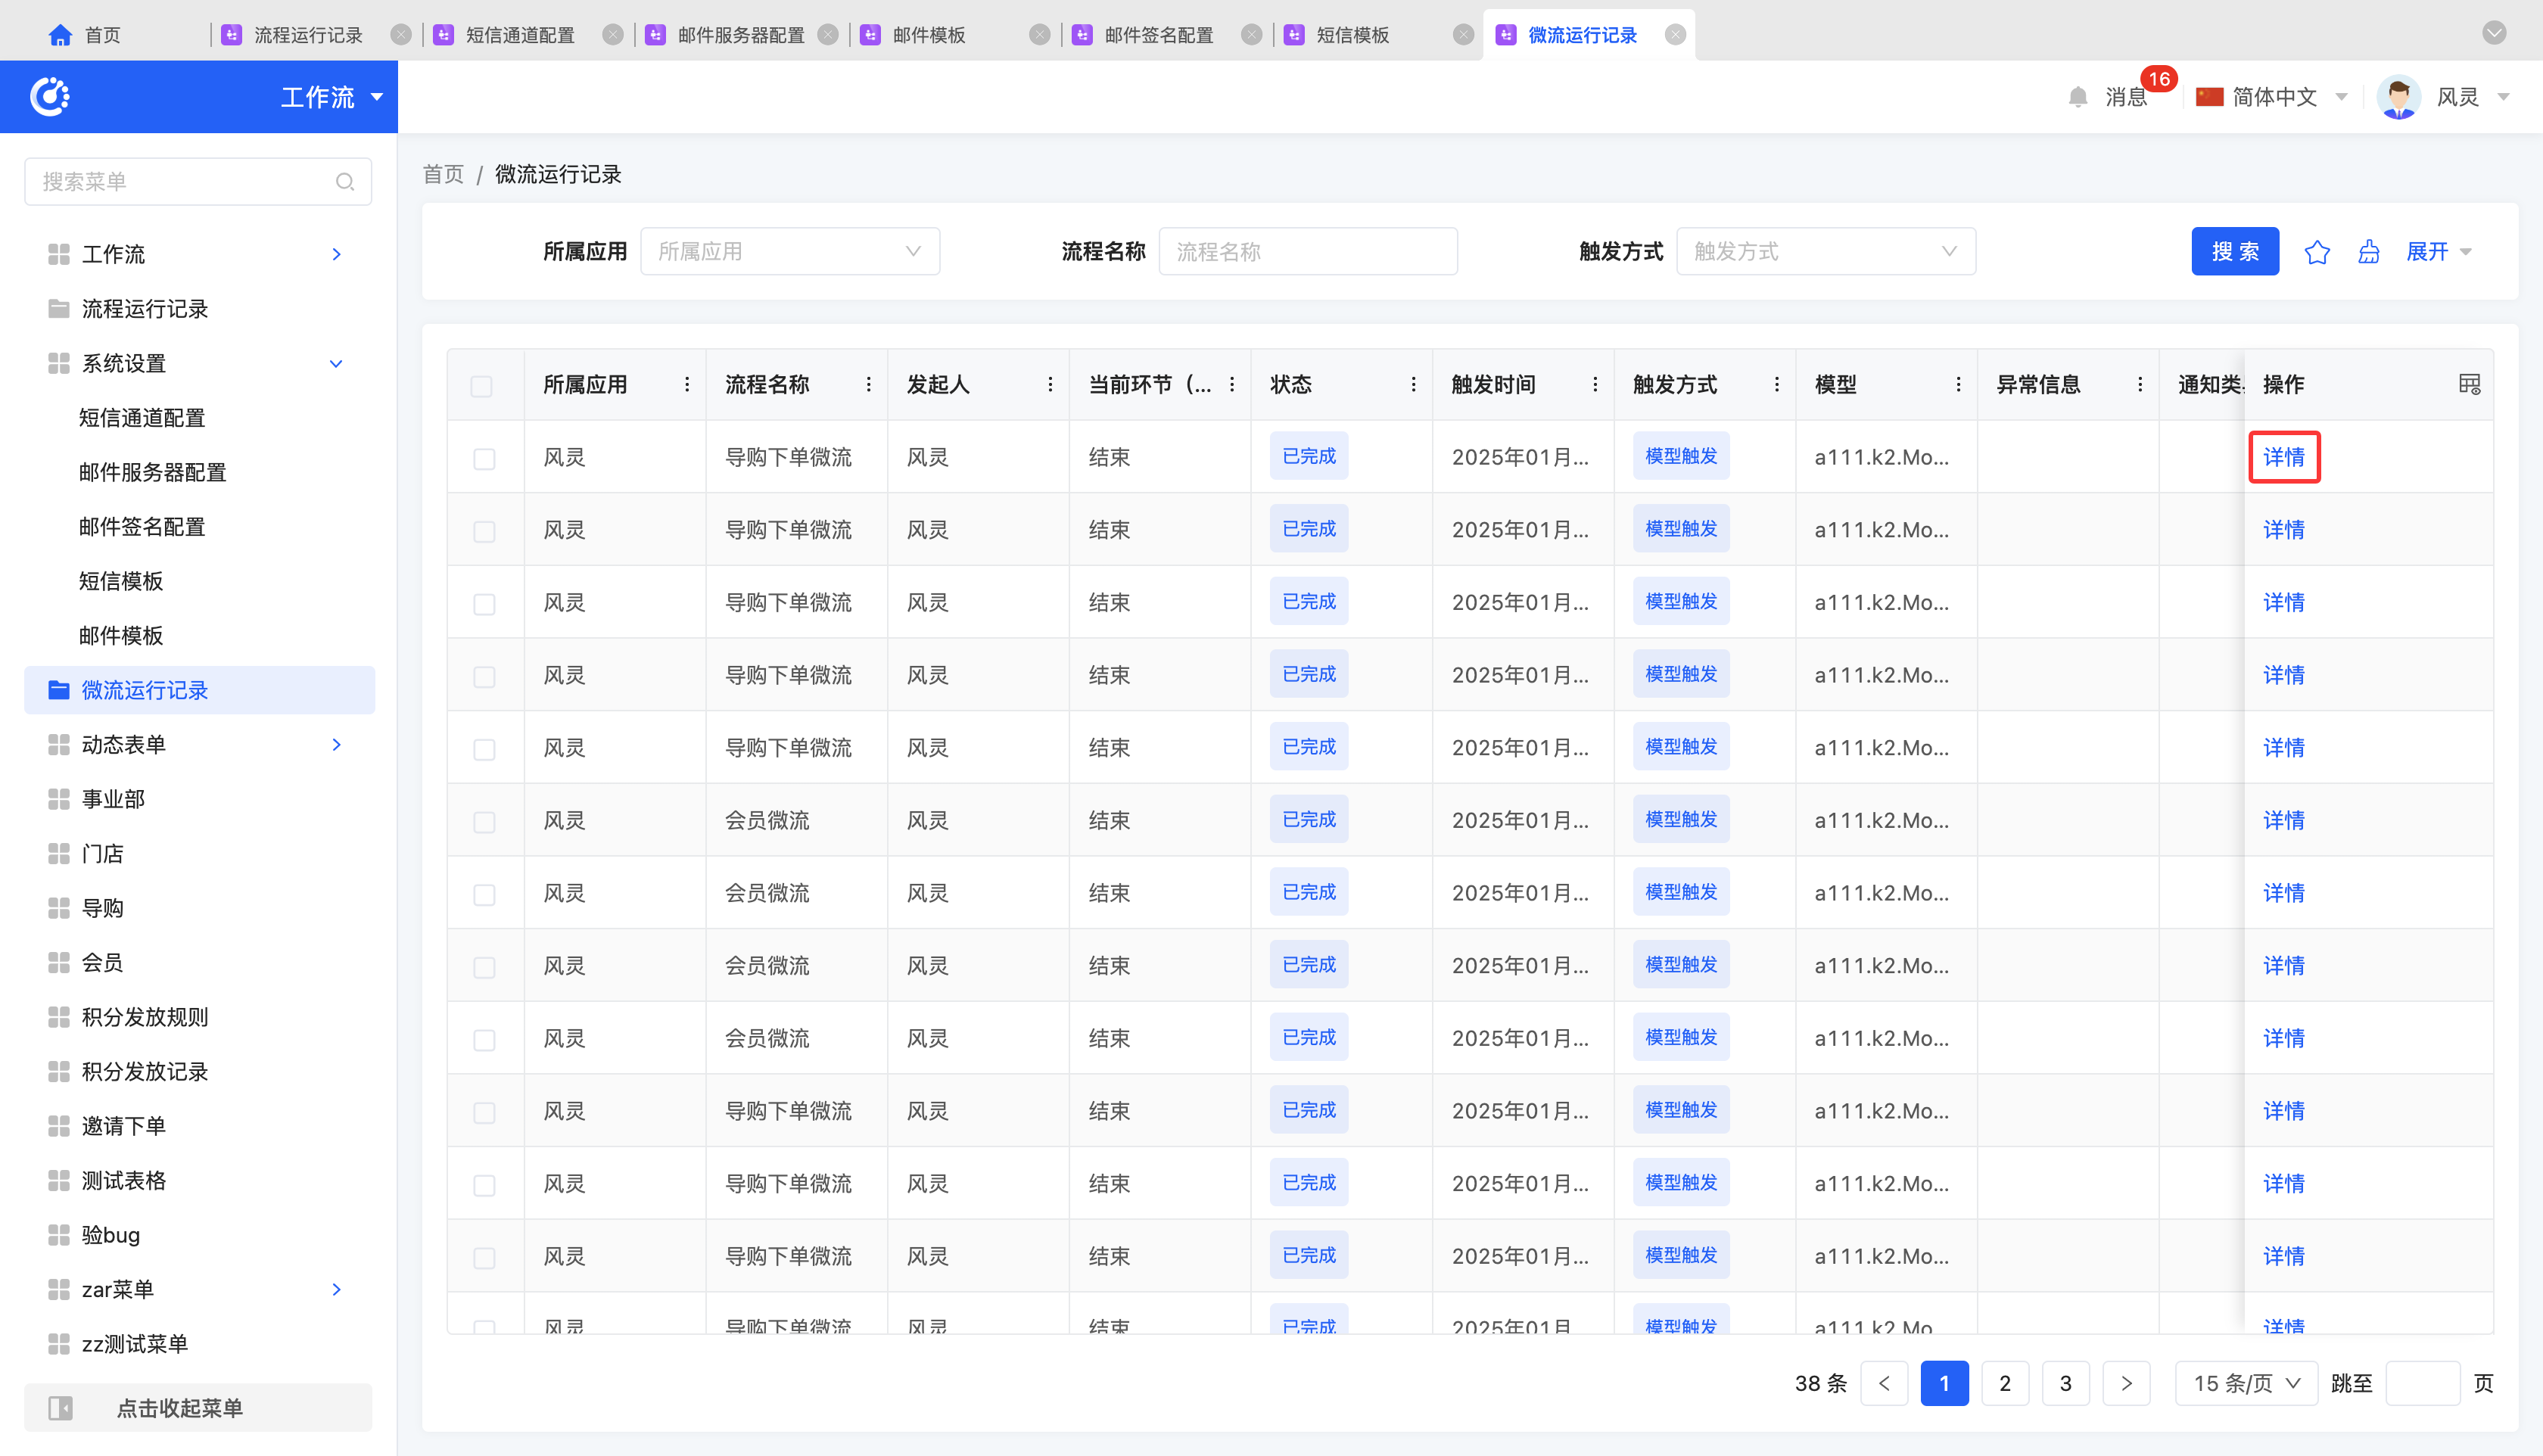
- Click "Details" to jump to the micro - flow execution details page and view the detailed information of the micro - flow execution.
Ⅴ. Delegation and Handover
(I) Delegation
1. Function Introduction
When a user is unable to handle pending work tasks, they can delegate the pending tasks to others for processing. After delegation, the delegatee will be responsible for handling these pending tasks to ensure the continuity of business processes.
Note
- For workflows, you can select "All Workflows"; the delegator is the currently logged-in user, the delegatee is limited to all employees and only 1 person can be selected, and the delegator and delegatee cannot be the same.
- During the delegated time period, the delegator cannot delegate to others again; the delegatee cannot initiate a new delegation within the delegated time period; during the delegation period, the delegator cannot accept other delegations.
- Delegatee disabled after delegation: The system will automatically return the delegatee's unprocessed delegated pending tasks to the original delegator, and at the same time send an in-site message: "The pending tasks you delegated to [XXX] have been returned because the other party has been disabled. Please handle them in a timely manner".
Reminder
You can initiate delegation for an employee in Admin Center - Employees. After delegation, the relevant records will be synchronized to the delegation records.
2. Operation Method
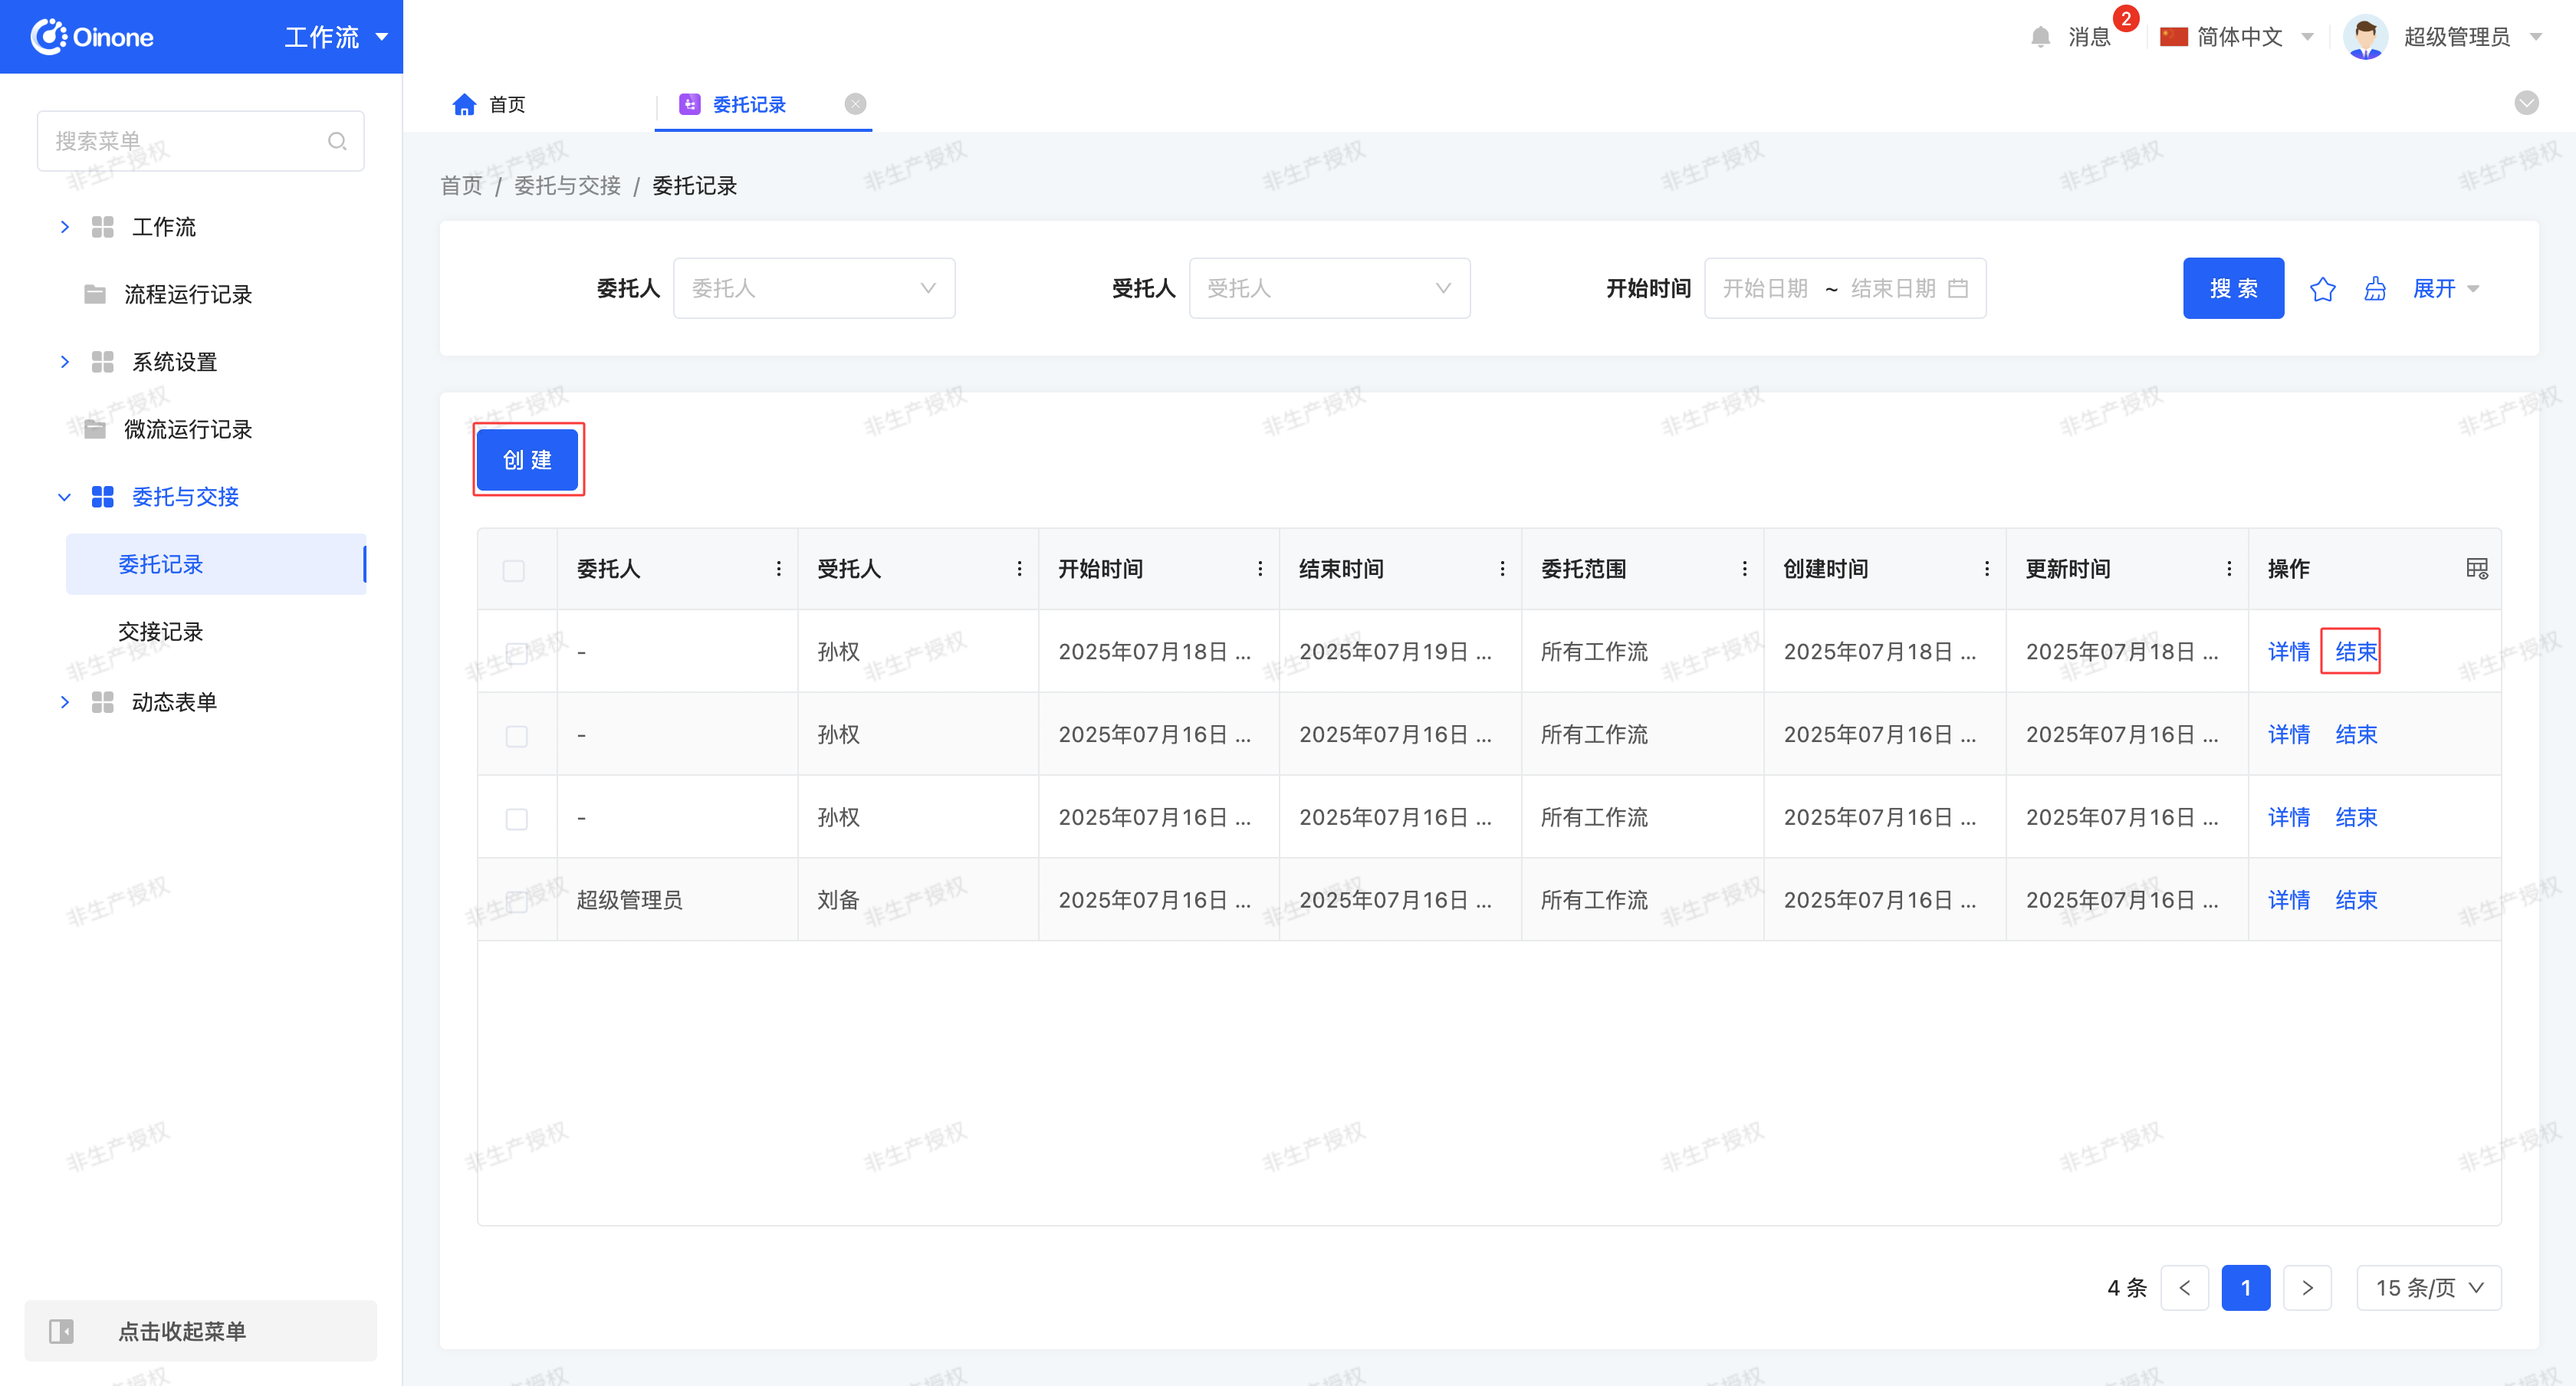
- Create Delegation: Click "Create", fill in the delegation information (including time, delegatee, etc.) in the pop-up window. After setting, the current user's pending tasks will be automatically transferred to the delegatee during the delegation period.
- End Delegation: Click "End" to terminate the ongoing delegation process in advance.
- Continuous Delegation: Click "Continue Delegation". After submitting a delegation, you will not return to the original page; the pop-up window will clear the information, and you can directly add a new delegation.
- Record Synchronization: Delegation records are synchronized bidirectionally. Both the delegator and the delegatee can view them in "Delegation and Handover - Delegation Records".
(II) Handover
1. Function Introduction
The handover function allows users to transfer work content to other employees, realizing a smooth transition and efficient flow of work. The relevant personnel of the handover work will be changed to the recipient. After that, no more pending tasks for this work will be sent to the original employee, and the work content after handover will no longer be displayed under the original employee's name.
Handover records are displayed synchronously in "Delegation and Handover - Handover Records" of both the handover initiator and the recipient. At the same time, an in-site message containing the handover content will be sent to the recipient.
Reminder
You can initiate handover for an employee in Admin Center - Employees. After handover, the relevant records will be synchronized to the handover records.
2. Operation Method
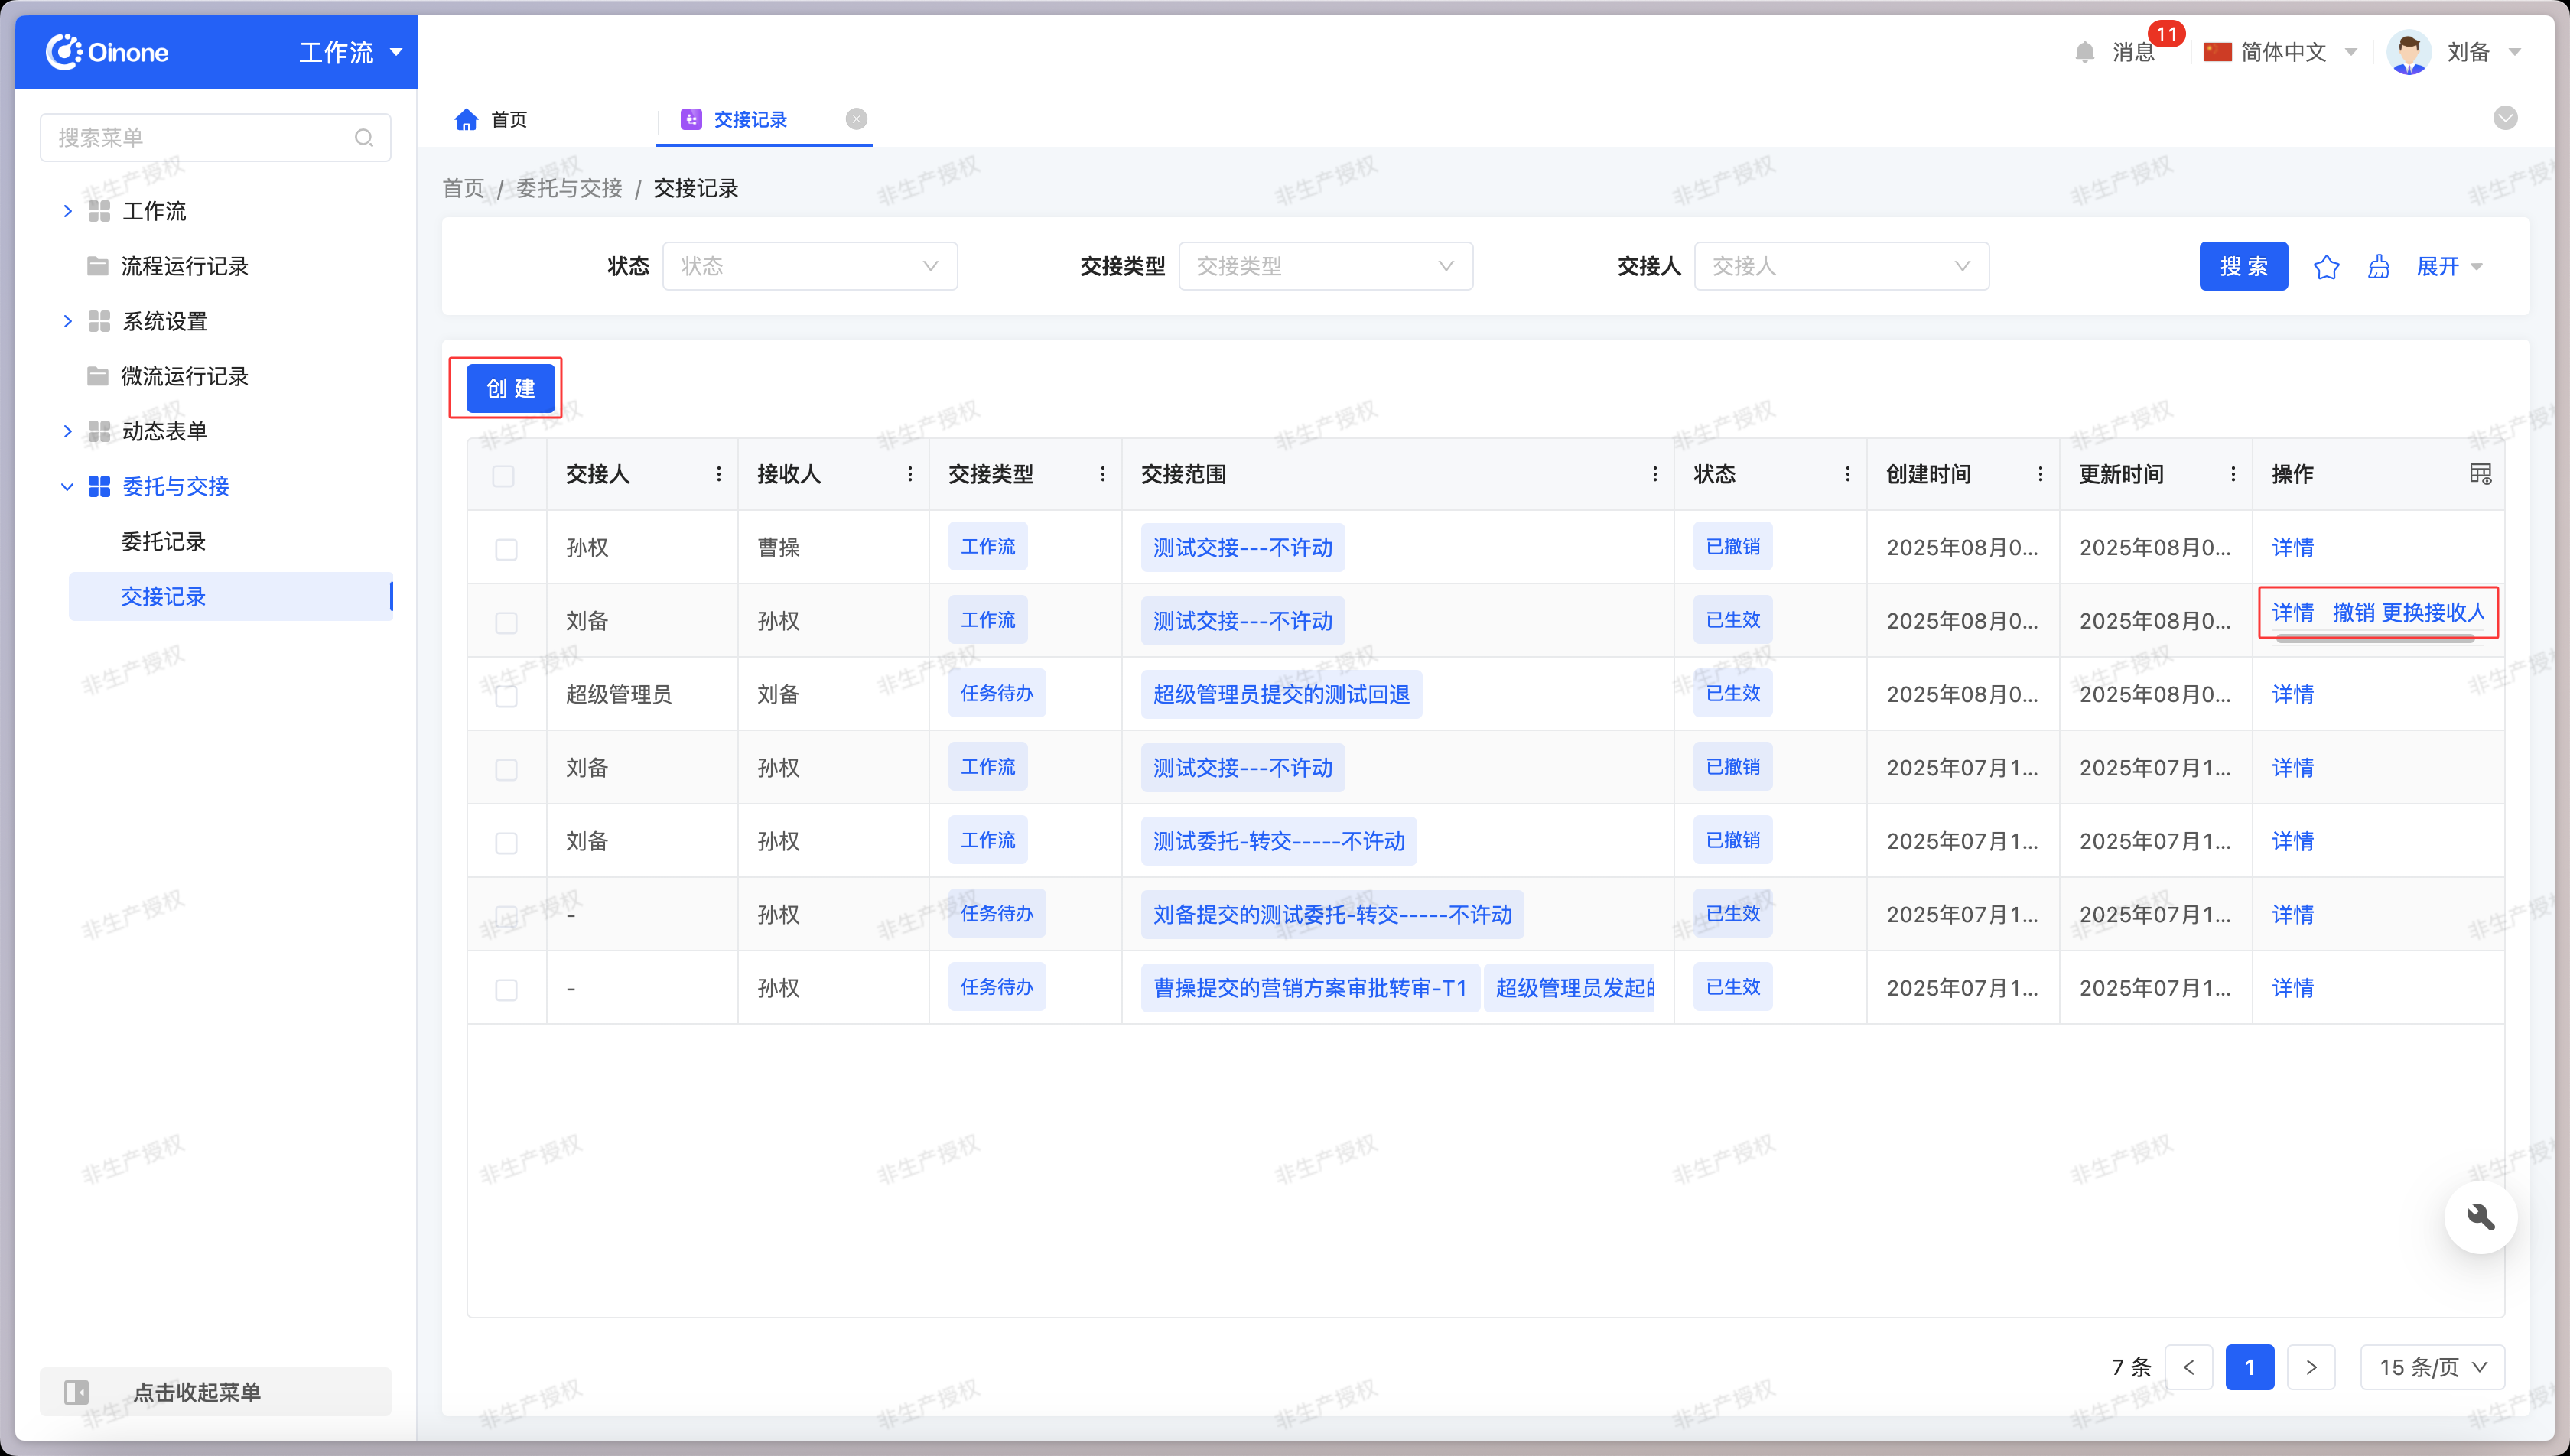
- Initiate Handover: Click "Create", select the employee's unprocessed pending tasks, workflows in which they participate as a node participant, and the recipient (the recipient cannot be the same as the initiator) in the pop-up window. Confirm to complete the work handover.
- Change Recipient: Click "Change Recipient". In the pop-up window, only the recipient can be edited, and other fields are read-only; click "Confirm" to submit the modification.
Note
The handover initiator can only hand over their own pending tasks and workflows. For pending tasks and workflows handed over by others, the recipient needs to be modified in the original record.
- Cancel Handover: Click "Cancel" to cancel the current handover. The pending tasks and workflows will still be handled by the original processor; after cancellation, the record will be invalidated but not deleted, and the status will be marked as "Cancelled".
Note
Cancellation is only allowed when the handover content is a workflow.
Ⅵ. Dynamic Forms
(Ⅰ) Dynamic Form Tasks
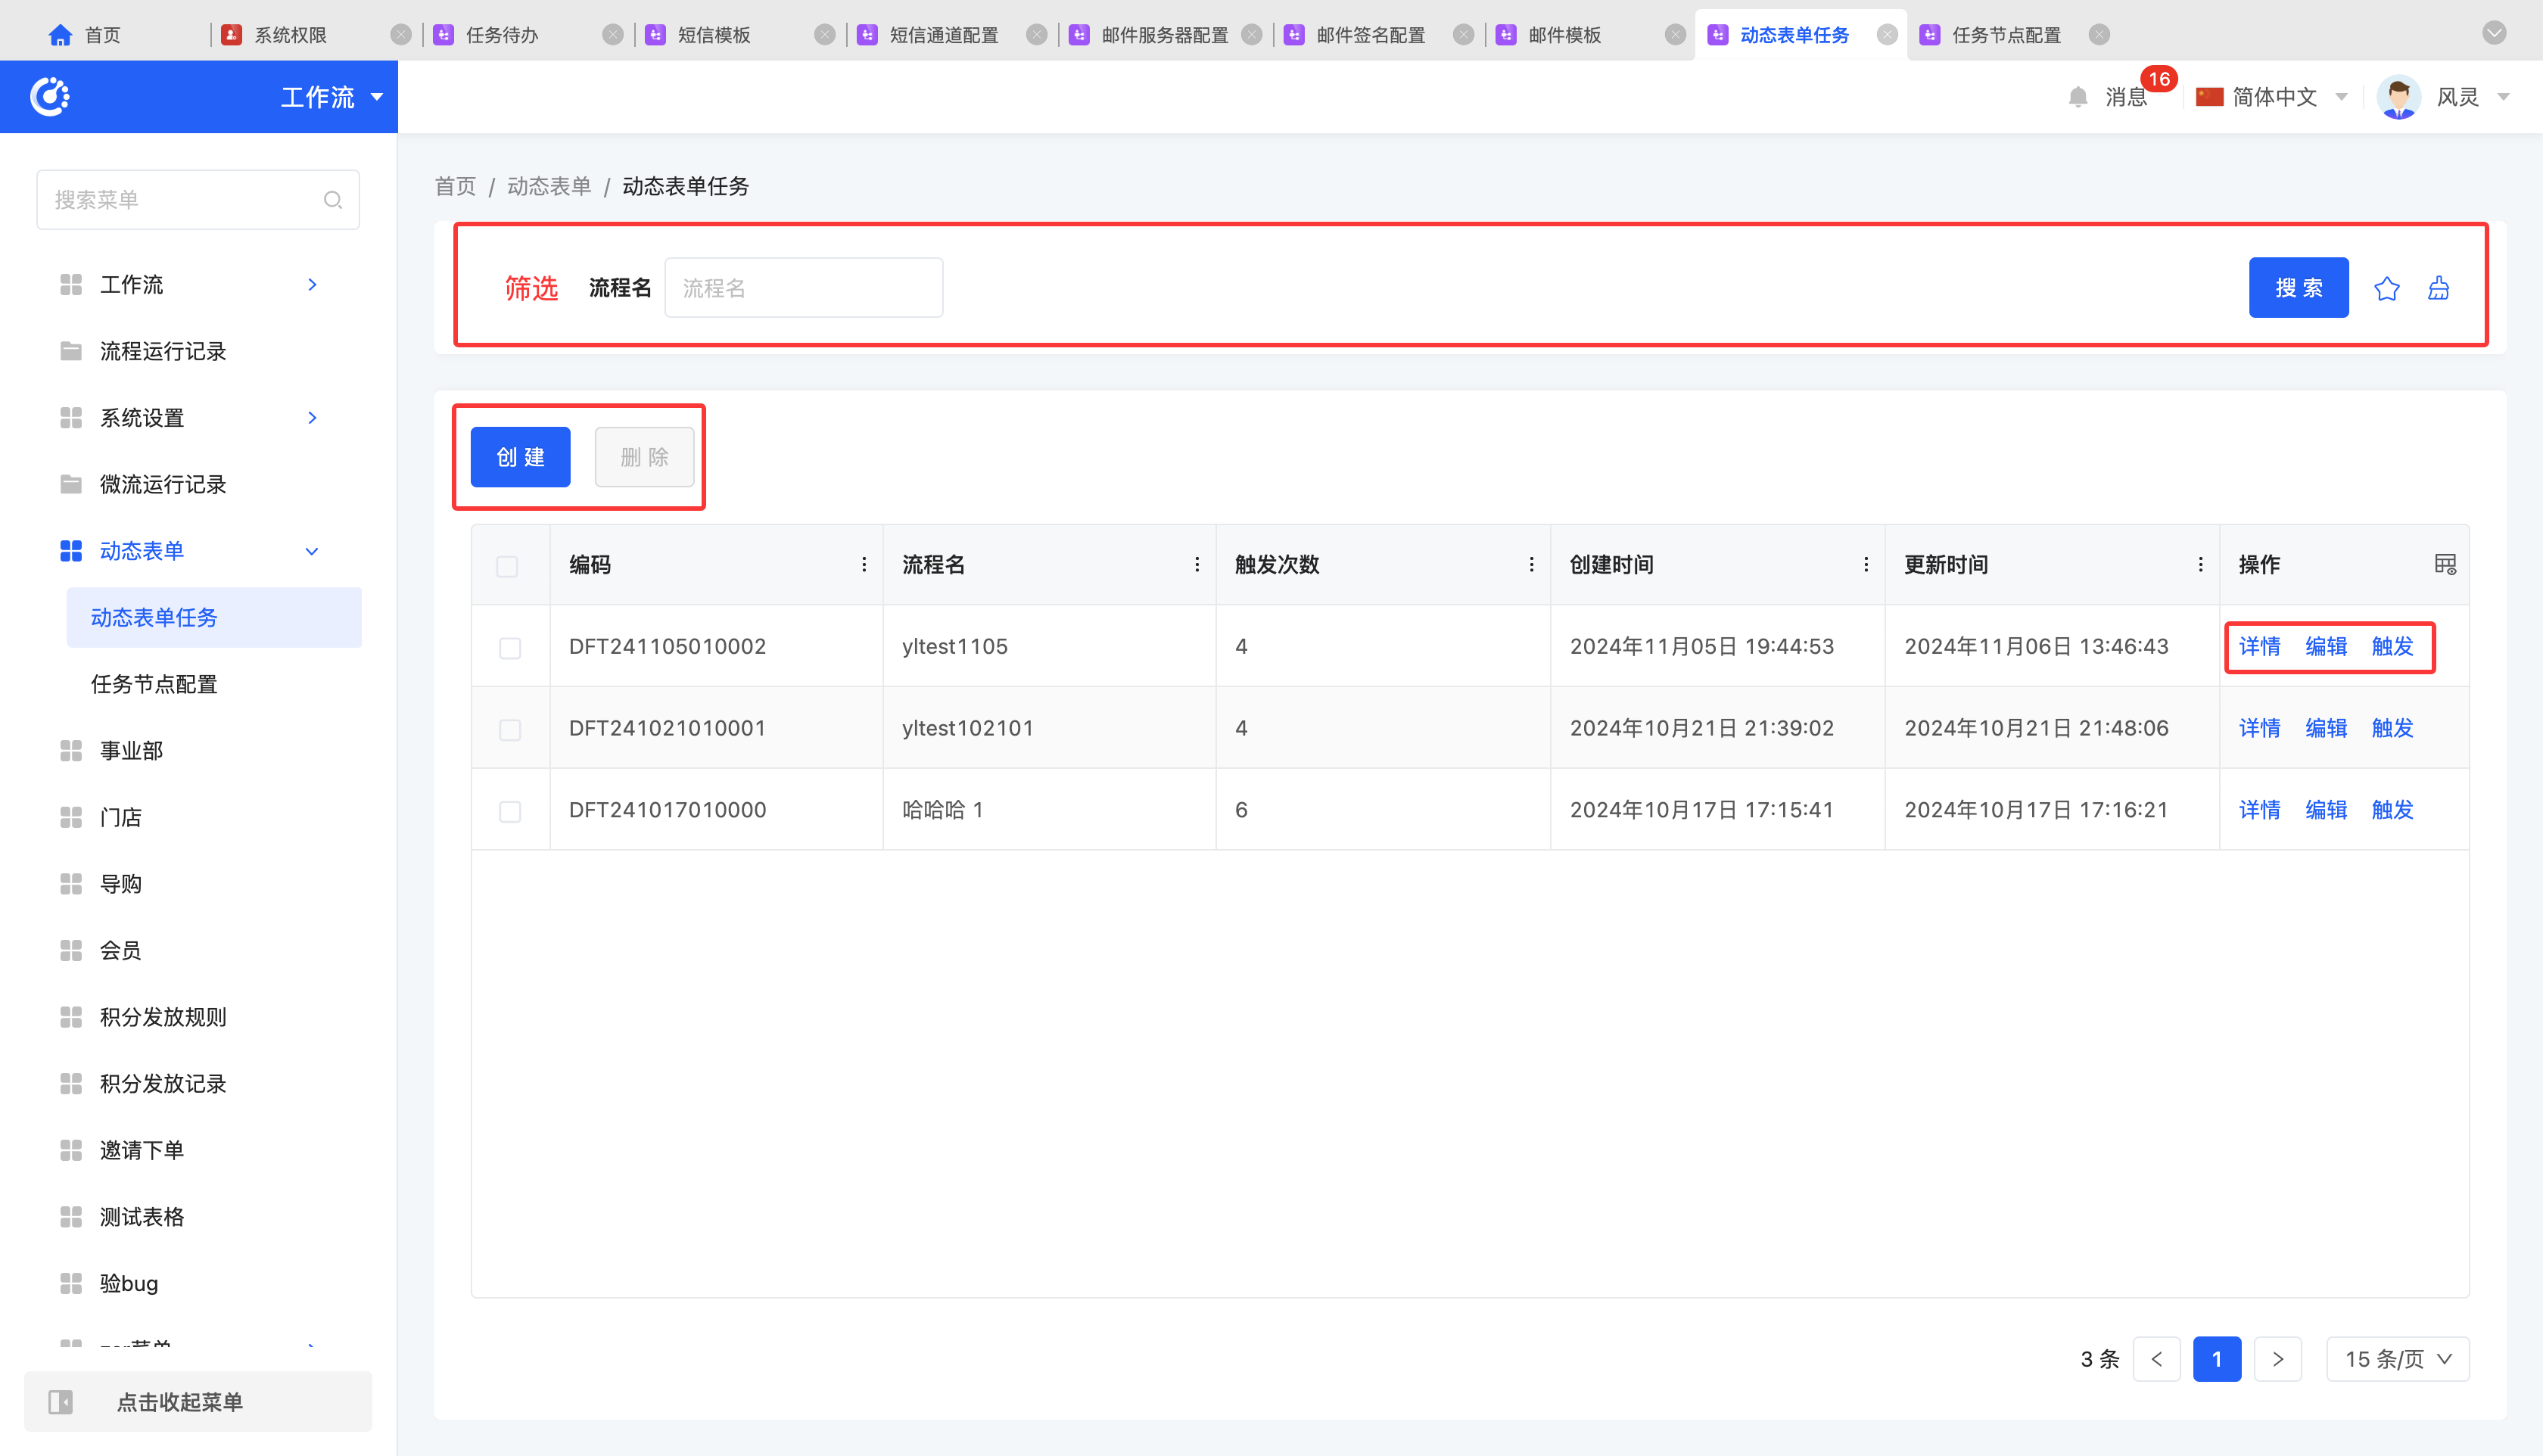
1. Function Introduction
In dynamic form tasks, users can customize the process name. When a task node uses the process name set in the dynamic form task, you can trigger the dynamic form task to perform corresponding testing operations on the node.
2. Operation Methods
- Filter: Enter or select the corresponding filtering conditions according to actual scenario requirements to filter task nodes.
- Add: Click "Create", enter the required configuration information and save to successfully create a new task node.
- Edit: Click "Edit" to update or modify the relevant information of the task node.
- Details: Click "Details" to view the detailed information of the selected task node.
- Trigger: Click "Trigger" to trigger the task nodes included in the dynamic form task.
- Delete: Select a task node and click "Delete" to delete the task node.
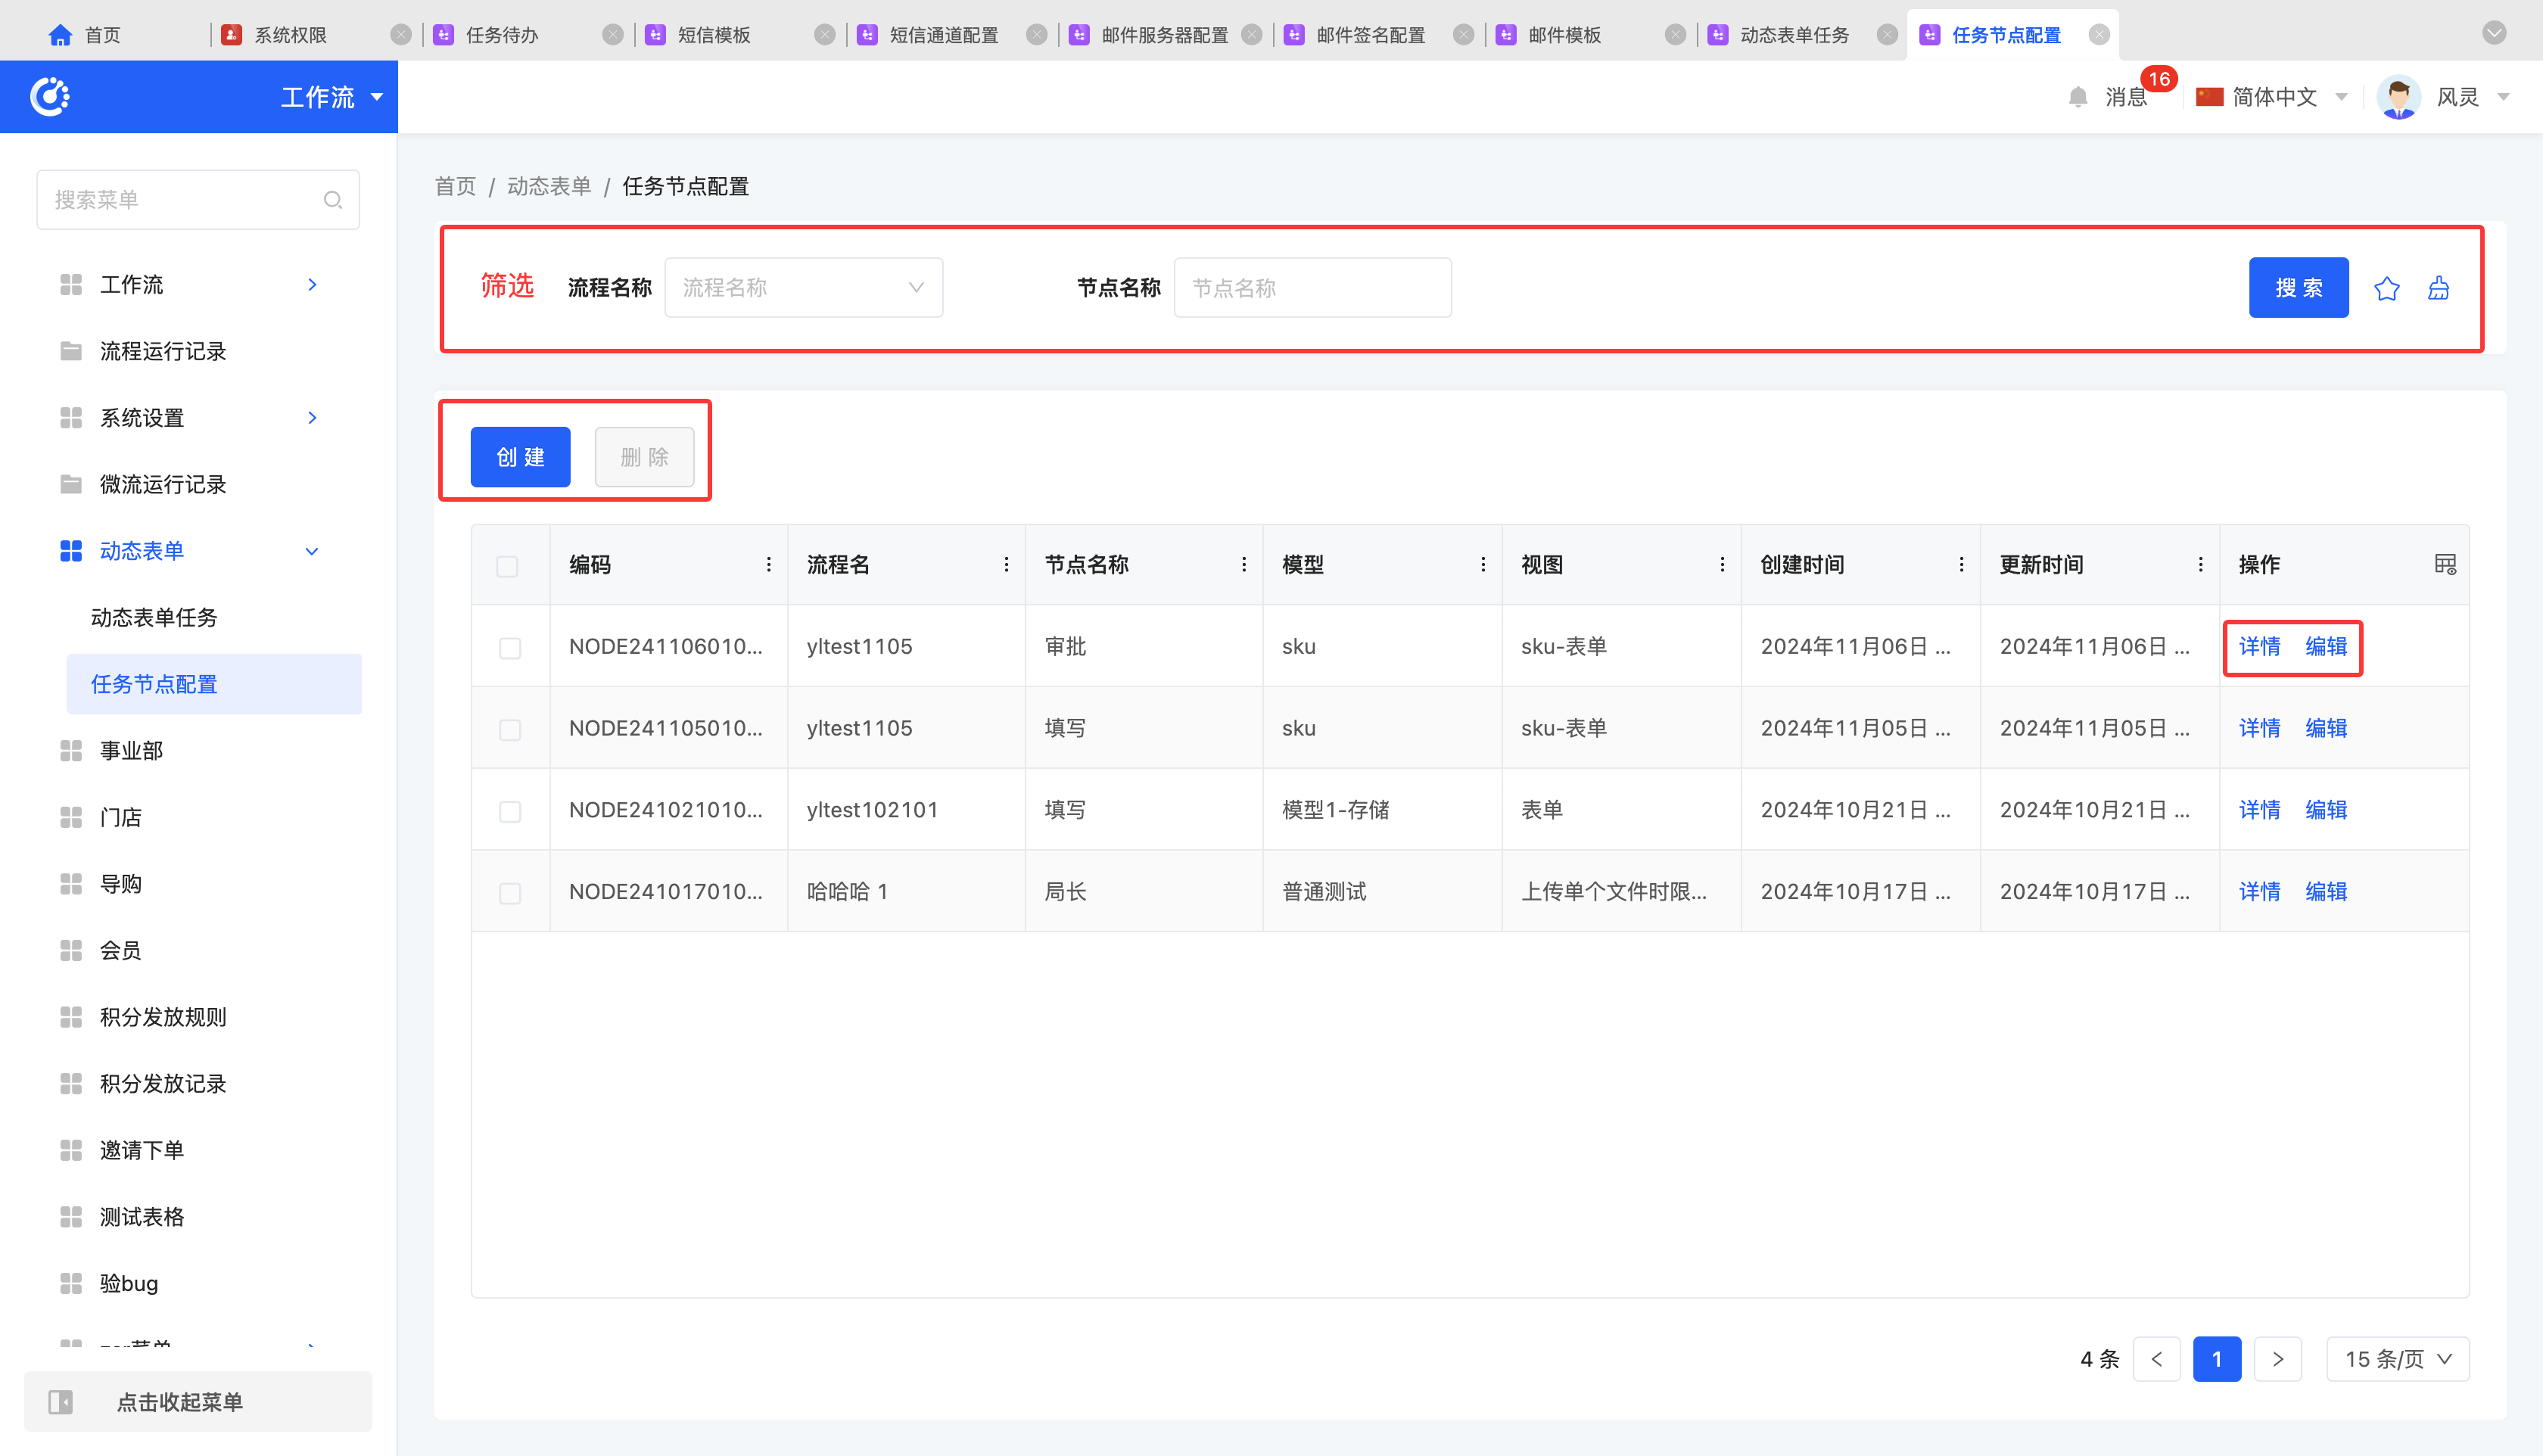
(Ⅱ) Task Node Configuration
1. Function Introduction
You can flexibly configure the task nodes of dynamic forms. When they match the names of approval or filling nodes in the process designer, they can be automatically connected to the corresponding task nodes and then jump to the corresponding dynamic forms.
Tip
When the processes of approval/filling nodes of different models are the same, dynamic forms can be used. By setting the node name and binding the view, different views can be achieved for the same process, thereby reducing redundant configuration work and improving development efficiency.
2. Operation Methods
- Filter: Enter or select the corresponding filtering conditions according to actual scenario requirements to filter task nodes.
- Add: Click "Create", enter the required configuration information and save to successfully create a new task node.
- Edit: Click "Edit" to update or modify the relevant information of the task node.
- Details: Click "Details" to view the detailed information of the selected task node.
- Delete: Select a task node and click "Delete" to delete the task node.
