Docker full installation
I. Overview
Each build version is isolated in its own container (Linux namespace container). This document provides instructions on how to install the image containing "all middleware and front-end/back-end projects".
The foundation is to prepare a Linux server with 4 cores and 16GB of memory. CentOS 7.6 64-bit is recommended for the operating system, which has all the necessary dependencies for Oinone and common useful packages installed.
It is the simplest way to use Oinone in a non-production environment or for trial purposes. The deployment structure is illustrated as follows:
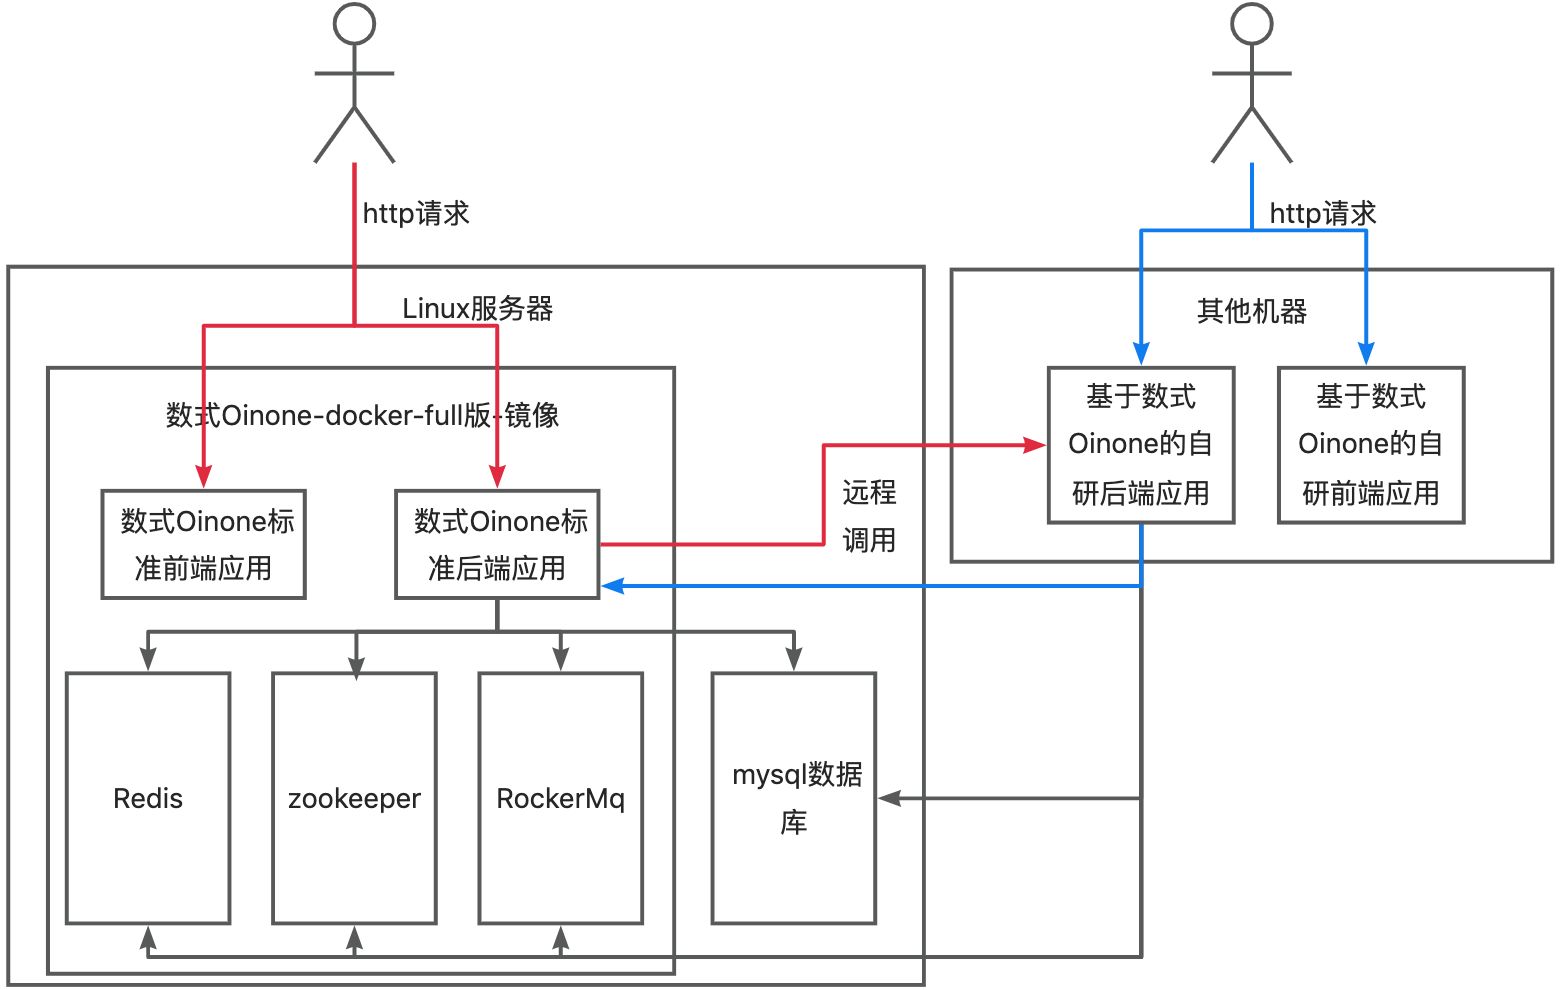
Note: If experiencing with other environments, networks need to be interoperable
Can the local development IP communicate with the server IP? Execute the command locally: ping 192.168.0.121 (replace with your own server IP)
Can the host IP where Docker is deployed communicate with the local development IP? Enter the server and execute the command: ping 192.168.0.60 (replace with your own local IP)
Warning: Database needs to be independent
If the database is not separated from the image but uses the database within the image, data loss will occur when the image is upgraded.
II. Install MySQL Database
If there is no existing database, you can download and install it from the official website: https://dev.mysql.com/downloads/mysql/.
Refer to MySQL Installation and Precautions
III. Install Docker
If Docker is not installed, please download and install it from the official website: https://www.docker.com/get-started/
Tip
When installing within China, if the <code>docker</code> repository is abnormal, you can change the official repository to Alibaba Cloud's repository:
Change from https://download.docker.com/linux/centos/docker-ce.repo to http://mirrors.aliyun.com/docker-ce/linux/centos/docker-ce.repo
Command: yum-config-manager --add-repo http://mirrors.aliyun.com/docker-ce/linux/centos/docker-ce.repo
IV. Download Image
(I) Confirm System Architecture
Check the current system architecture: Use the arch (recommended) or uname -a command
- x86_64: Indicates support for AMD64 architecture.
- aarch64: Indicates support for ARM64 architecture
Note: Image support
All images on this platform use docker manifest to support amd64 and arm64 architectures! (If there are other architectures, please contact Oinone personnel first to confirm usability)
(II) Pull Image
Special notes
If the digital staff has already sent you a deployment package, use 'oinone-op-ds-all-full' in the deployment package and the version specified in the deployment package; This article serves as a reference for the deployment process.
1. Community Edition
Not currently provided, please use the source code installation method
2. Enterprise Edition
##oinone-designer-mini-vMajorVersion.MediumVersion:FullVersion
## The version numbers 6.2:6.2.1 are just examples and will vary based on the actual version of the digital Oinone image
docker pull harbor.oinone.top/oinone/oinone-designer-mini-v6.2:6.2.1
If the image pull is too slow, you can add -amd64 or -arm64 suffix to the corresponding image Tag to obtain a single-architecture image.
##oinone-designer-mini-vMajorVersion.MediumVersion:FullVersion-ArchitectureTag
## The version numbers 6.2:6.2.1 are just examples and will vary based on the actual version of the digital Oinone image
docker pull harbor.oinone.top/oinone/oinone-designer-mini-v6.2:6.2.1-amd64
docker pull harbor.oinone.top/oinone/oinone-designer-mini-v6.2:6.2.1-arm64
V. Run Oinone
(I) Download Structure Package
- First, create a folder on the server (it is recommended to create it in the home directory for easy searching), then enter the folder.
# Create directory on server
# Go to home directory
cd ~
# Create folder
mkdir oinone
# Enter folder
cd oinone- Download the structure package oinone-op-ds-all-full.zip locally, unzip it, and upload the structure package from the local computer to the server
# Upload structure package from local computer
scp home/user/myfolder(Replace with actual local unzip path) username@ip_address:/home/oinone(Replace with specific server path)
(II) Introduction to Directory Structure
The following Oinone image-related directory structure and data volume (Volume) mounting with the host
# Structure package directory
|____config
| |____logback.xml
| |____application.yml
| |____oinone-demo.lic
|____logs
|____lib
|____nginx
| |____default.conf
|____mq
| |____broker.conf
|____startup.sh
|____startup.cmd
# Image directory structure is all under /opt
├── jdk
├── mq
├── nginx-1.15.5
├── nginx.conf
├── pamirs
│ ├── dist
│ ├── ext
│ │ ├── application.yml
│ │ ├── license.lic
│ │ └── logback.xml
│ ├── lib
│ ├── logs
│ │ └── sql-records
│ ├── nginx
│ │ └── vhost
│ ├── out
│ ├── outlib
│ ├── releases.jar
│ ├── run
│ │ └── run.sh
│ ├── static
│ └── tables.txt
├── redis
├── redis.conf
├── zoo.cfg
└── zookeeper# startup.sh file content
#!/bin/bash
configDir=$(pwd)
majorVersion=5.3
version=5.3.8.4
IP=192.168.0.121
docker run -d --name designer-allinone \
-e DUBBO_IP_TO_REGISTRY=$IP \
-e DUBBO_PORT_TO_REGISTRY=20880 \
-p 8099:8091 \
-p 3307:3306 \
-p 2182:2181 \
-p 6378:6379 \
-p 19876:9876 \
-p 10991:10991 \
-p 20880:20880 \
-p 88:80 \
-v $configDir/config/:/opt/pamirs/ext \
-v $configDir/nginx:/opt/pamirs/nginx/vhost \
-v $configDir/logs:/opt/pamirs/logs \
-v $configDir/mq/broker.conf:/opt/mq/conf/broker.conf \
-v $configDir/lib:/opt/pamirs/outlib harbor.oinone.top/oinone/oinone-designer-full-v$majorVersion:$version(III) Run startup.sh
1. Modify startup.sh File
Find the following code in the file and modify majorVersion, version, and the corresponding IP to the Docker host IP (i.e., server IP) and other configuration items
configDir=$(pwd)
majorVersion=6.2  # Modify according to the actual version of the Oinone image
version=6.2.1     # Modify according to the actual version of the Oinone image
IP=192.168.0.121  # Change to server IP
2. Modify broker.conf File in mq Directory
Find the following code in the file and modify the IP addresses of namesrvAddr and brokerIP1 and other configuration items
namesrvAddr=127.0.0.1:9876   # Change to 127.0.0.1:9876
brokerIP1=192.168.0.121  # Change to host IP
Tip:
If you don't know what the IP is, execute the command: ipconfig or ip a
3. Modify application.yml File in config Directory
Find the following code in the file and modify the IP, port, username, password, and other configuration items of the database
# application.yml file
# Change to the IP, port (default port 3306, consistent with the port of MySQL on the server), username, password of the MySQL server
pamirs:
  datasource:
    pamirs:
      driverClassName: com.mysql.cj.jdbc.Driver
      type: com.alibaba.druid.pool.DruidDataSource
      url: jdbc:mysql://192.168.0.129:3306/demo_pamirs?useSSL=false&allowPublicKeyRetrieval=true&useServerPrepStmts=true&cachePrepStmts=true&useUnicode=true&characterEncoding=utf8&serverTimezone=Asia/Shanghai&autoReconnect=true&allowMultiQueries=true
      username: root
      password: shushi@2019
    base:
      driverClassName: com.mysql.cj.jdbc.Driver
      type: com.alibaba.druid.pool.DruidDataSource
      url: jdbc:mysql://192.168.0.129:3306/demo_base?useSSL=false&allowPublicKeyRetrieval=true&useServerPrepStmts=true&cachePrepStmts=true&useUnicode=true&characterEncoding=utf8&serverTimezone=Asia/Shanghai&autoReconnect=true&allowMultiQueries=true
      username: root
      password: shushi@2019
4. Execute startup.sh and View Logs
sh startup.shView logs: First enter the logs folder and check if logs are generated?
cd logs # Enter logs folder# If logs are generated! You can execute the command:
tail -200f 2024.9.0.log(Change to the current day's log file name)
# The first startup will take relatively longer. Wait until you see the words "Startup successful" in the log file, which means the startup is successful# If logs are not generated, please first execute the following command
docker logs
# After execution, check whether it has started. If there is an error and you can't solve it, please export all error messages and send them to the group.After a successful startup, you can access http://ServerIP:88/ through a browser, with the account and password being admin/admin