On the model page of the Model Designer, you can manage groups, models, and fields.
I. Group Management
1. Function Introduction
You can use the grouping function to classify and manage models (including adding, modifying, and deleting). You can customize and add up to 15 groups as needed.
2. Operation Method
- Manage Groups: Click "All" to expand the list of all groups. After expanding, click "Manage Groups" on the right side of the group, and perform management operations on the groups in the pop-up window.


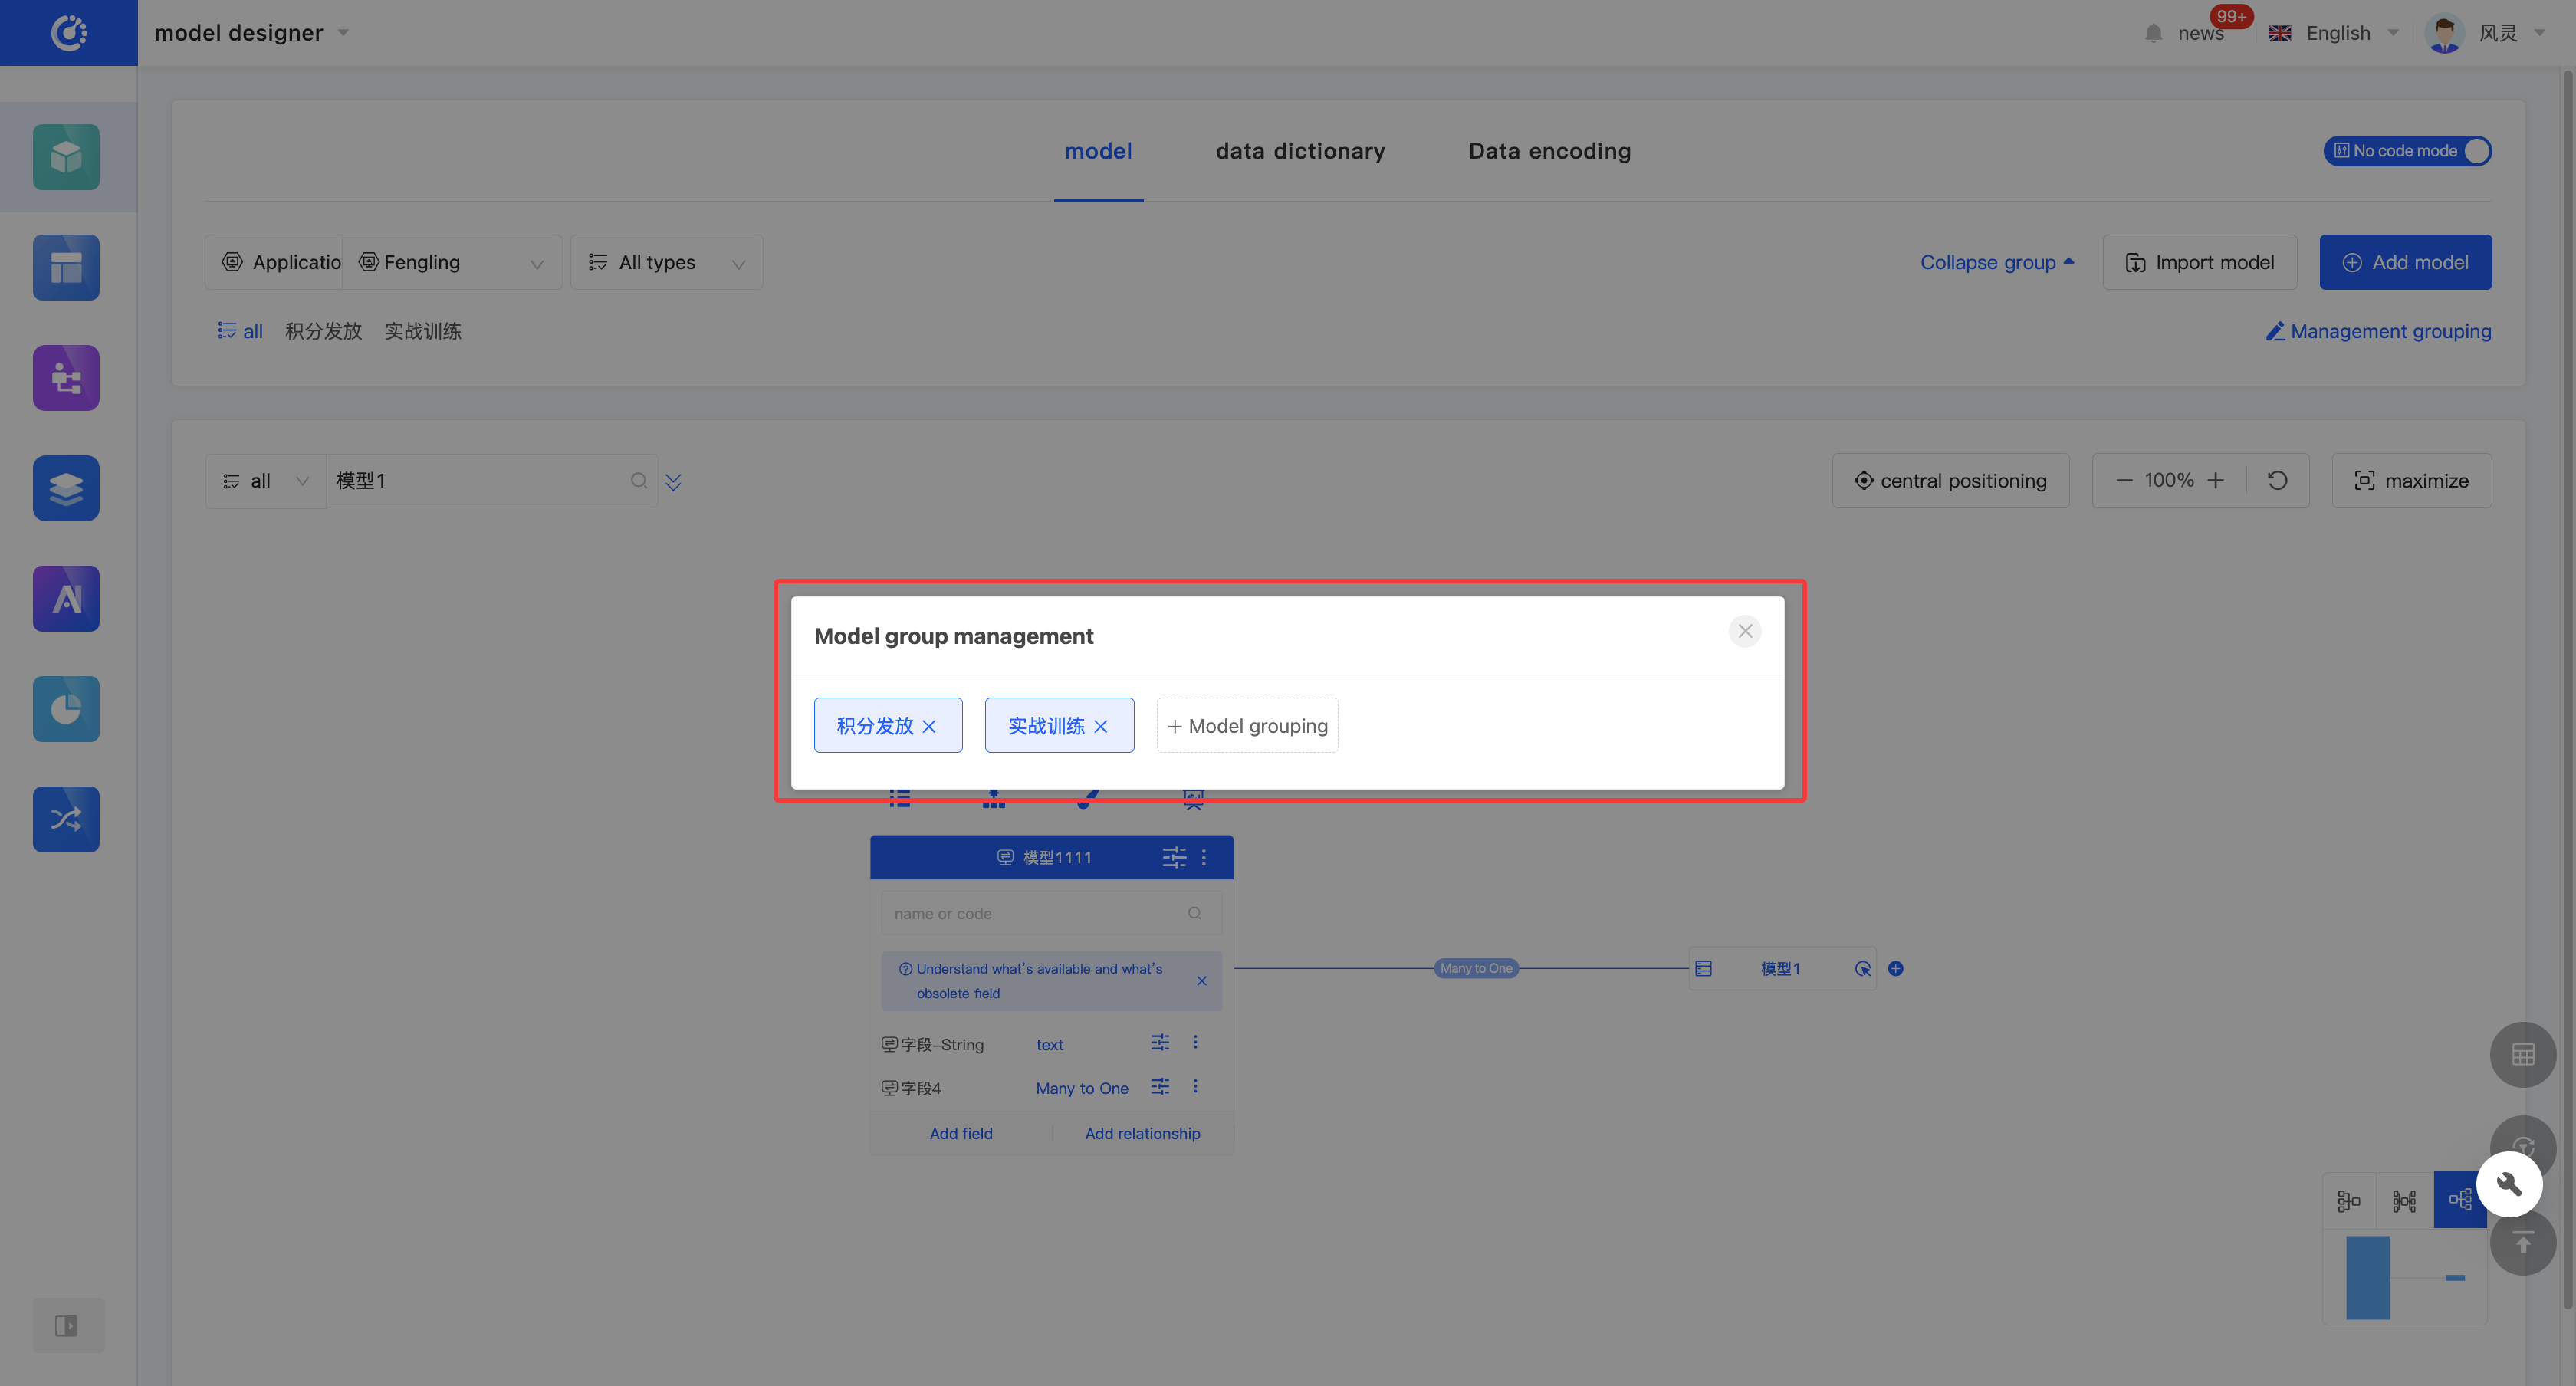
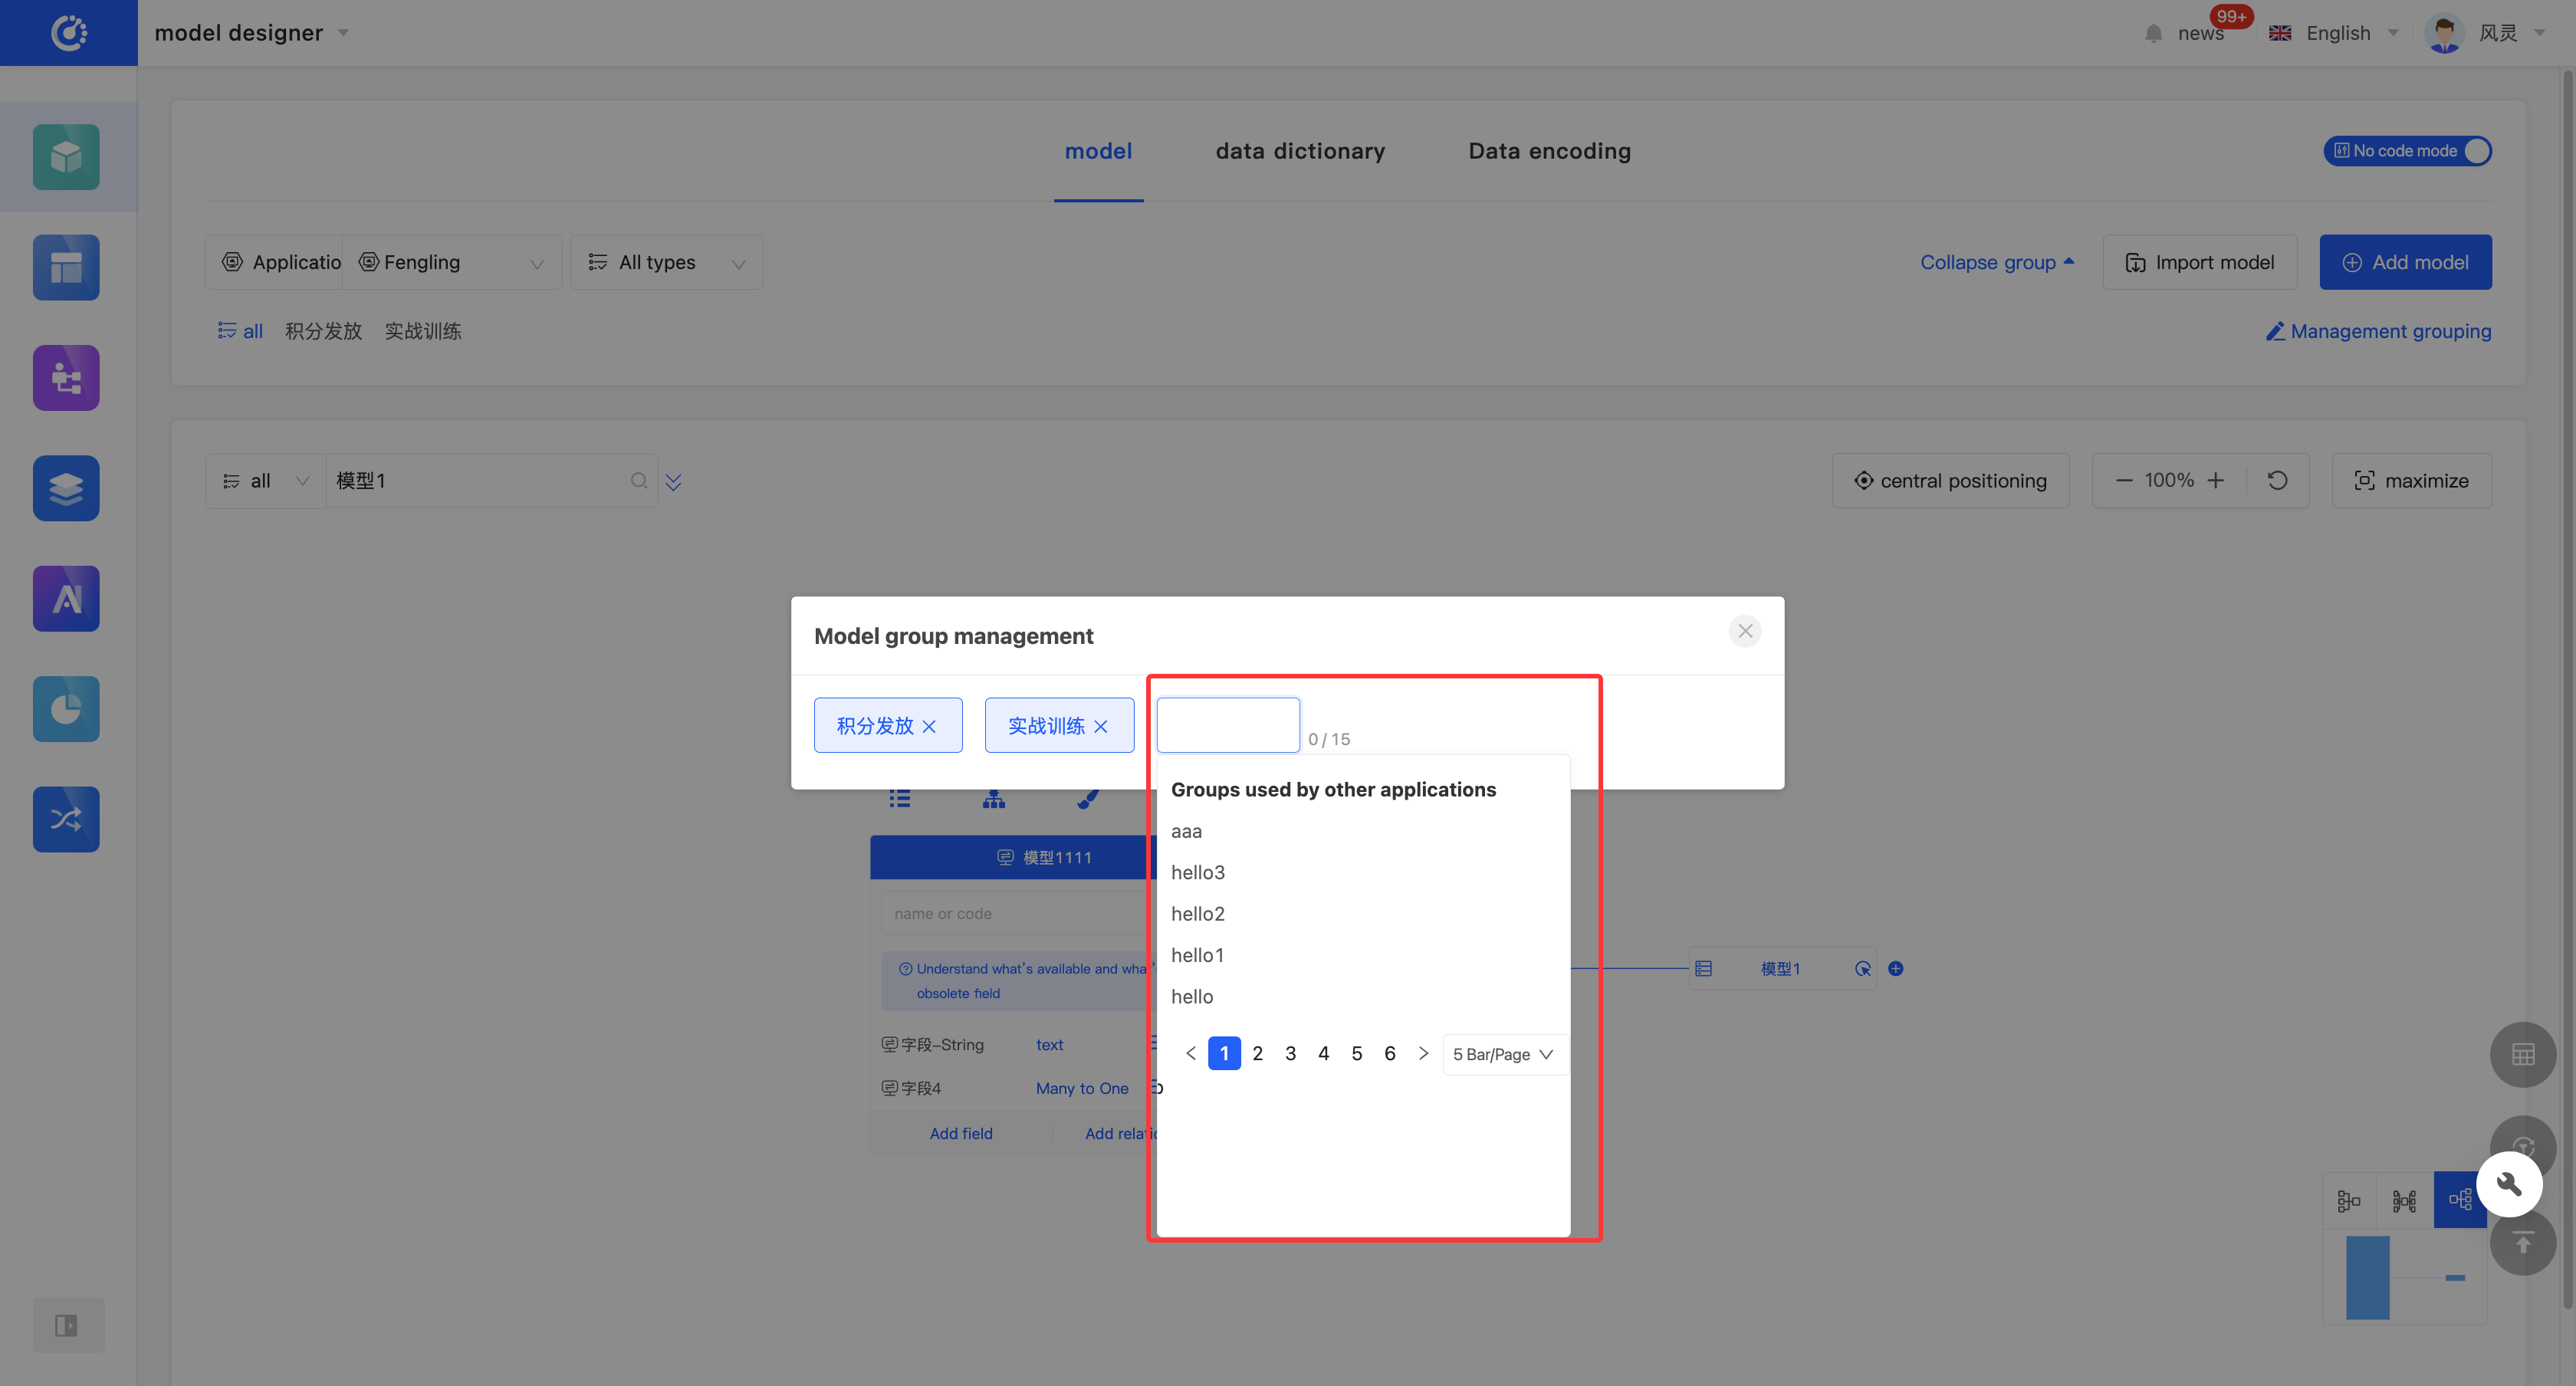
- Add a Group: Click "+ Model Group", enter the group name and press Enter; or select a group used in other applications.
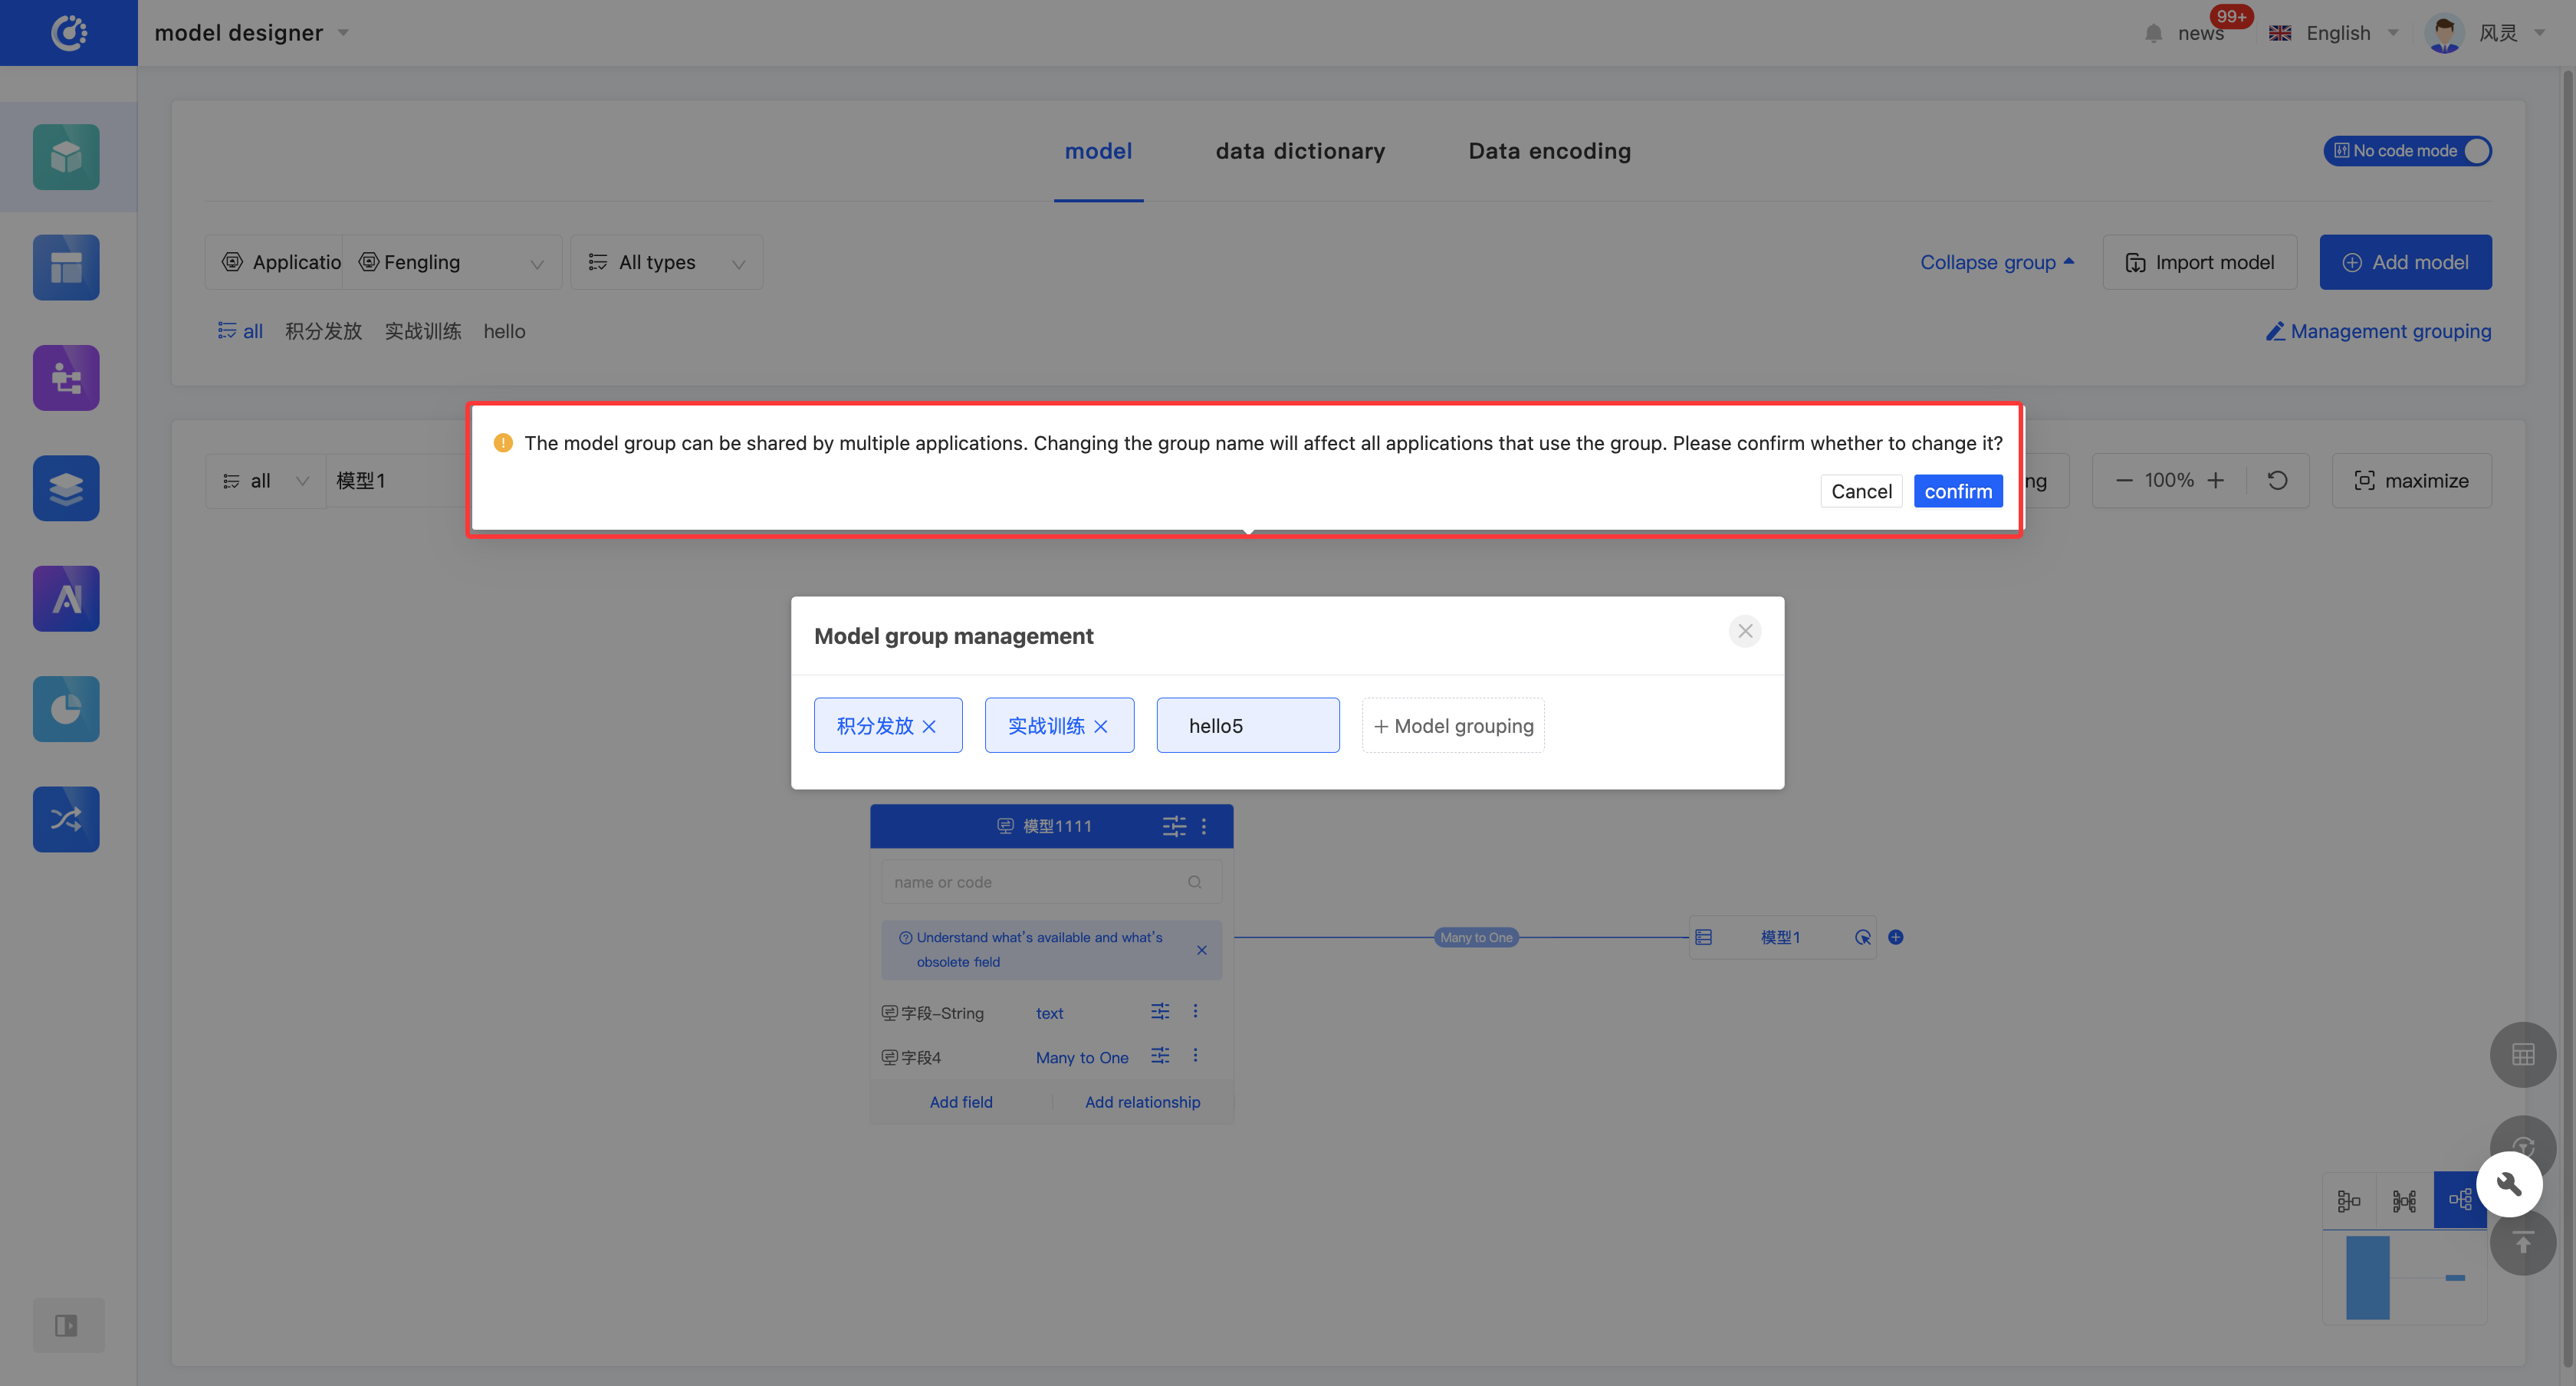
- Modify a Group: Double-click the group label, make the modification, and press Enter to save.
Note
If the group is also used in other applications, the name will change synchronously.
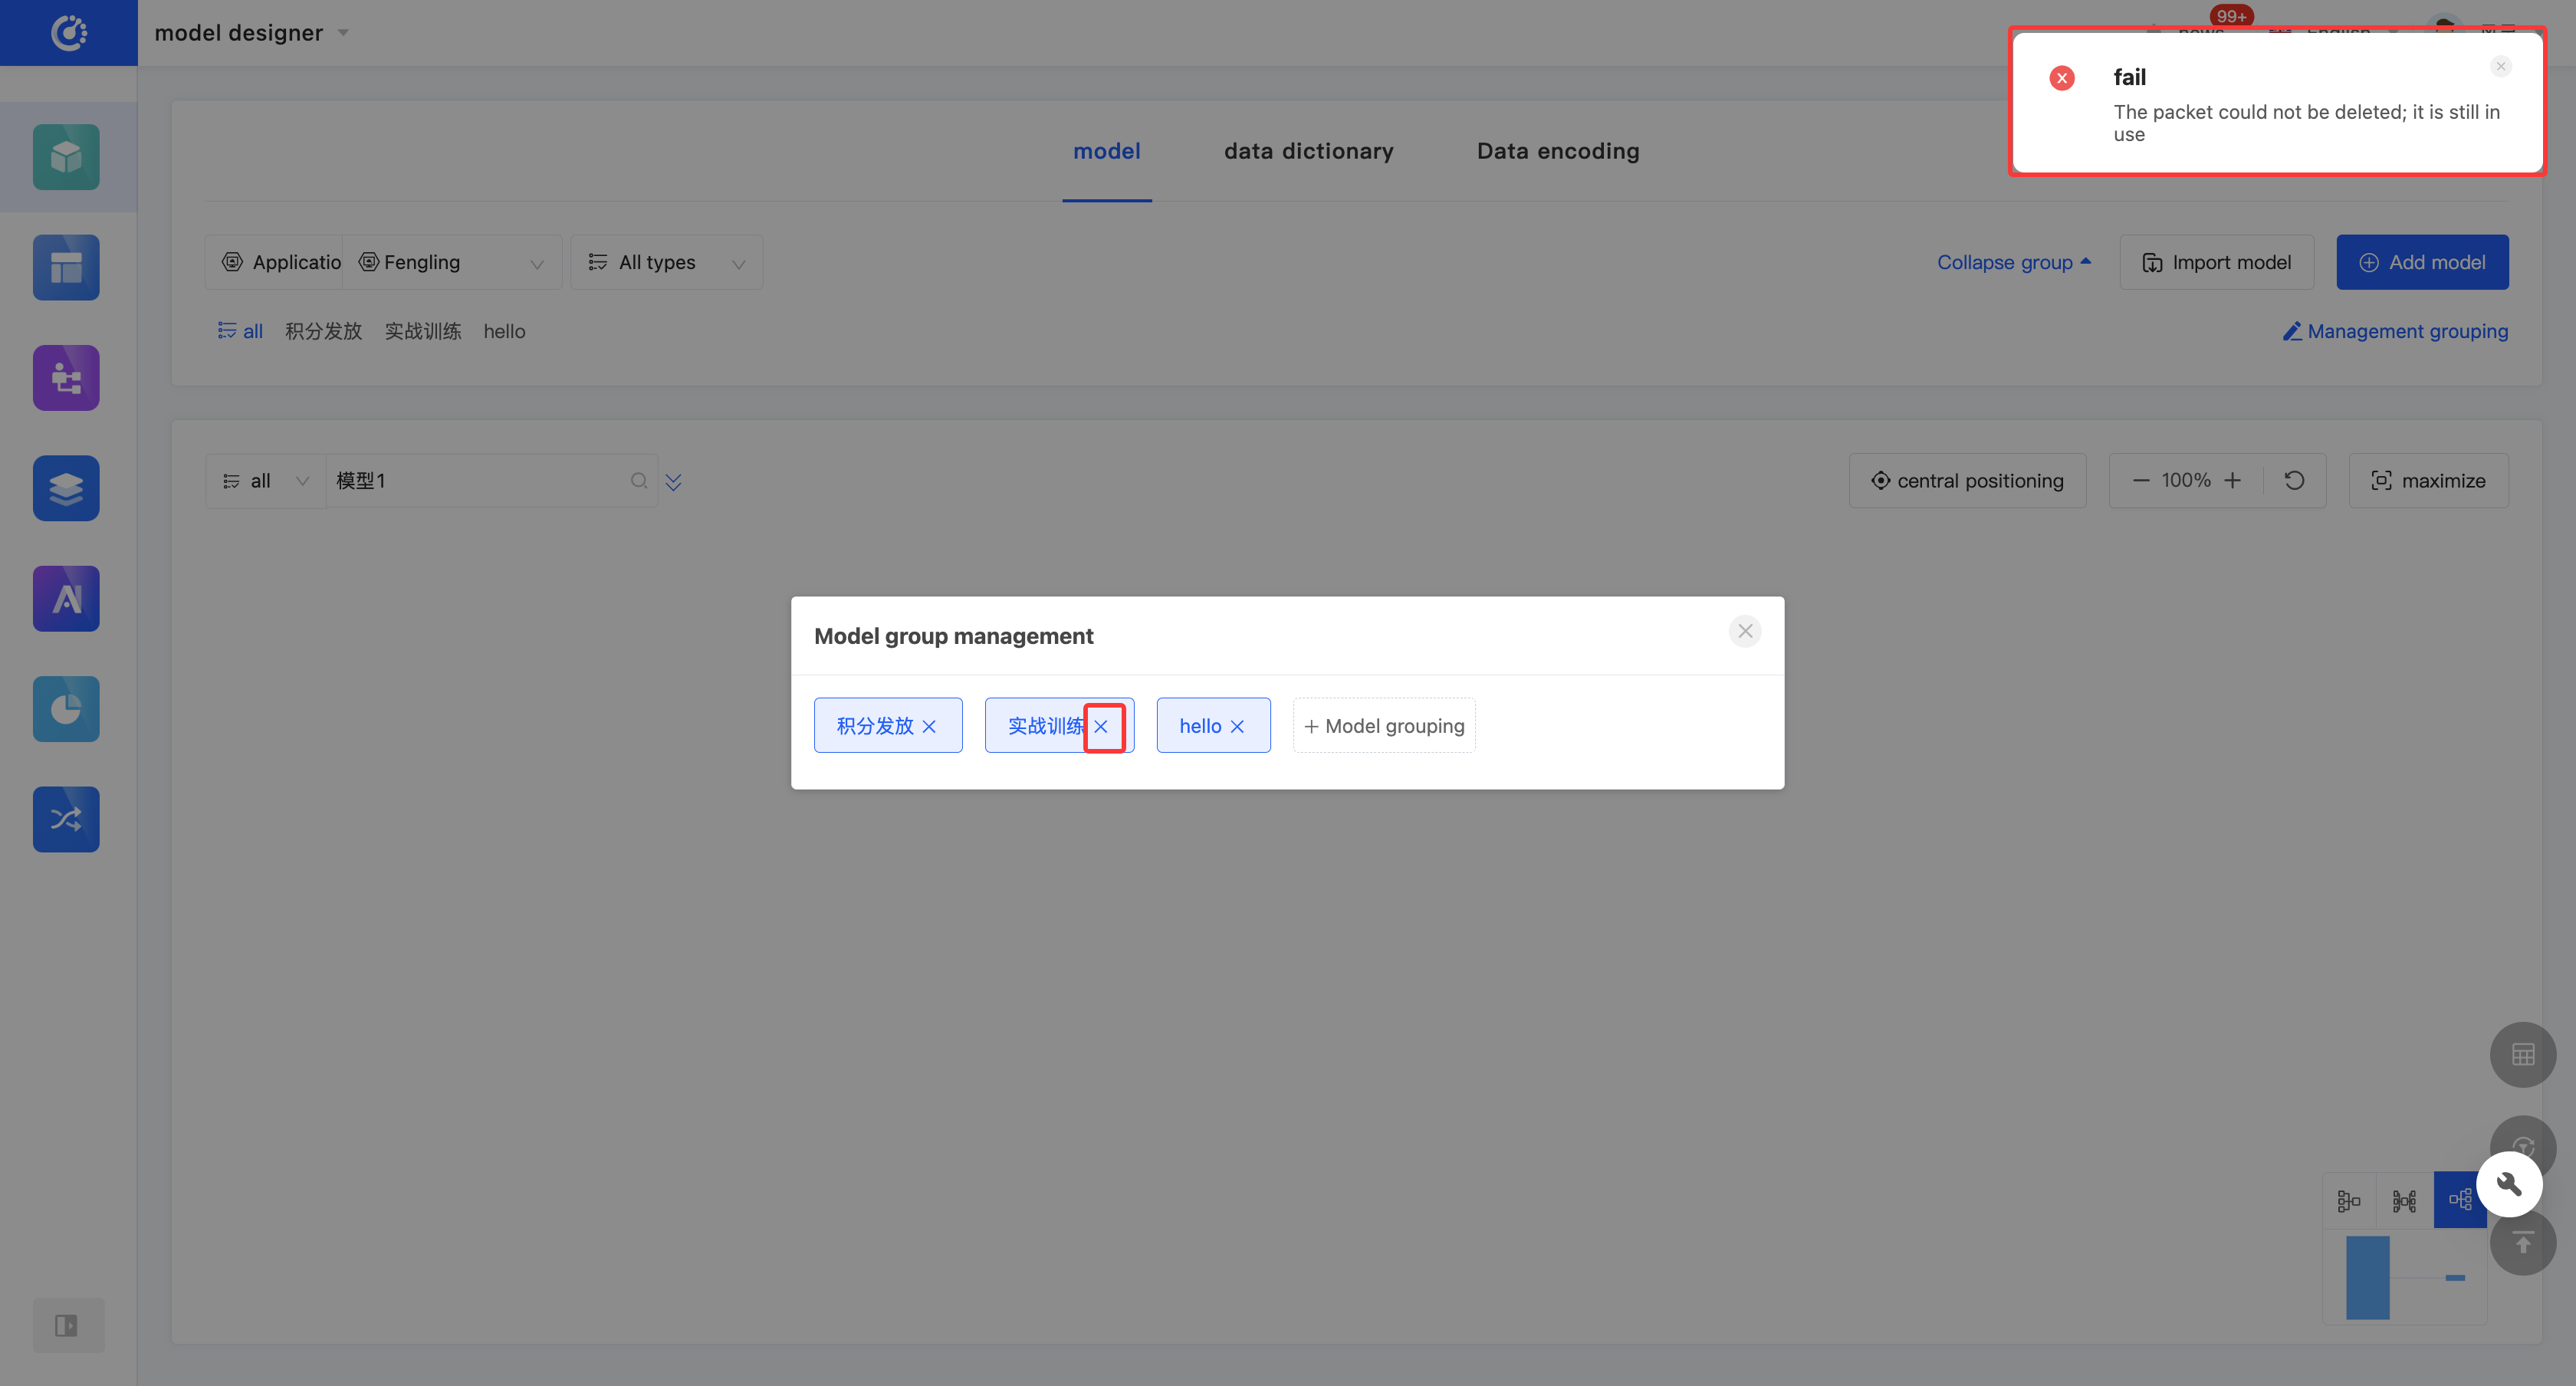
- Delete a Group: Click the "×" after the group to delete the group.
Note
If there are models under the group, it cannot be deleted.
II. Model Management
The Oinone platform takes models as the core starting point. A model serves as a carrier for data and behavior, simplifies the entities to be described in an application, and presents their main features in an appropriate form or rule. A model consists of meta-information, fields, data managers, and custom functions. The designer of this platform adopts a model-driven approach and provides a visual configuration method, enabling users to quickly design models. In the Model Designer, the design process is mainly divided into two parts: model design and field design within the model.
(I) Management Modes
1. Function Introduction
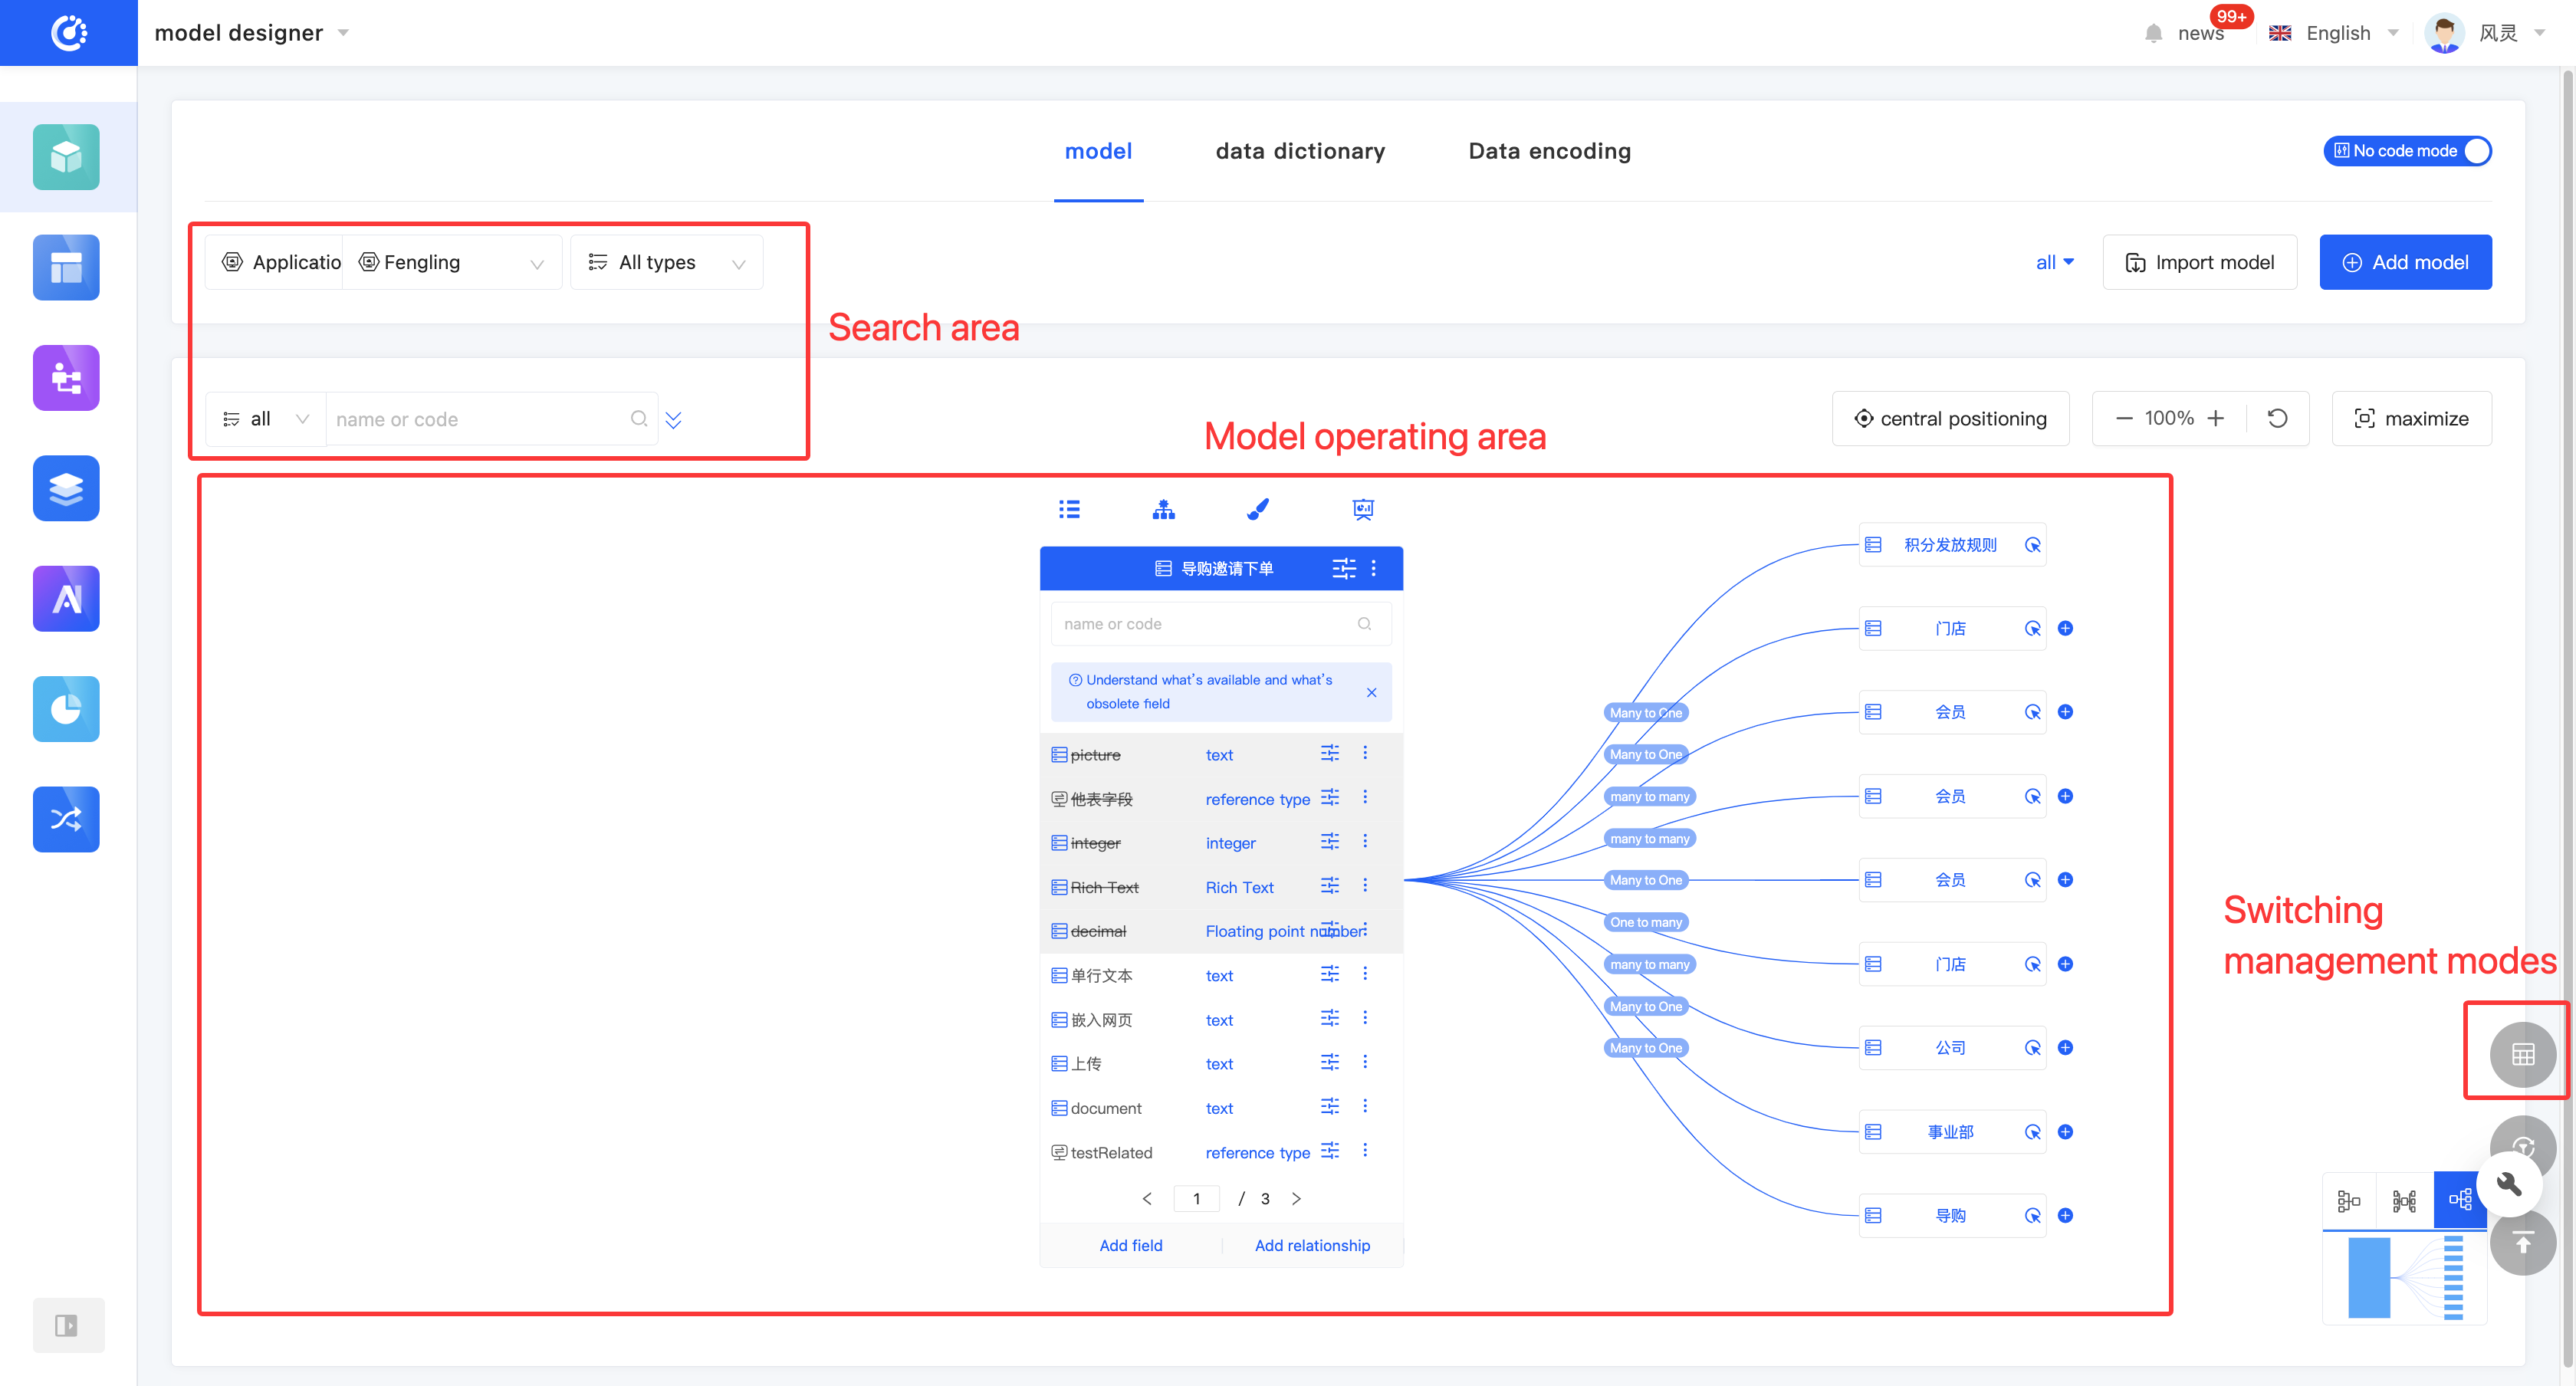
The Model Designer provides a graphical management mode and a list management mode for displaying and managing models (hereinafter referred to as the graphical mode and the tabular mode).
You can switch to different management modes according to different usage scenarios:
- Graphical Mode: Displays the current model and the relationship diagram of models directly related to the current model in the model operation area. It can be used when you focus on the model relationship.
- Tabular Mode: Displays detailed model information and field information. You can quickly switch between different models in the model list. It can be used when you focus on the basic information of models.
2. Operation Method
Click the "Switch Management Mode" icon in the lower right corner of the page to switch between different modes.

(II) Filtering
1. Function Introduction
According to actual needs, you can customize the filtering conditions for applications/modules, model types, and group settings to accurately filter models. It supports clearing all filtering conditions with one click. Under the current filtering conditions, you can expand the model list to switch between different models; after switching the model, the model operation area will be synchronously switched.
Note
When you select an application/module filter option in the drop-down list, it only provides a preliminary filter for the applications or modules on the platform. In the actual filtering operation, you still need to further select a specific application or module to complete the configuration. Similarly, only when all filter options are correctly configured can the correct models be filtered out.
2. Operation Method
- Select or enter conditions in the filtering area to filter models.
Tip
In the graphical mode, to maximize the model display area, the model list is hidden by default. When you click anywhere in the model list search area, the model list will be displayed.
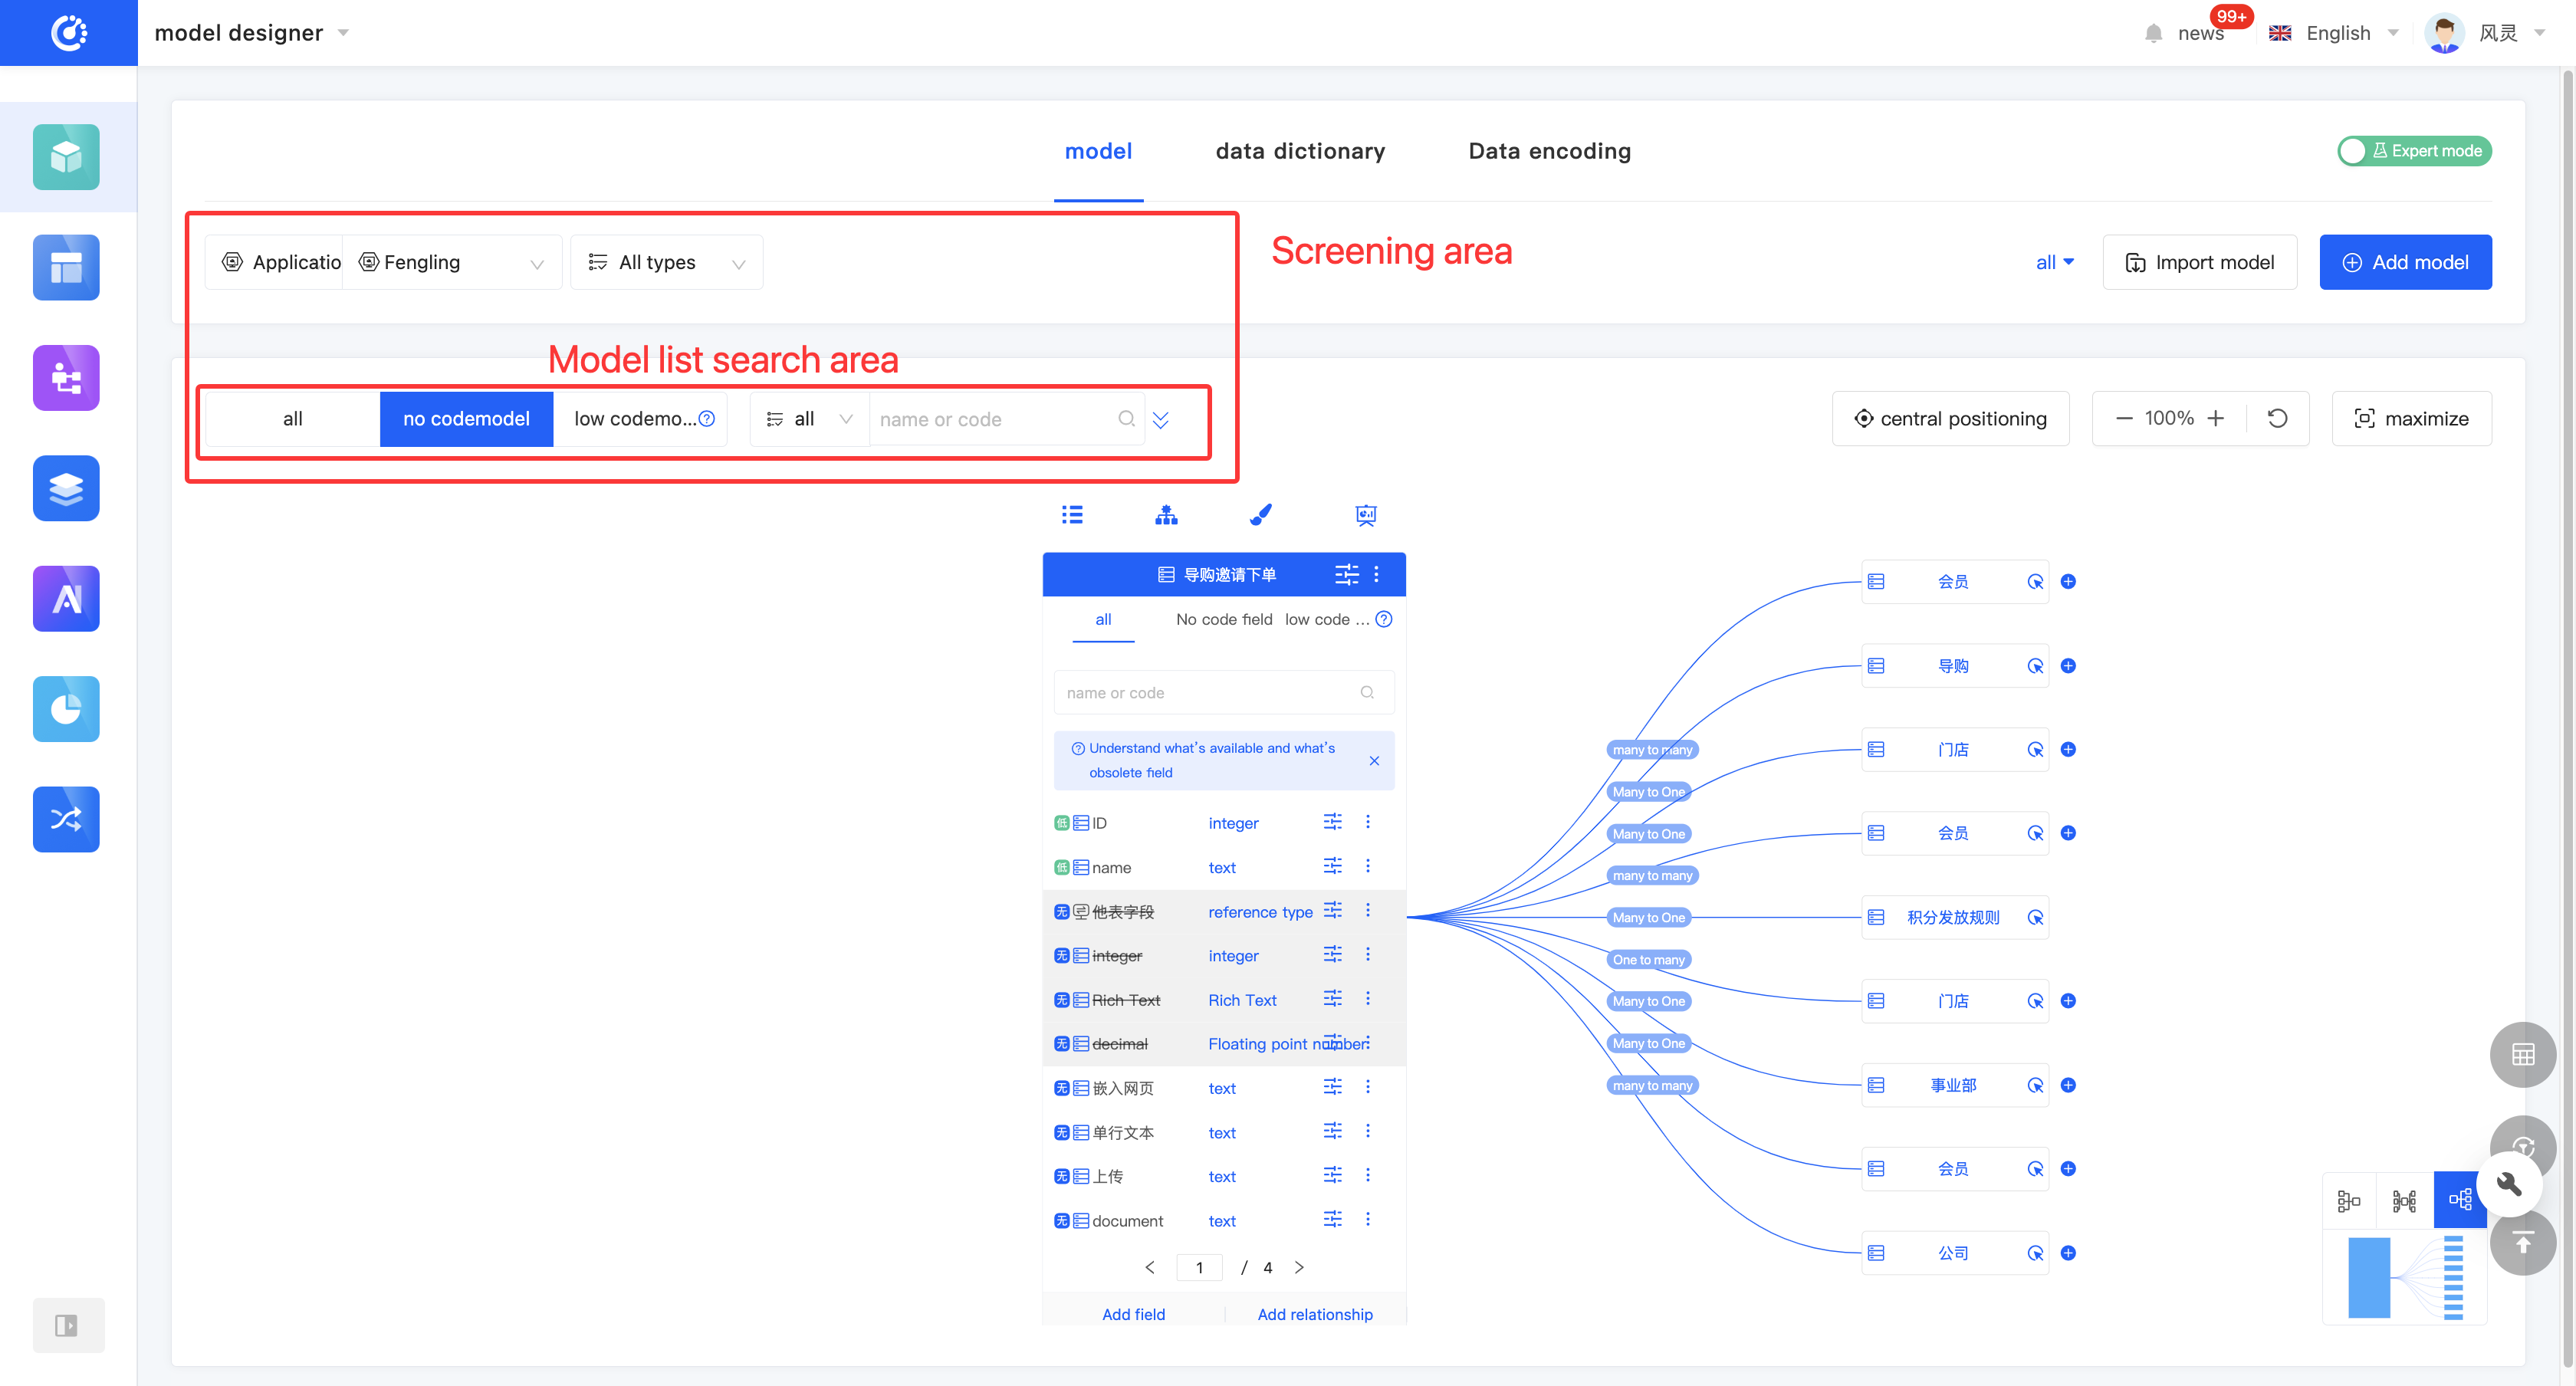

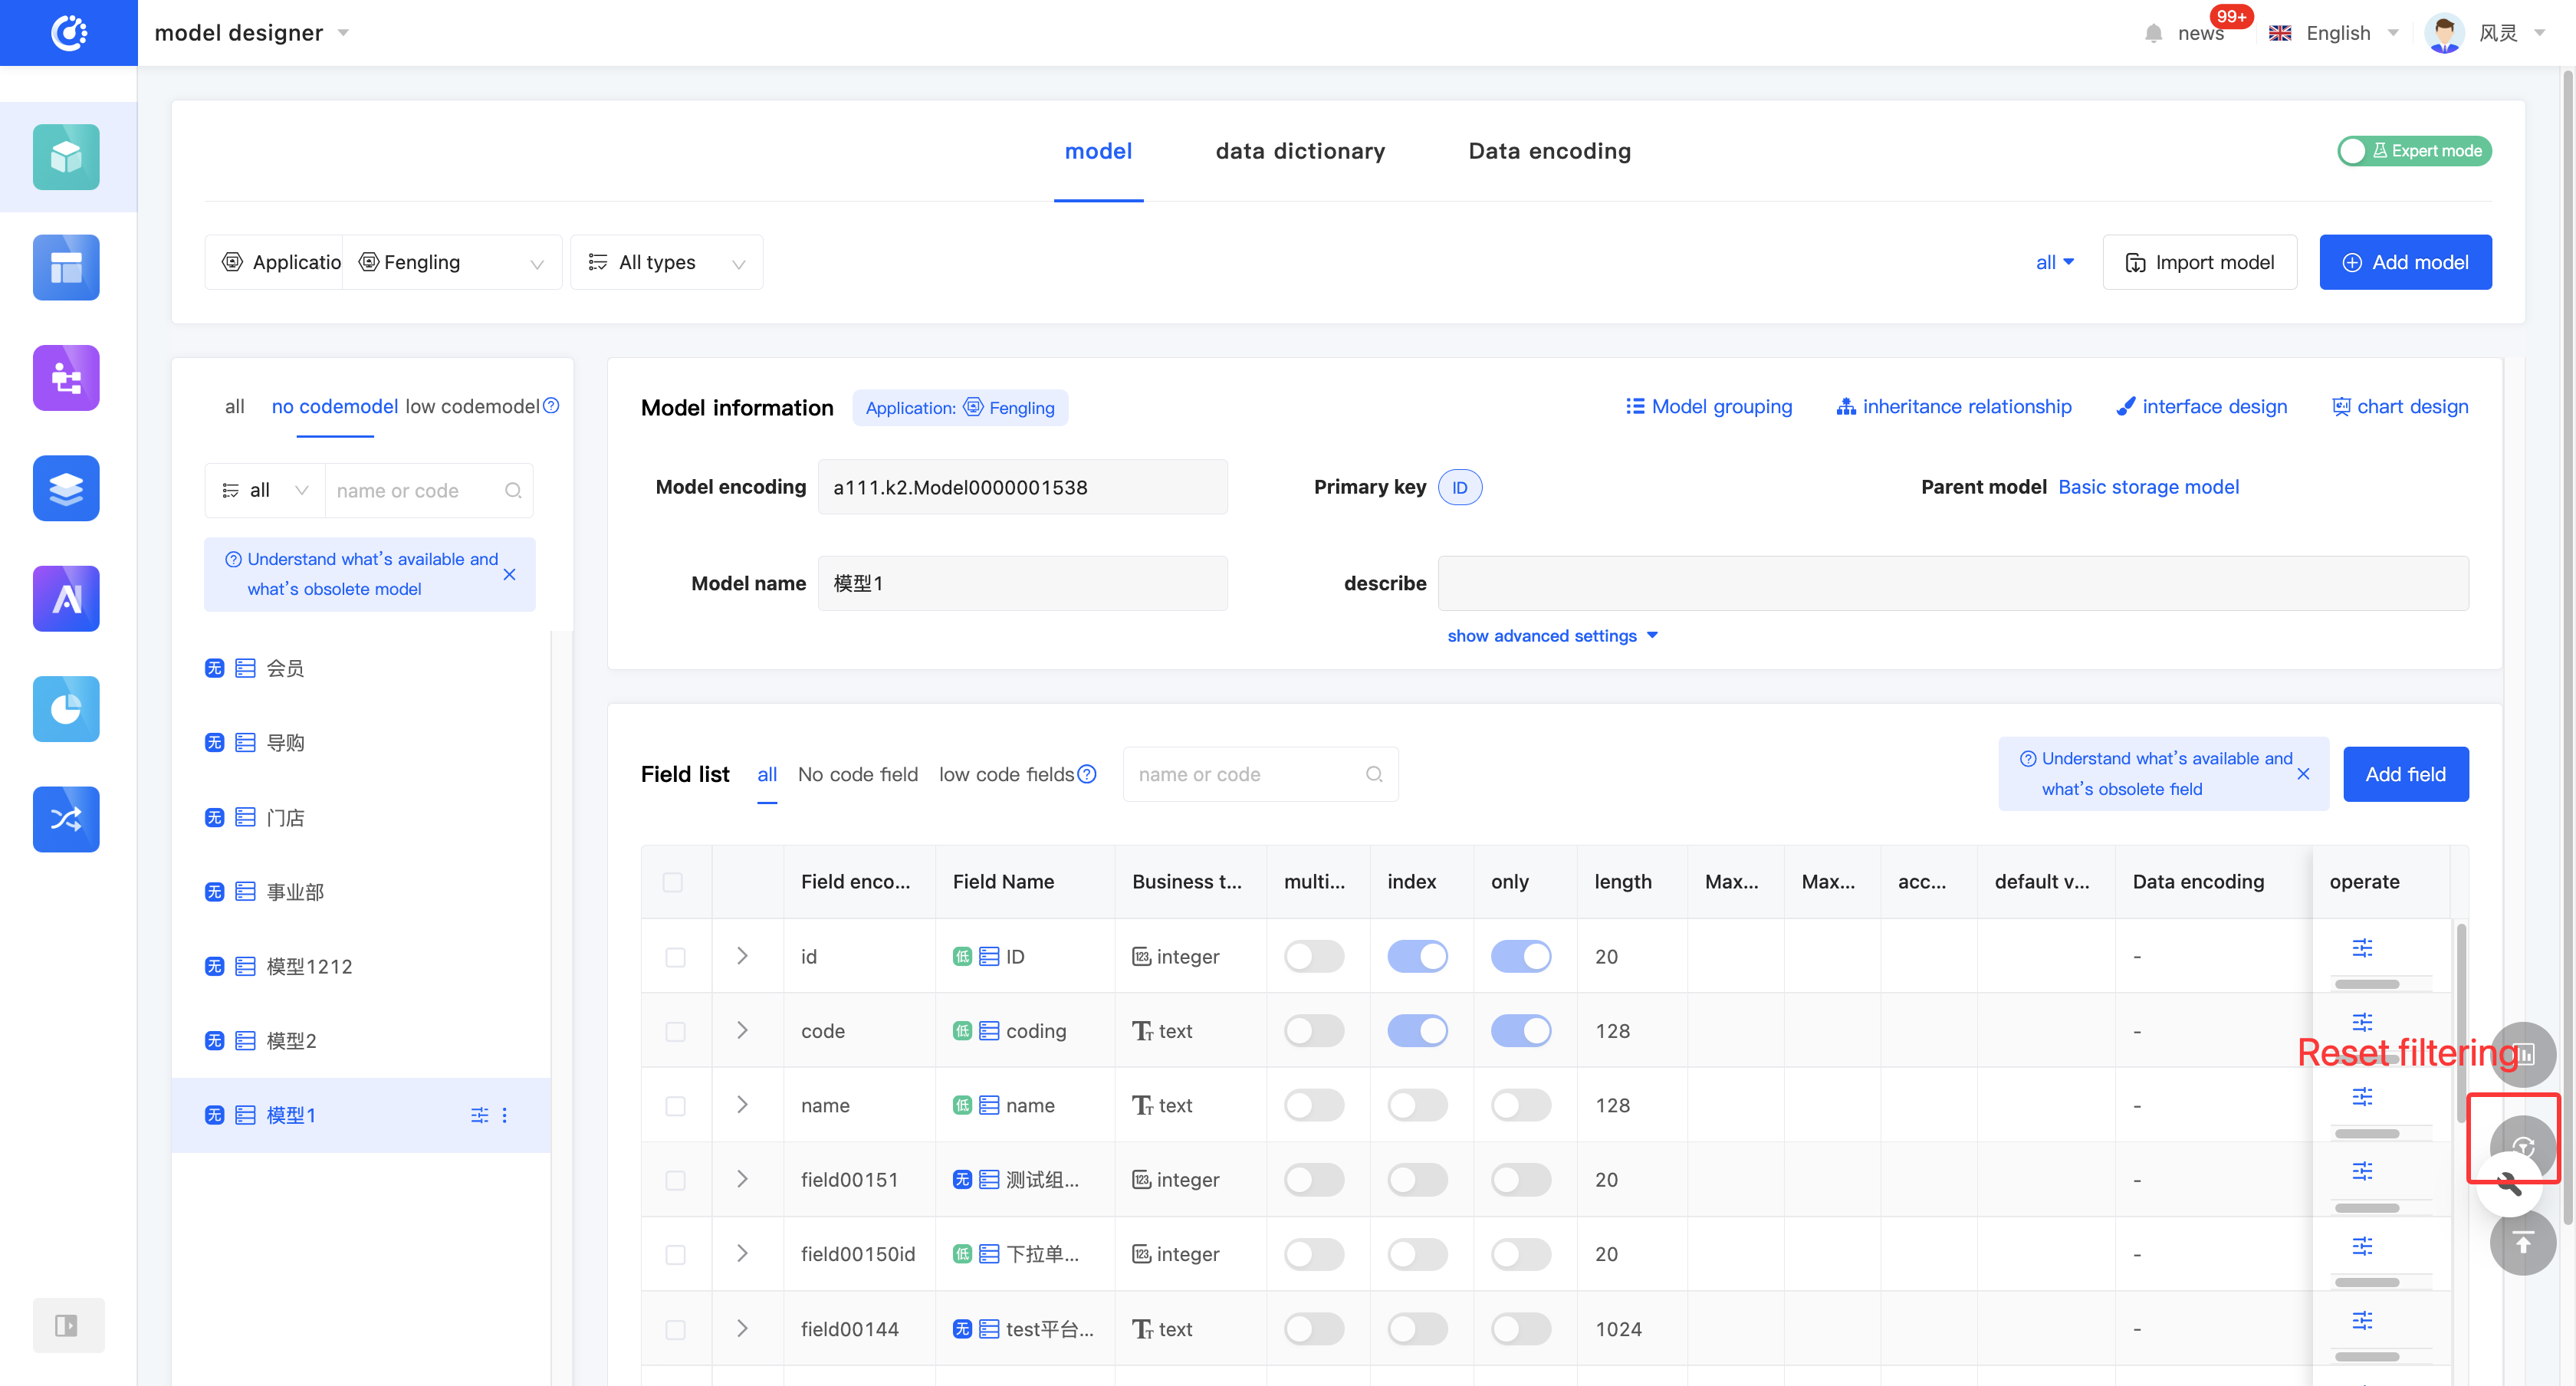
- Clear All: Click "Reset Filter" to clear all existing filtering conditions.
(III) Import Models
1. Function Introduction
Importing models is an efficient way to add models. You can download the import template provided by the platform, fill in the relevant information according to the established rules, and then import the file into the system to quickly complete the addition of models.
- Import Template: The platform provides import templates for models. Different templates are provided for different operation modes, and you can switch the operation mode.
Note
The import templates provided in the no-code mode and the expert mode are different:
- In the no-code mode, the template only provides basic model information, with a small amount and is easy to fill in.
- In the expert mode, the template provides rich model information, with detailed content and more professional information.
- Import Instructions: It elaborates on the meaning and filling rules of each item in the import template, which can help users fill in the import file accurately. Corresponding import instructions are provided according to different operation modes to ensure that users can successfully complete the import process.
- Upload File: Only files with the extensions .xlsx, .xls, and .xlsm are supported.
Note
When uploading a file, you should upload a file corresponding to the current operation mode.
2. Operation Method
- Click "Import Models" and select the application to which the models belong.

- Click the "Current Mode" button to switch the operation mode.
- Click "Click to Download the Import Model Template" to download the import template for the corresponding mode.
- Click "Import Instructions" to view the import instructions for the corresponding mode.
- Click "Click to Upload" or drag the file to the specified location to upload the file.

(IV) Add a Model
1. Function Introduction
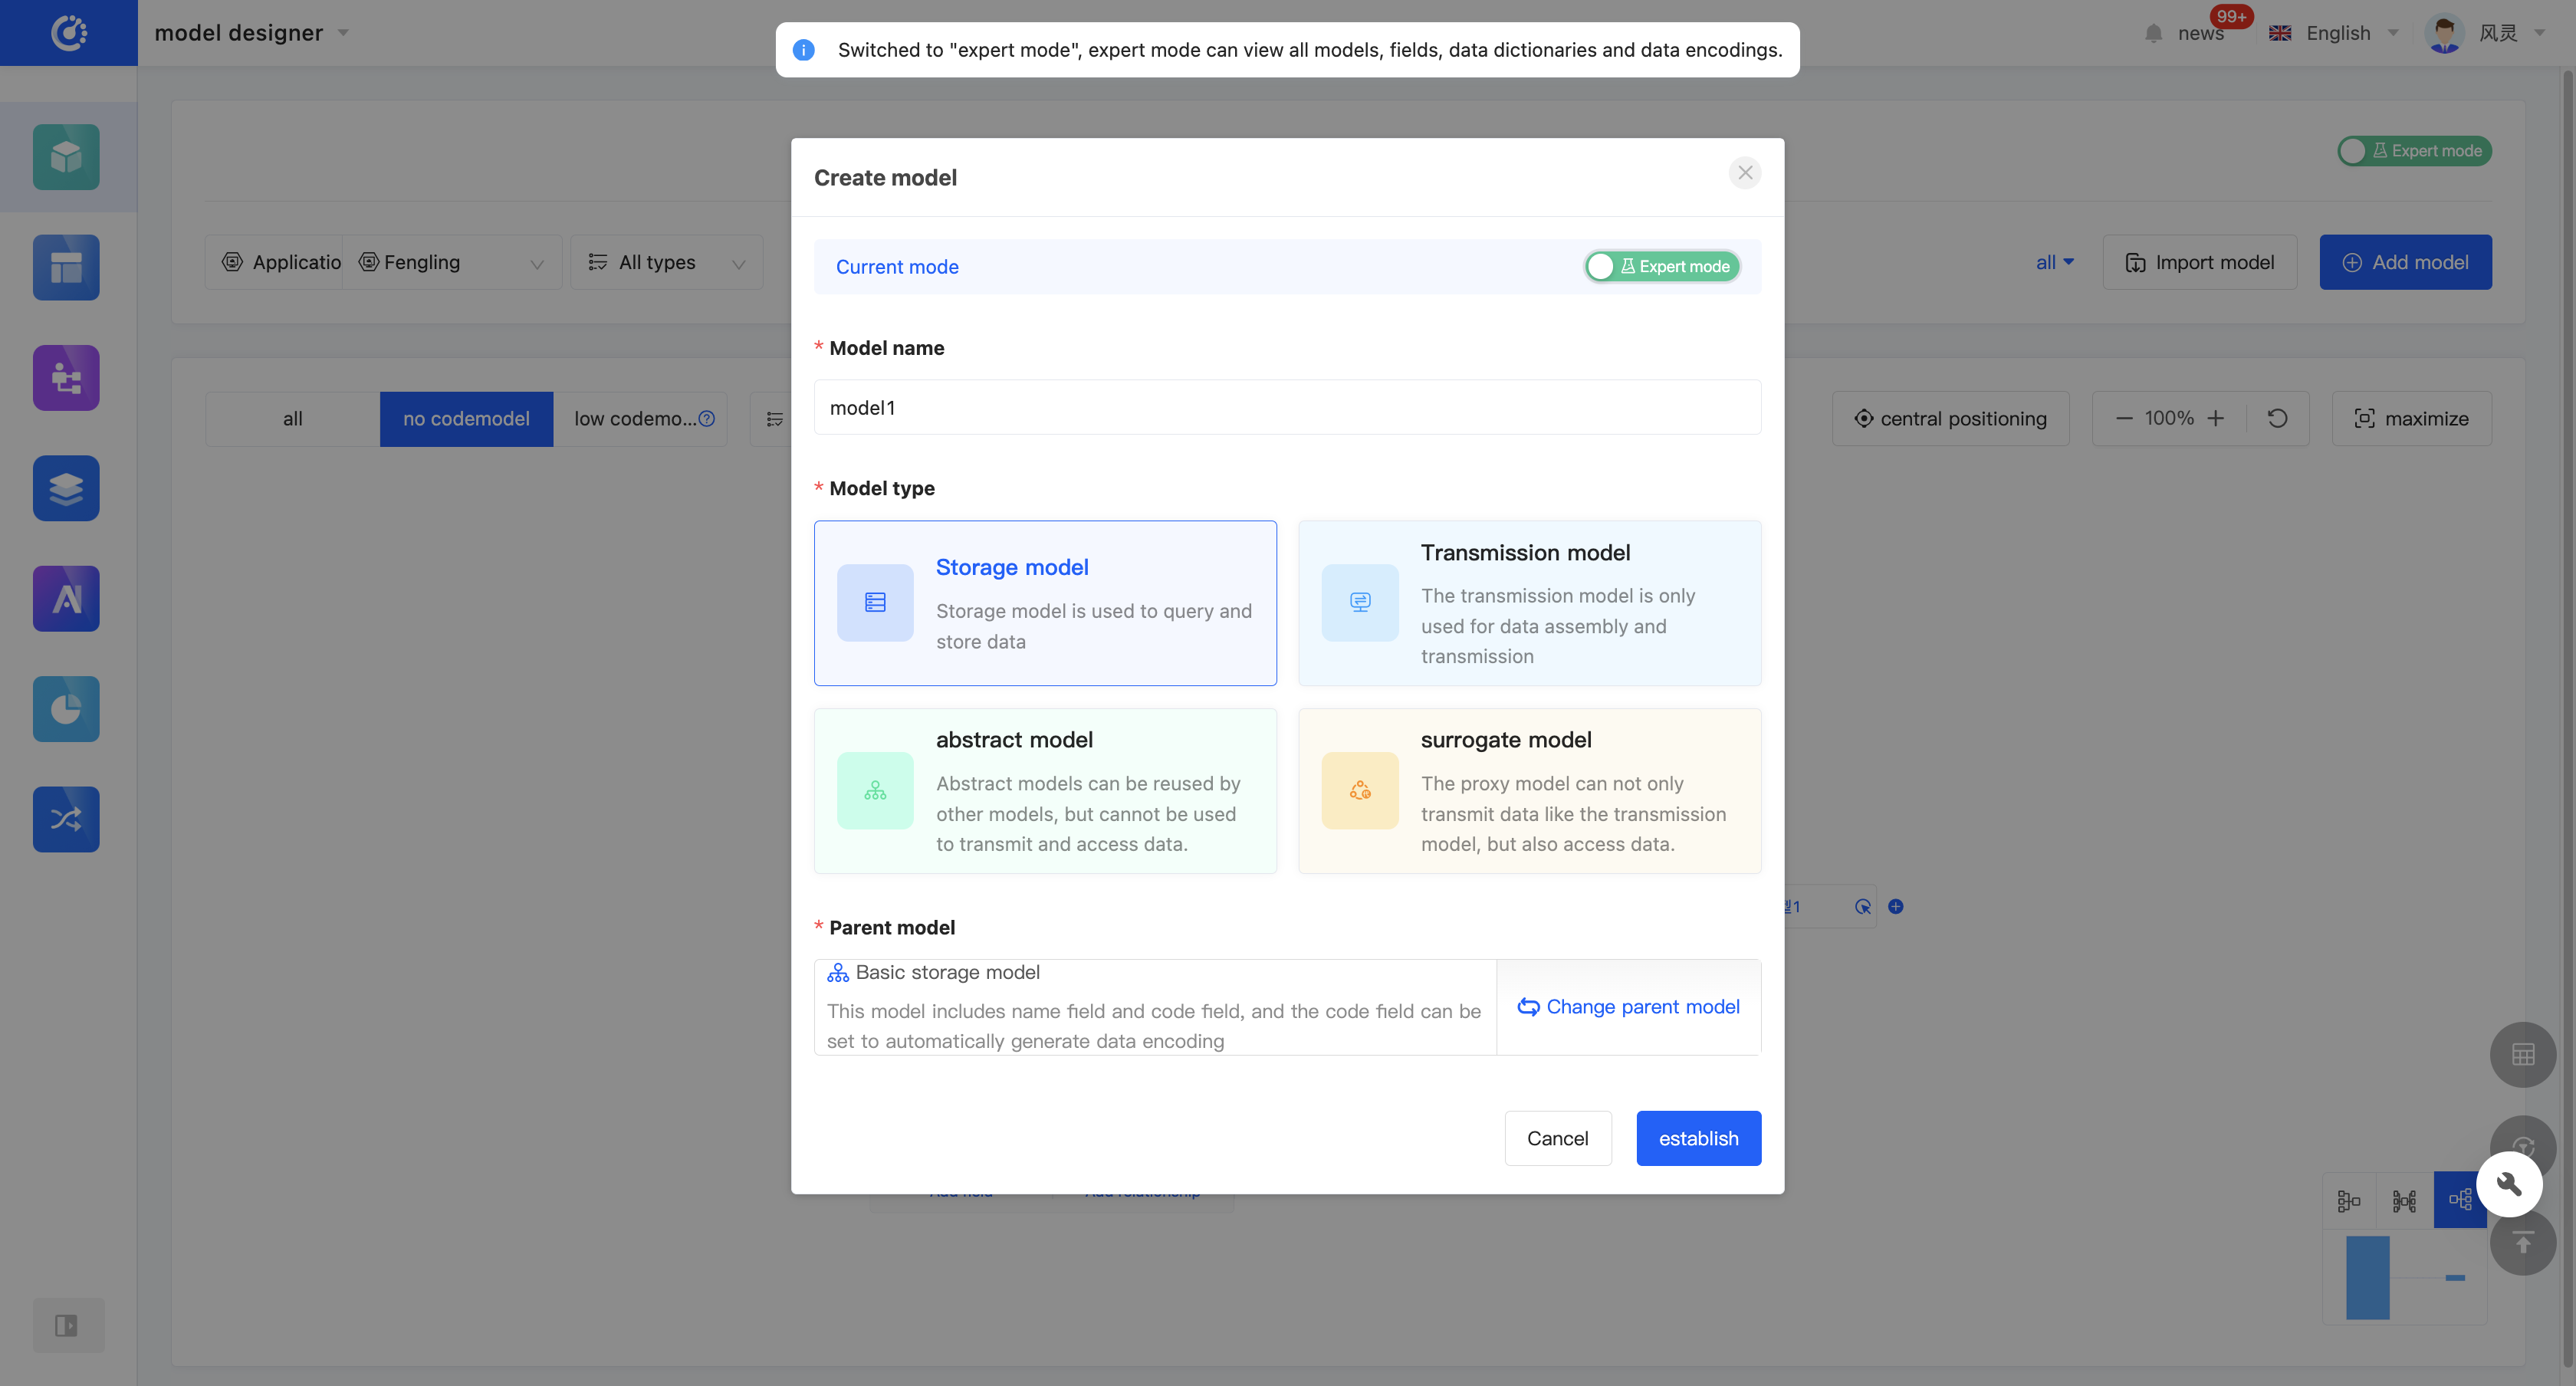
You can create a no-code model through the Model Designer. When creating, you can edit the model name, model type, and parent model (only in the expert mode).
Warning
The model type and parent model cannot be changed after creation. Please fill them in carefully.
In the expert mode, 4 types of models are supported: storage models, transmission models, abstract models, and proxy models (see the appendix: Glossary for details). In the no-code mode, 2 types of models are supported: storage models and transmission models.
In the no-code mode, you do not need to select and the parent model is not displayed; in the expert mode, you must select the parent model.
Note
- The parent model of a storage model is defaulted to the "Basic Storage Model" and can be switched to a visible abstract model or storage model.
- The parent model of a transmission model is defaulted to the "Basic Transmission Model" and can be switched to a visible transmission model.
- The parent model of an abstract model is defaulted to the "Basic Storage Model" and can be switched to a visible abstract model.
- The parent model of a proxy model has no default value and needs to be specified by yourself. It can be switched to a visible storage model or proxy model.
2. Operation Method
Click "Add a Model", select the application/module to which the model belongs, and click "Add". A pop-up window will appear. After filling in the information, click "Create" to successfully create the model.

(V) Edit a Model
1. Function Introduction
Successfully created models can be edited.
Note
Only some information can be modified. Some information is fixed at the time of creation, so please fill it in carefully when creating.
2. Operation Method
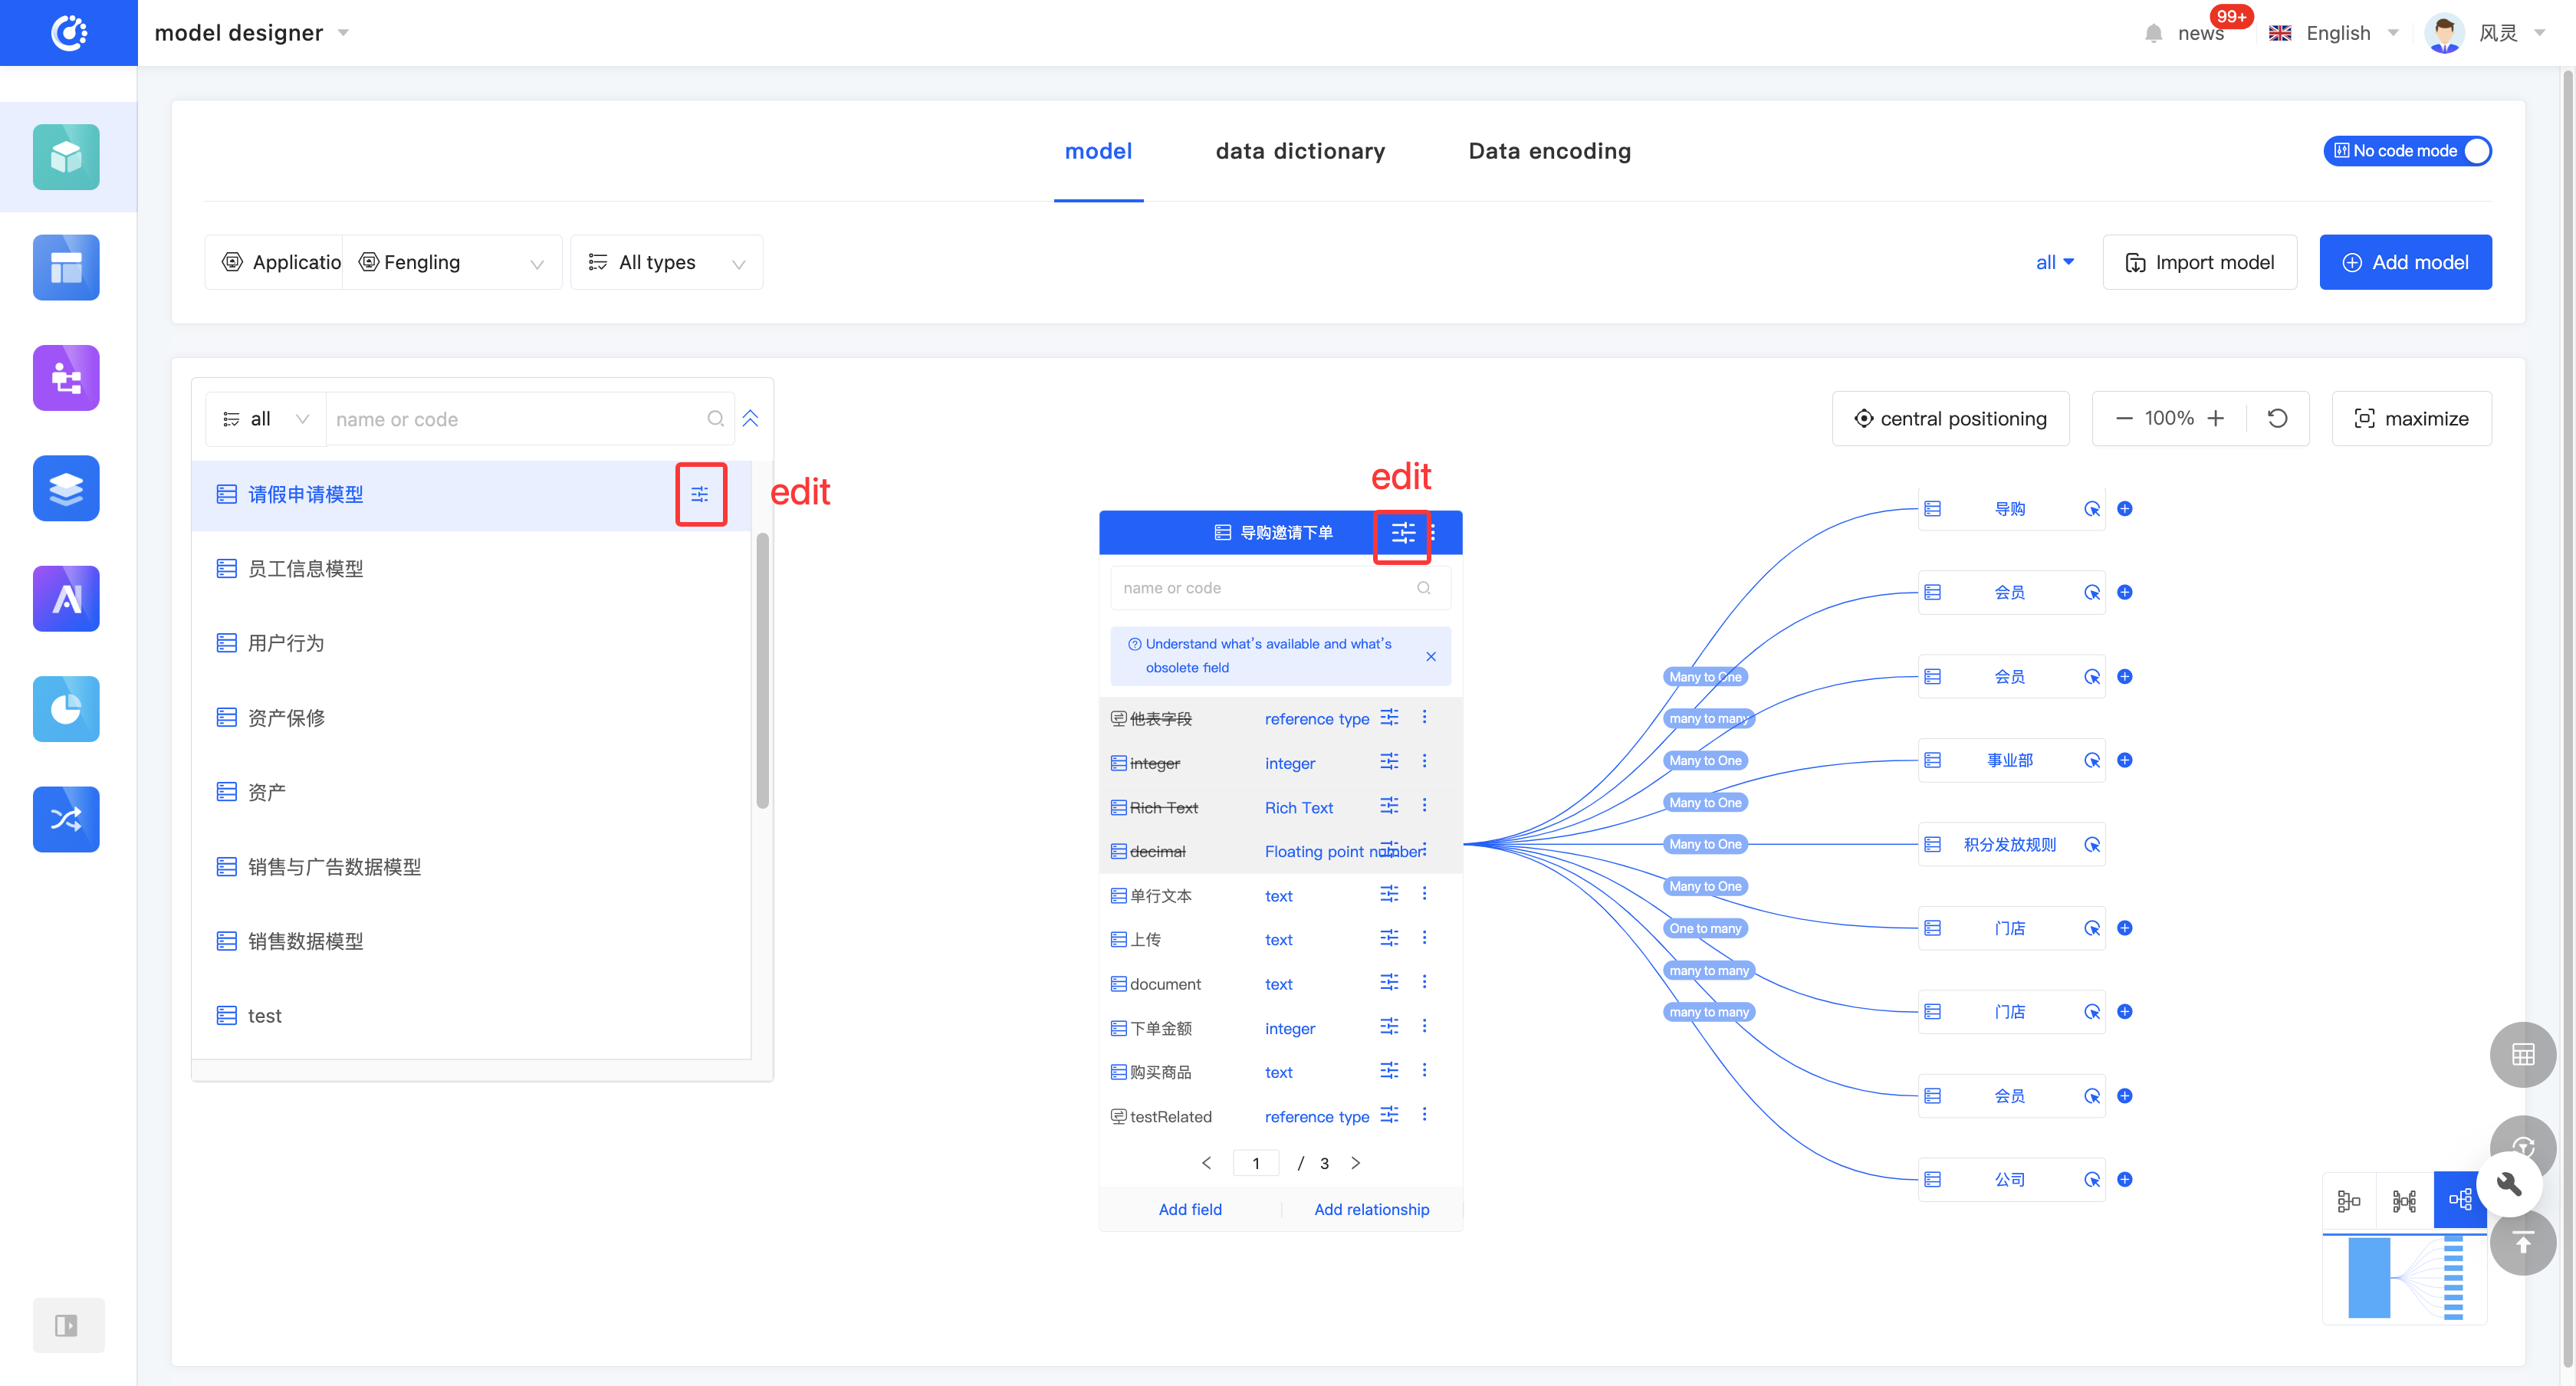
- In the graphical mode, click the "Edit" icon on the right side of the model, or expand the model list and click the "Edit" icon. Then, you can edit the model in the edit page that pops up on the right side of the page.
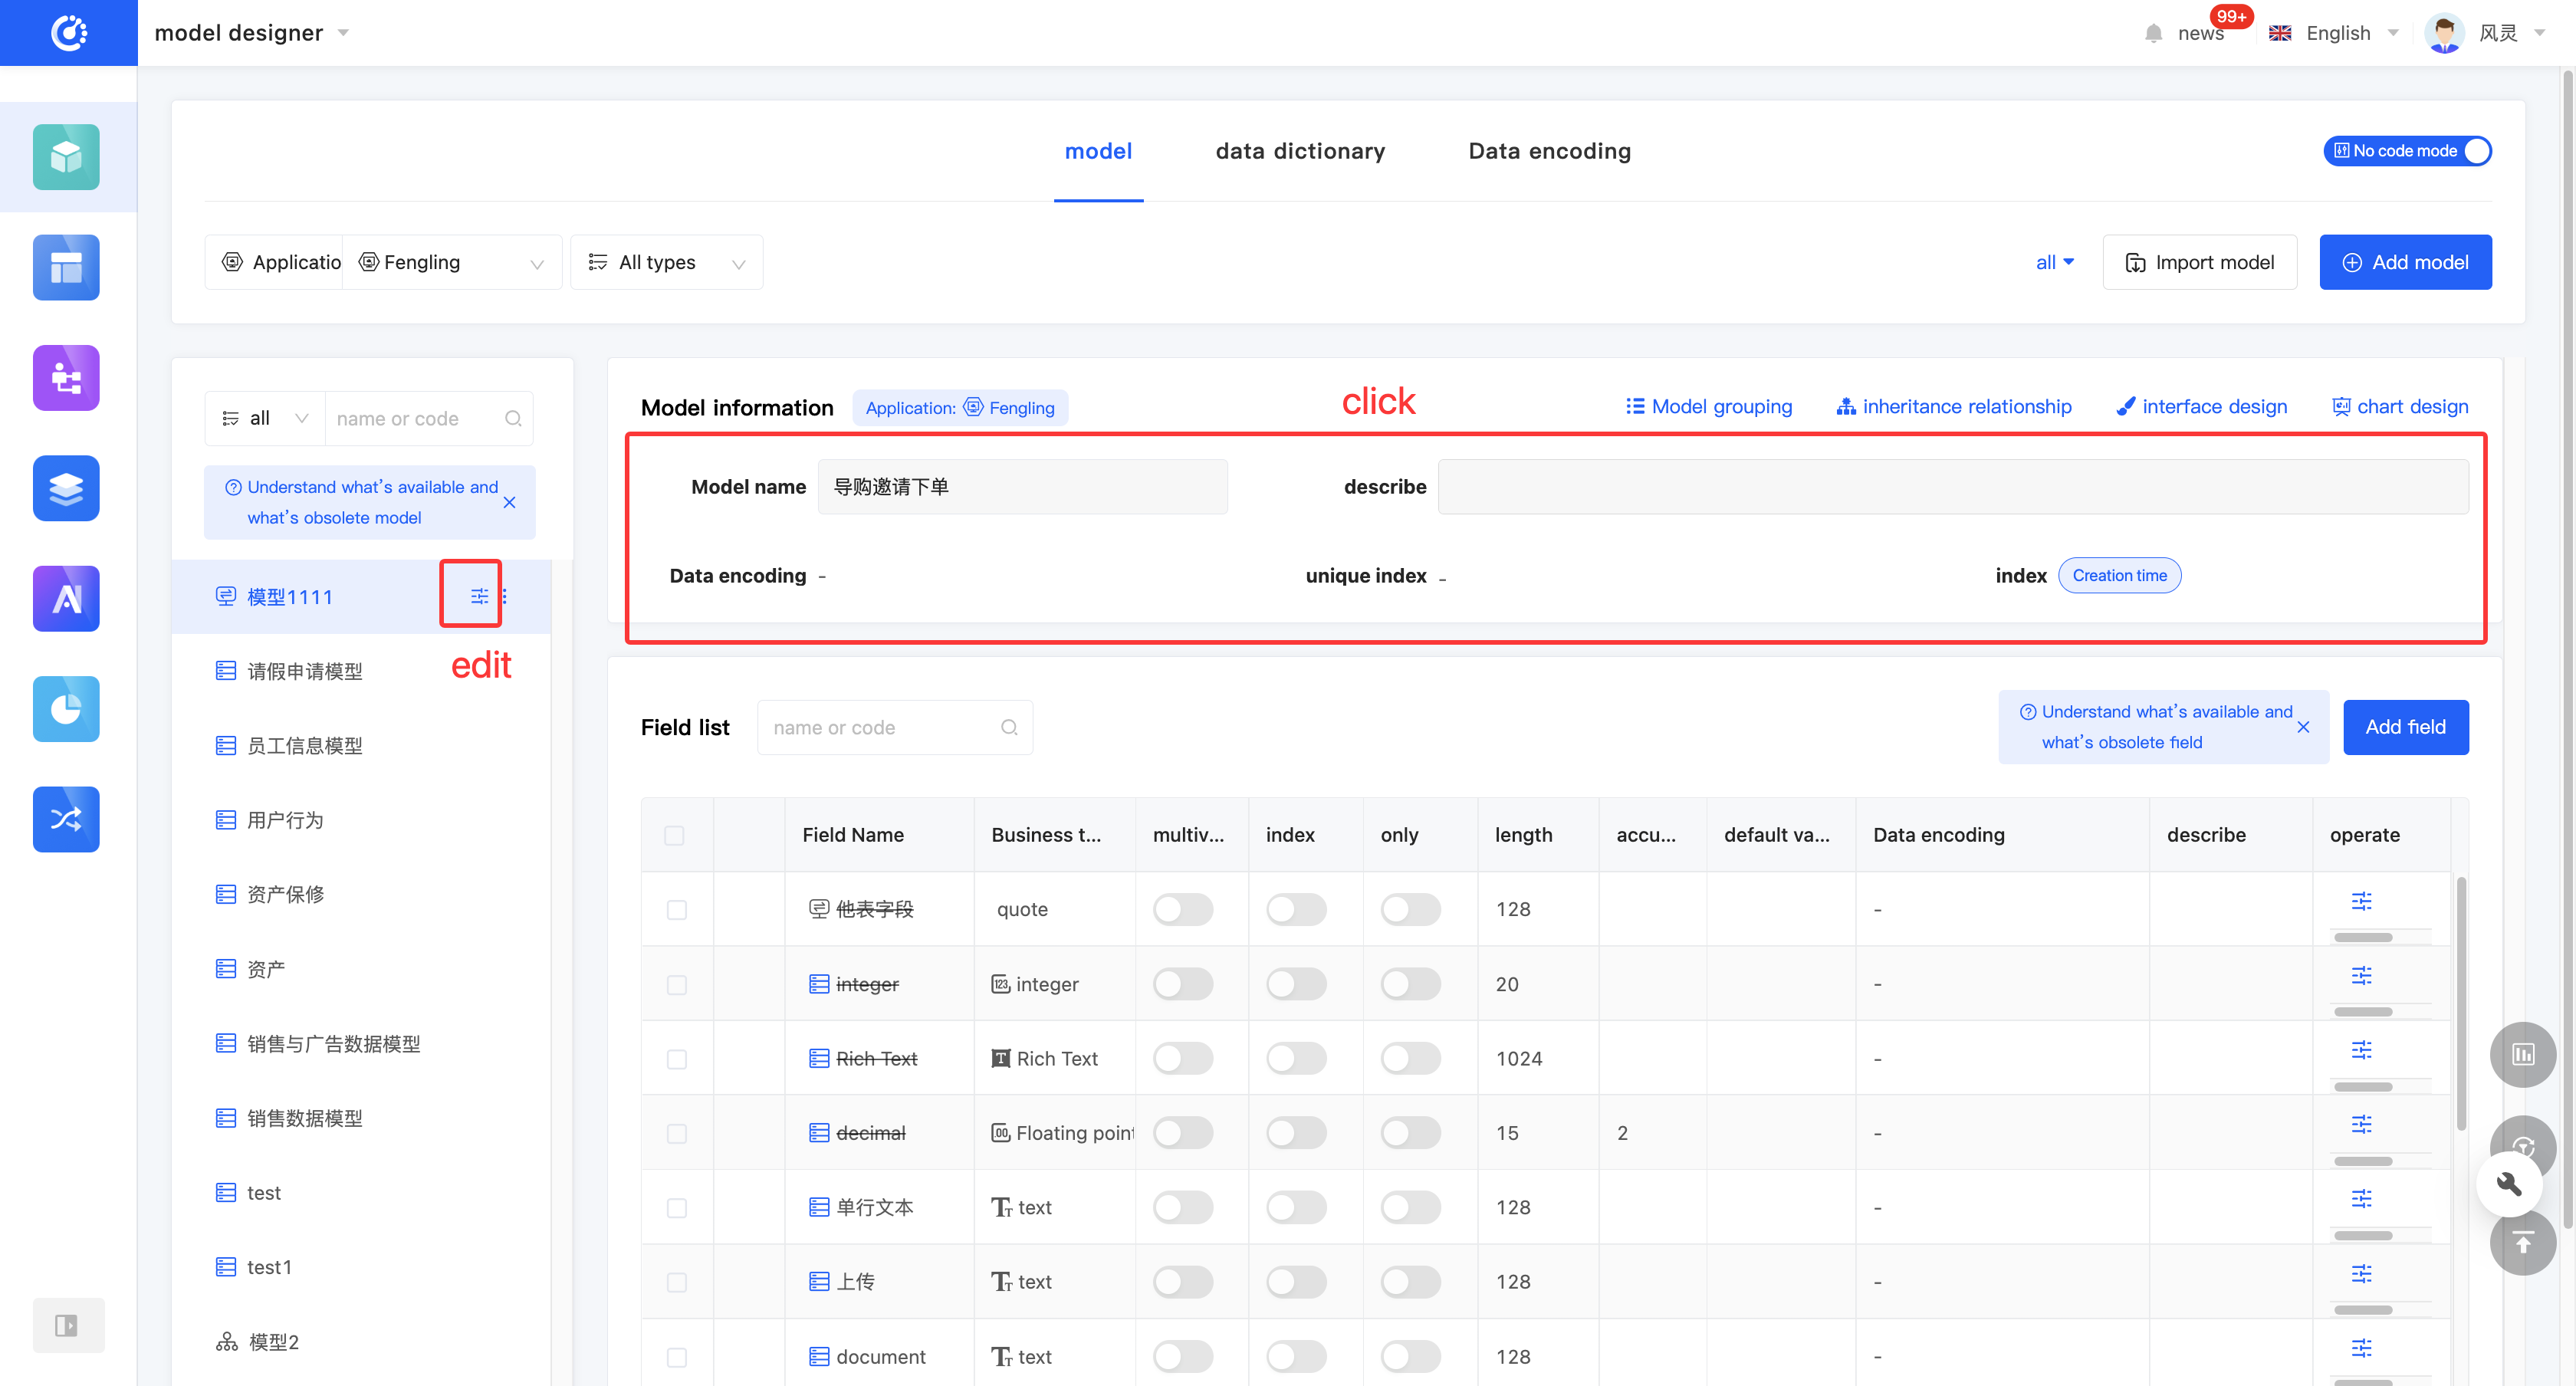
- In the tabular mode, directly click the model information to be edited, or click the "Edit" icon in the model list to edit the model.
(VI) Model Grouping
1. Function Introduction
Each model can be assigned to a group. After setting, when filtering by group, the model will be displayed under the assigned group.
Tip
After a model is successfully added, it has no assigned group by default. If you select a group when adding a model, the model will be directly added to that group after successful creation.
2. Operation Method
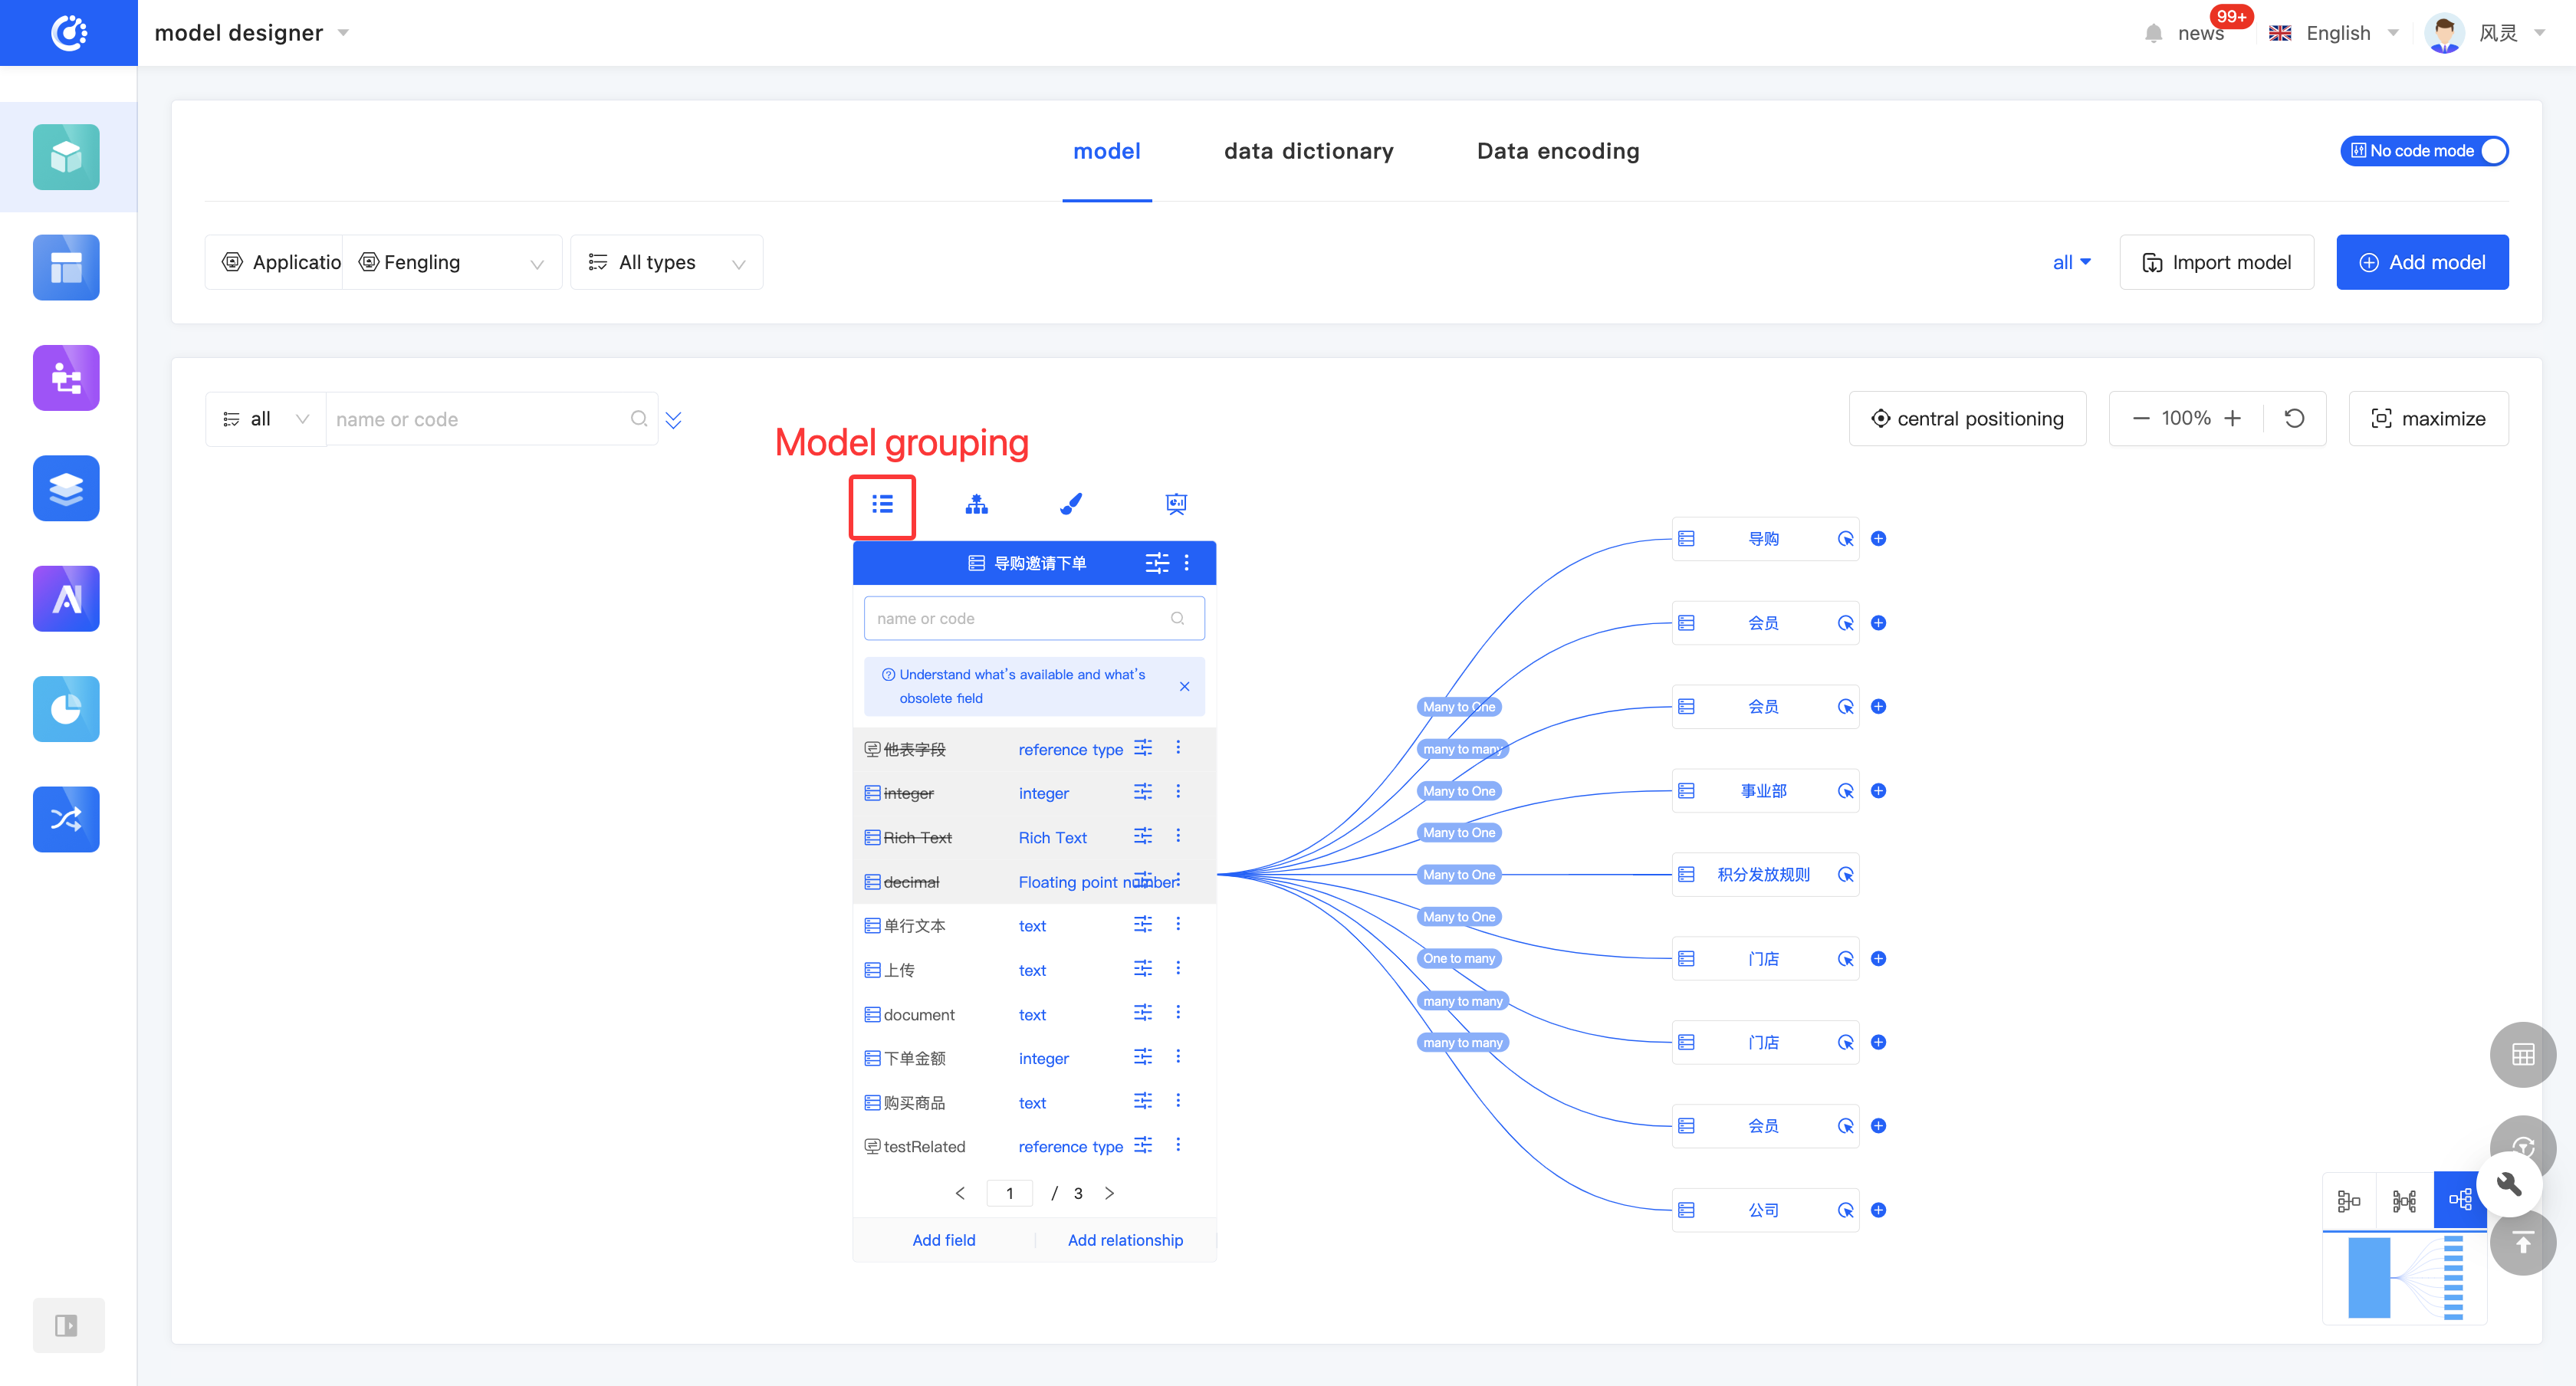
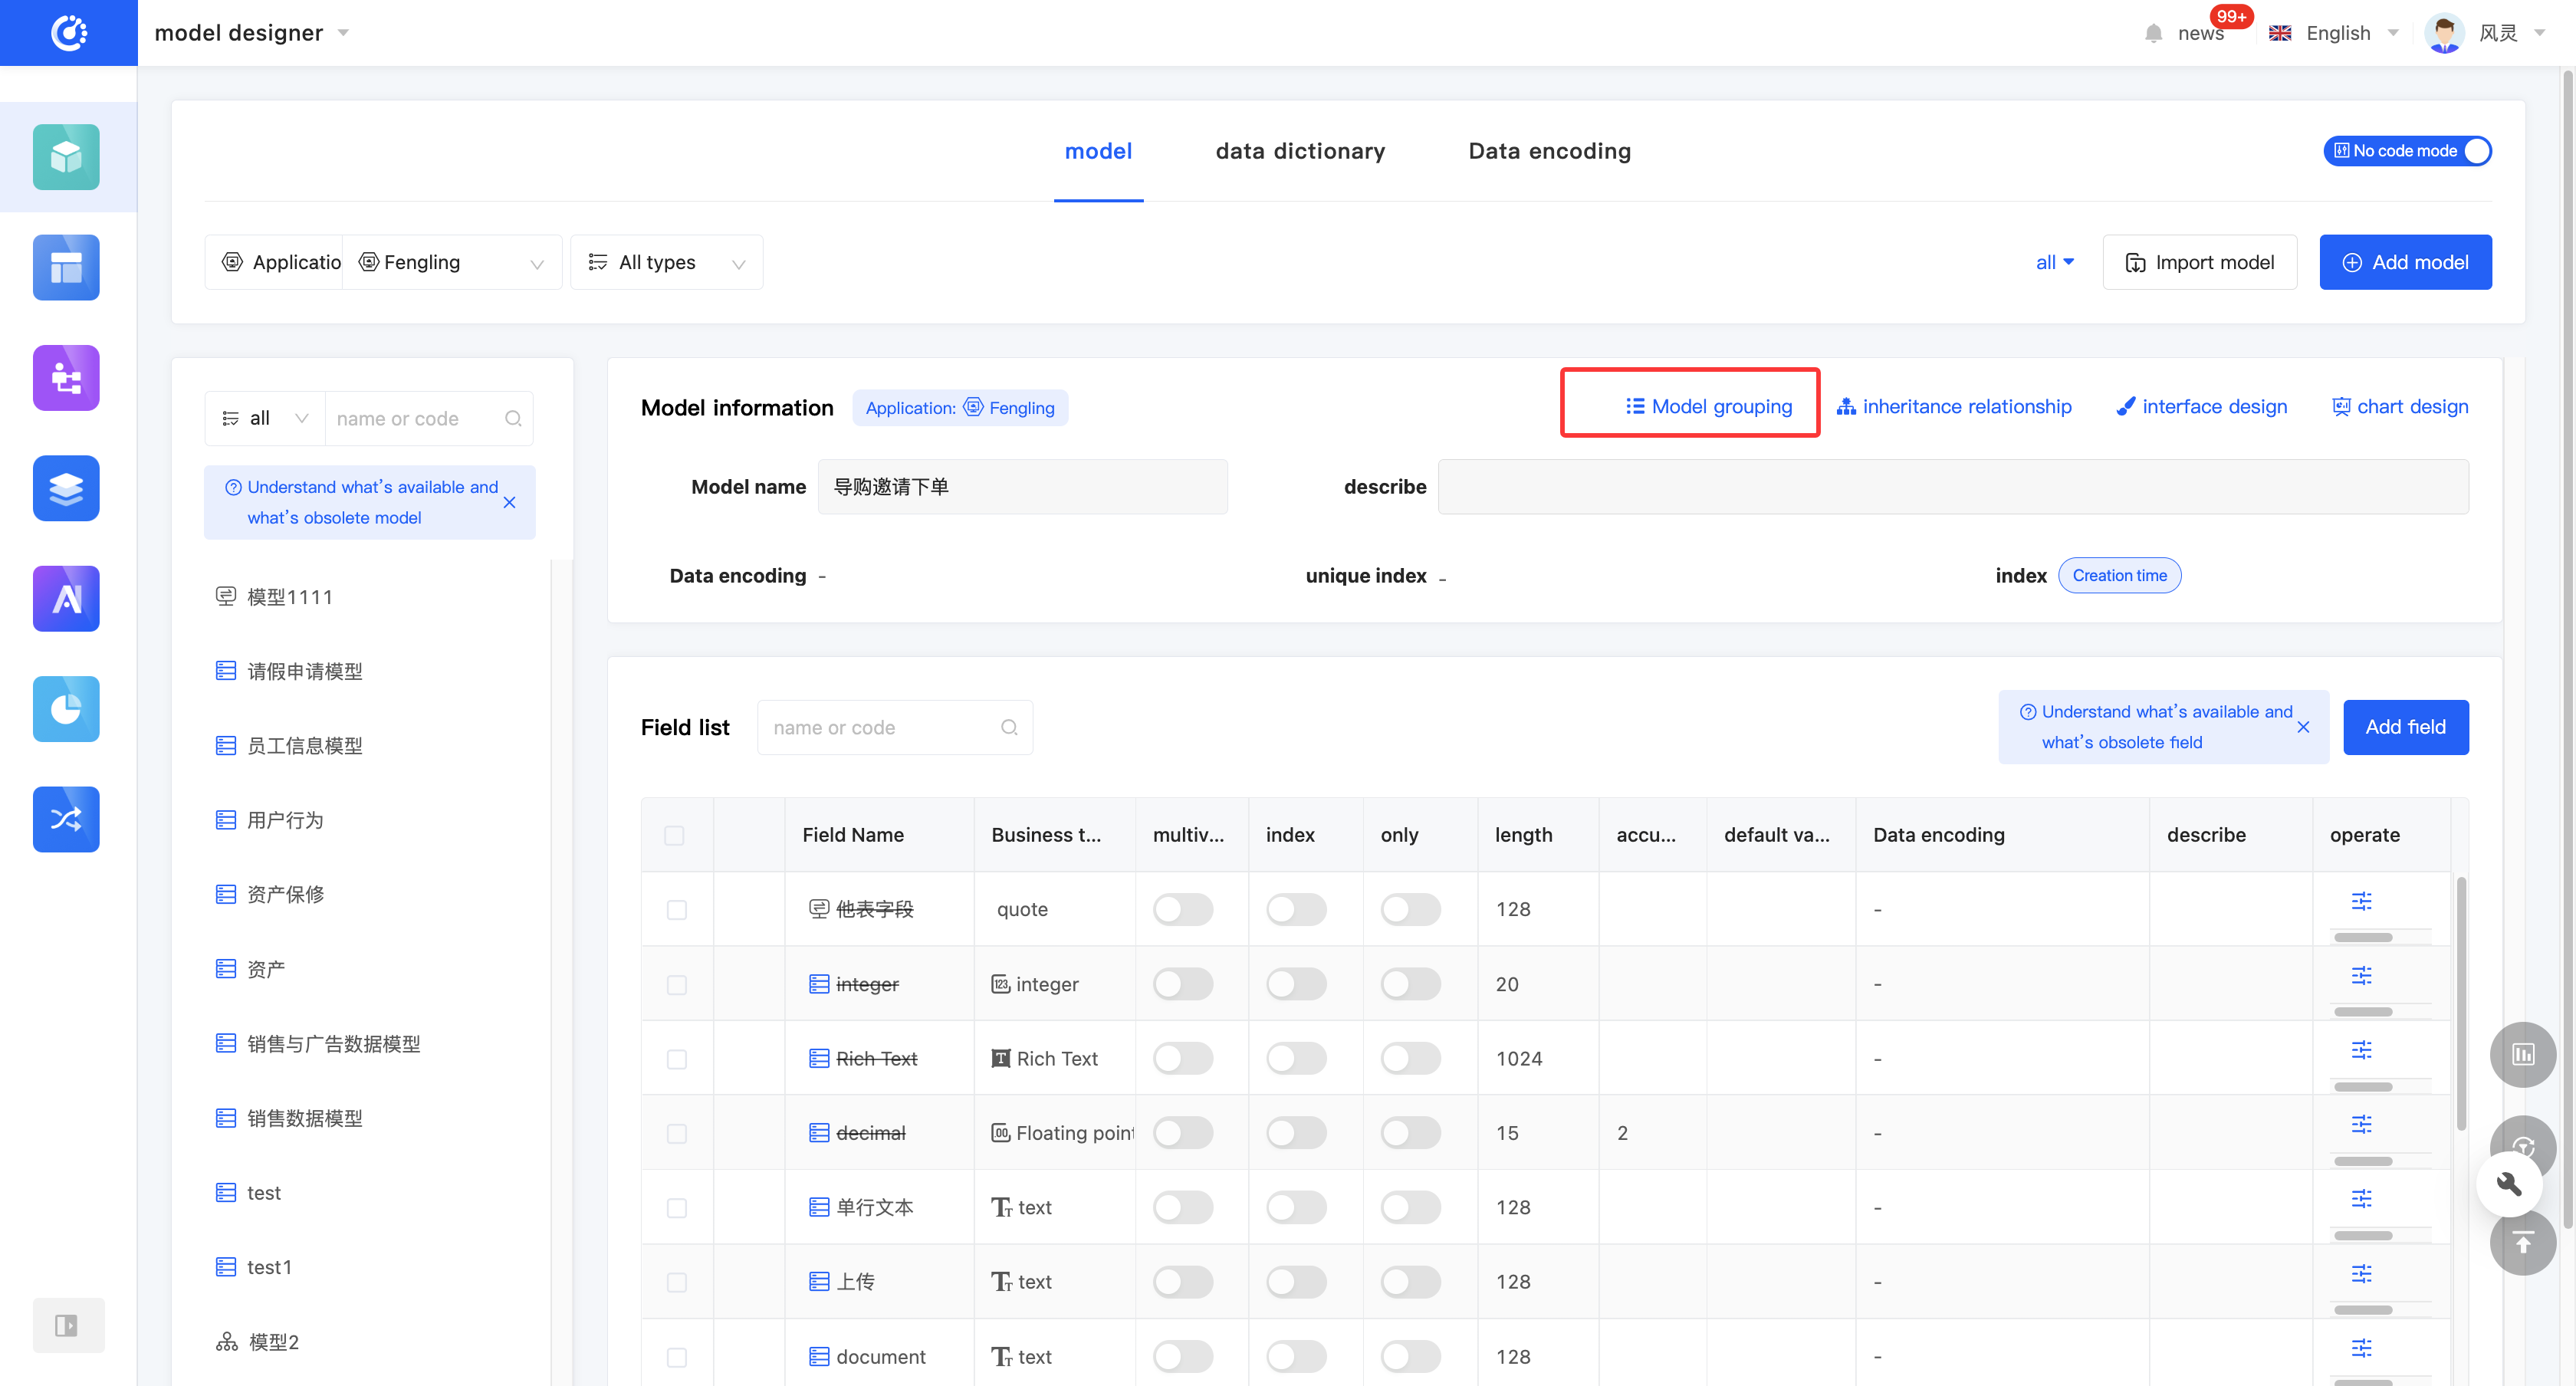
Click the "Model Group" icon at the top of the model information to set or modify the group.
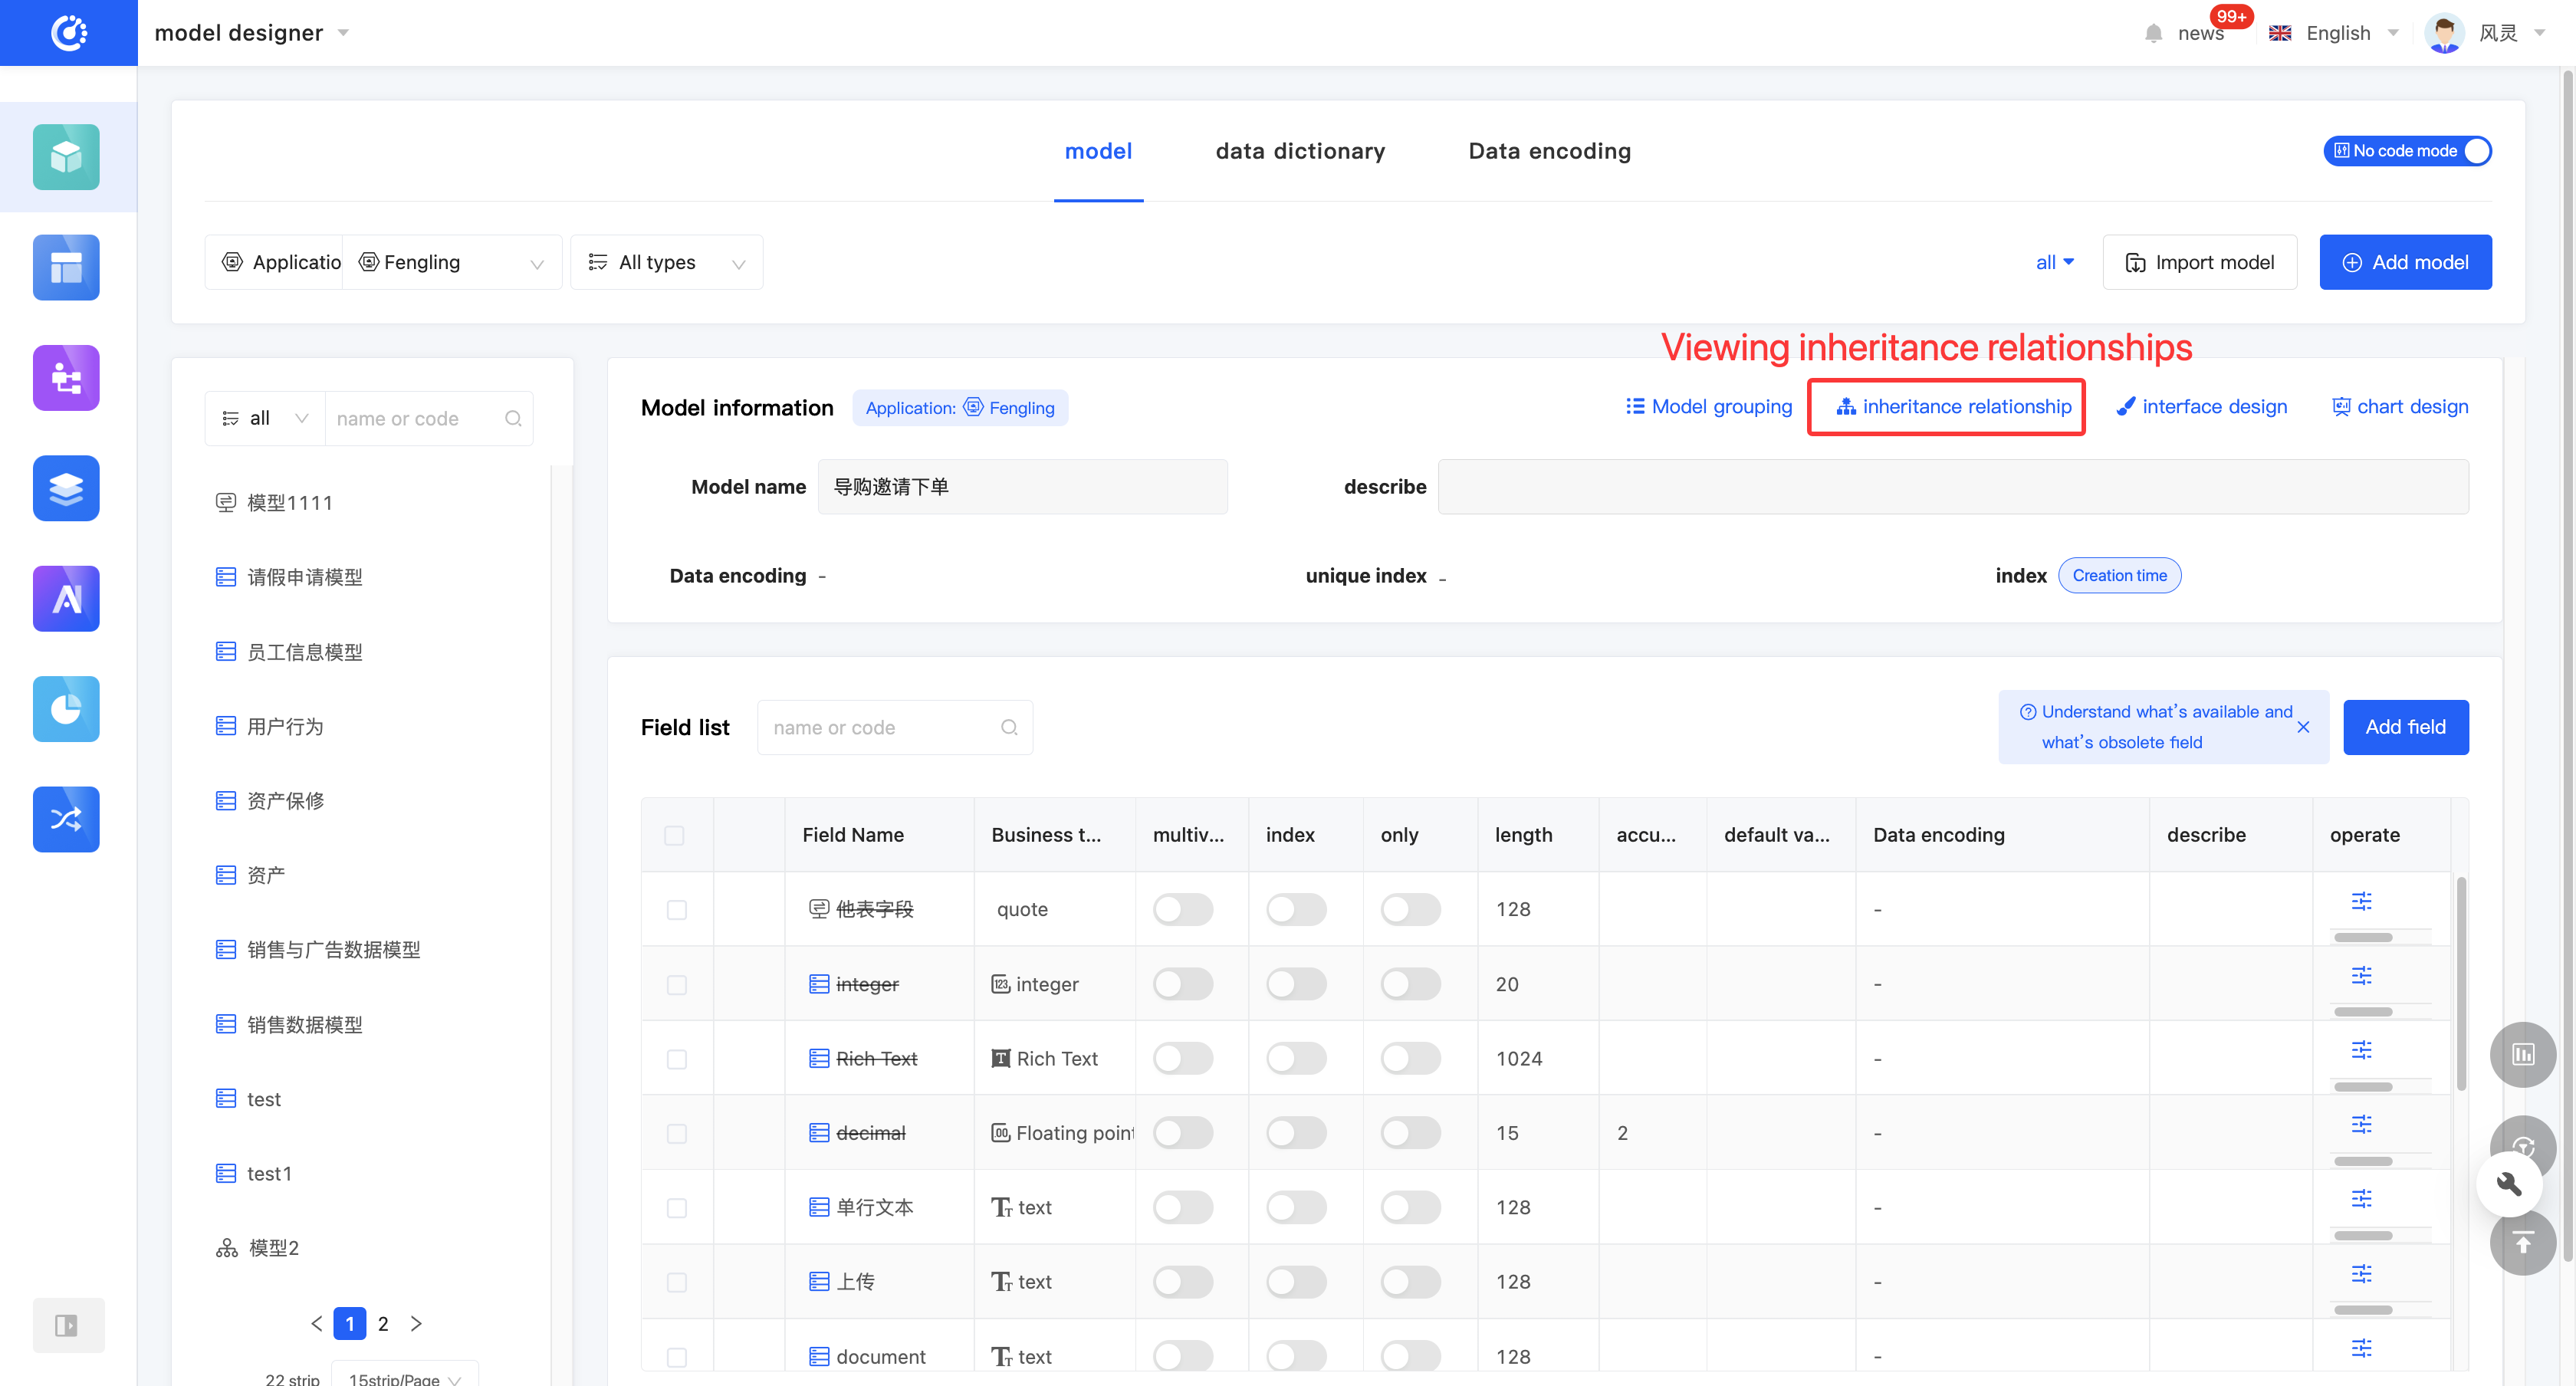
(VII) Inheritance Relationship
1. Function Introduction
The inheritance relationship of a model displays the relationship diagram of models that have a parent-child relationship with the current model.
Initially, only one level of parent models and one level of child models are displayed on the page. You can expand one level upward or collapse the current model. When there is only the last level of parent models, collapsing is not allowed. It supports zooming in and out of the relationship diagram or full-screen display.
Tip
If you click a non-current model, a new window will open and jump to the Model Designer page of the clicked model. The new page will meet the filtering conditions of the clicked model.
2. Operation Method
- Click the "Inheritance Relationship" icon at the top of the model information to display the model inheritance relationship diagram.
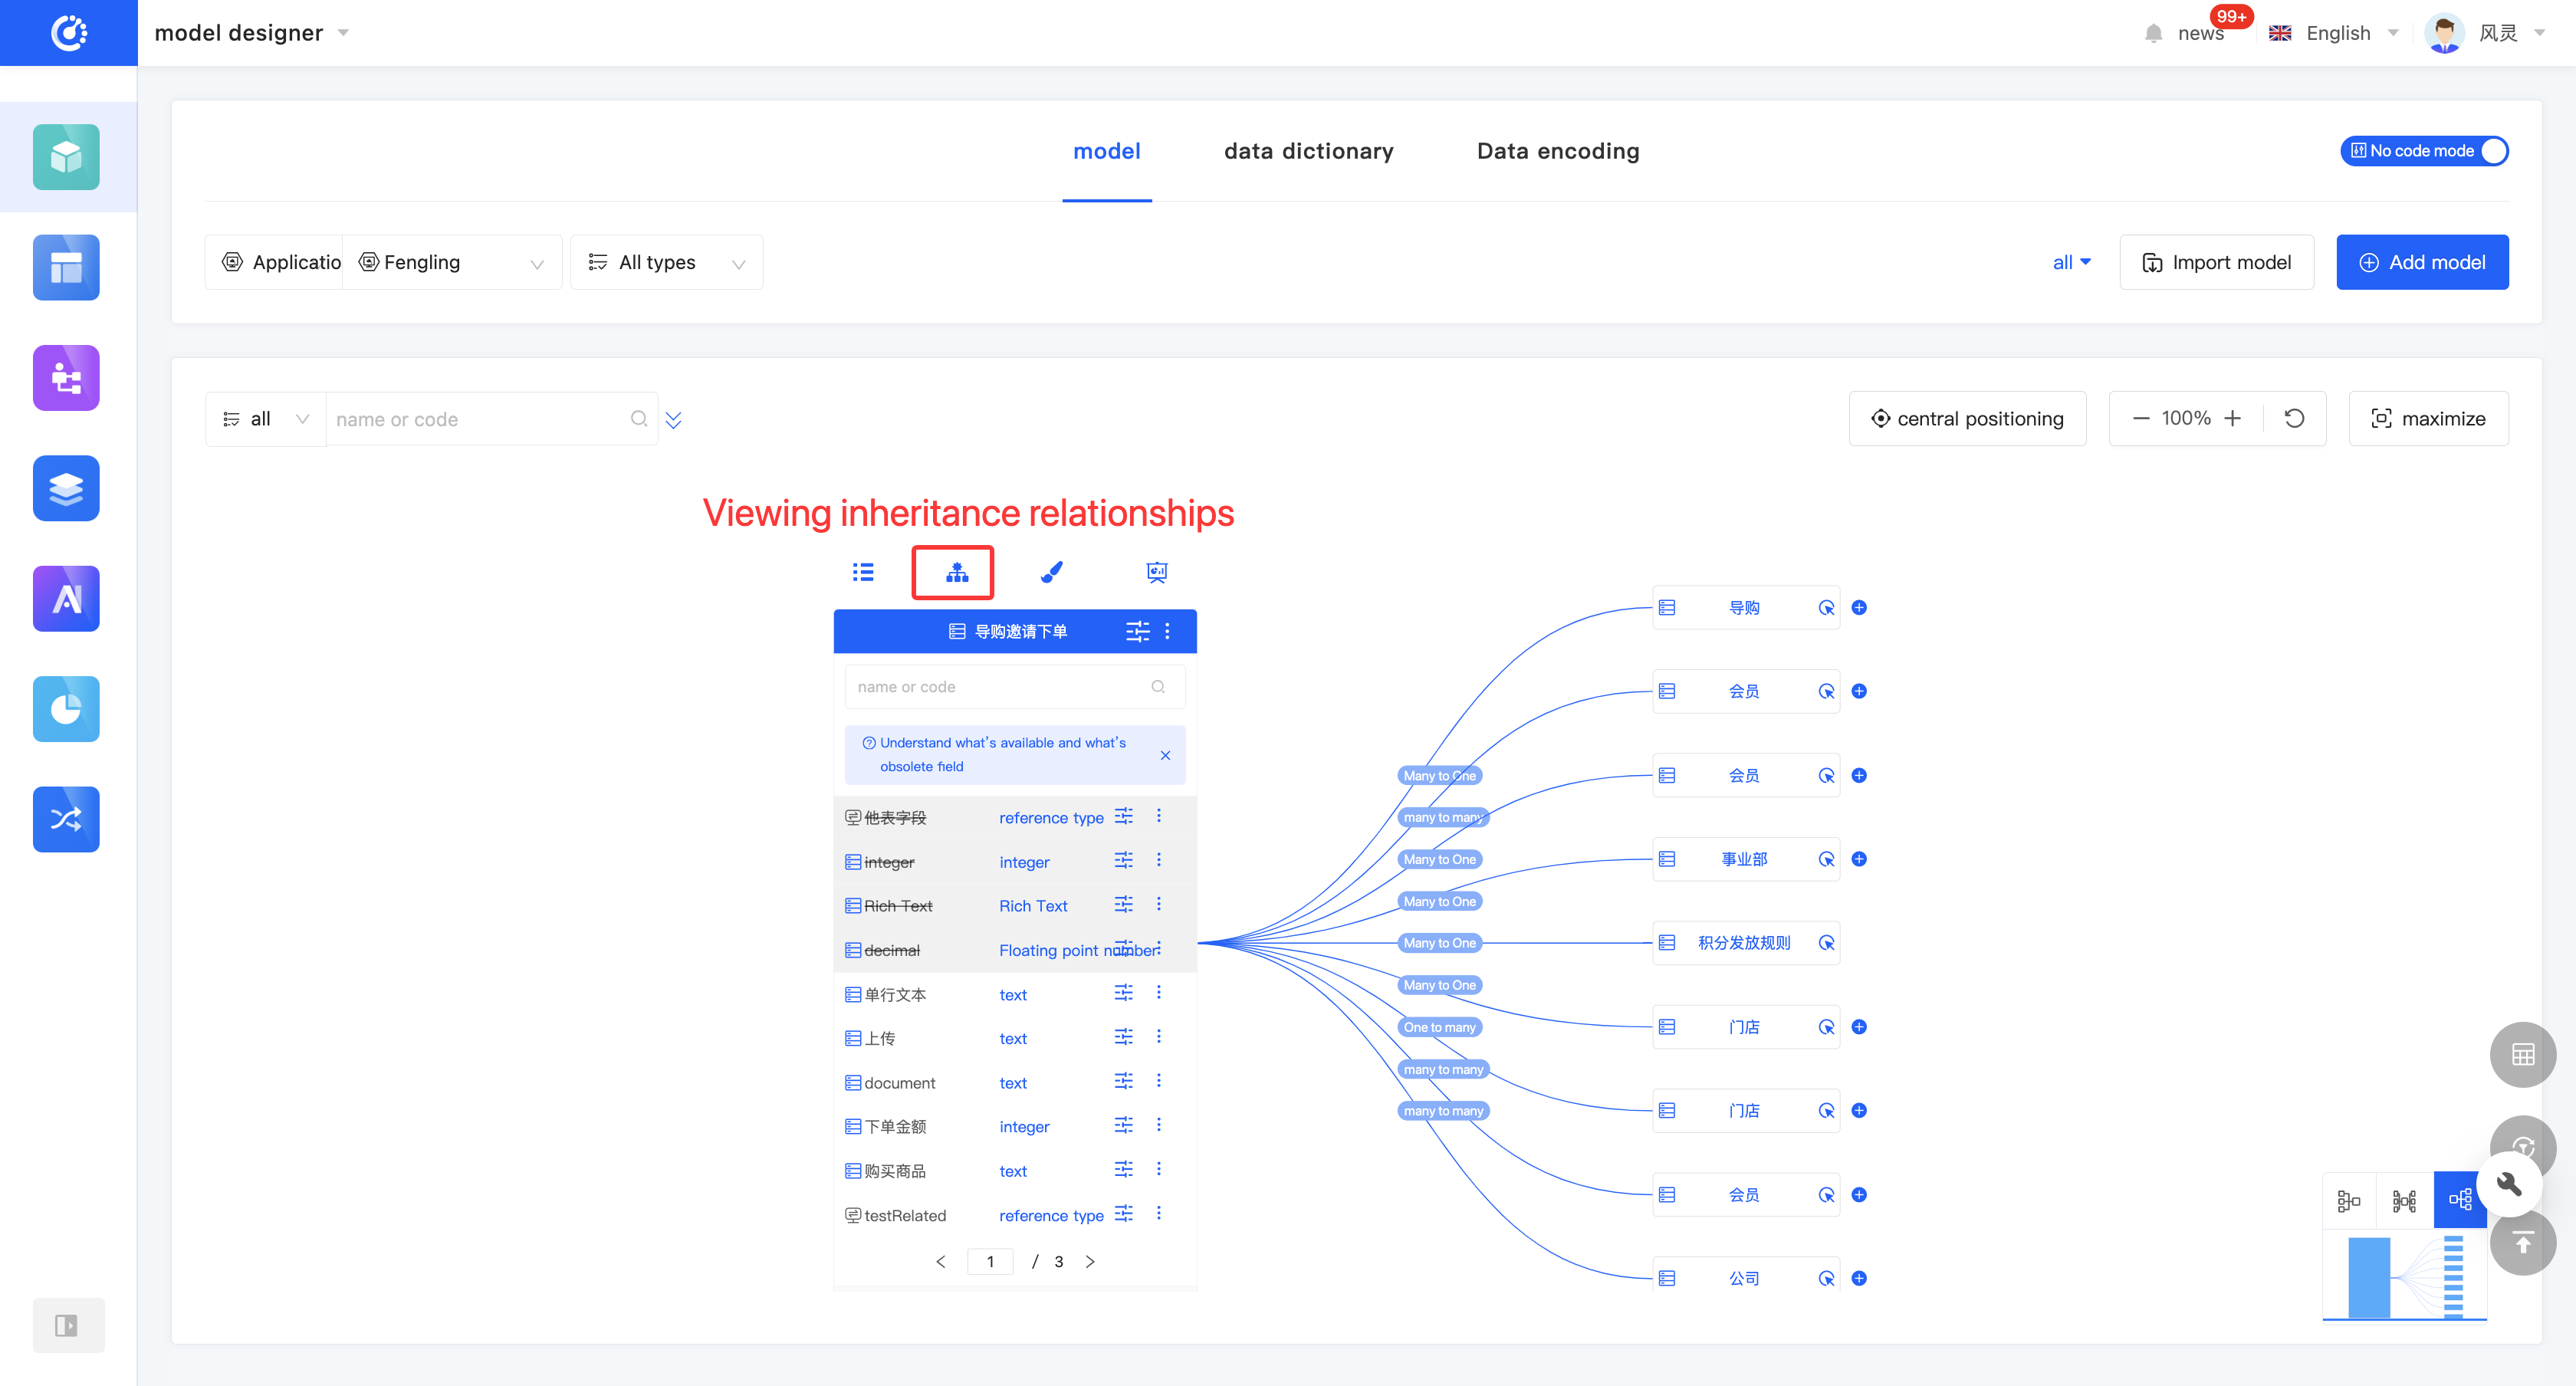
- In the model inheritance relationship diagram, click "Expand" to expand the parent models upward.
- In the model inheritance relationship diagram, click "Collapse" to collapse the current model.

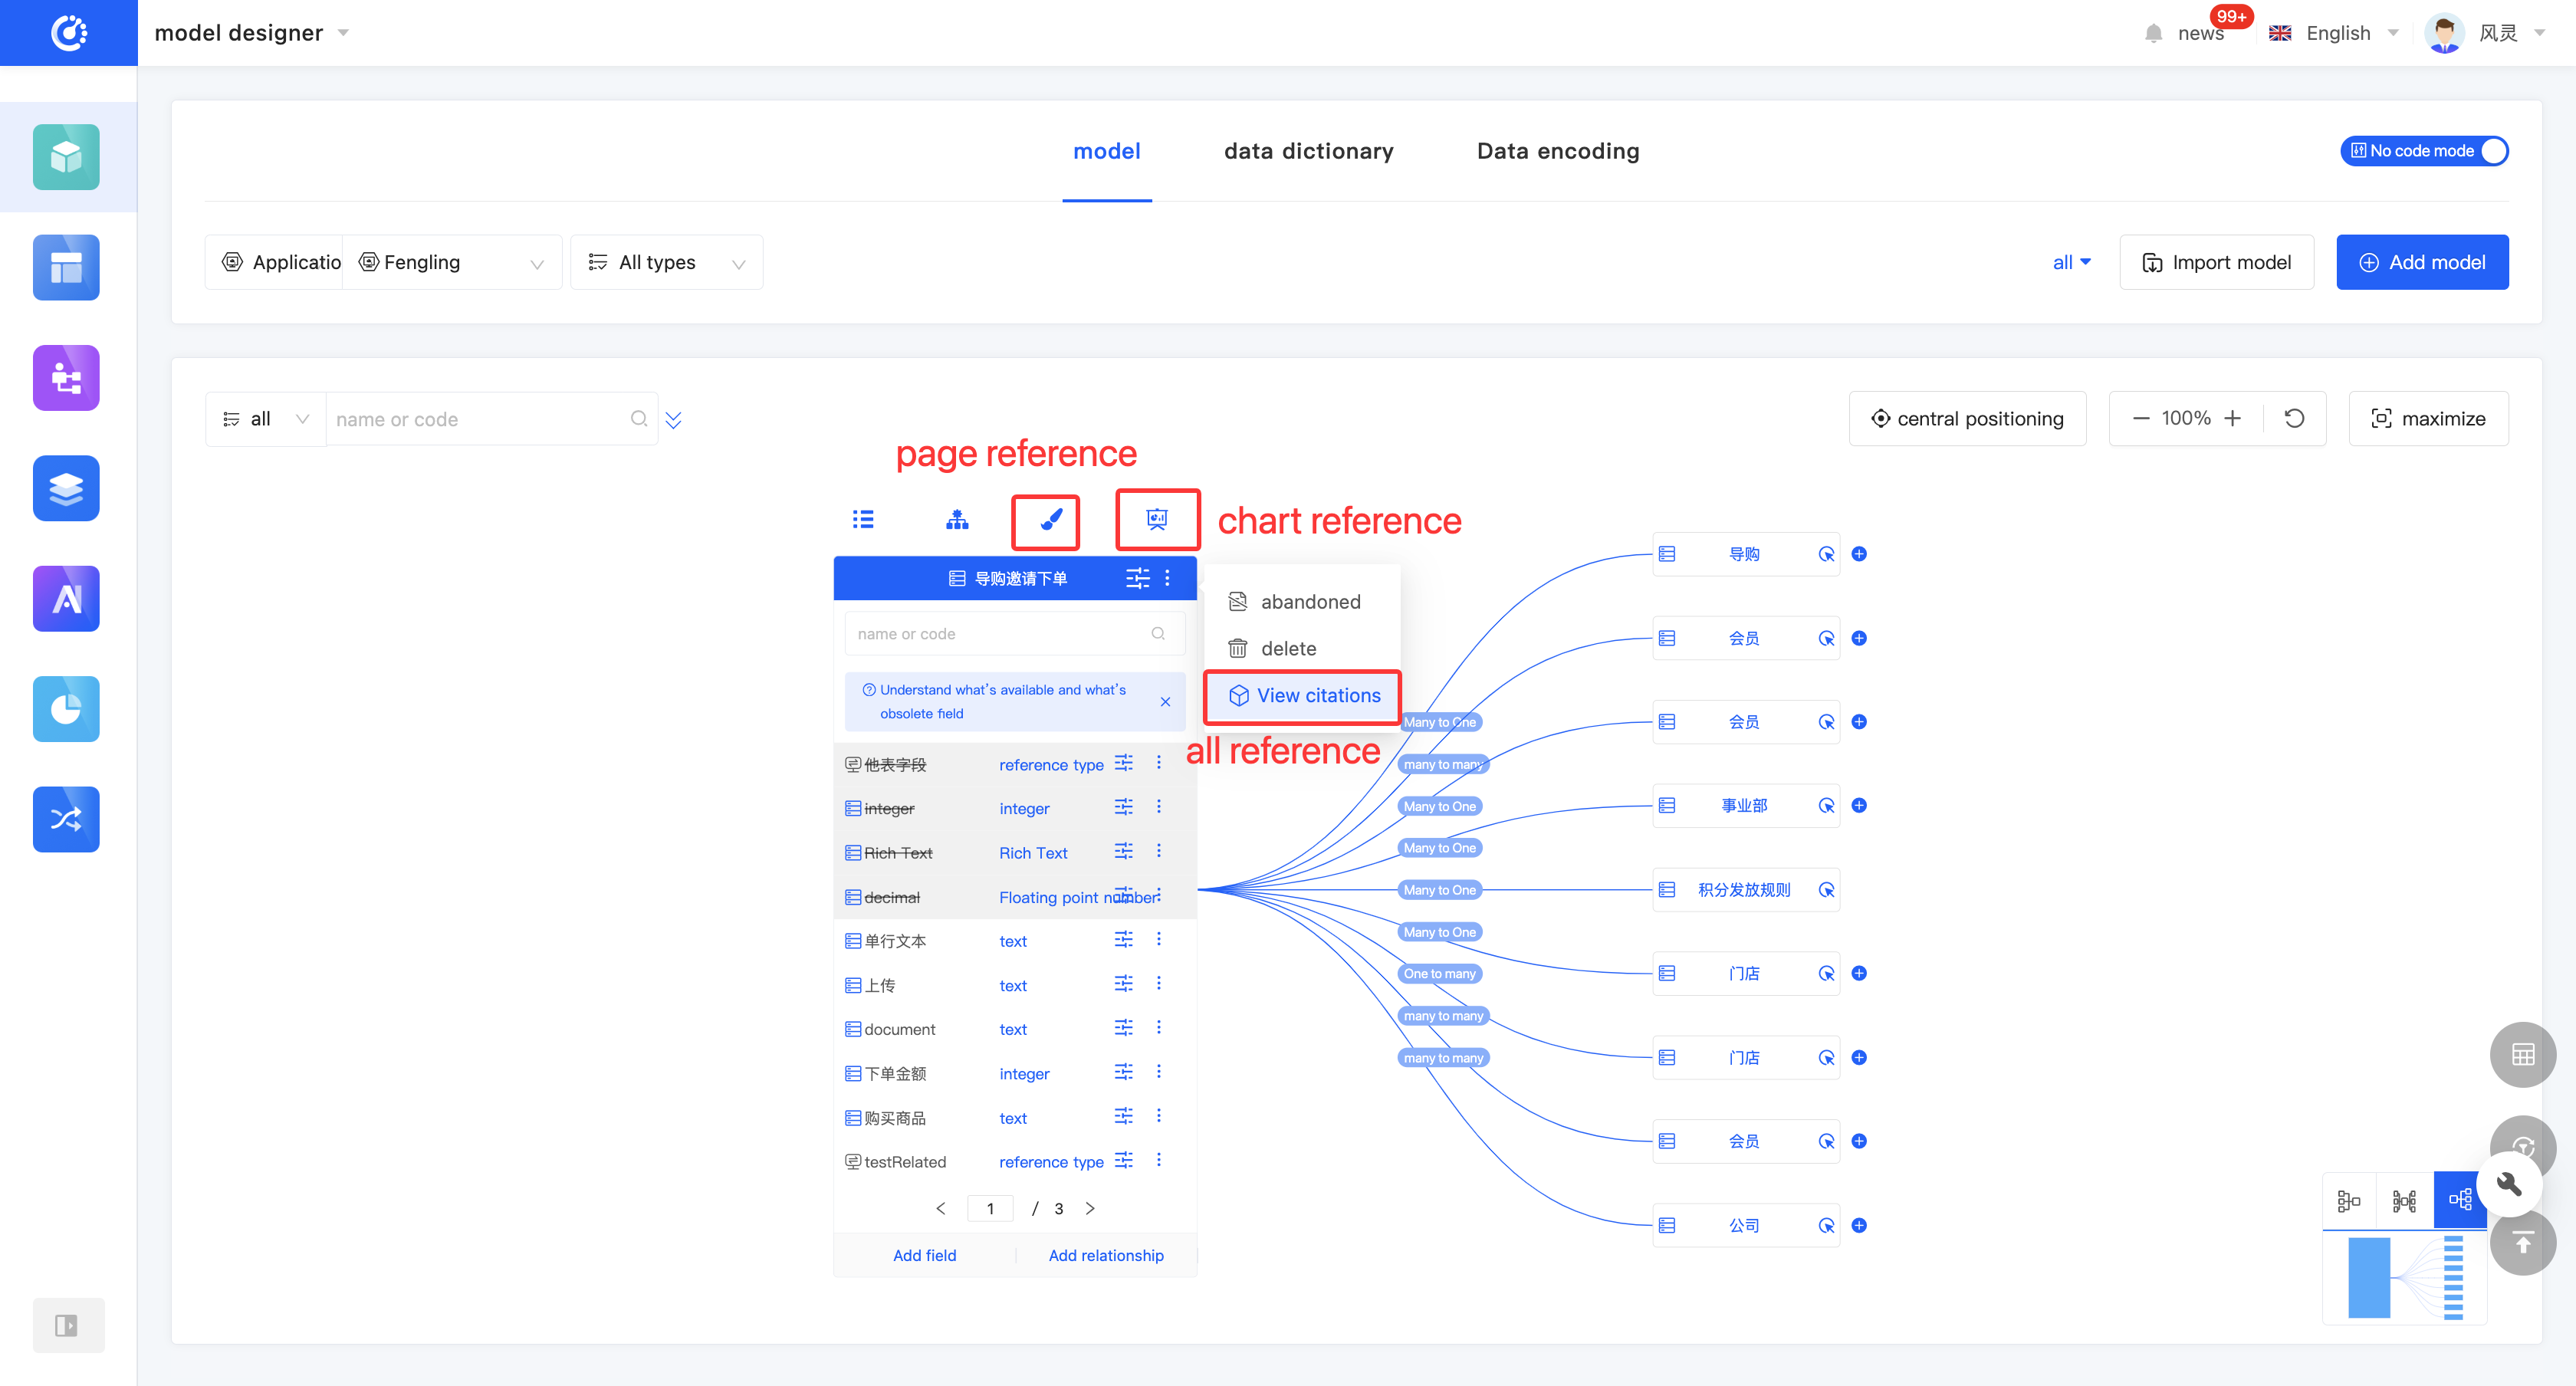
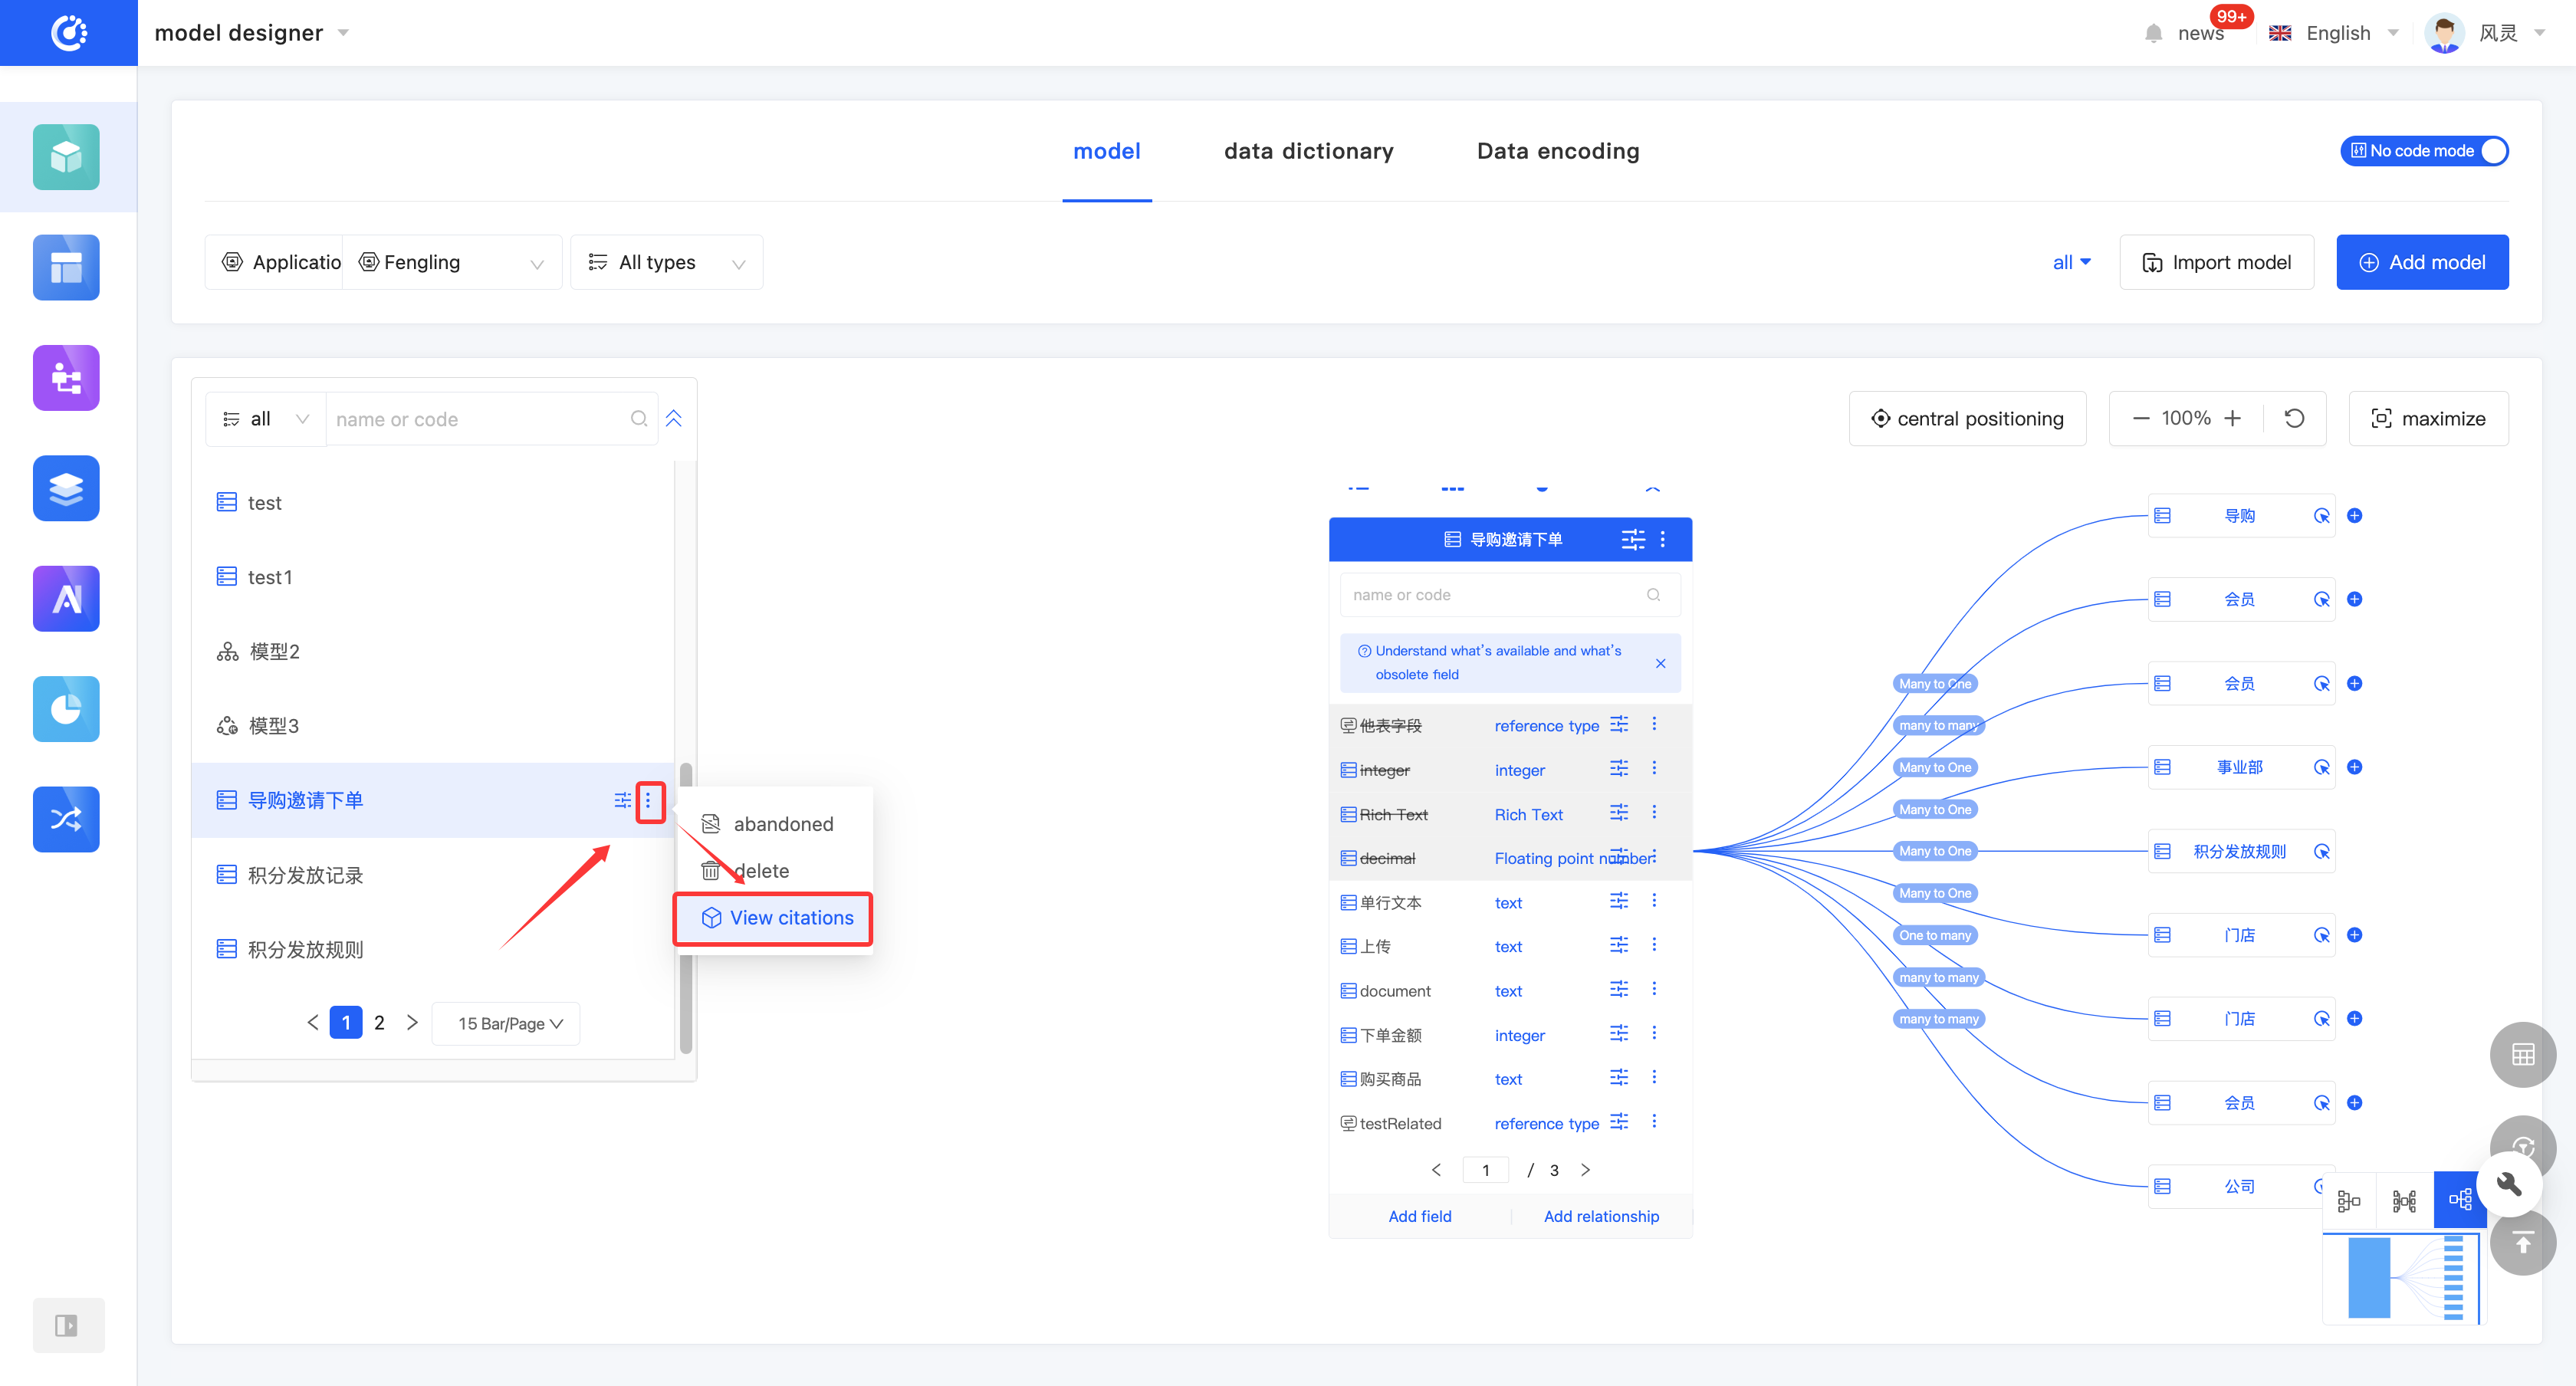
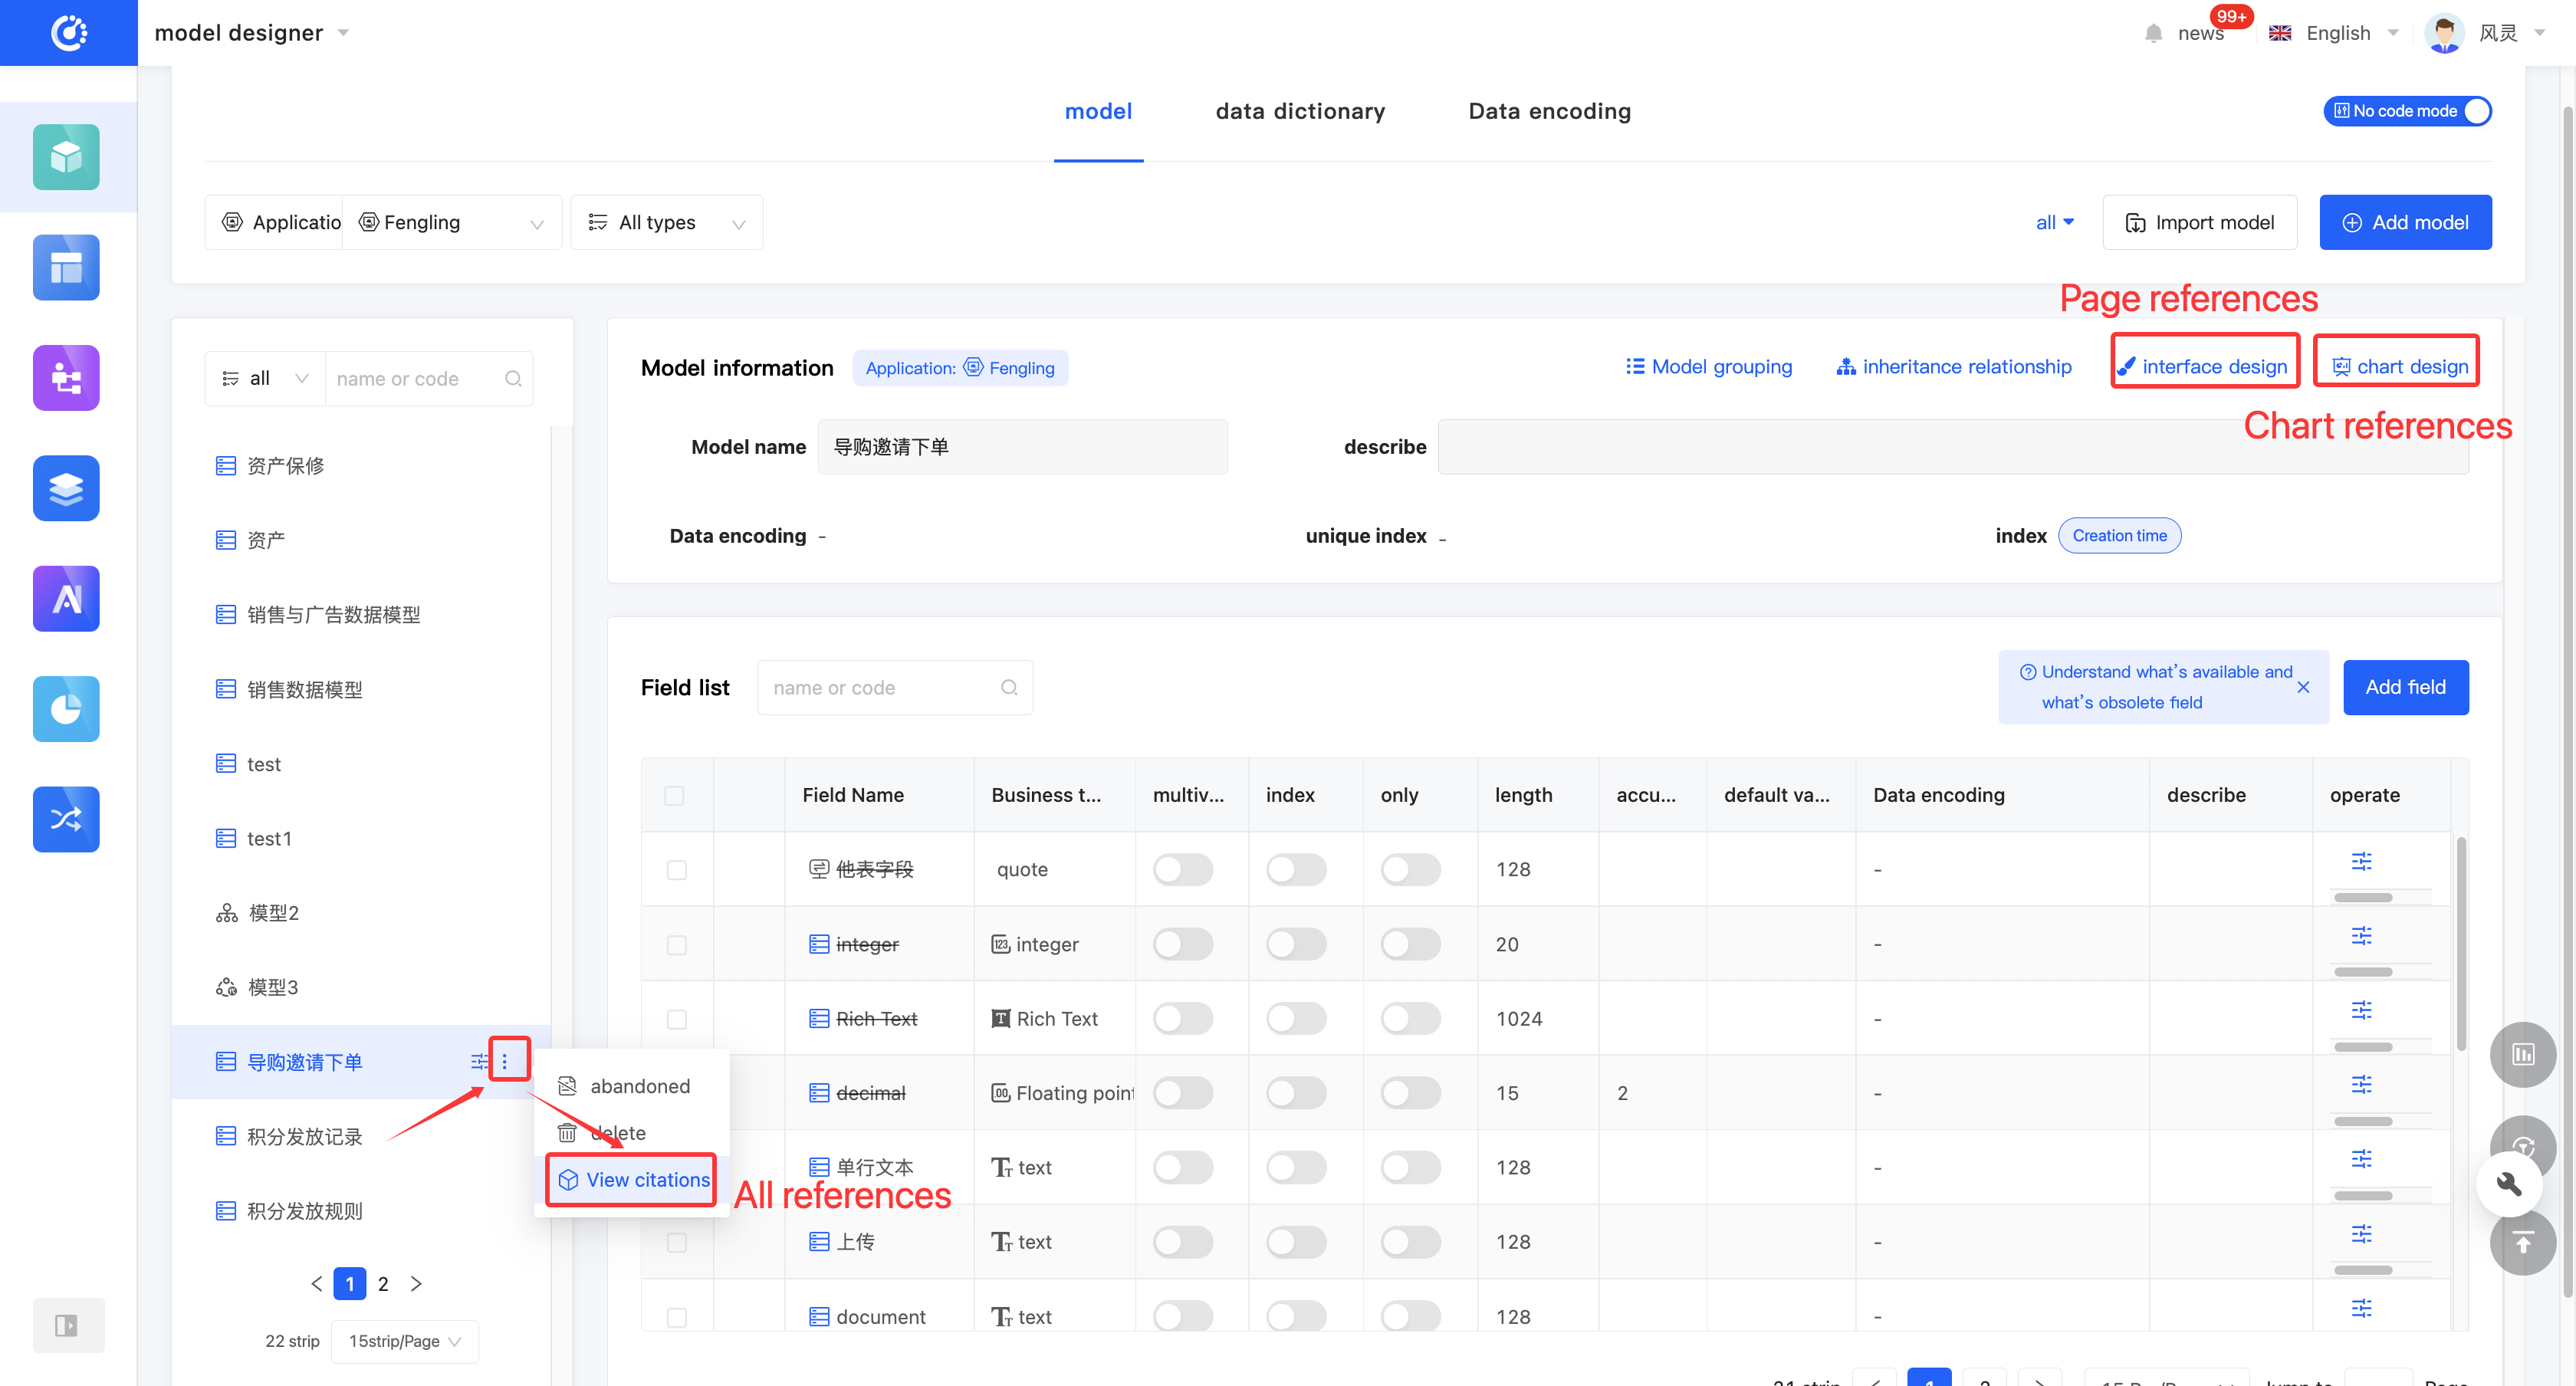
(VIII) View Reference Relationships
1. Function Introduction
By using the view reference function, you can gain in-depth insights into the hierarchical structure and dependency relationships between models, and comprehensively understand the data flow and interaction methods of the entire application. Through this function, you can view various elements that have a reference relationship with the model, including other models, pages, processes, and charts. Each relationship is displayed in a list, and the list items are links that can lead to the corresponding design pages; the content is the corresponding information.
Example
The list item of a process with a reference relationship displays the name of the process, and the list item link leads to the design page of the corresponding process.

2. Operation Method
- Click "View References" on the model or in the model list to view all references.
- Two quick view entries are provided at the top of the model. Click the "View Page References" icon and the "View Chart References" icon to view page references and chart references respectively.
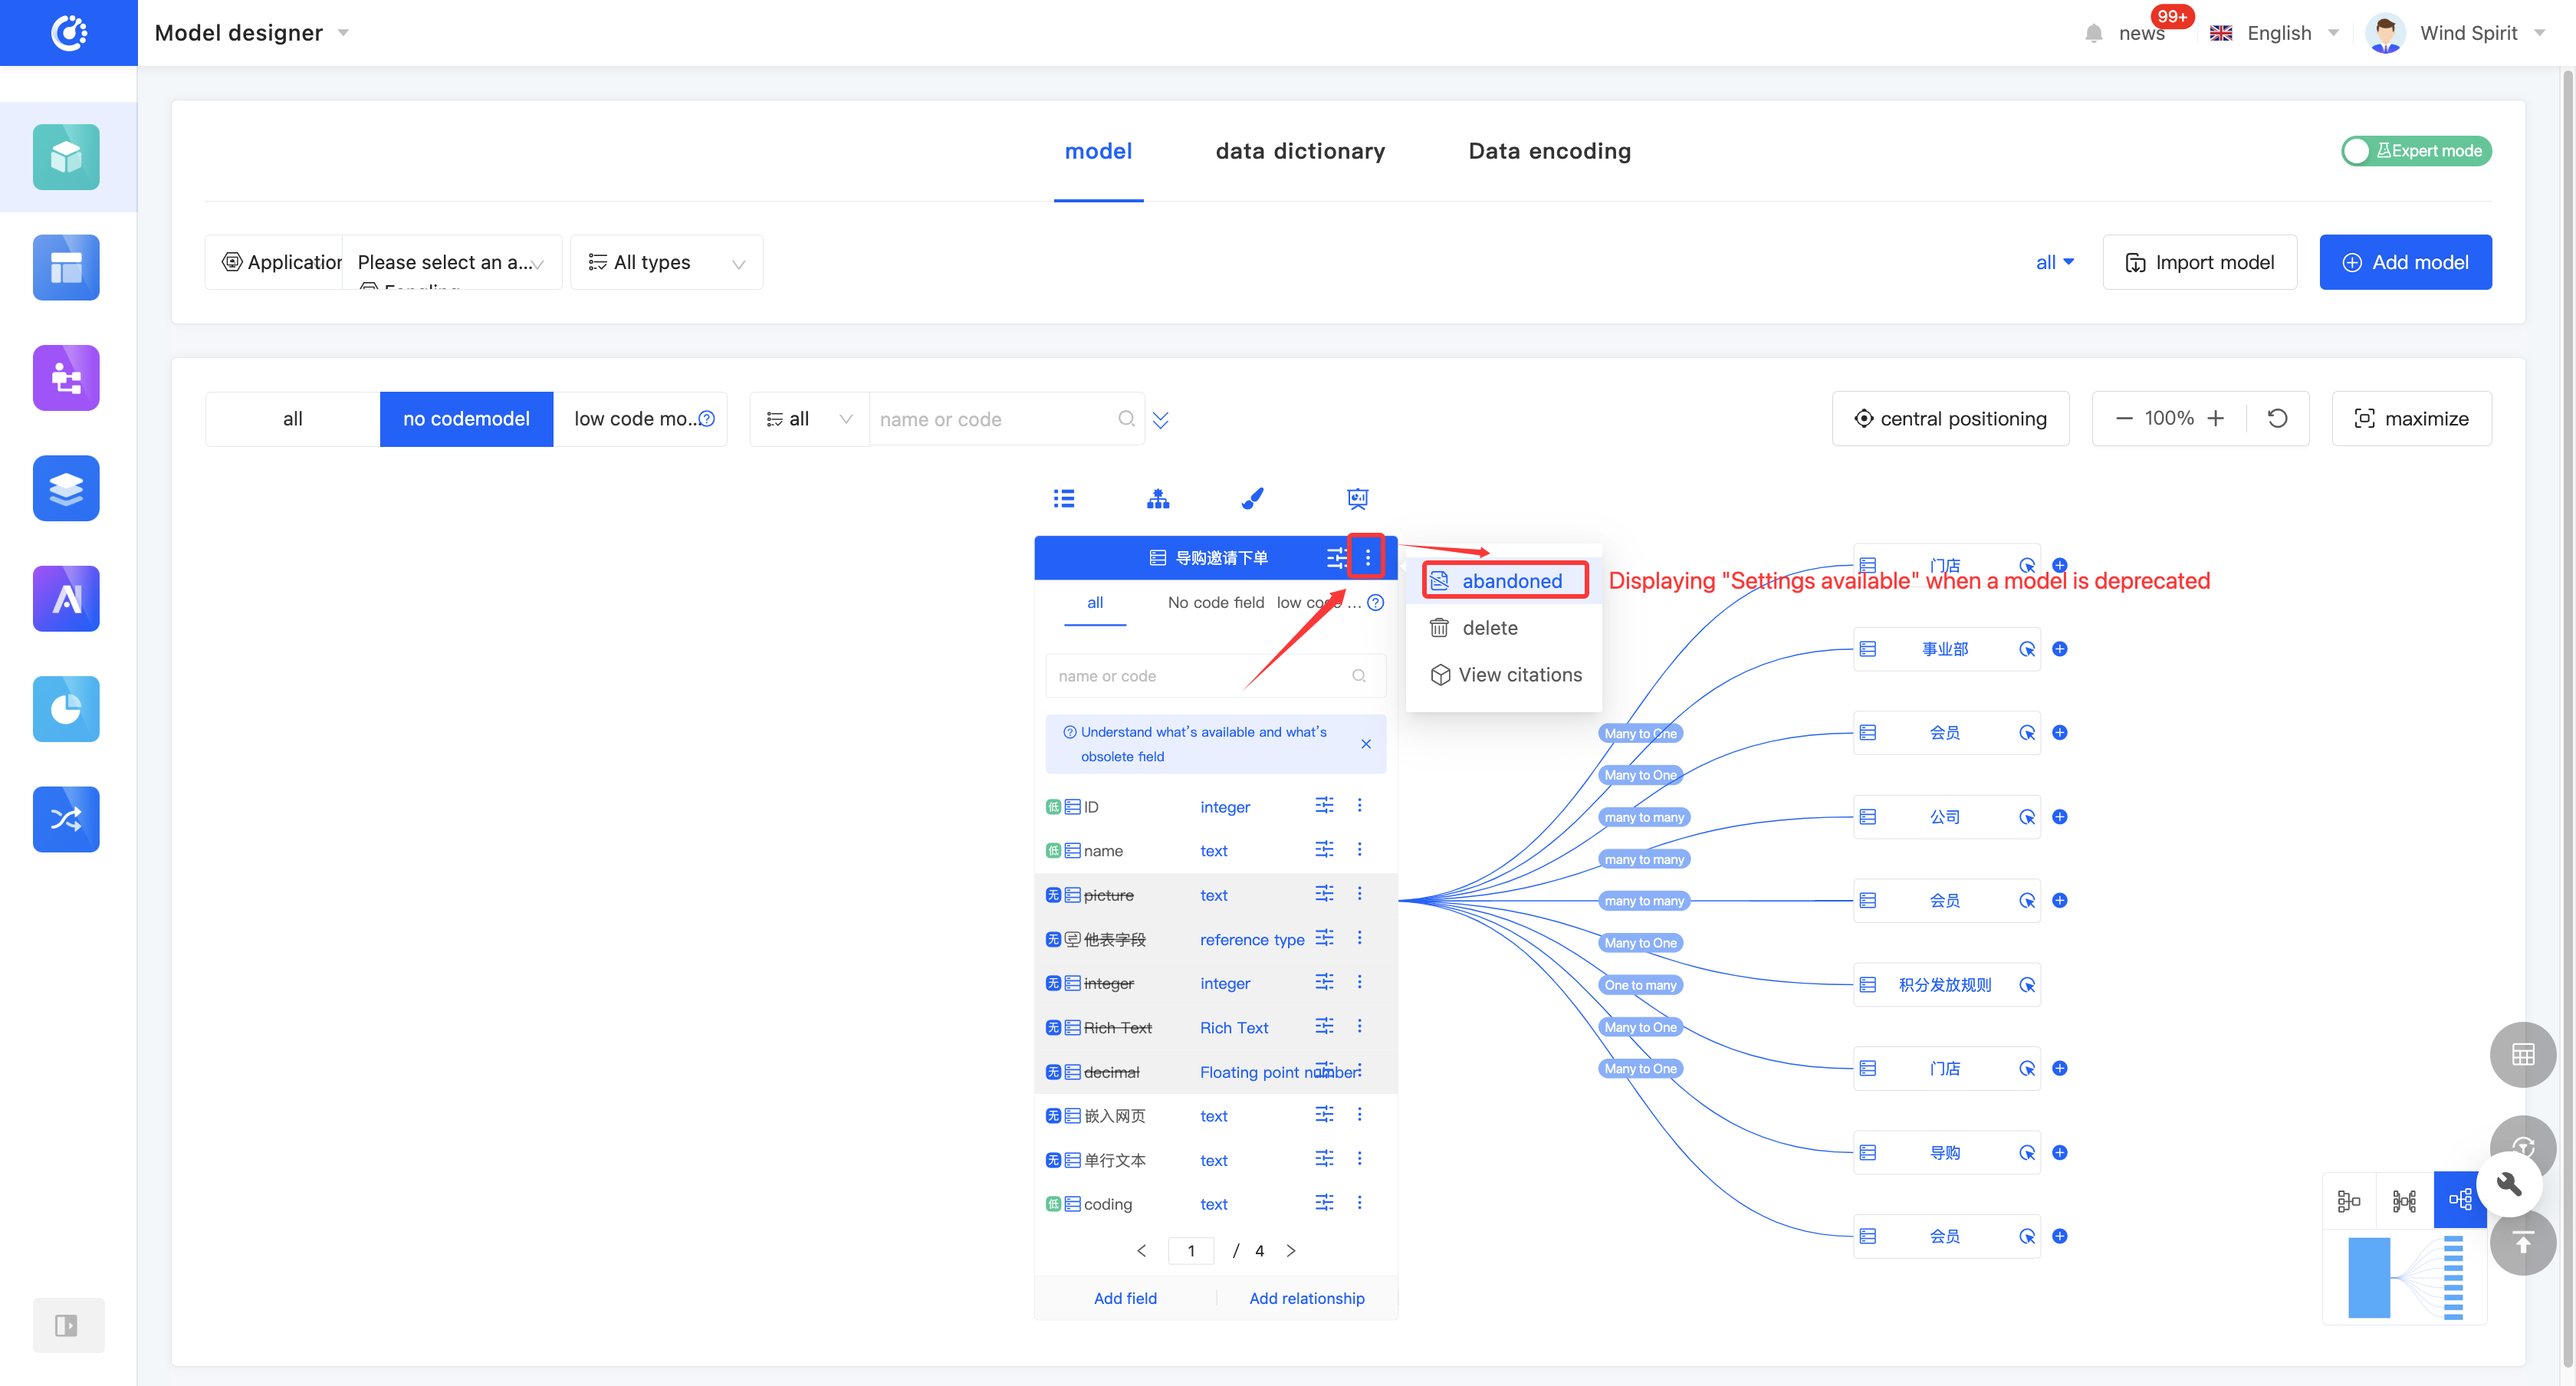
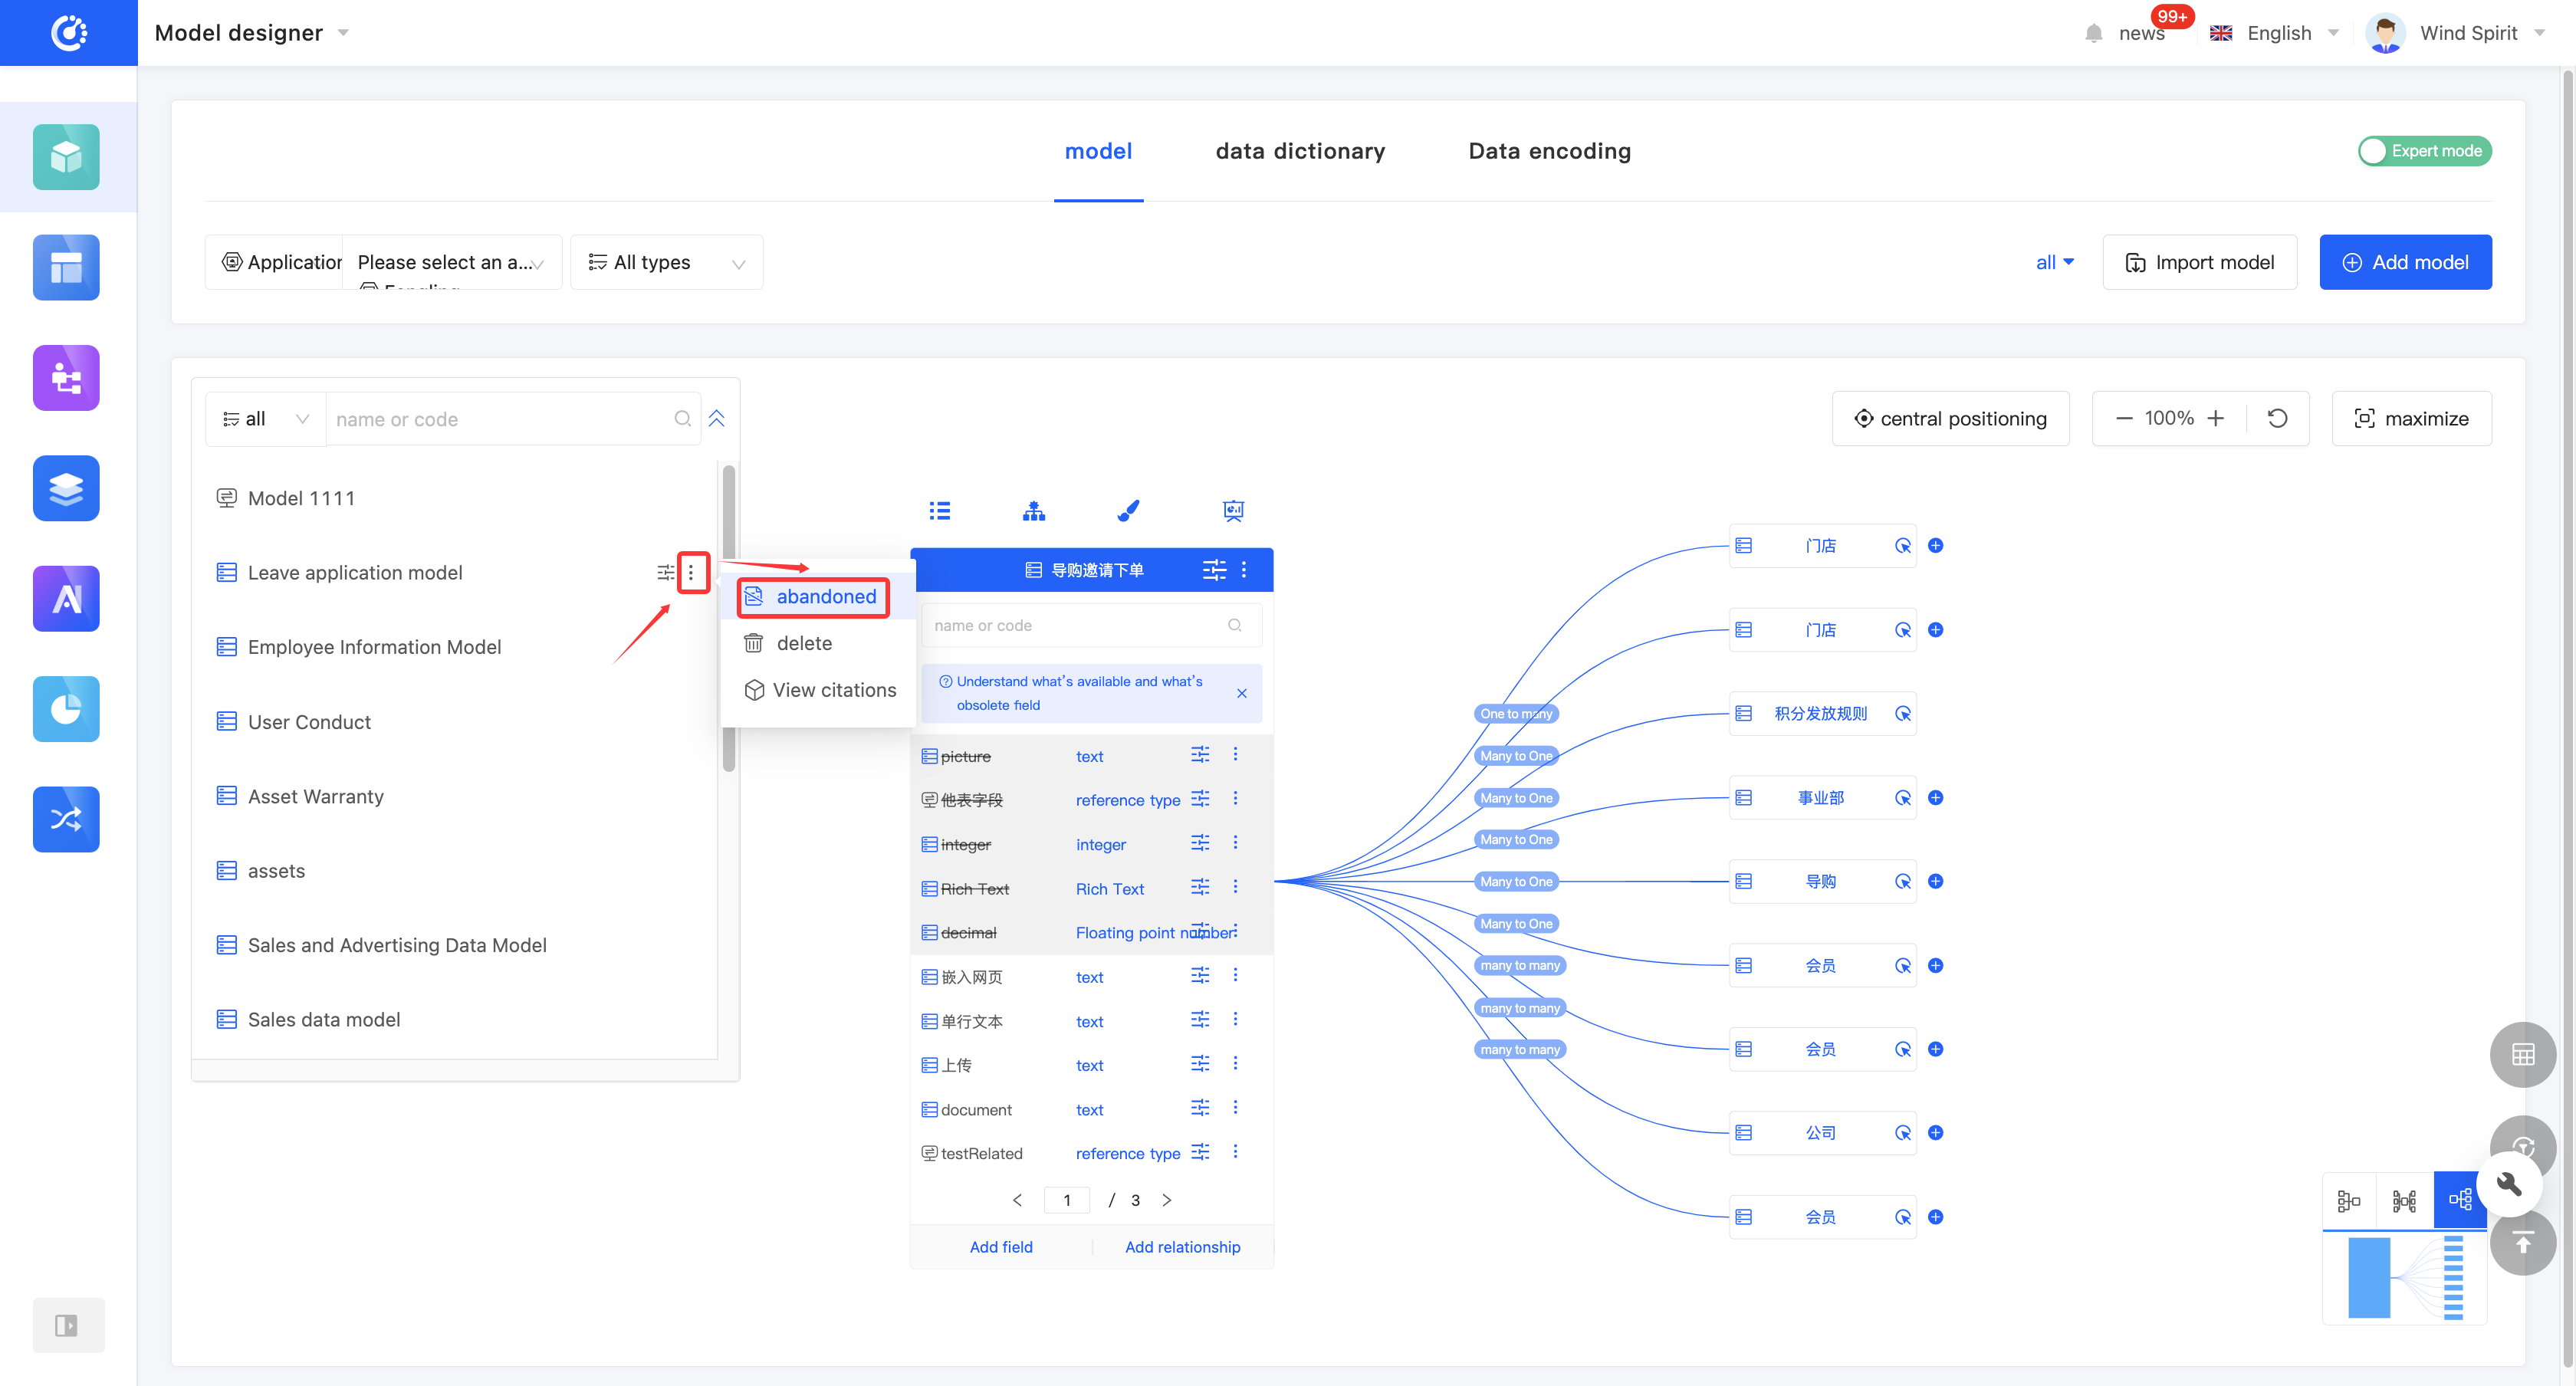
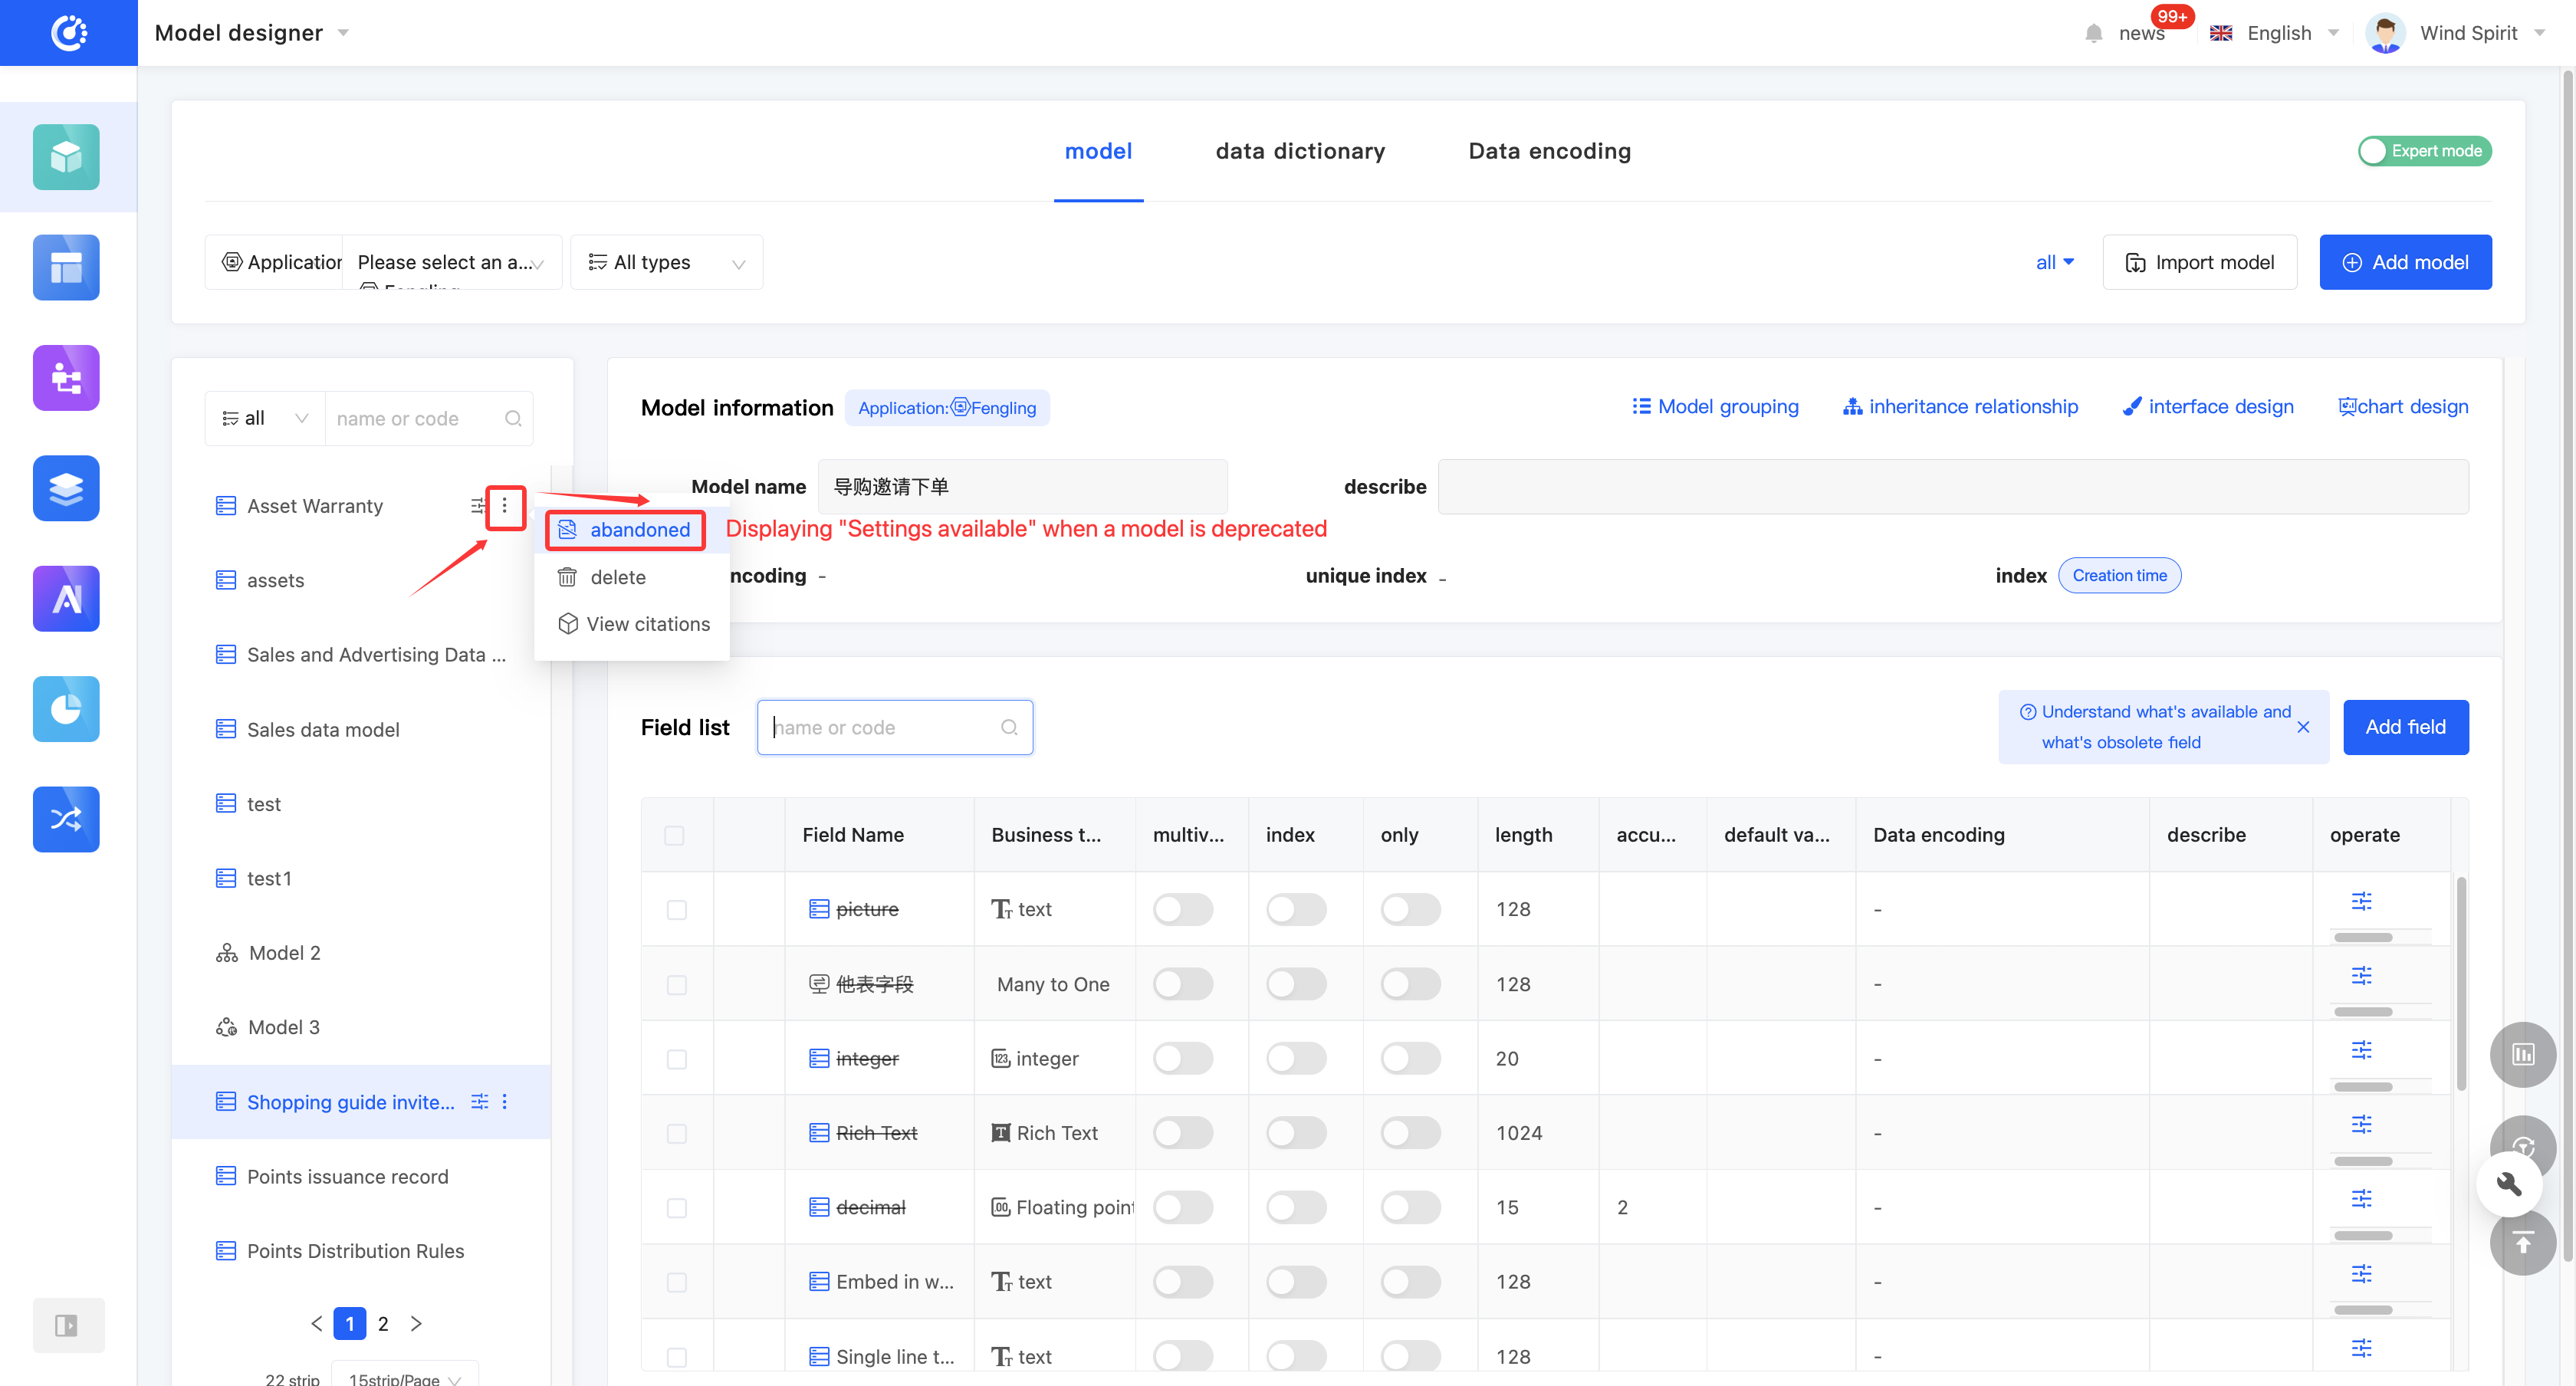
(IX) Discard/Activate a Model
1. Function Introduction
For models that are not currently in use, you can perform a discard operation. If needed in the future, you can simply set the discarded model to an active state to put it back into use. In addition, discarded models still support operations such as editing.
Note
Discarded models will no longer be displayed in the optional list when selecting a parent model or being referenced in other designers.
2. Operation Method
Click "Discard" on the model or in the model list to set the model to a discarded state. The button will change to "Set to Active". Click it again to set the model to an active state.
(X) Delete a Model
1. Function Introduction
When a model is no longer needed, you can choose to delete it.
Note
Before deletion, make sure that the model is not referenced by other designers; otherwise, the deletion operation will fail.
Warning
The deleted model will no longer appear in the model list, and this operation cannot be undone. Please perform it with caution.
2. Operation Method
- Click "Delete" in the model list or at the top of the model to delete the model.
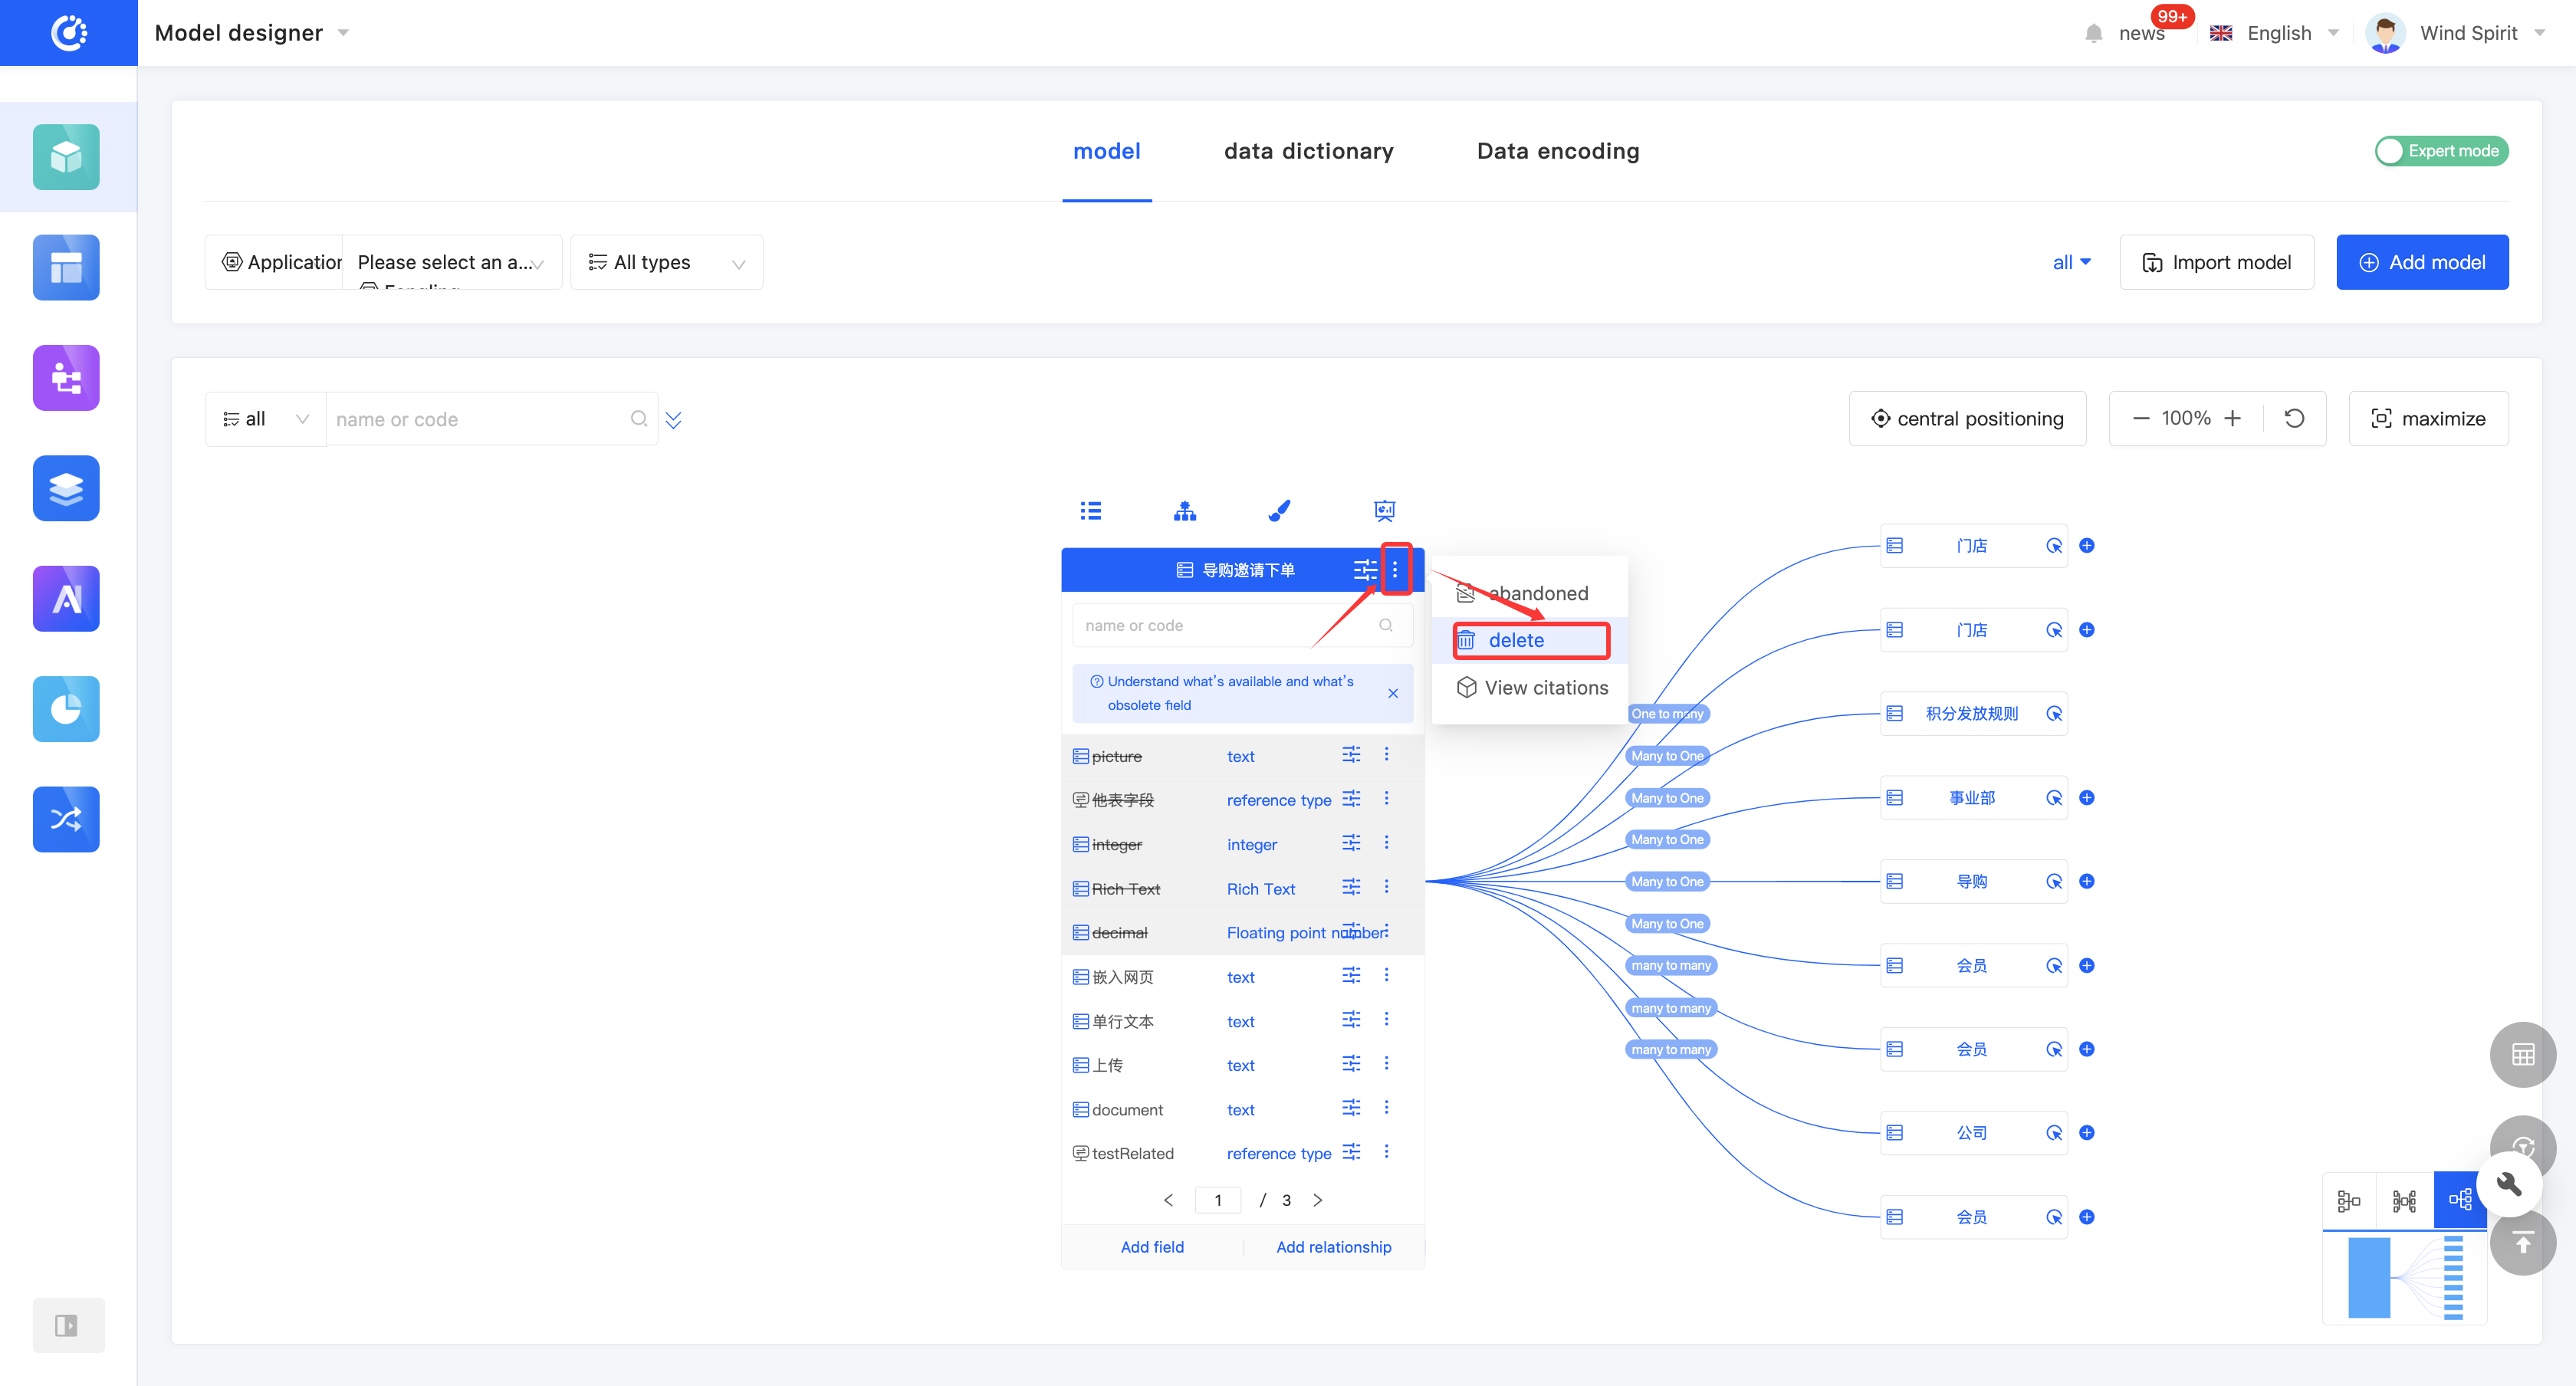
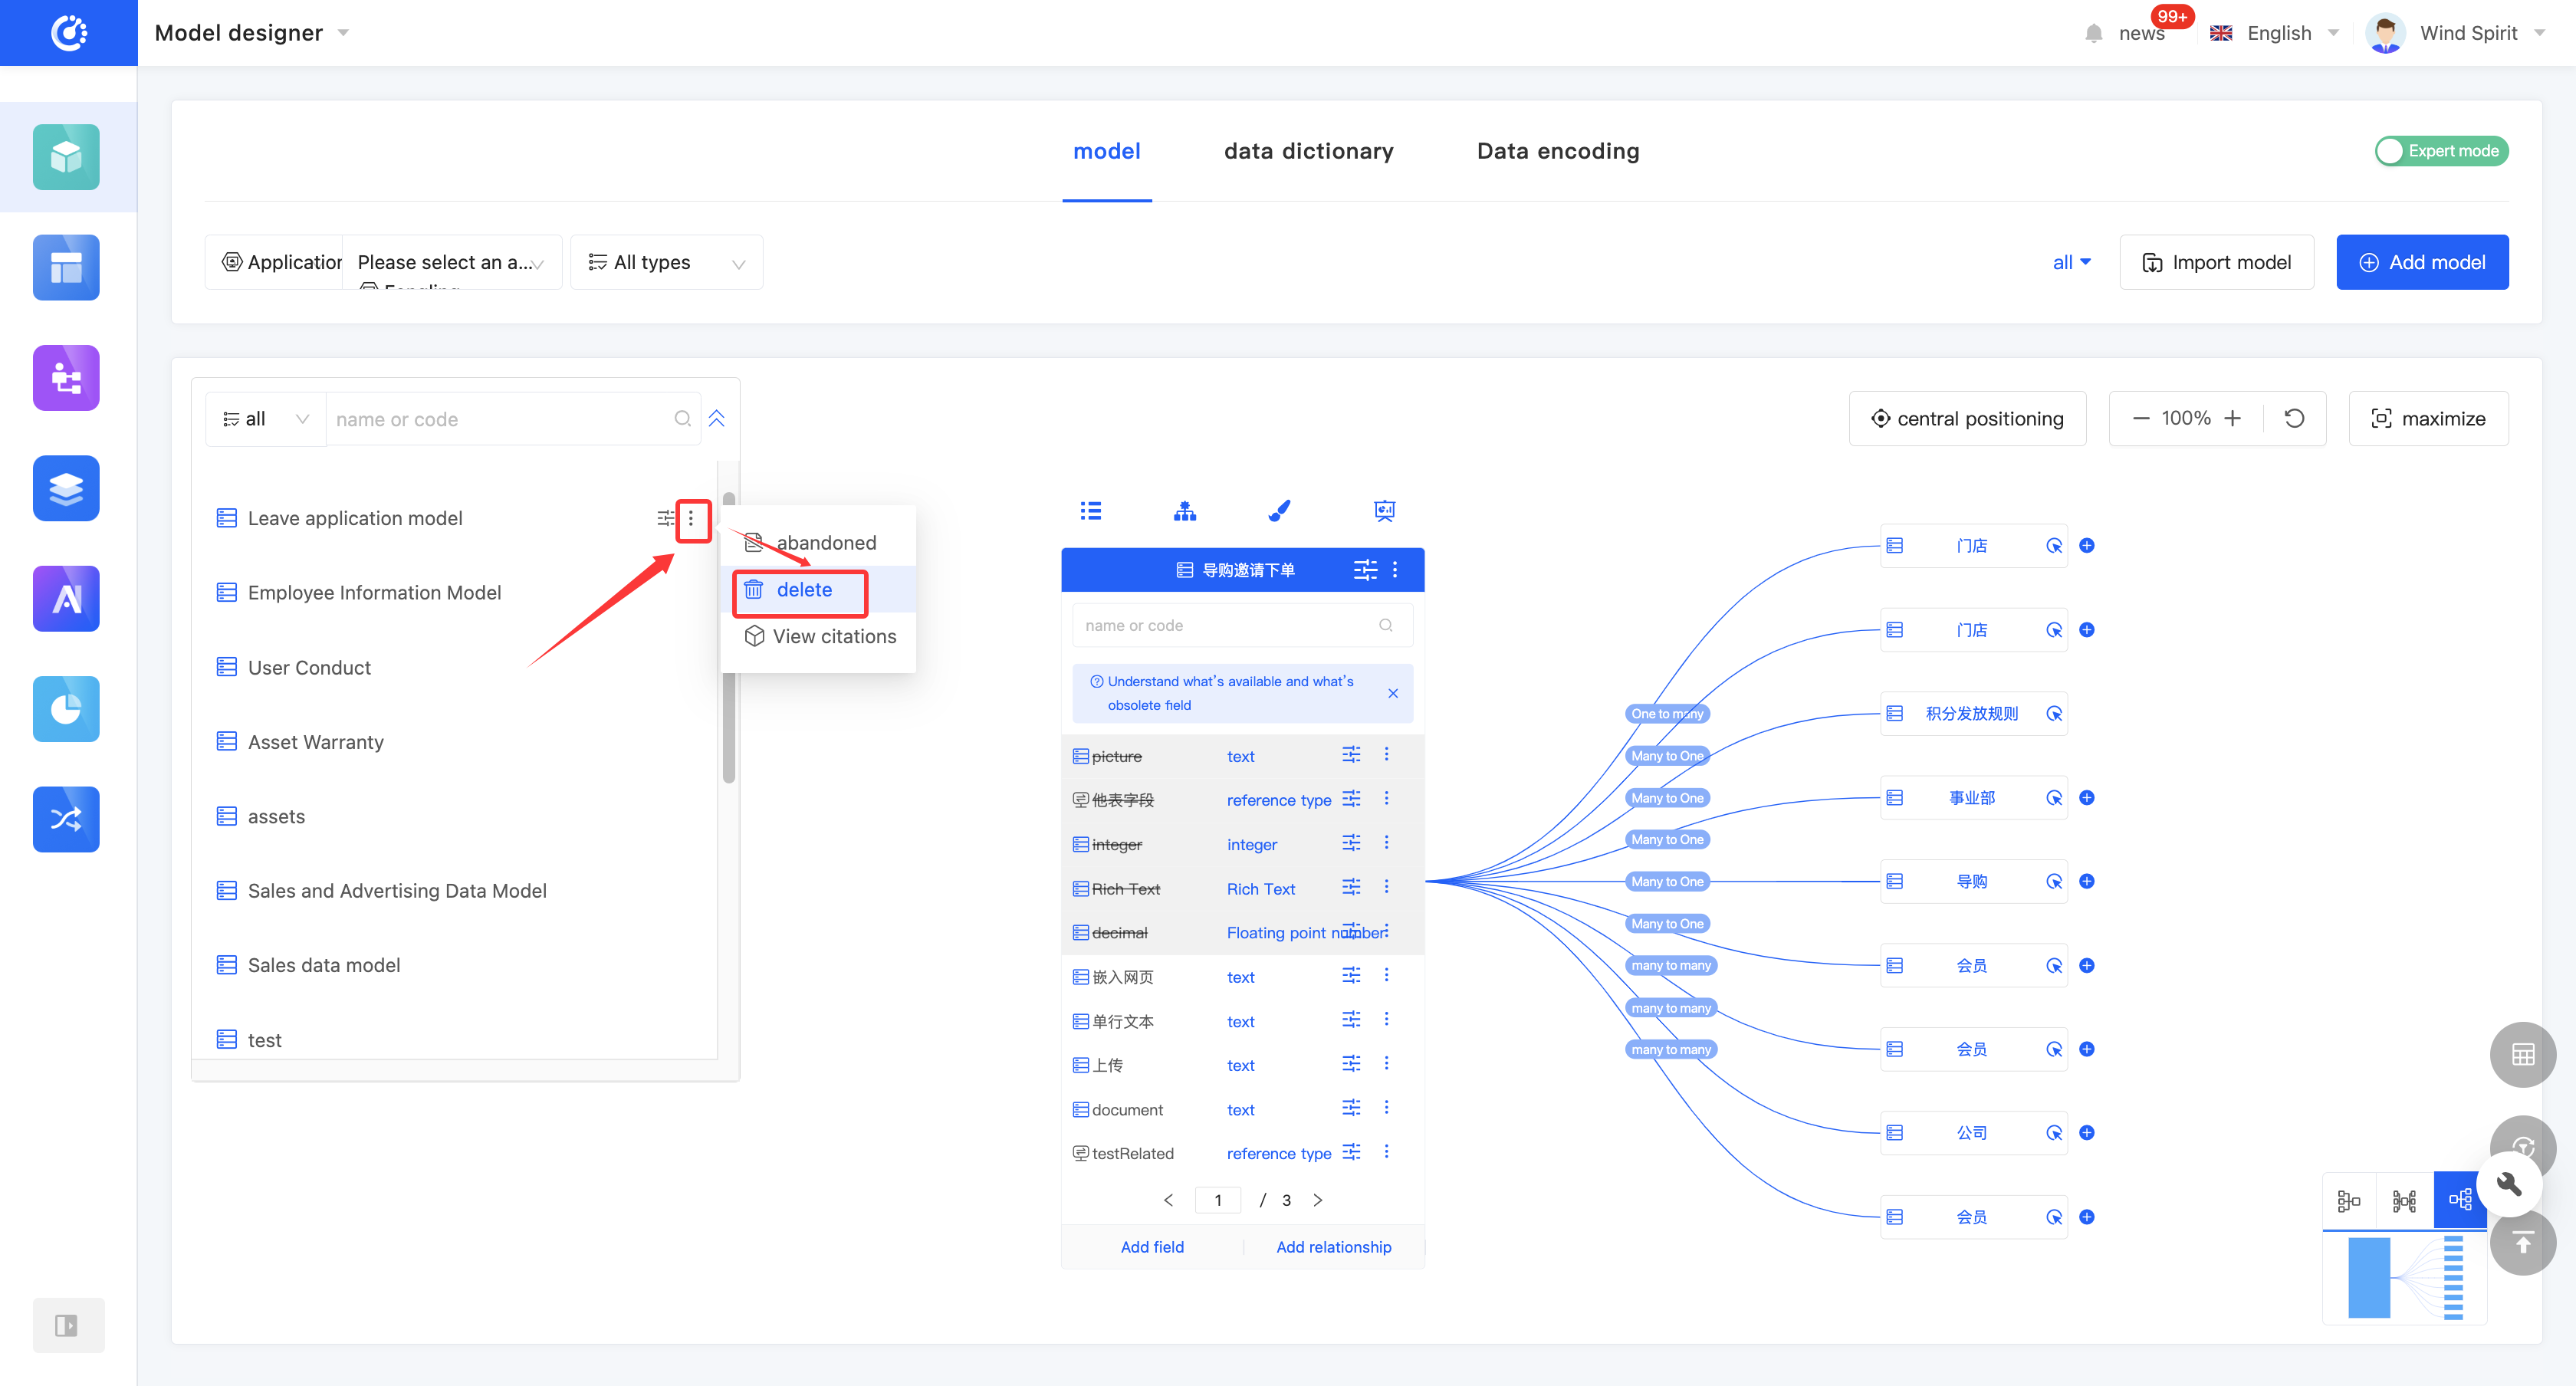
- If the deletion fails, click "View Model References" to view the reference relationships of the current model.

III. Field Management
Fields in a model are one of the core elements that make up a model. They correspond to a column in a database table and are used to store specific types of data information. The platform provides a rich variety of business-type fields, including basic types and relationship types. In the Model Designer, you can easily perform basic management operations on fields, such as adding, deleting, modifying, and querying. In the no-code mode, the model only displays no-code fields; in the expert mode, the model displays both no-code fields and low-code fields. Low-code fields are only for display and cannot be edited or deleted.
(I) Add a Field
1. Function Introduction
A model can have multiple fields added. Fields manually added in the Model Designer are no-code fields. When creating, you can edit the field name, business type, whether it is a multi-value field, storage type, and field length (only in the expert mode).
Fields support two storage types: storage fields and transmission fields (see the appendix: Glossary for details).
Note
A multi-value field means that the field can store or transmit multiple data of the same business type, while a non-multi-value field can only store or transmit a single data of the same business type.
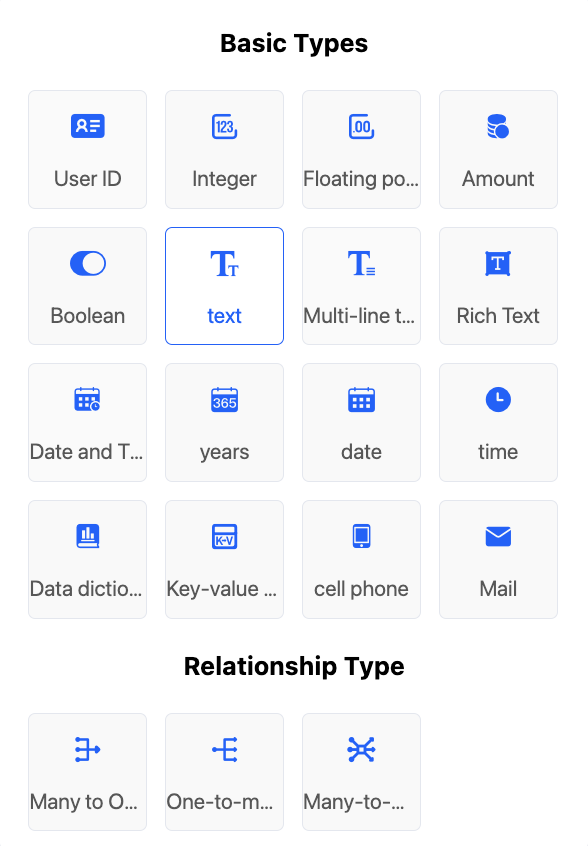
The platform provides a rich variety of field business types, including 16 basic types and 3 relationship types, which you can select according to actual needs.
- Basic Types: User ID, Integer, Floating-point Number, Amount, Boolean, Text, Multi-line Text, Rich Text, Date and Time, Year, Date, Time, Data Dictionary, Key-Value Pair, Mobile Phone, Email
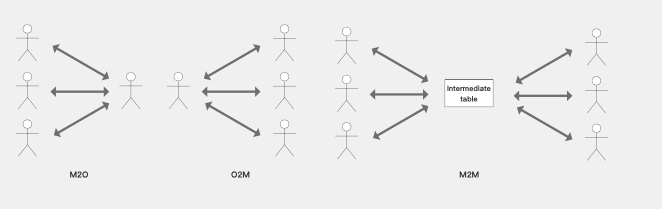
- Relationship Types: Many-to-One, One-to-Many, Many-to-Many
Example
2. Operation Method
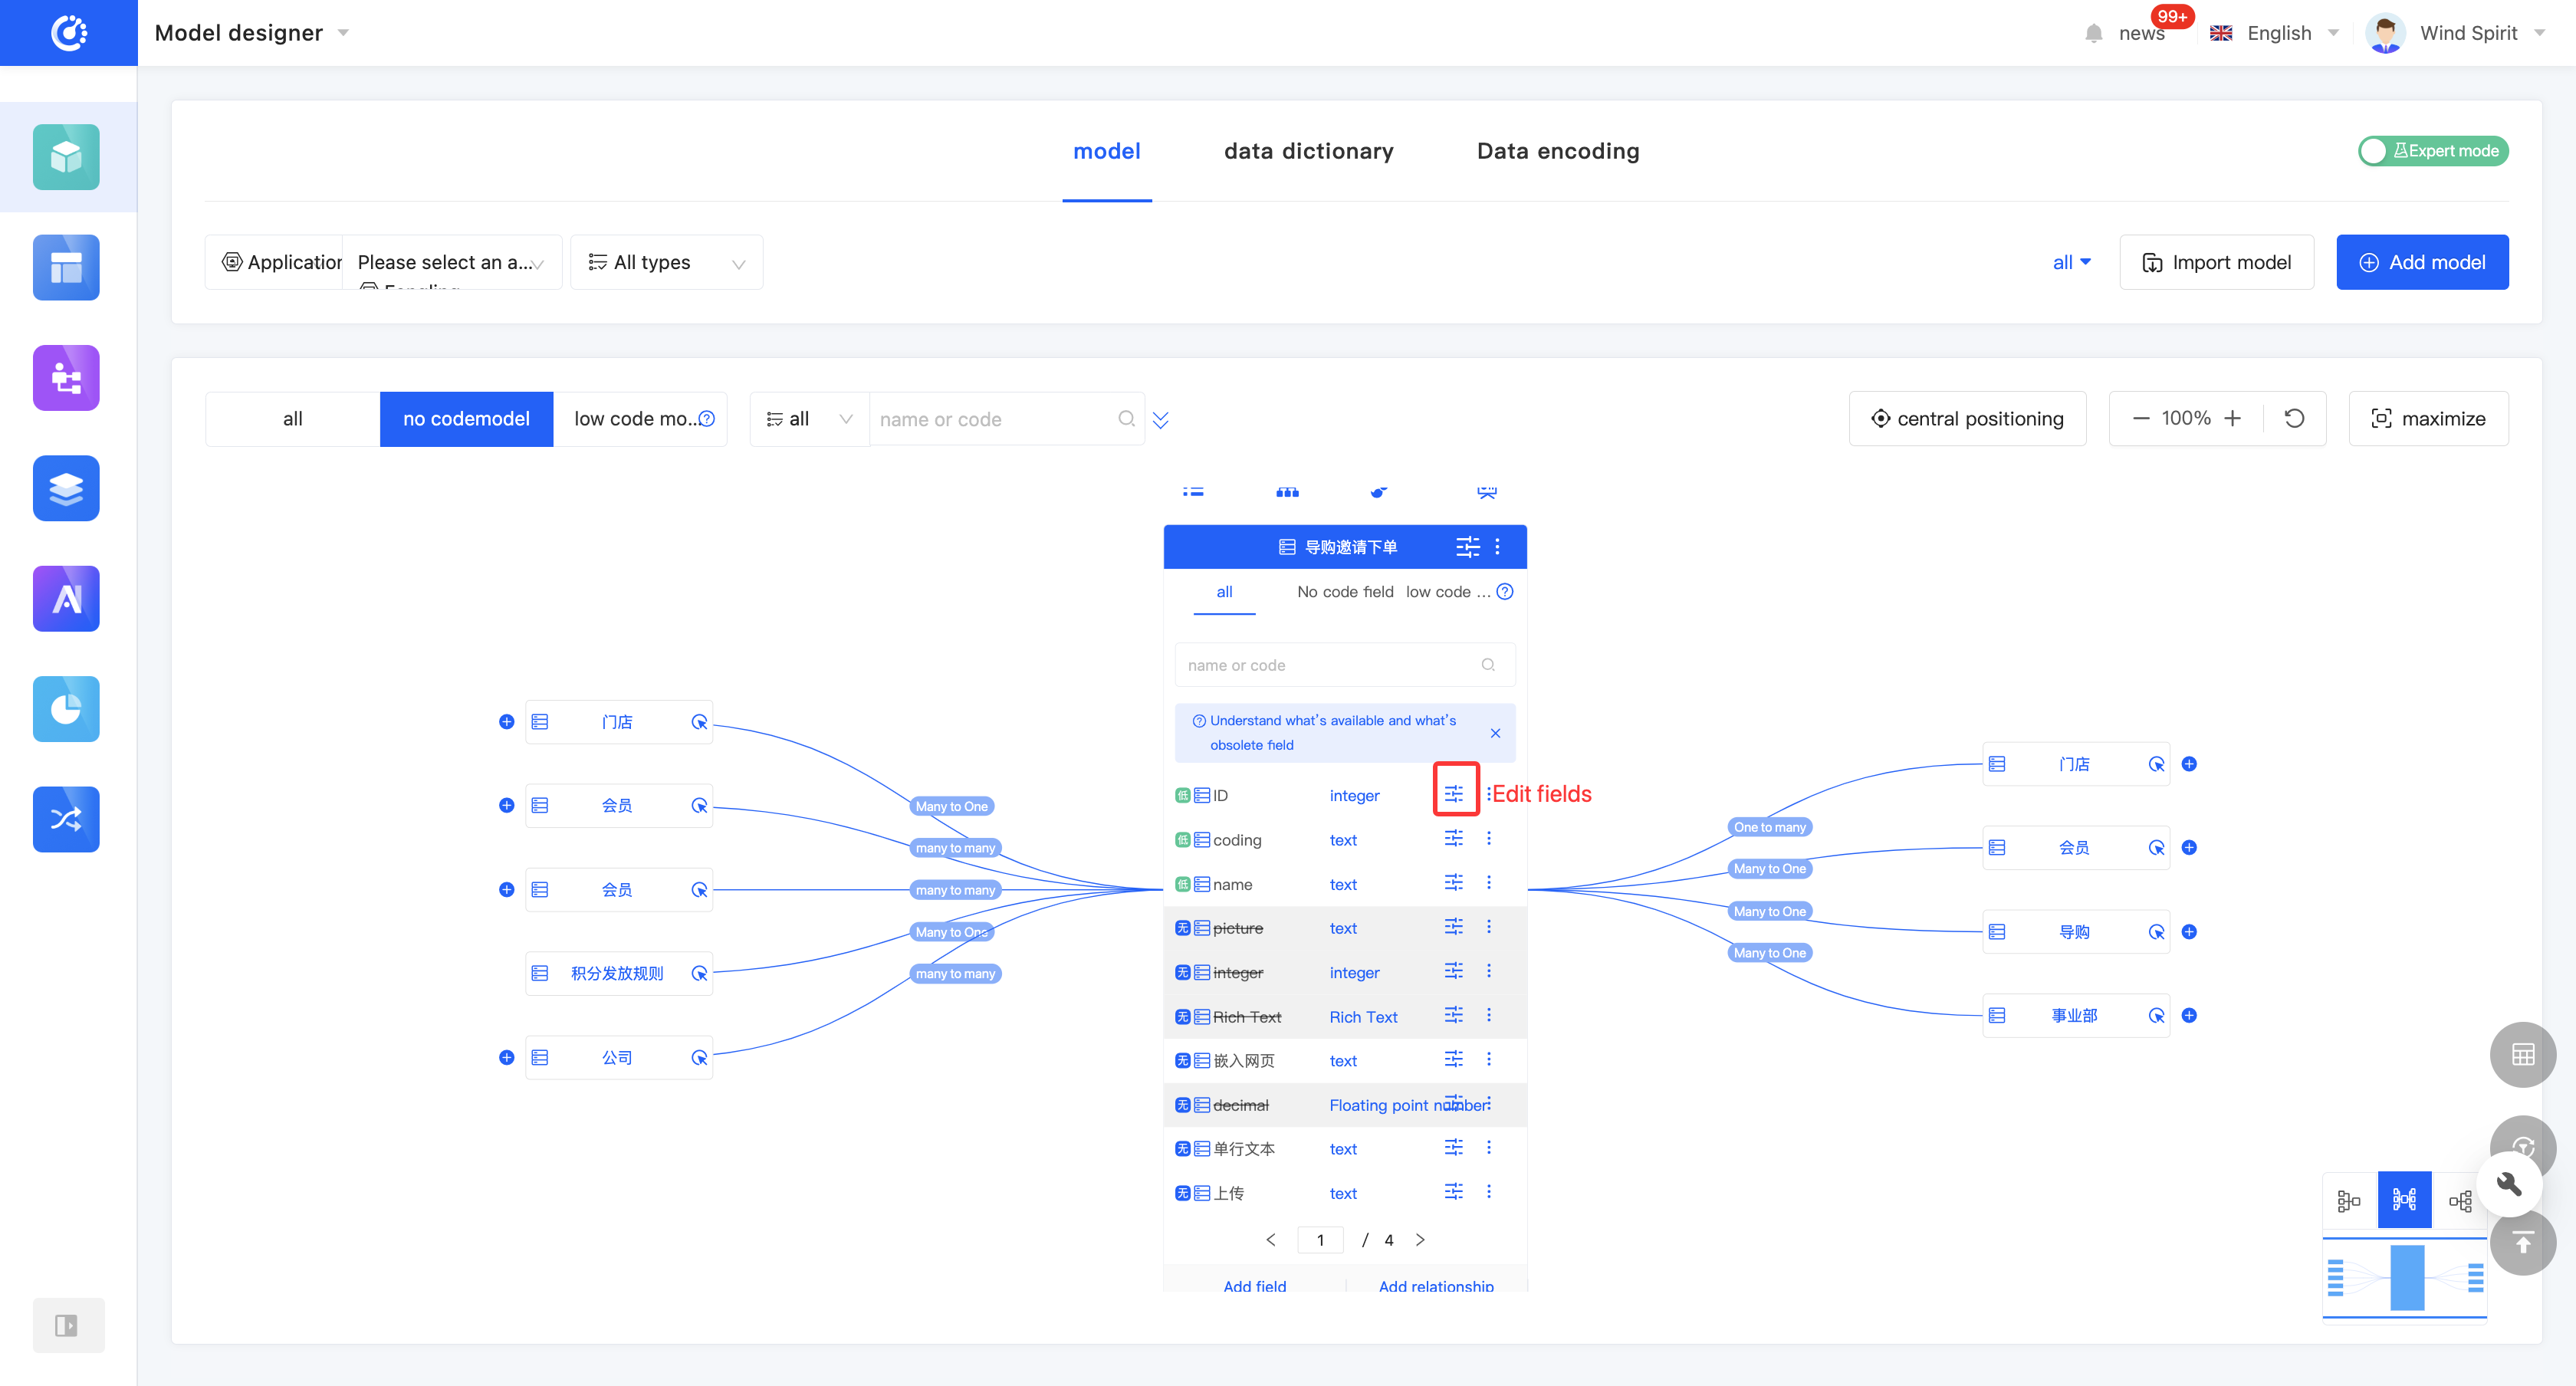
- In the graphical mode, click "Add a Field" to add a field. Additionally, the platform provides a shortcut for adding relationships. Click "Add a Relationship" to directly add a relationship-type field.

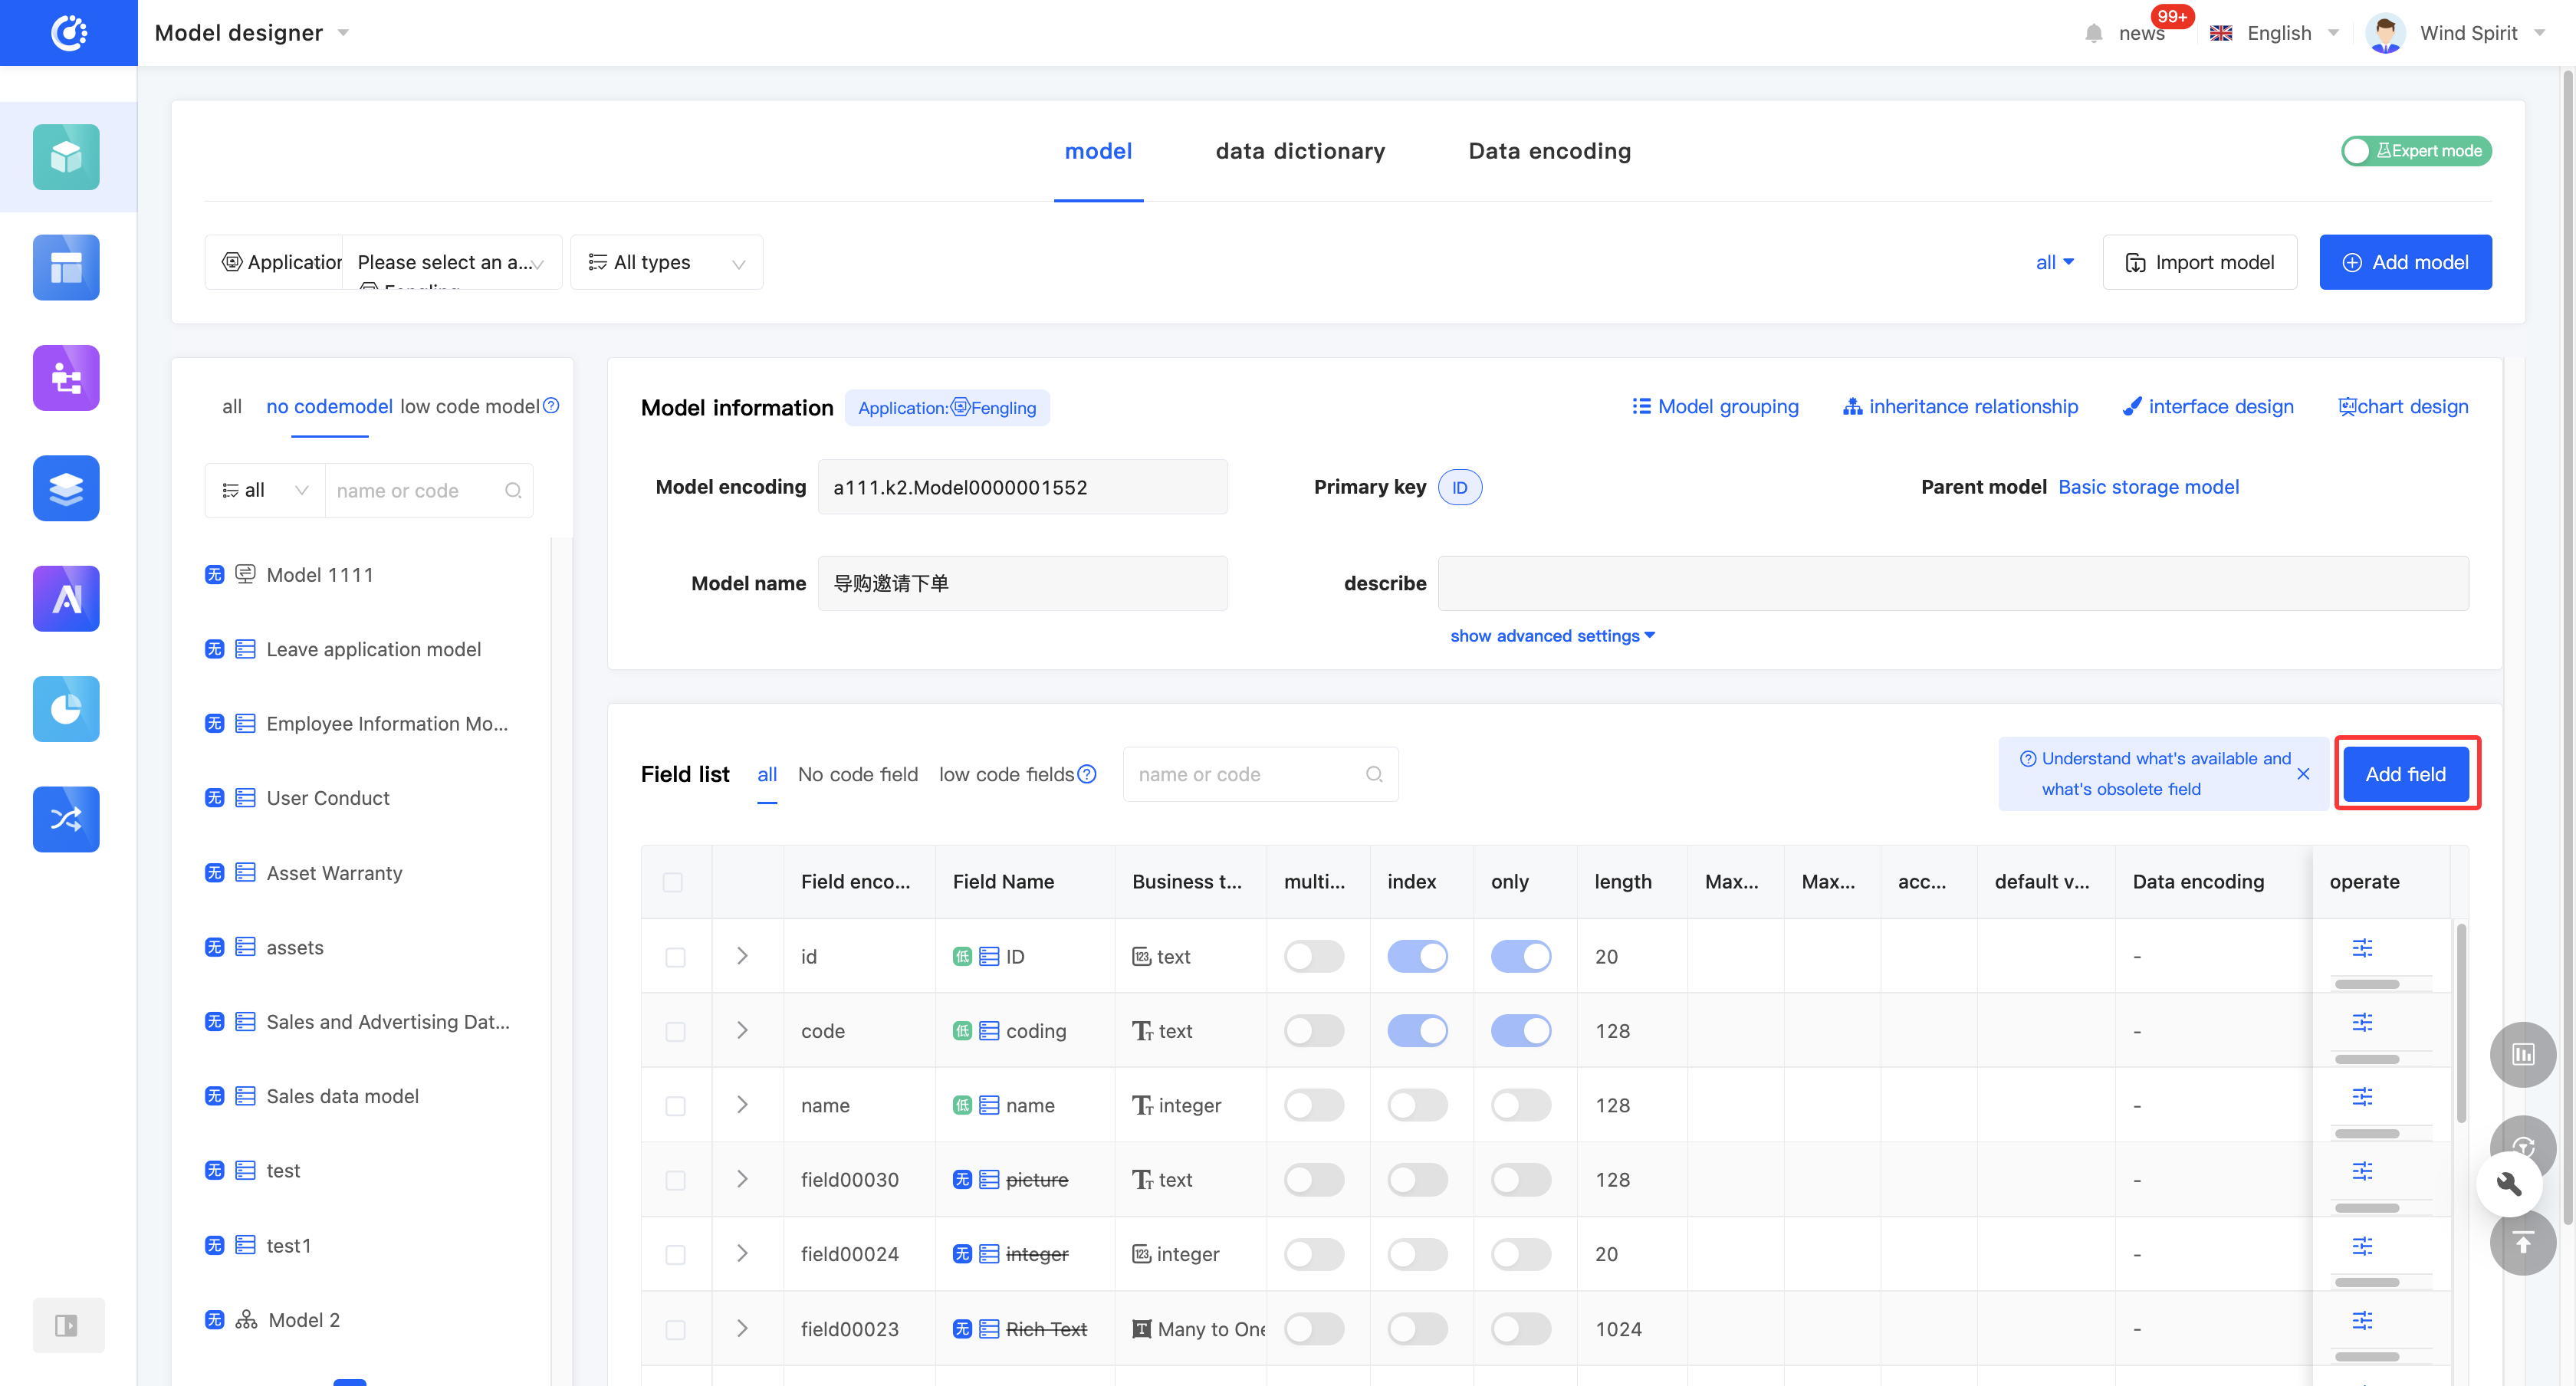
- In the tabular mode, click "Add a Field" in the upper right corner of the field list to add a field.
(II) Edit a Field
1. Function Introduction
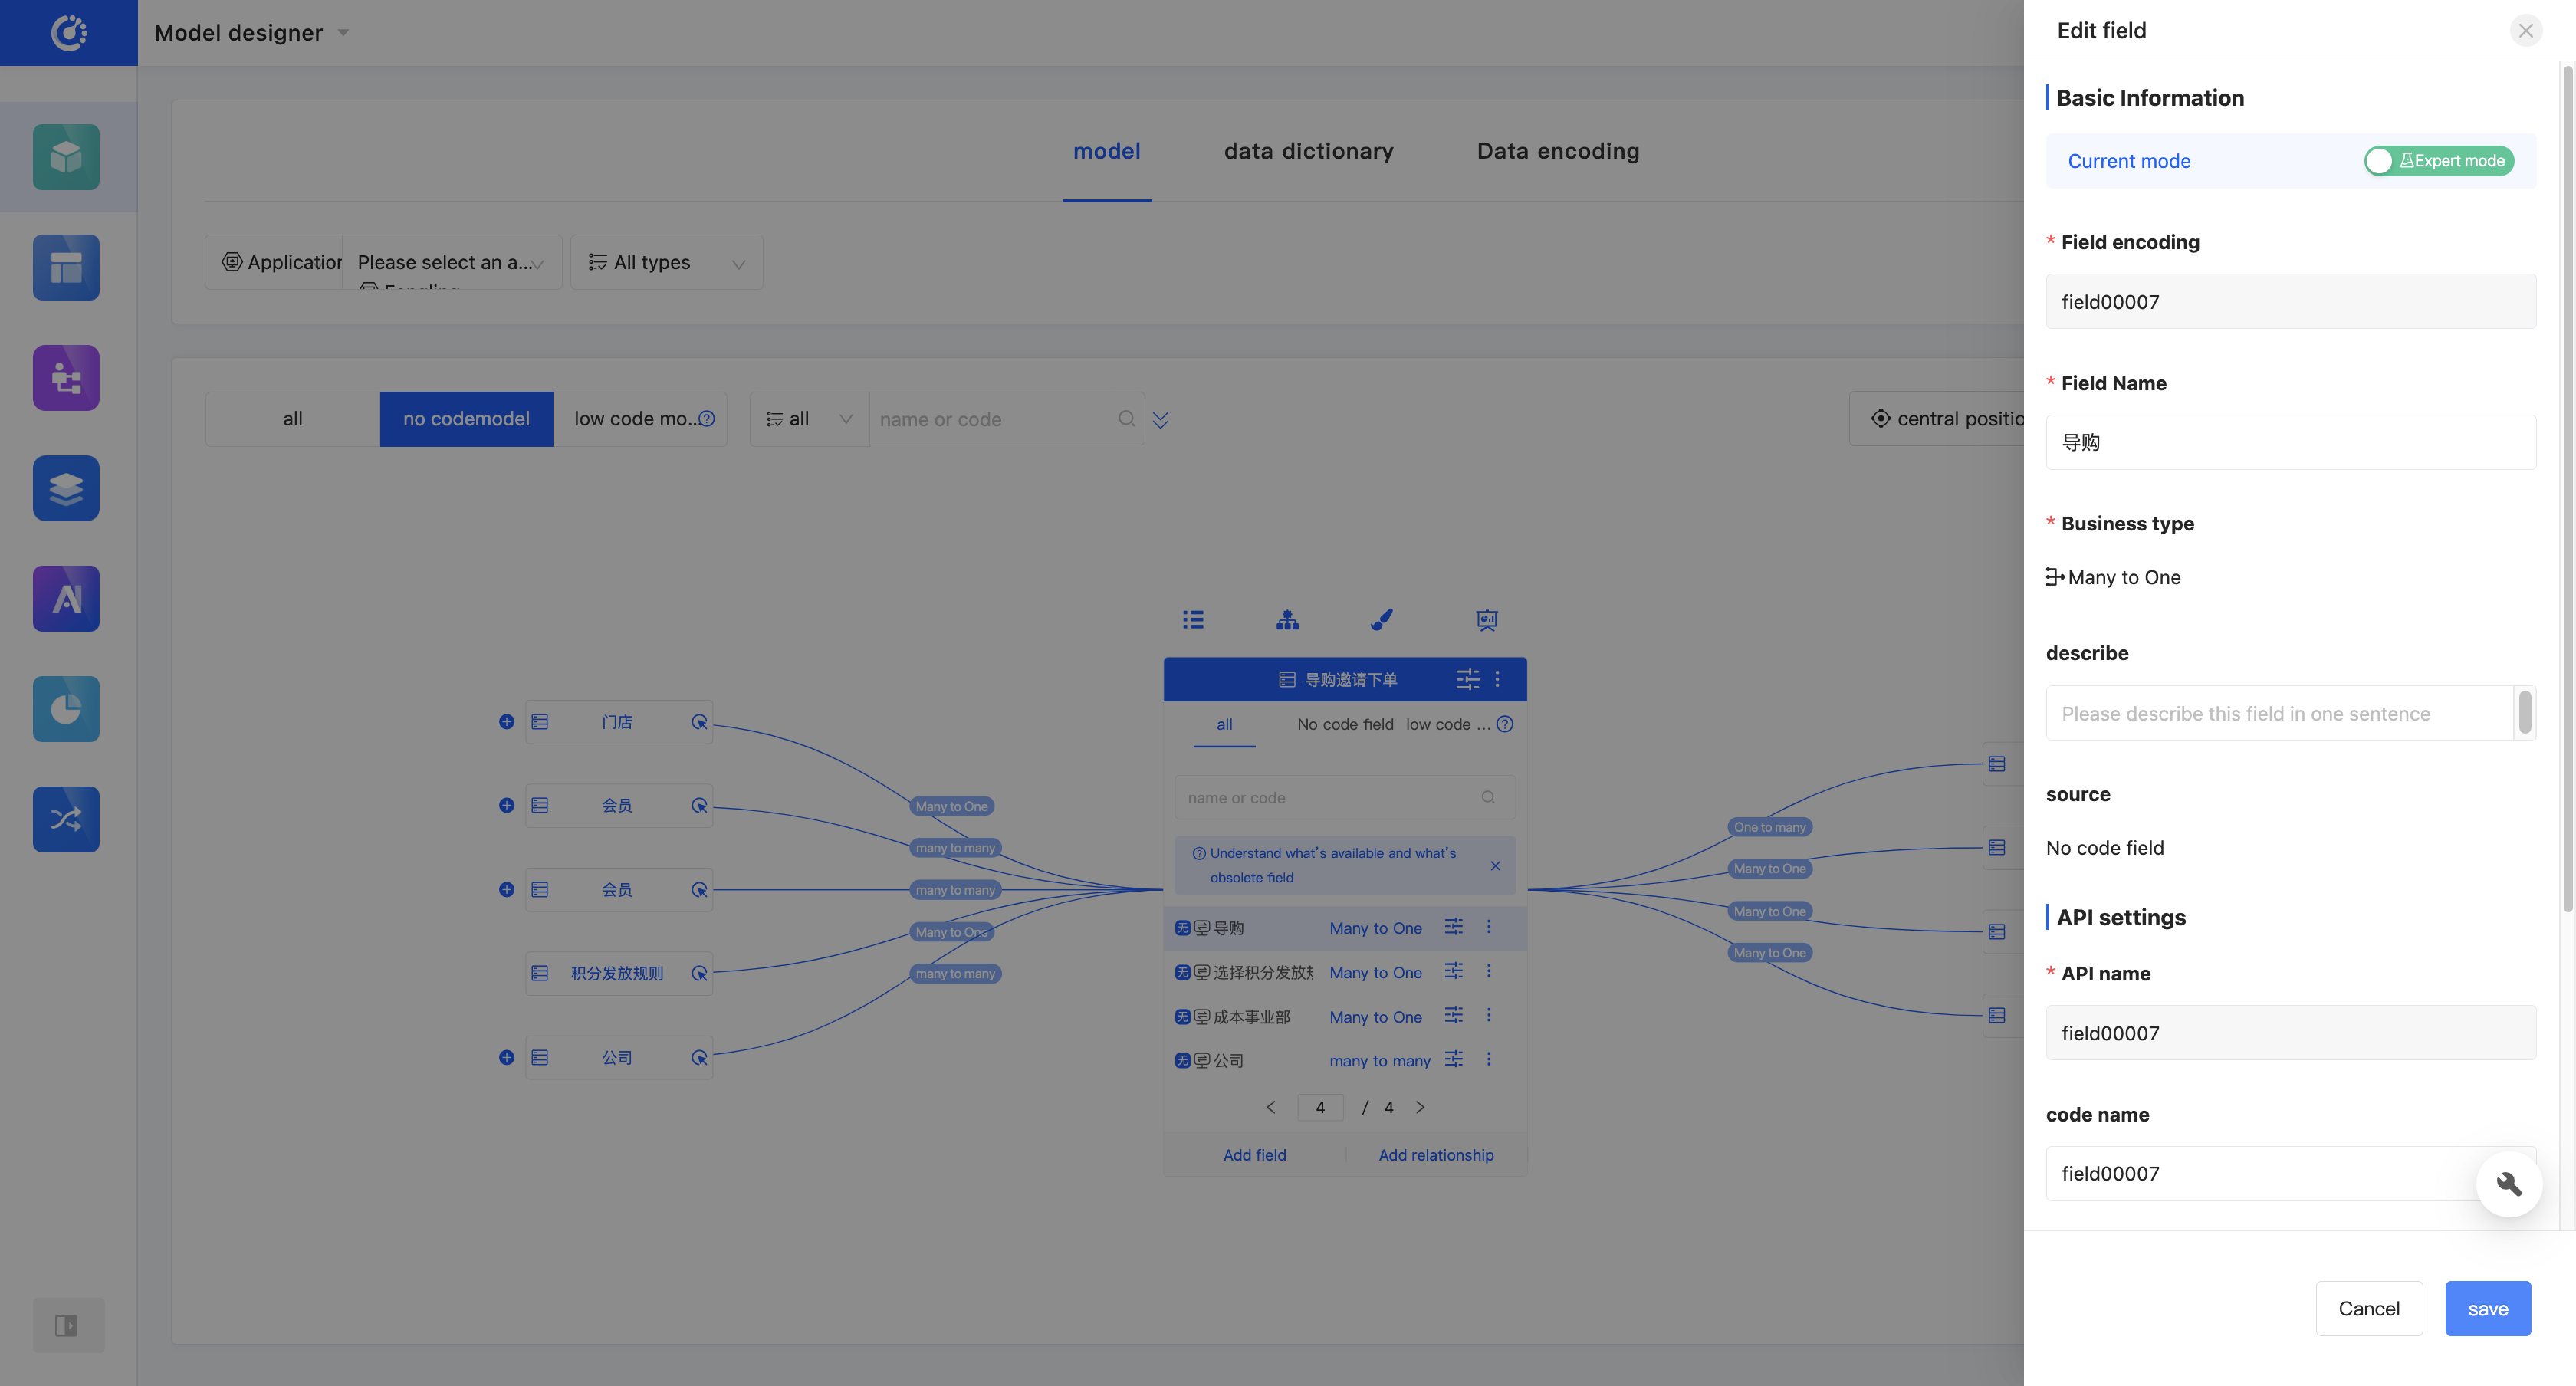
Successfully created fields can be edited. However, note that only some information can be modified. Some information is fixed at the time of creation, so please fill it in carefully when creating.
Note
The field length and precision can only be changed from small to large, not from large to small.
2. Operation Method
- In the graphical mode, click the "Edit Field" icon on the right side of the row in the field list. Then, you can edit the field information in the pop-up edit page.
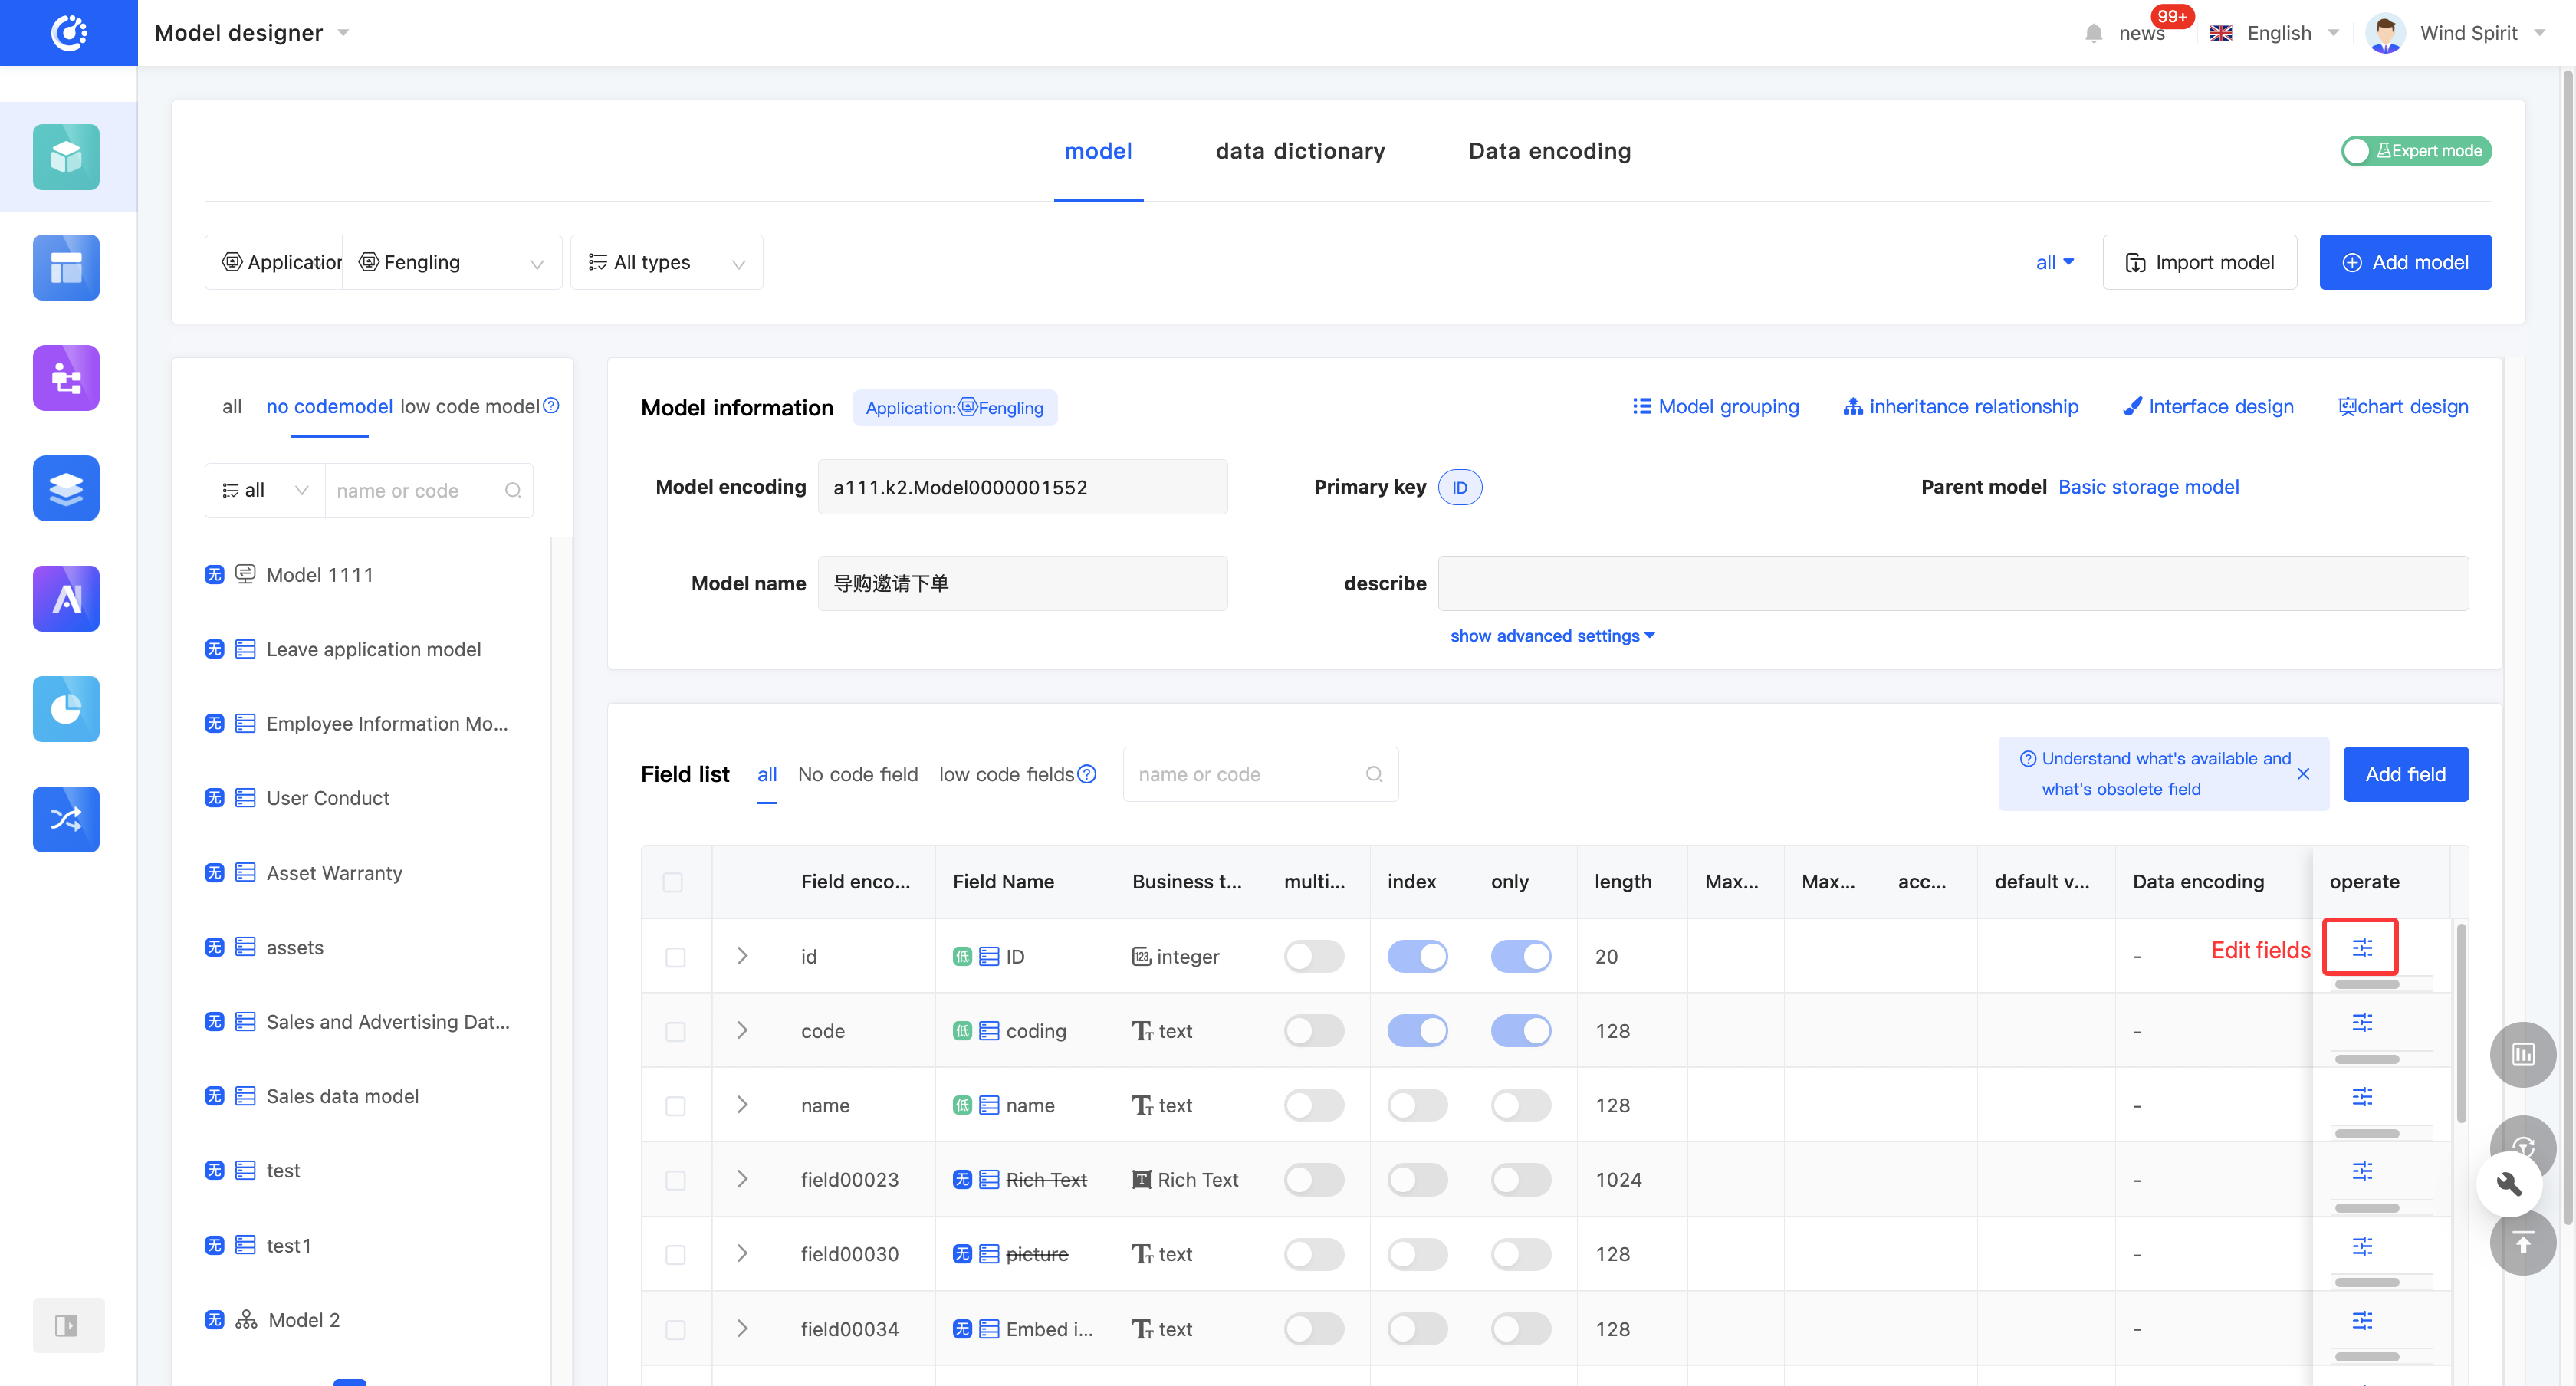
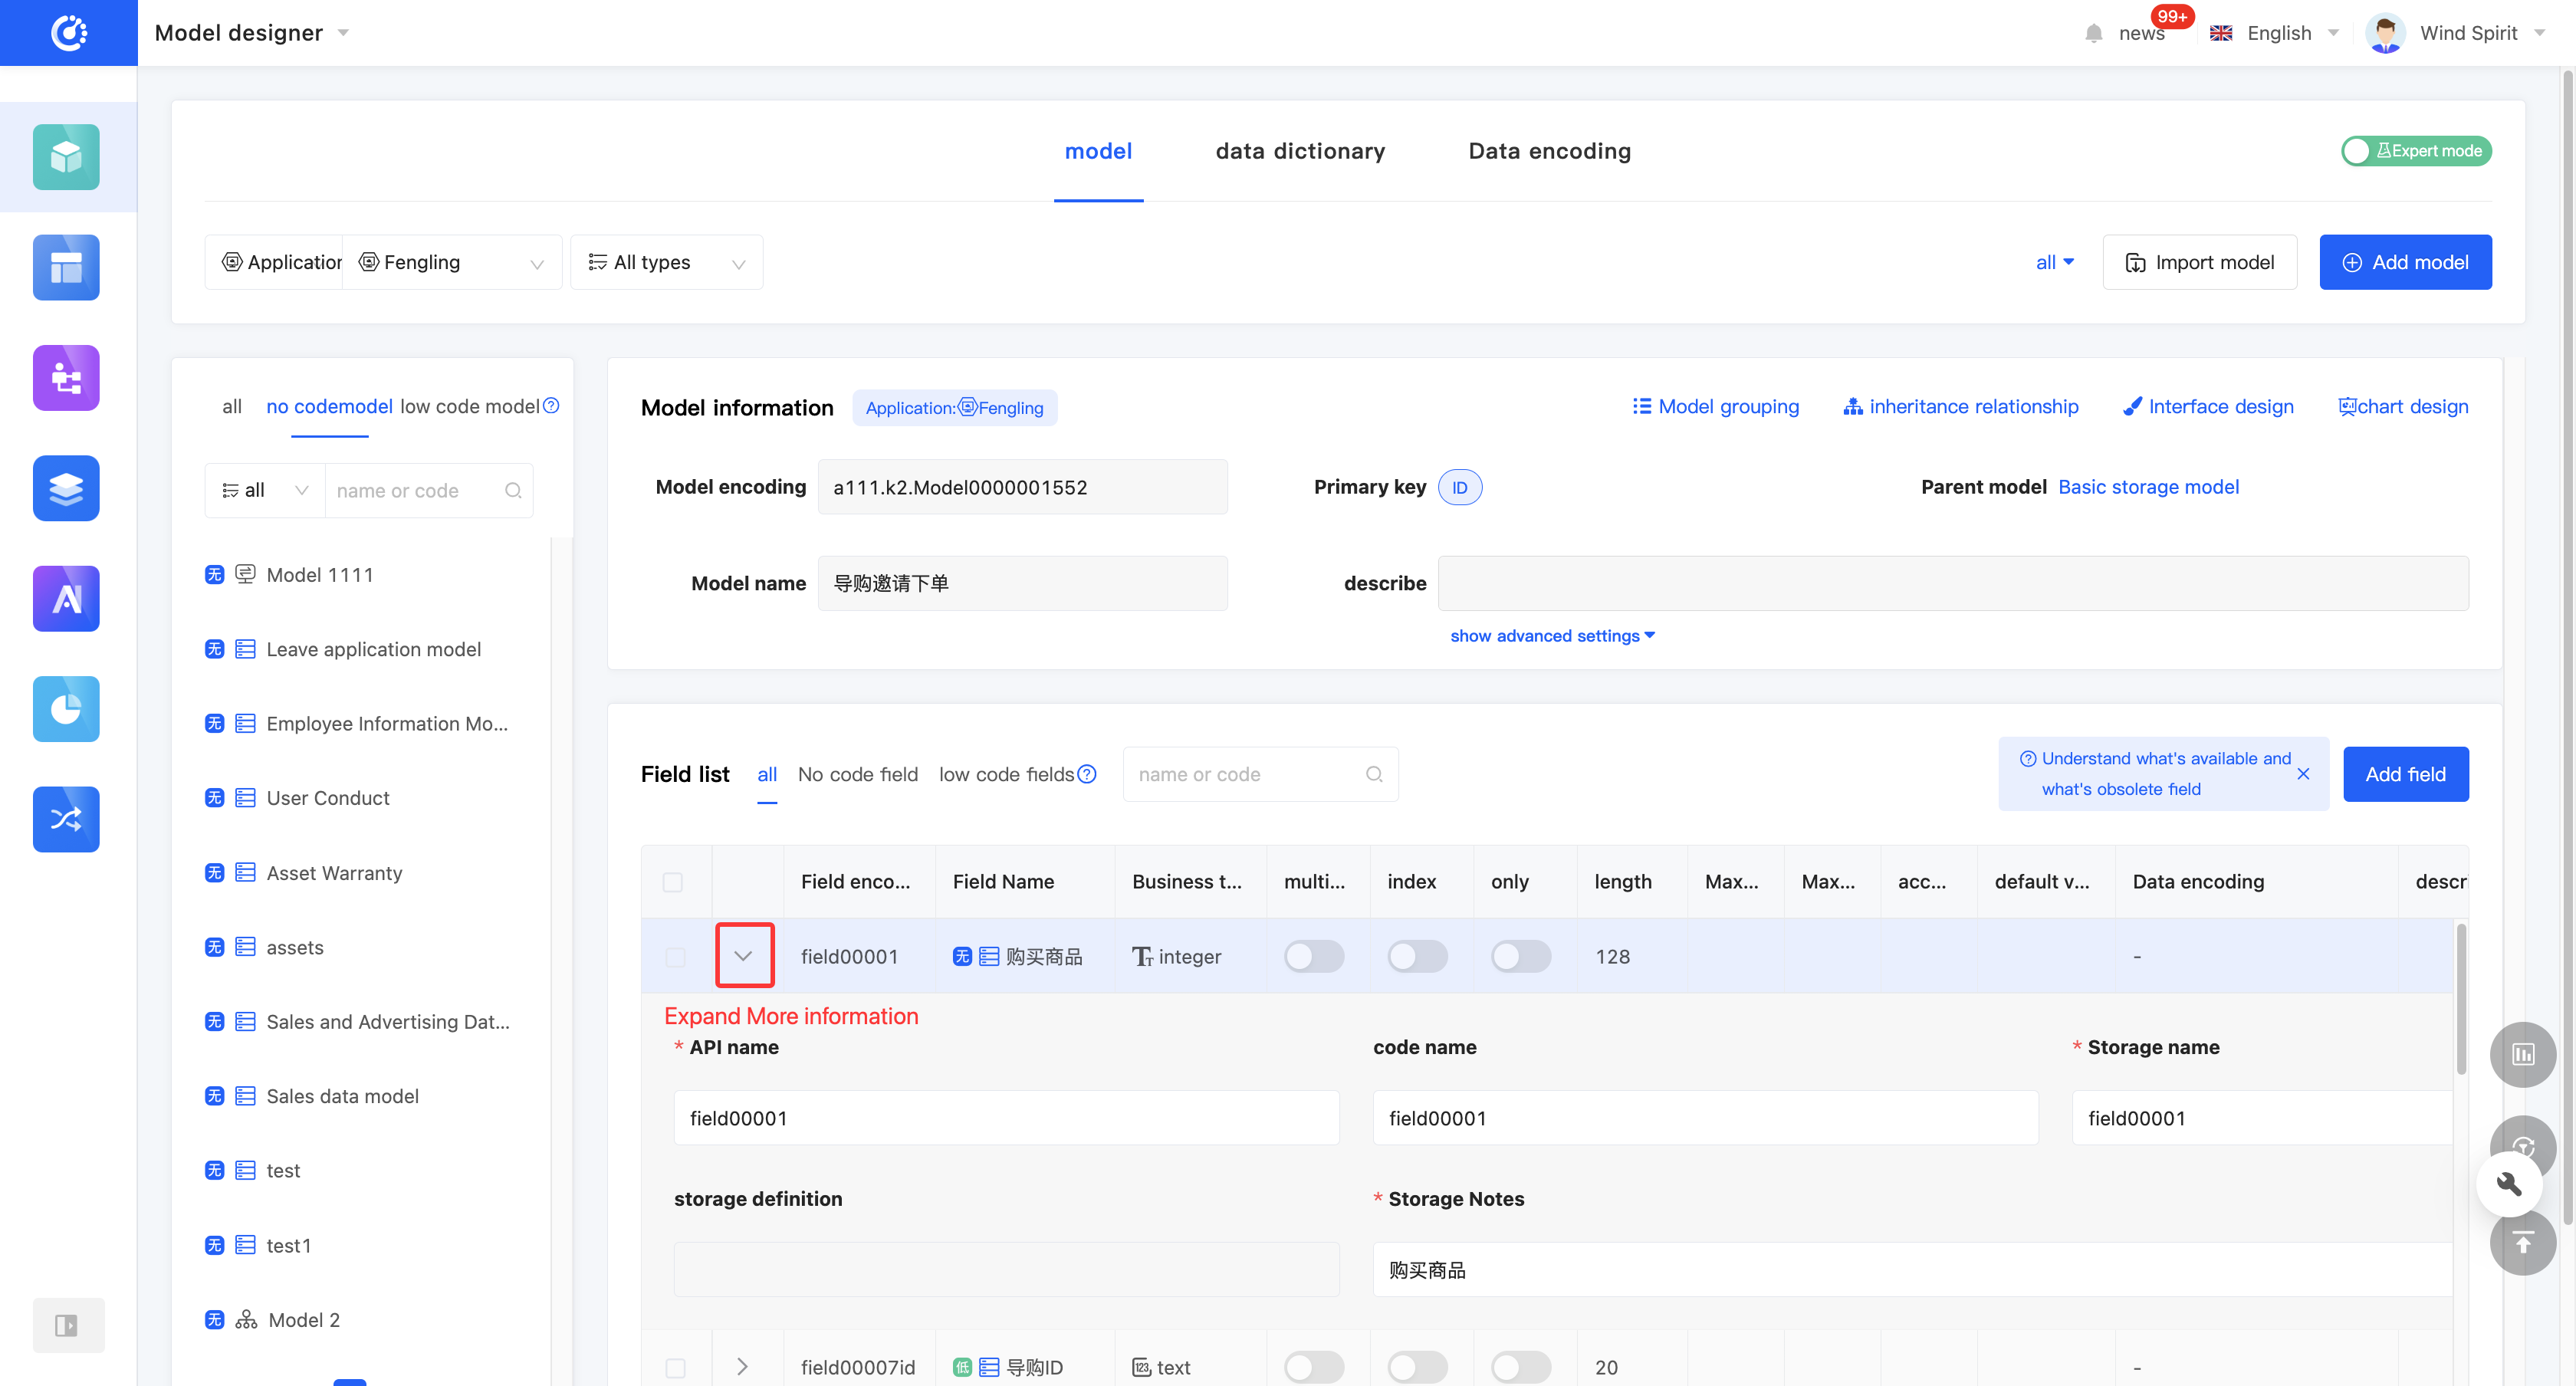
- In the tabular mode, click the "Edit Field" icon on the right side of the row in the field list, or directly click the field information to edit the field information in the field list. You can click the "Expand" icon to edit more field information.
(III) View Reference Relationships
1. Function Introduction
By using the view reference function, you can view various elements that have a reference relationship with the model, including other models, pages, processes, and charts.
2. Operation Method
Click "View References" to view all references, including models, pages, processes, and charts.


(IV) Discard/Activate a Field
1. Function Introduction
For fields that are not currently in use, you can perform a discard operation. If needed in the future, you can simply set the discarded field to an active state to put it back into use. In addition, discarded fields still support operations such as editing.
Note
Discarded fields will no longer be displayed in the optional list when being referenced in other designers.
2. Operation Method
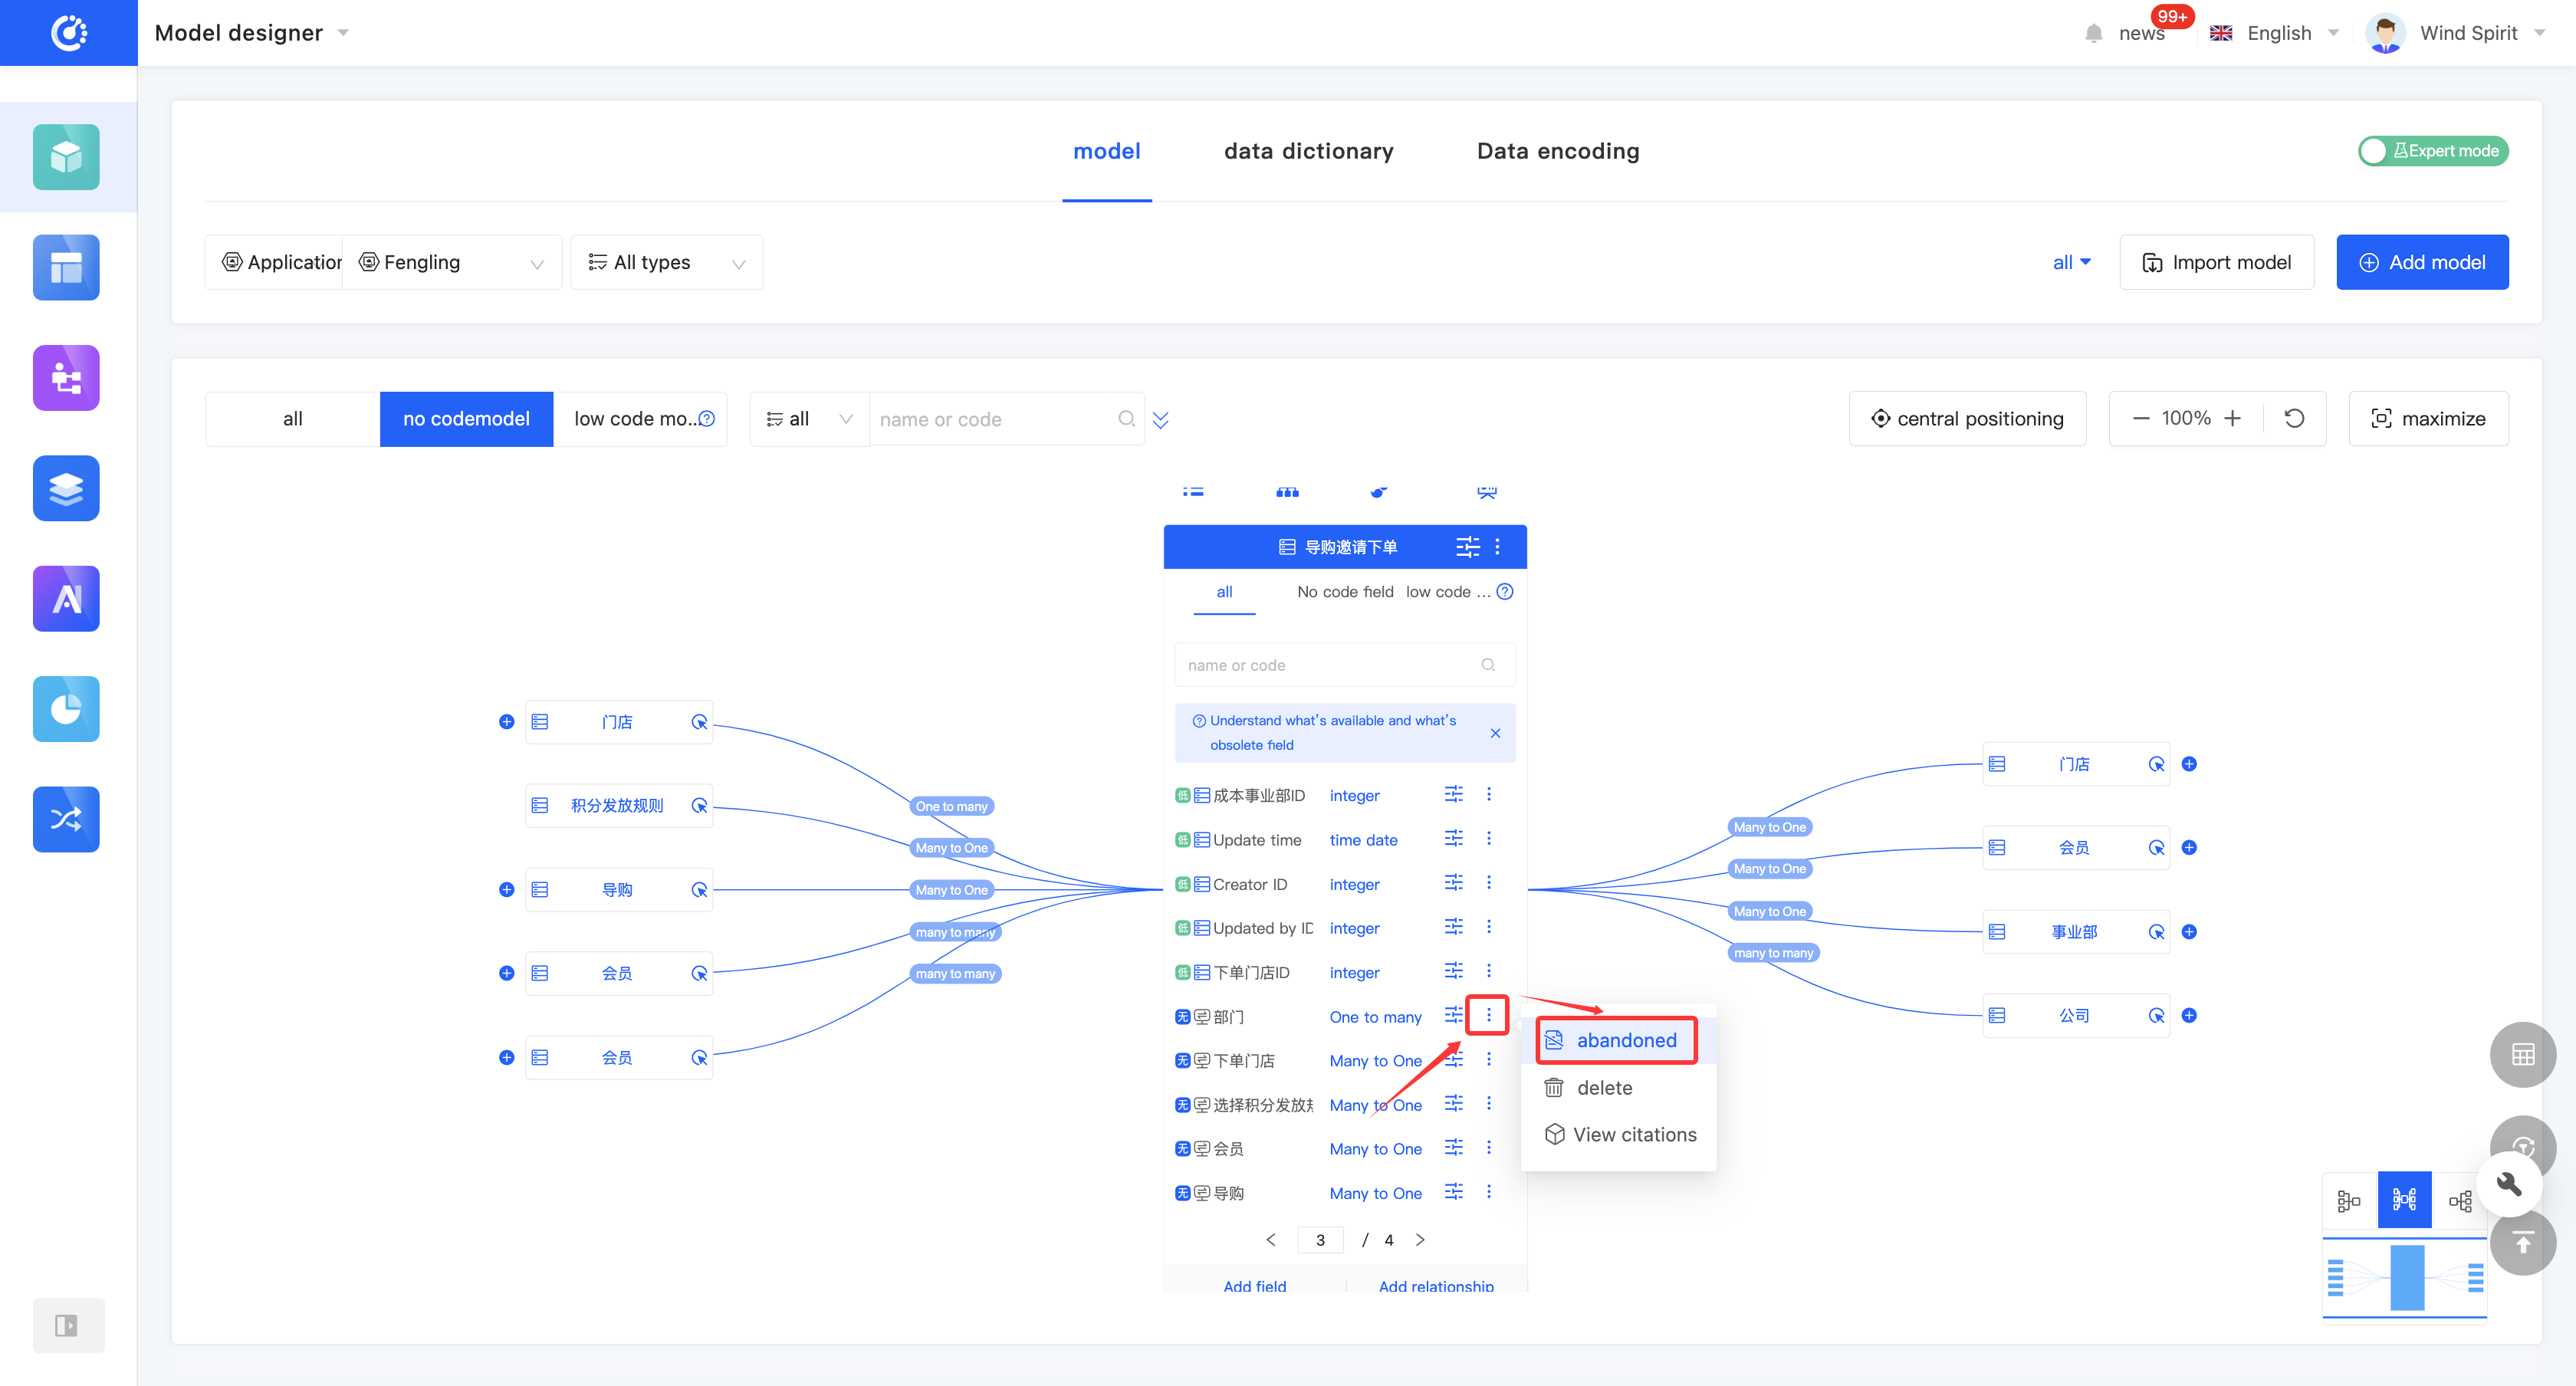
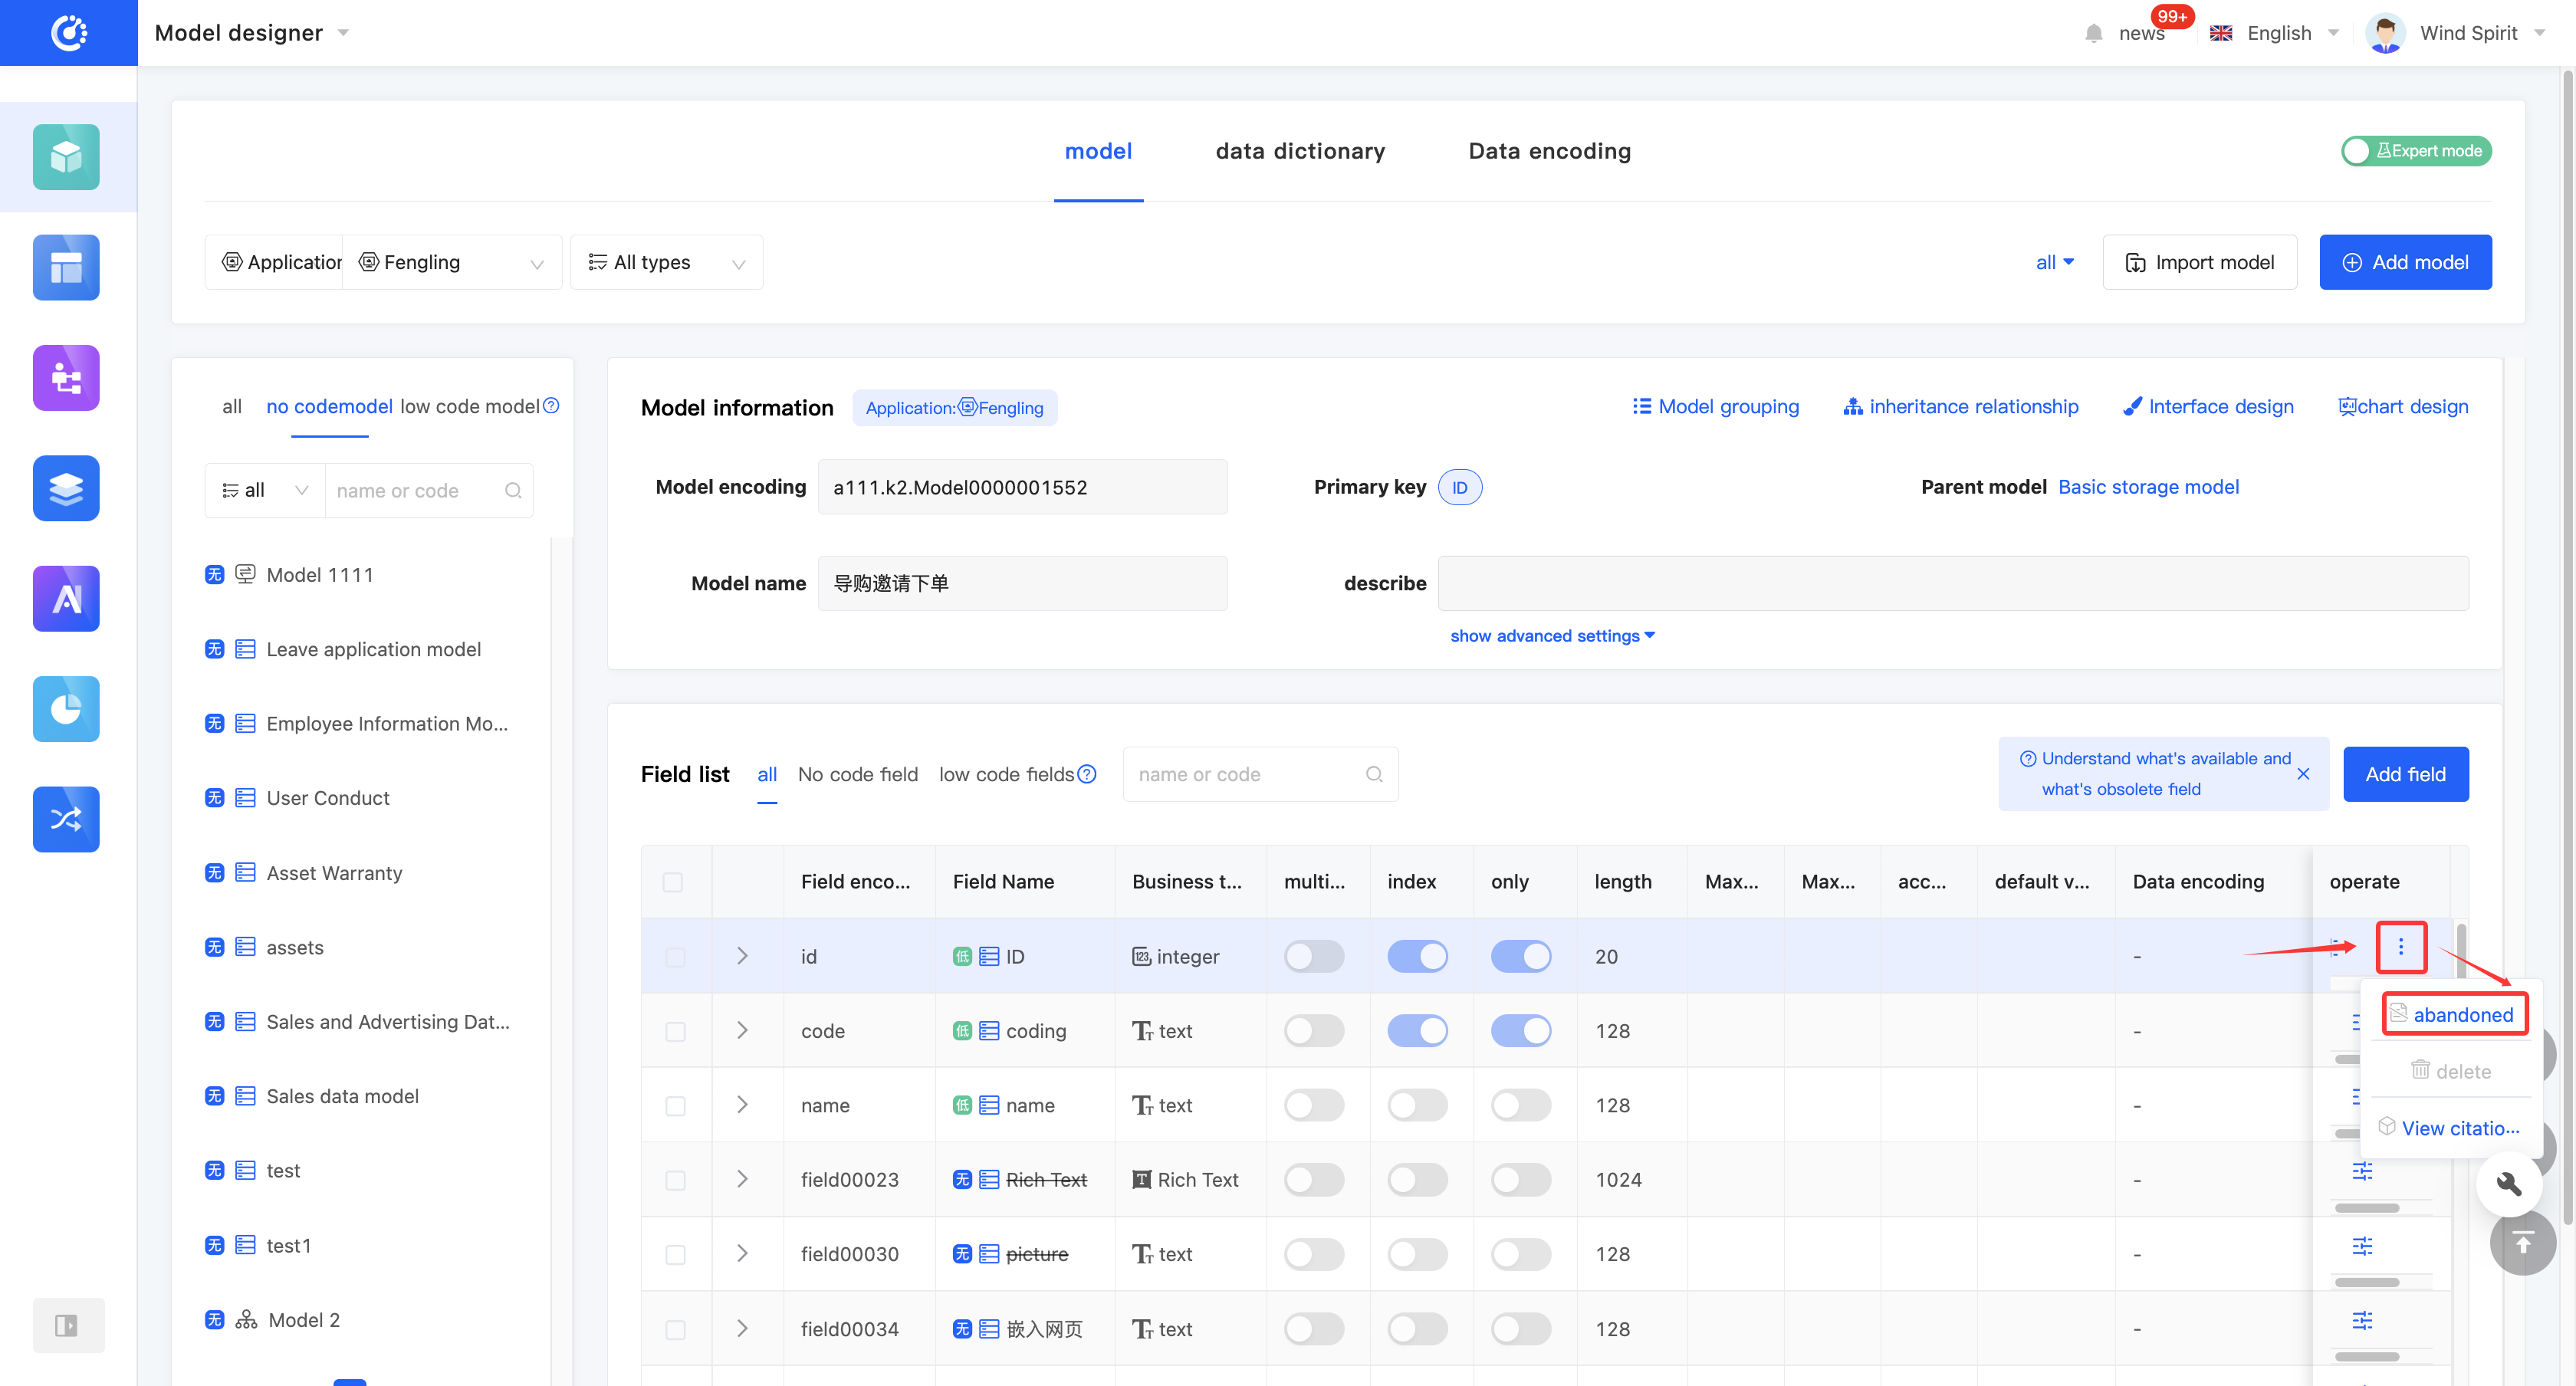
Click "Discard" to set the field to a discarded state. The button will change to "Set to Active". Click it again to set the field to an active state.
(V) Delete a Field
1. Function Introduction
When a field is no longer needed, you can choose to delete it.
Note
Before deletion, make sure that the field is not referenced by other designers; otherwise, the deletion operation will fail.
Warning
The deleted field will no longer appear in the field list, and this operation cannot be undone. Please perform it with caution.
If the deletion fails, the field reference relationship will be directly displayed.

2. Operation Method
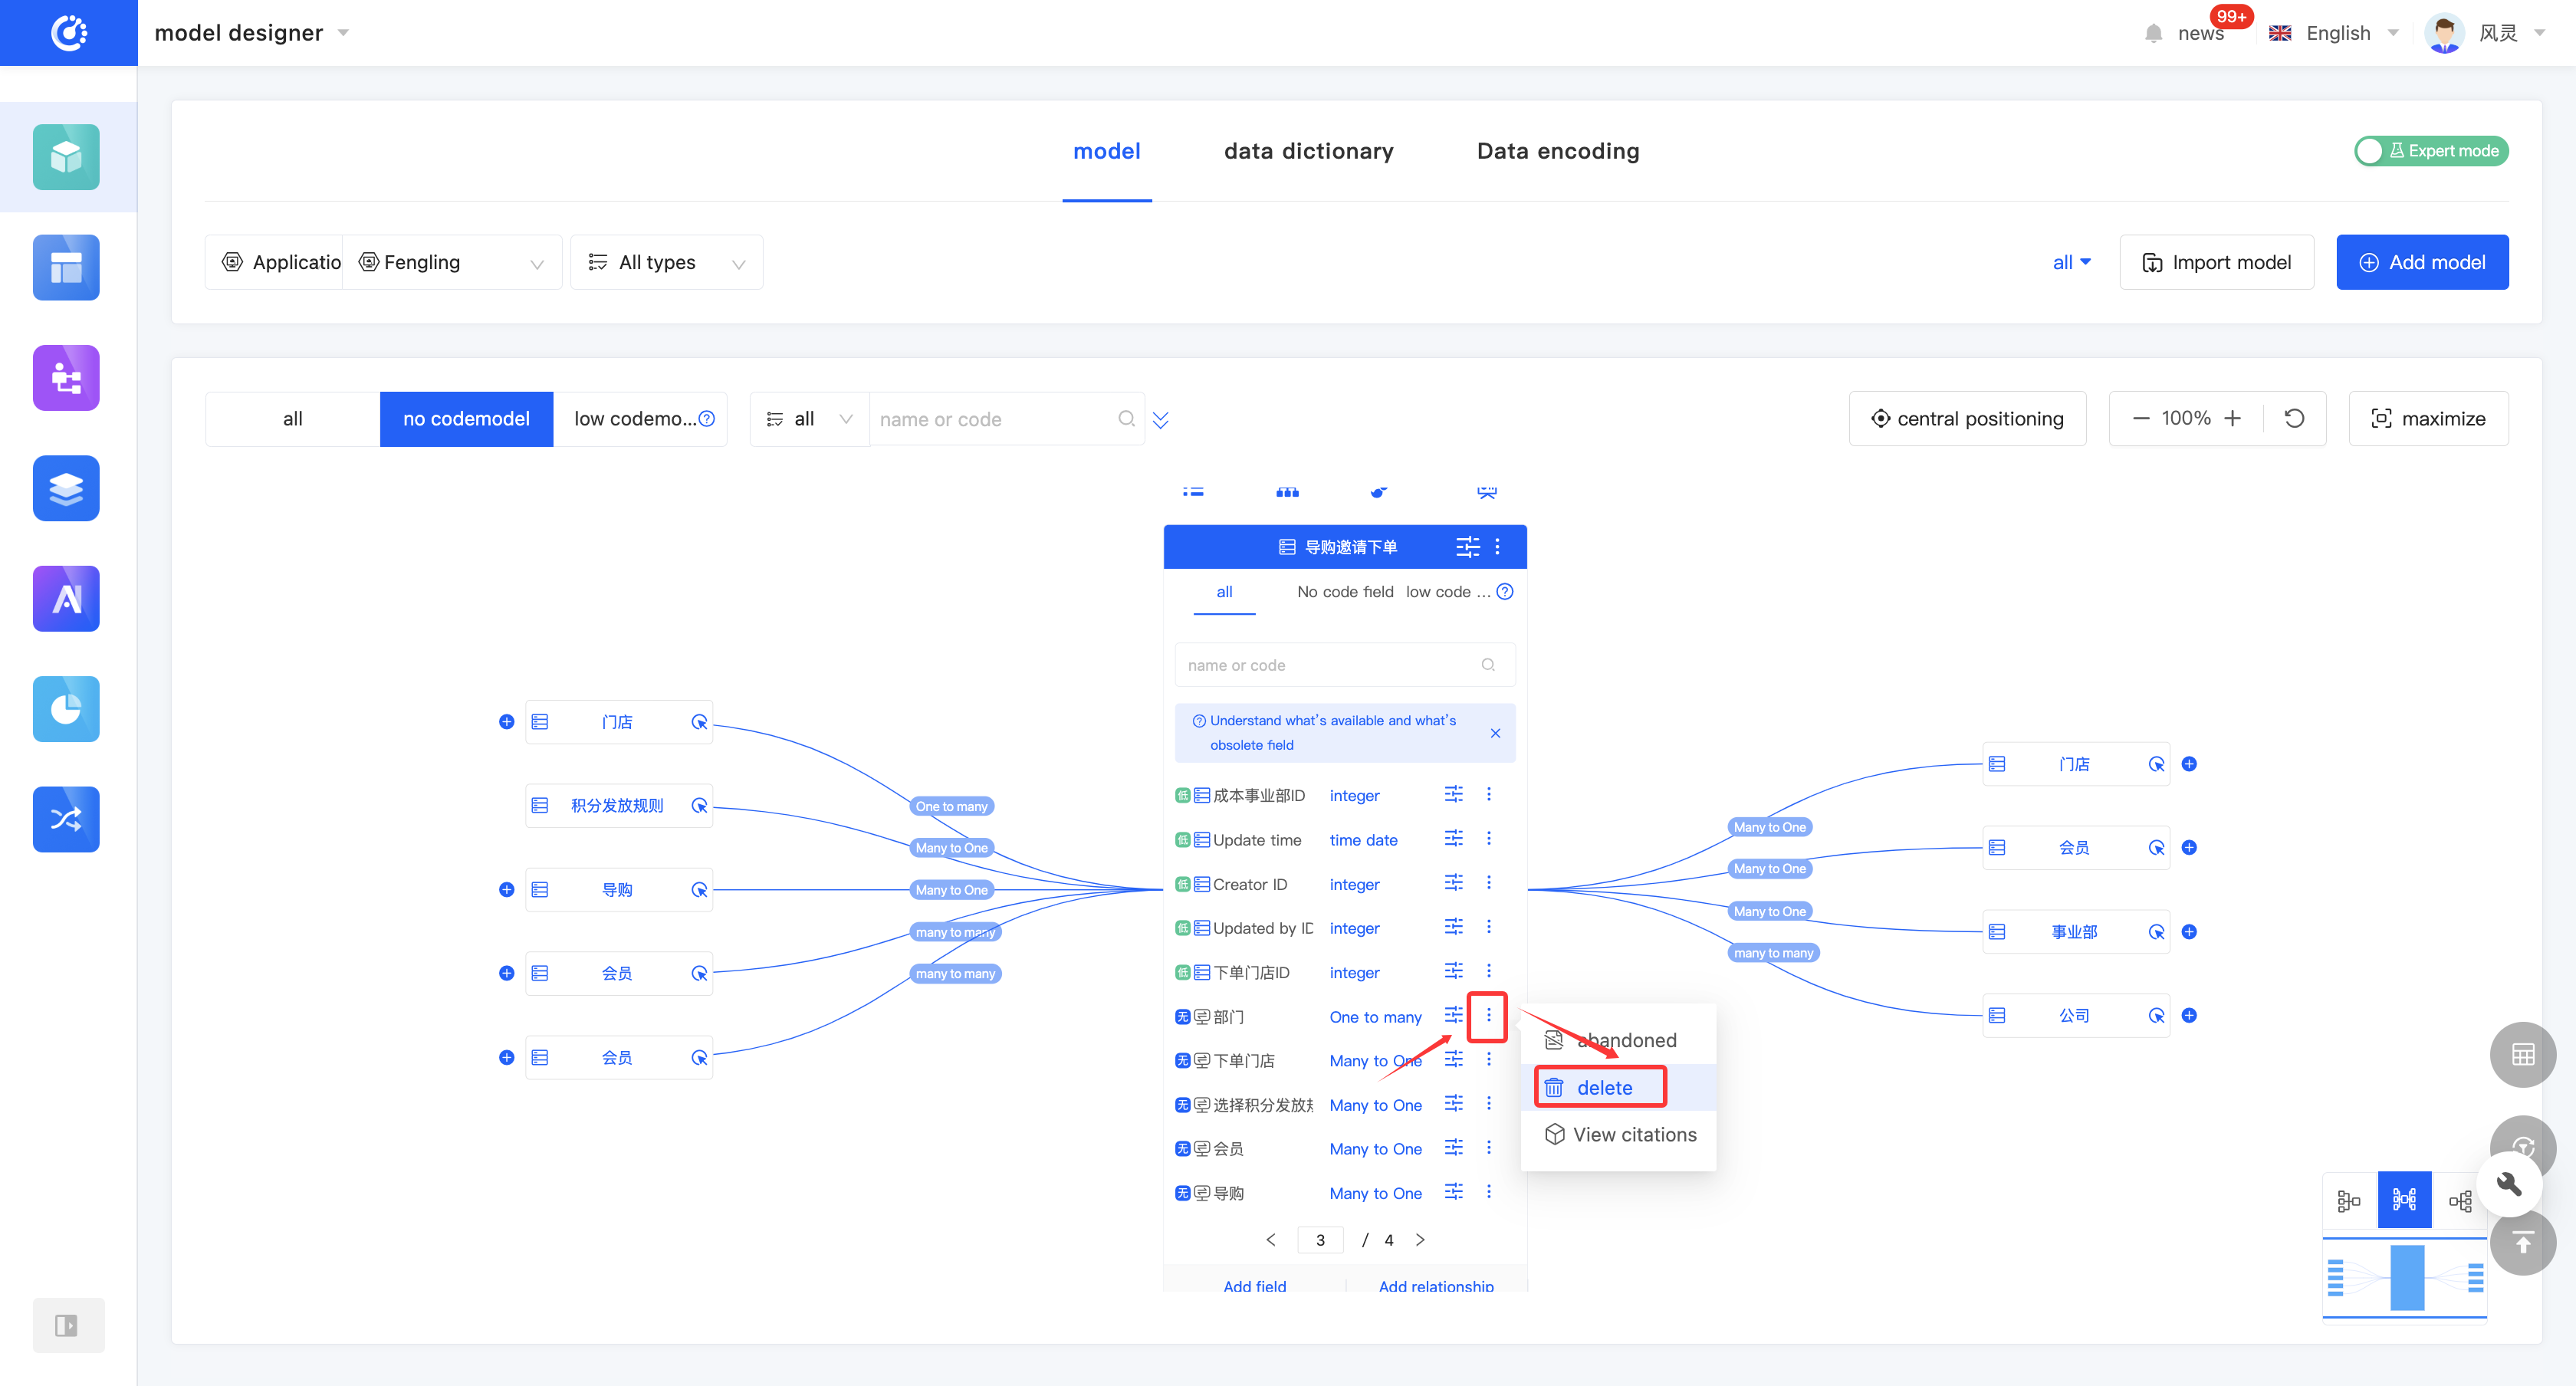
- Click "Delete" on the right side of the row in the field list to delete the field.

IV. Appendix: Glossary
Term | Description |
|---|---|
| Storage Model | A model used to store data. It can generate front-end and back-end interaction protocols, data tables, data constructors, and data managers. |
| Abstract Model | A model used to configure common fields and functions for multiple child models. It does not generate front-end and back-end interaction protocols, data tables, data constructors, or data managers. |
| Transmission Model | A model used for data transmission. It can generate front-end and back-end interaction protocols and data constructors but does not generate data tables or data managers. |
| Proxy Model | A model used to extend a storage model in a proxy manner. It can add transmission fields and functions on the basis of the storage model and shares the same data manager as the proxied storage model. |
| No-code Model | A model designed through a no-code designer (such as the Model Designer or the Interface Designer) is called a no-code model. |
| Low-code Model | A model written through a low-code development framework or automatically generated by the system during no-code design is called a low-code model. |
| Abstract Inheritance | Inheriting an abstract model. |
| Extension Inheritance | Inheritance between storage models is defaulted to extension inheritance. The child model of extension inheritance has the same data table as the parent model, and the child model inherits the fields and functions of the parent model. |
| Proxy Inheritance | Creating a proxy for the original model, allowing you to perform create, read, update, and delete operations on the entity data of the proxy model. |
| Transmission Inheritance | Using the parent model as a transmission model and adding transmission fields. |
| Storage Field | A field used for querying and storing data. |
| Transmission Field | A field only used for data assembly and storage. |