Action components cover all possible user operations. In Oinone, all possible user operations are divided into four categories:
- View Action: Triggers page navigation within the application when clicked.
- URL Action: Jumps to a specified URL, similar to
window.open. - Server Action: Sends a request to the backend and processes the response.
- Client Action: Used exclusively for frontend interactions, theoretically capable of performing any operation.
For each action type, we provide built-in components to support system operations. However, for complex and diverse business scenarios, our standard interaction flows may not cover all cases. In such instances, we need to customize action behaviors by modifying pre-click or post-click processing, or even replacing the entire post-click effect.
Recall the exercises we've done before—you may already be familiar with element components or have learned about field components. In fact, customizing action components is similar to registering and replacing other component types. Let's quickly go through this content and start with some simple exercises.
I. Theory: Registration of Action Components
The Widget framework classifies components, and during registration, we determine the usage scope based on these classification features. When using components, we can select the most suitable one from all registered components for rendering.
Here, we briefly explain the basics of action component registration to ensure easy understanding of key concepts in the following learning. For more details on component registration, refer to: Action
(Ⅰ) Registration Options for Action Components
/**
 * Action component registration options
 */
export interface BaseActionOptions extends SPIOptions {
  /**
   * Specify action type
   */
  actionType?: ActionType | ActionType[];
  /**
   * Specify view action target (for view actions only)
   */
  target?: ViewActionTarget | string | string[];
  /**
   * Specify action name
   */
  name?: string | string[];
  /**
   * Specify model
   */
  model?: string[] | string;
  /**
   * Specify view type
   */
  viewType?: ViewType | ViewType[];
  /**
   * Specify view name
   */
  viewName?: string | string[];
  /**
   * Specify component name or alias
   */
  widget?: string[] | string;
}From the above type declaration, it's evident that classification dimensions include: action type, target (for view actions), action name, model code, view type, and view name. These dimensions describe the component's usage location. Generally, the more "precise" the location description, the higher the component's priority during rendering. For identical location descriptions, the later-registered component overrides the earlier one.
Take the RouterViewActionWidget component as an example:
@SPI.ClassFactory(
  ActionWidget.Token({
    actionType: ActionType.View,
    target: ViewActionTarget.Router
  })
)
export class RouterViewActionWidget extends ViewActionWidget {
  ...
}From the registration criteria, we can see this component handles view actions and processes only the "open in current window" navigation mode.
(Ⅱ) Different Types of Action Components
In Oinone, we provide built-in components for the four action types defined in metadata, each implementing corresponding functionalities.
The following lists some components and base classes categorized by action type:
| Action Type | Action Component | Description | Base Class |
|---|---|---|---|
| rowspan="4" ActionType.View | RouterViewActionWidget | Navigates within the application | ViewActionWidget |
| OpenWindowViewActionWidget | Navigates via a new window | RouterViewActionWidget | |
| DialogViewActionWidget | Opens a dialog | rowspan="2" PopupActionWidget | |
| DrawerViewActionWidget | Opens a drawer | ||
| ActionType.URL | UrlActionWidget | Jumps to a specified URL | rowspan="8" ActionWidget |
| ActionType.Server | ServerActionWidget | Sends requests to the backend | |
| rowspan="6" ActionType.Client | ValidateFormActionWidget | Triggers form field validation | |
| BackActionWidget | Returns using an appropriate method | ||
| ReloadViewActionWidget | Refreshes data | ||
| DeleteOneActionWidget | Deletes data | ||
| TableAddOneAction | Adds a row of data | ||
| BackActionWidget | Copies a row of data |
(Ⅲ) Using Action Components in DSL
<action name="redirectCreatePage" />Tip
For more information about action components, refer to: Action
II. Replacing Page Actions by Registering Components
In most cases, modifications to action components involve logical changes, which can be completed within the Widget component. Only in rare cases do we need to modify Vue components.
Let's explore how to replace page action components via SPI registration and add processing logic.
(Ⅰ) Viewing Action Metadata with Vue DevTools
Using Vue DevTools, select a specified action, then choose the first Widget component under the Action component in the Components area. You will see the following information:
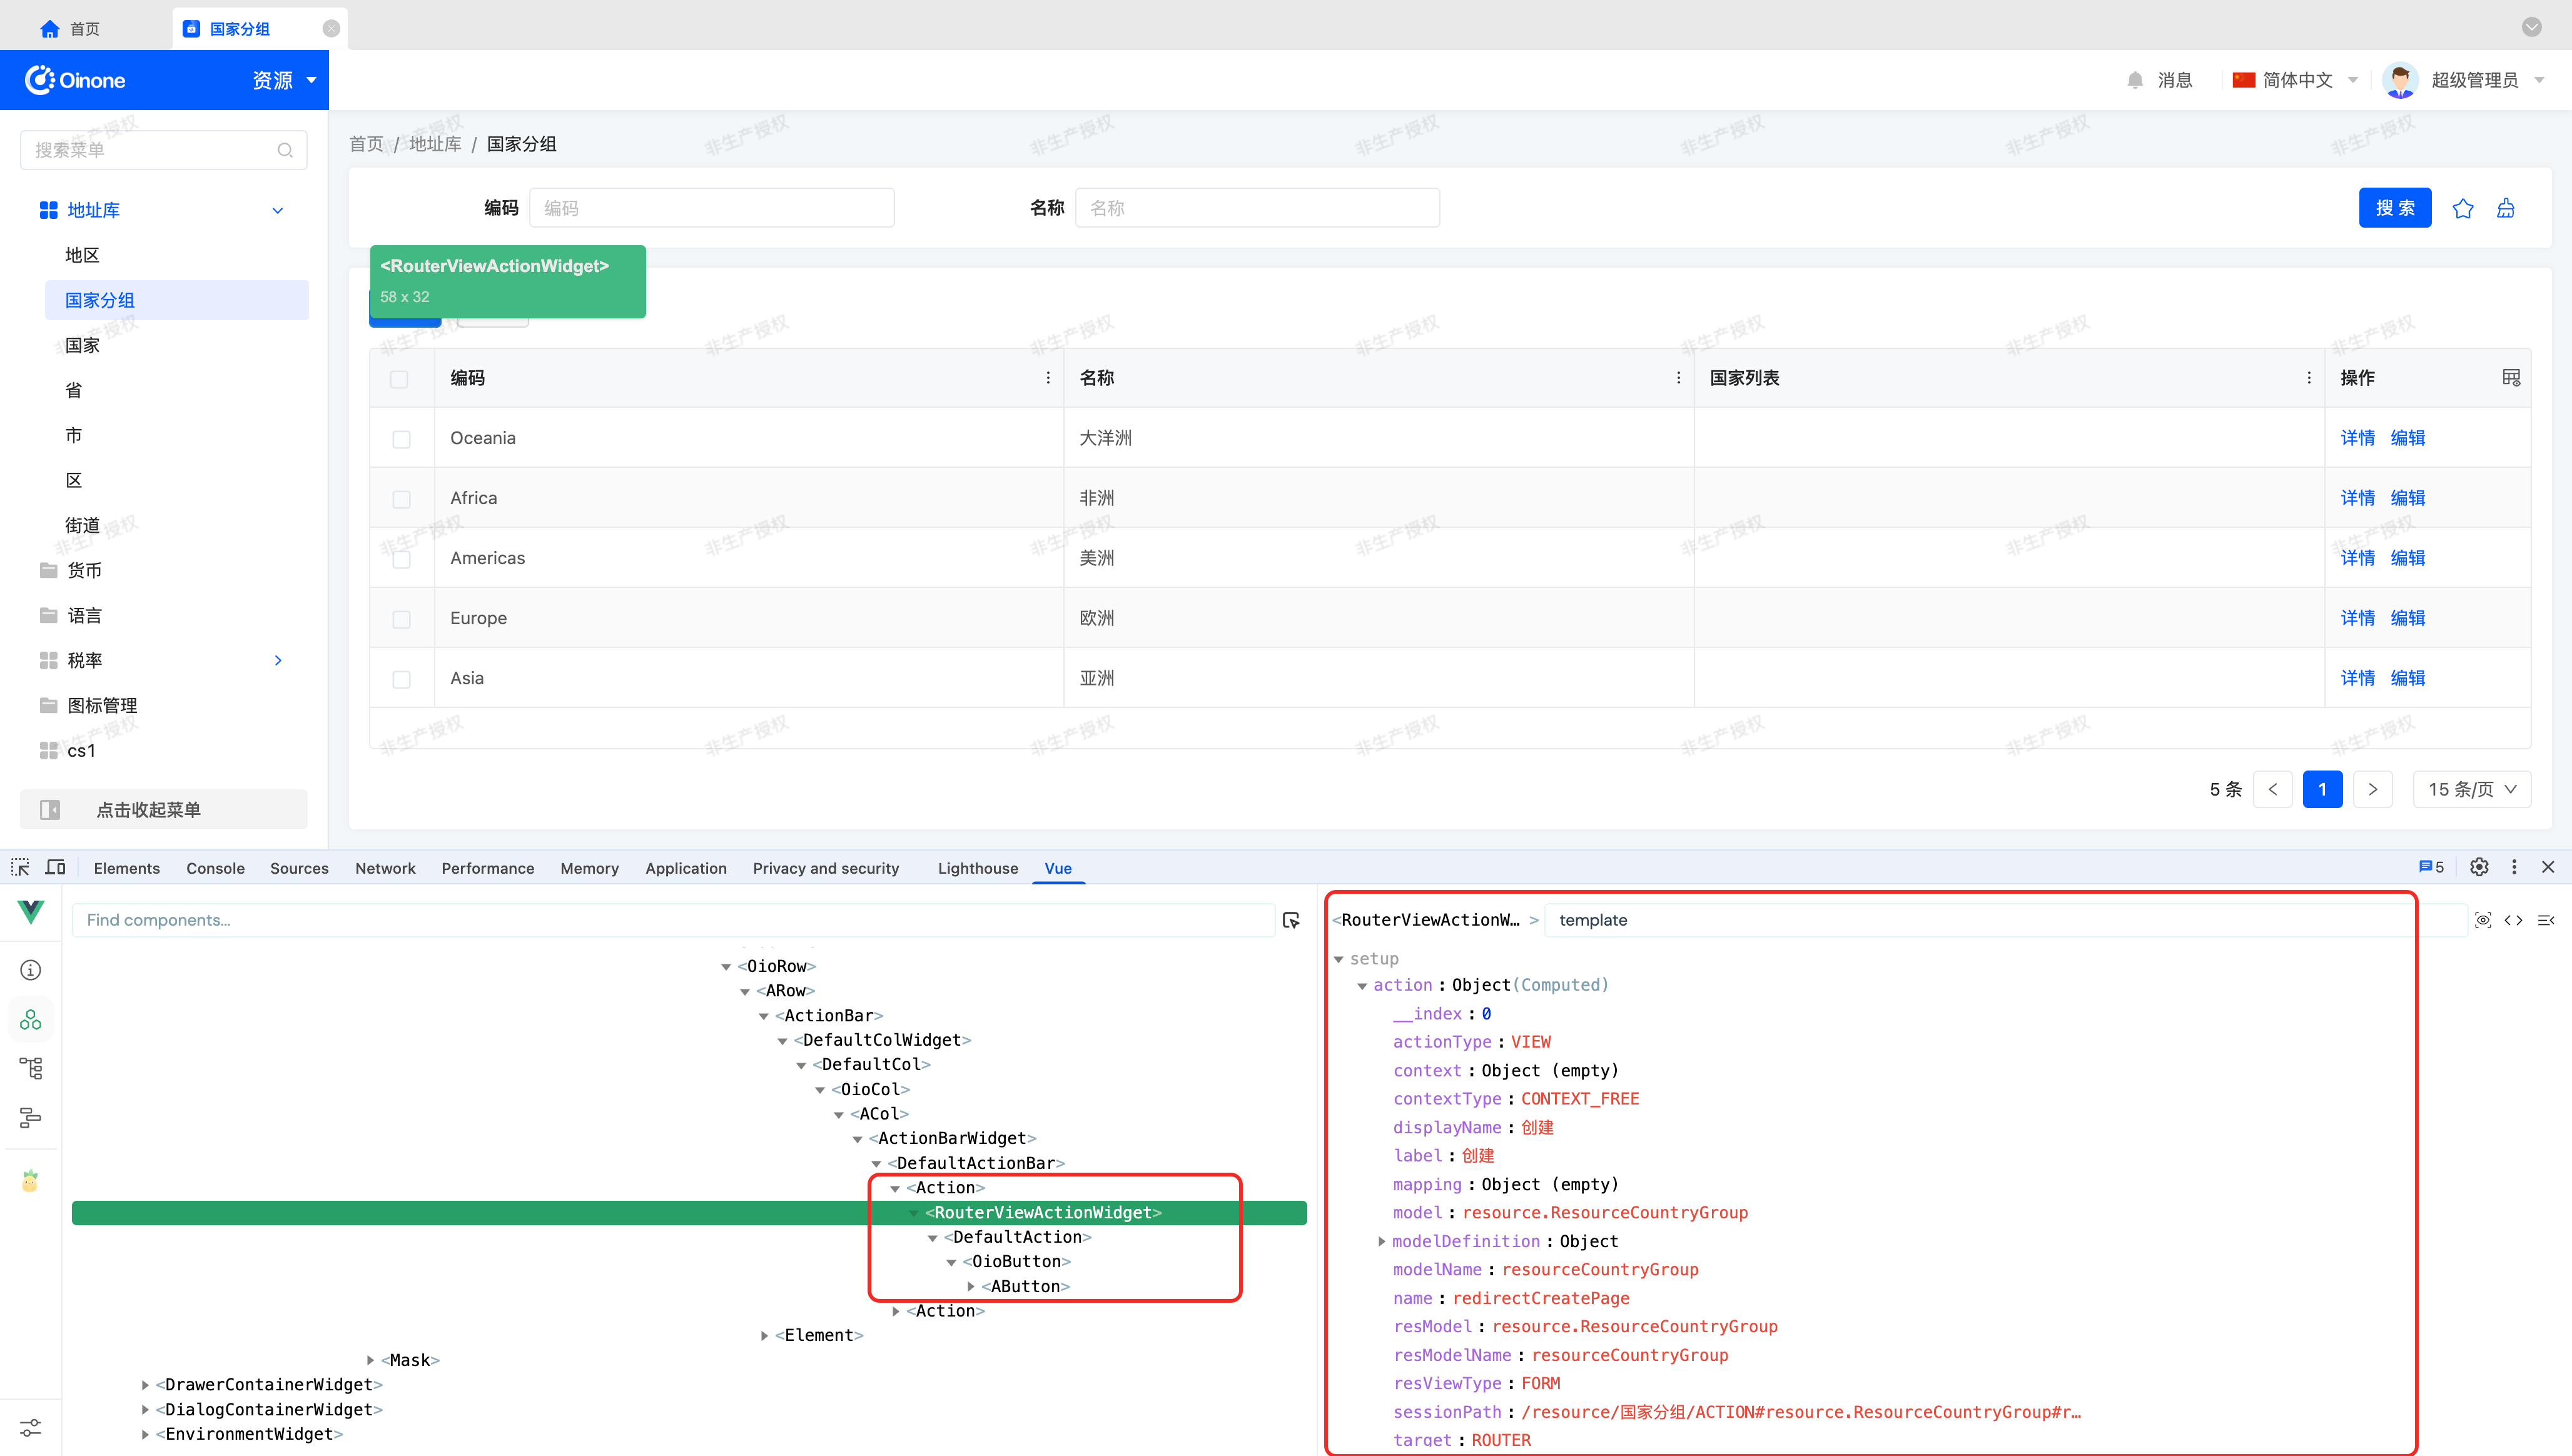
From the component structure in the Components area, any action component consists of three parts:
Action Component - Widget Component - Vue Component
These three components are essentially Vue component implementations, named for clarity:
- Action Component: Renders the
actiontag inXMLand uses SPI to find the corresponding Widget component based on configurations. - Widget Component: A component declared using a
TypeScript Classprovided by the Widget framework. - Vue Component: Set via the
setComponentmethod in the Widget component'sinitializemethod.
Looking at the right section, which contains all visible information about the selected Vue component: props, attrs, setup, etc. By filtering for "template" - related content, you will find two properties: action and template.
- action: Action metadata, an object processed from the template attribute. Typed as
RuntimeActionand its subclasses, a non - reactive object. - template: The original data object converted from
XMLtoJSONformat. Typed asDslDefinitionand its subclasses.
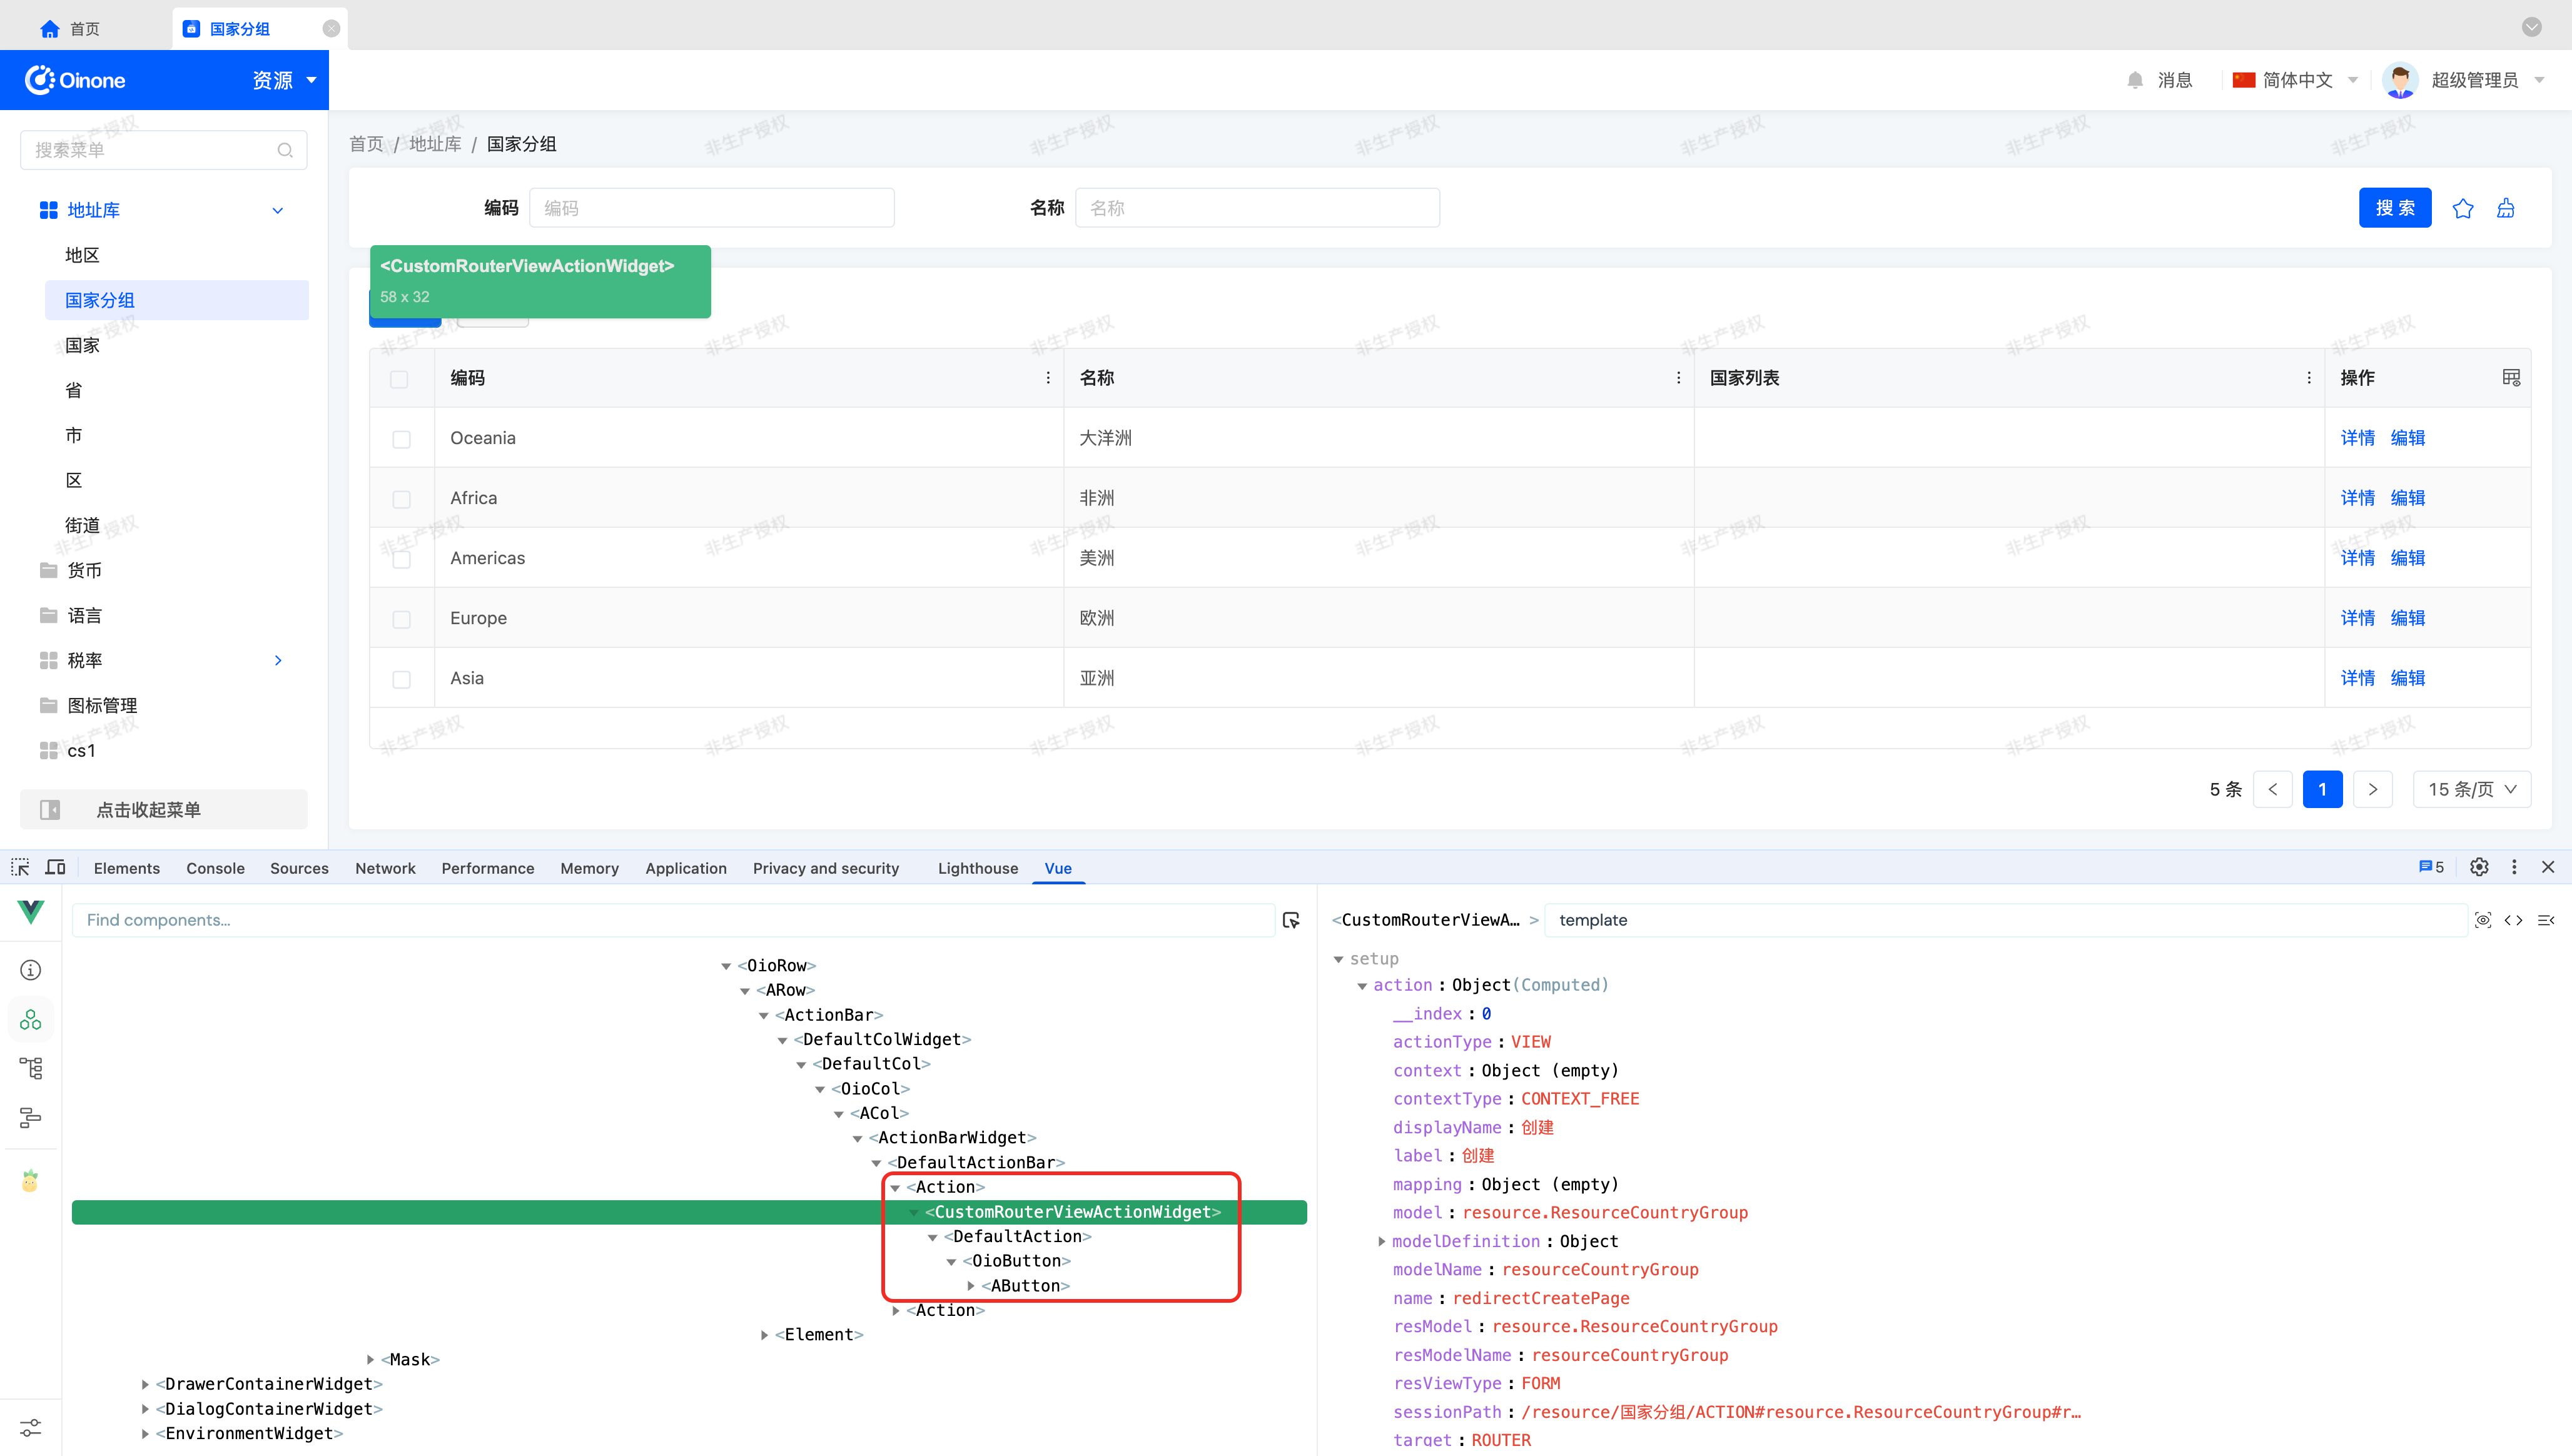
(Ⅱ) Replacing Components by Model and Action Name
From Vue DevTools, we see the corresponding Widget component is RouterViewActionWidget, with action attribute model as resource.ResourceCountryGroup and name as redirectCreatePage.
Let's inherit RouterViewActionWidget to create CustomRouterViewActionWidget and register it for replacement, as shown below:
@SPI.ClassFactory(
  ActionWidget.Token({
    actionType: ActionType.View,
    target: ViewActionTarget.Router,
    model: 'resource.ResourceCountryGroup',
    name: 'redirectCreatePage'
  })
)
export class CustomRouterViewActionWidget extends RouterViewActionWidget {
  ...
}This replaces all actions named redirectCreatePage under the resource.ResourceCountryGroup model.
Tip
Generally, replacing components by model and action name meets our requirements. For a model's actions, the same name implies the same functionality. In special cases, the same action name may have different functionalities based on placement, though it's challenging to provide a suitable example.
To address such cases, flexibly use other parameters from Action Component Registration Options, as demonstrated in the next section for replacing components by view name and action name.
After replacement, checking the action via Vue DevTools shows the corresponding Widget component has been replaced with CustomRouterViewActionWidget.
(Ⅲ) Replacing Components by View Name and Action Name
Replacing components by model and action name has an inevitable issue: unintended replacements may occur if the same action is used on other pages. So, how to solve this?
Let's modify the registration criteria to replace components by view name and action name:
@SPI.ClassFactory(
  ActionWidget.Token({
    actionType: ActionType.View,
    target: ViewActionTarget.Router,
    viewName: '国家分组table',
    name: 'redirectCreatePage'
  })
)
export class CustomRouterViewActionWidget extends RouterViewActionWidget {
  ...
}This replaces all actions named redirectCreatePage in the 国家分组table view.
(Ⅳ) How to Obtain View Names
We've used Vue DevTools to find the RouterViewActionWidget component, which may now be CustomRouterViewActionWidget. Starting from this component, search for the nearest View component in the parent component hierarchy, as shown below:
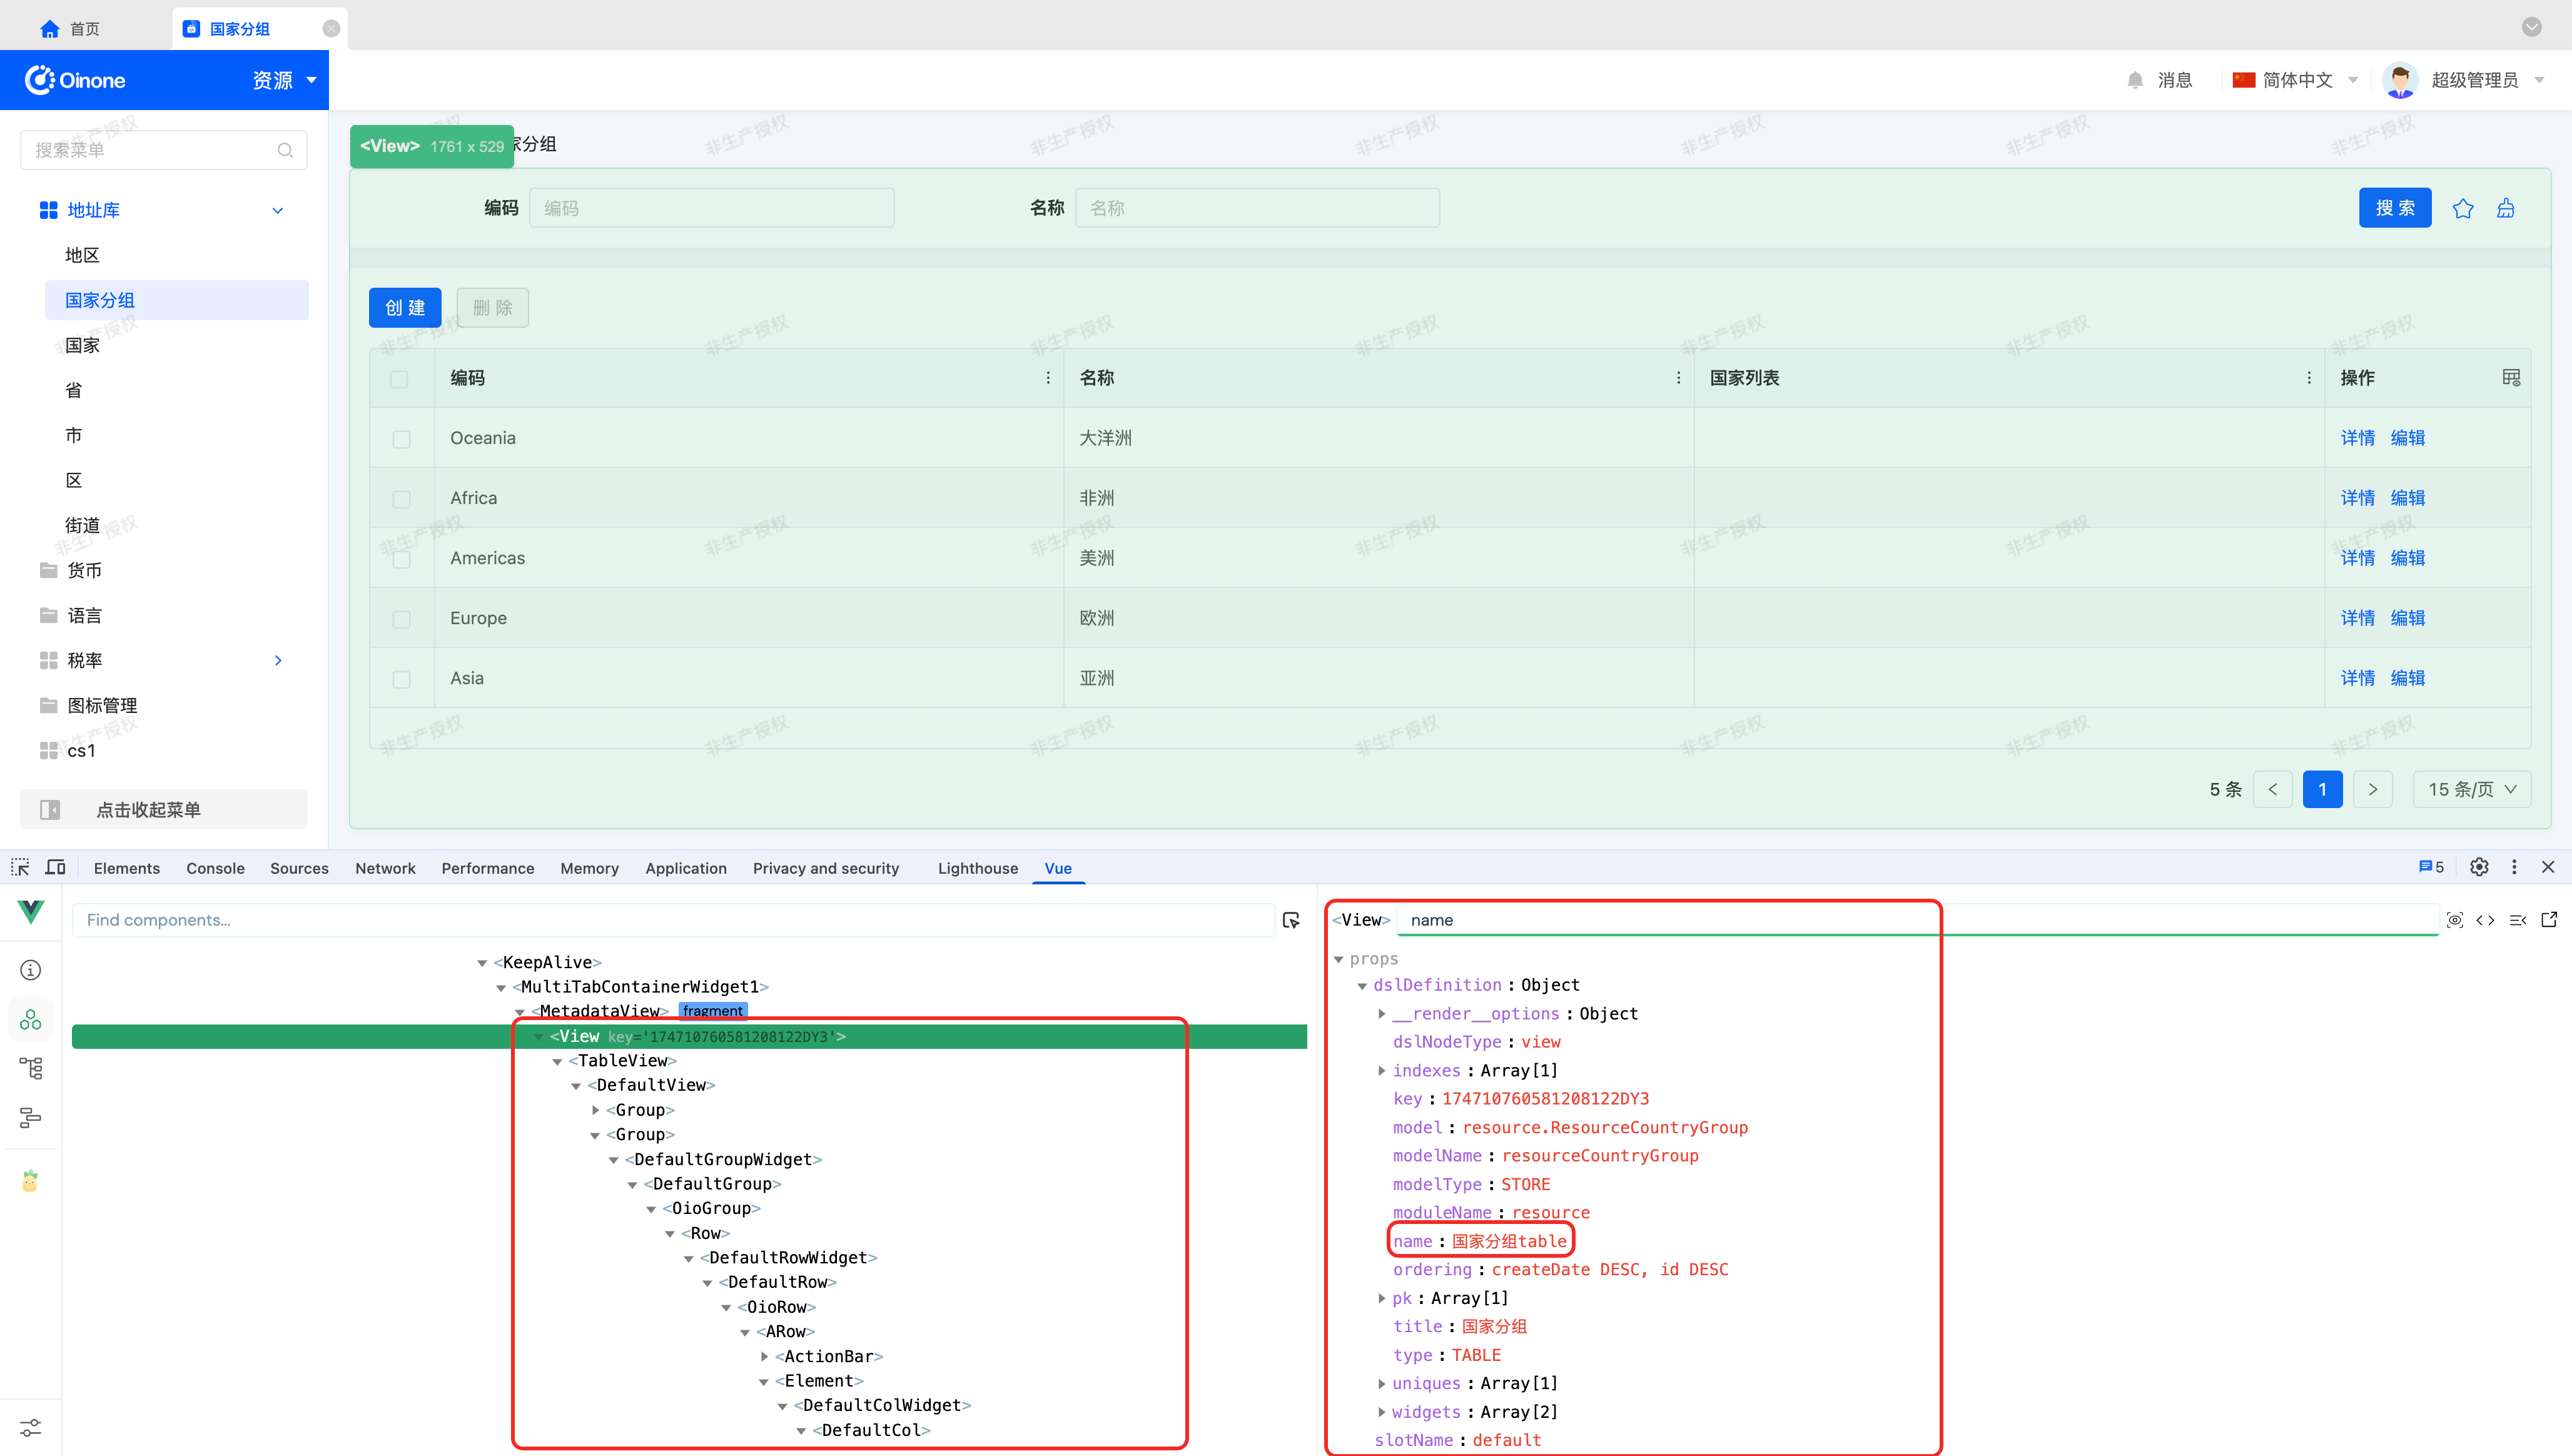
Here, we see the view name is 国家分组table, matching what we filled in the registration criteria.
III. Processing Before View Action Execution
In the previous section, we replaced a view action with CustomRouterViewActionWidget. Next, let's add processing before the action executes.
We can append logic by overriding the executeAction method provided by RouterViewActionWidget, as follows:
protected executeAction(action: RuntimeViewAction, parameters: UrlQueryParameters): void {
  // Add custom processing.
  super.executeAction(action, parameters);
}Tip
Note that different view action opening methods have different data processing approaches. Here, we only illustrate appending logic to the "open in current window" method in code.
Also, note that the page unloads after a view action executes, so avoid placing appended logic after action execution.
IV. Processing Before Server Action Execution
Let's see how to add processing before a server action (e.g., the "Delete" button) executes by overriding it.
Using the replacement method mentioned above, inherit the ServerActionWidget component to create CustomServerActionWidget and register it, as shown below:
@SPI.ClassFactory(
  ActionWidget.Token({
    actionType: ActionType.Server,
    model: 'resource.ResourceCountryGroup',
    name: 'delete'
  })
)
export class CustomServerActionWidget extends ServerActionWidget {
  ...
}We can append logic via the executeAction method in ServerActionWidget, as follows:
protected async executeAction(action: RuntimeServerAction, submitValue: SubmitValue): Promise<ClickResult> {
  // Pre-action processing.
  const res = await super.executeAction(action, submitValue);
  // Post-action processing.
  return res;
}VI. Creating a Client Action
Due to the特殊性 (particularity) of client actions, we can't provide default functionalities like other actions, but the button styles displayed on the page are consistent. We can implement such actions by inheriting the ActionWidget component, as follows:
@SPI.ClassFactory(
  ActionWidget.Token({
    name: 'custom-action'
  })
)
export class CustomClientActionWidget extends ActionWidget {
  ...
}We can implement any logic via the clickAction method in ActionWidget, as follows:
protected clickAction(): ReturnPromise<ClickResult> {
  // Implement custom logic.
  return true;
}VII. Theory: Action Click Flow
When an action is clicked, it typically executes according to the following flow:

The @click event from the OioButton component rendered on the page in the Vue component triggers the standard click flow via the validateAndClick method provided by the Widget component.
- validatorForm: Form validation result. Proceeds if valid, otherwise interrupts. Defaults to valid if no validation is configured.
- validateConfirm: Result of the second confirmation. Proceeds if the user clicks "OK" in the confirmation dialog, otherwise interrupts. Defaults to confirmed if no confirmation is configured.
- clickAction: Executes custom logic. Interrupts if
falseis returned, otherwise proceeds. - clickActionAfter: Executes after successful action execution.
VIII. Theory: ClickResult Type
First, let's look at the ClickResult type definition in TypeScript:
export type ReturnVoid = null | undefined | void;

export type ClickResult = ReturnVoid | boolean | Record<string, unknown> | Record<string, unknown>[];For different actions, click results may return:
- ReturnVoid: Any empty value or no return value.
- boolean: Determines whether to execute post-click operations.
- Object or array of objects: May return one of these types after calling
ServerAction#executeAction, depending on backend interface definitions.