I. Overview
Reference: Documentation related to this topic can be found in "Module Definition".
The purpose of this chapter is to lay the foundation for creating a brand-new Oinone module. We will start from scratch, using only the minimum elements required for Oinone to recognize our module. In the following chapters, we will gradually add features to build a practical business case.
II. Expense Management Module (expenses)
Our new module will cover a familiar business domain that is not within the basic module set provided by Oinone: expense management. It's important to note that Oinone focuses on providing business-agnostic basic capabilities rather than upper-layer business scenarios.
Here's an overview of the main list view for expense management - project information:
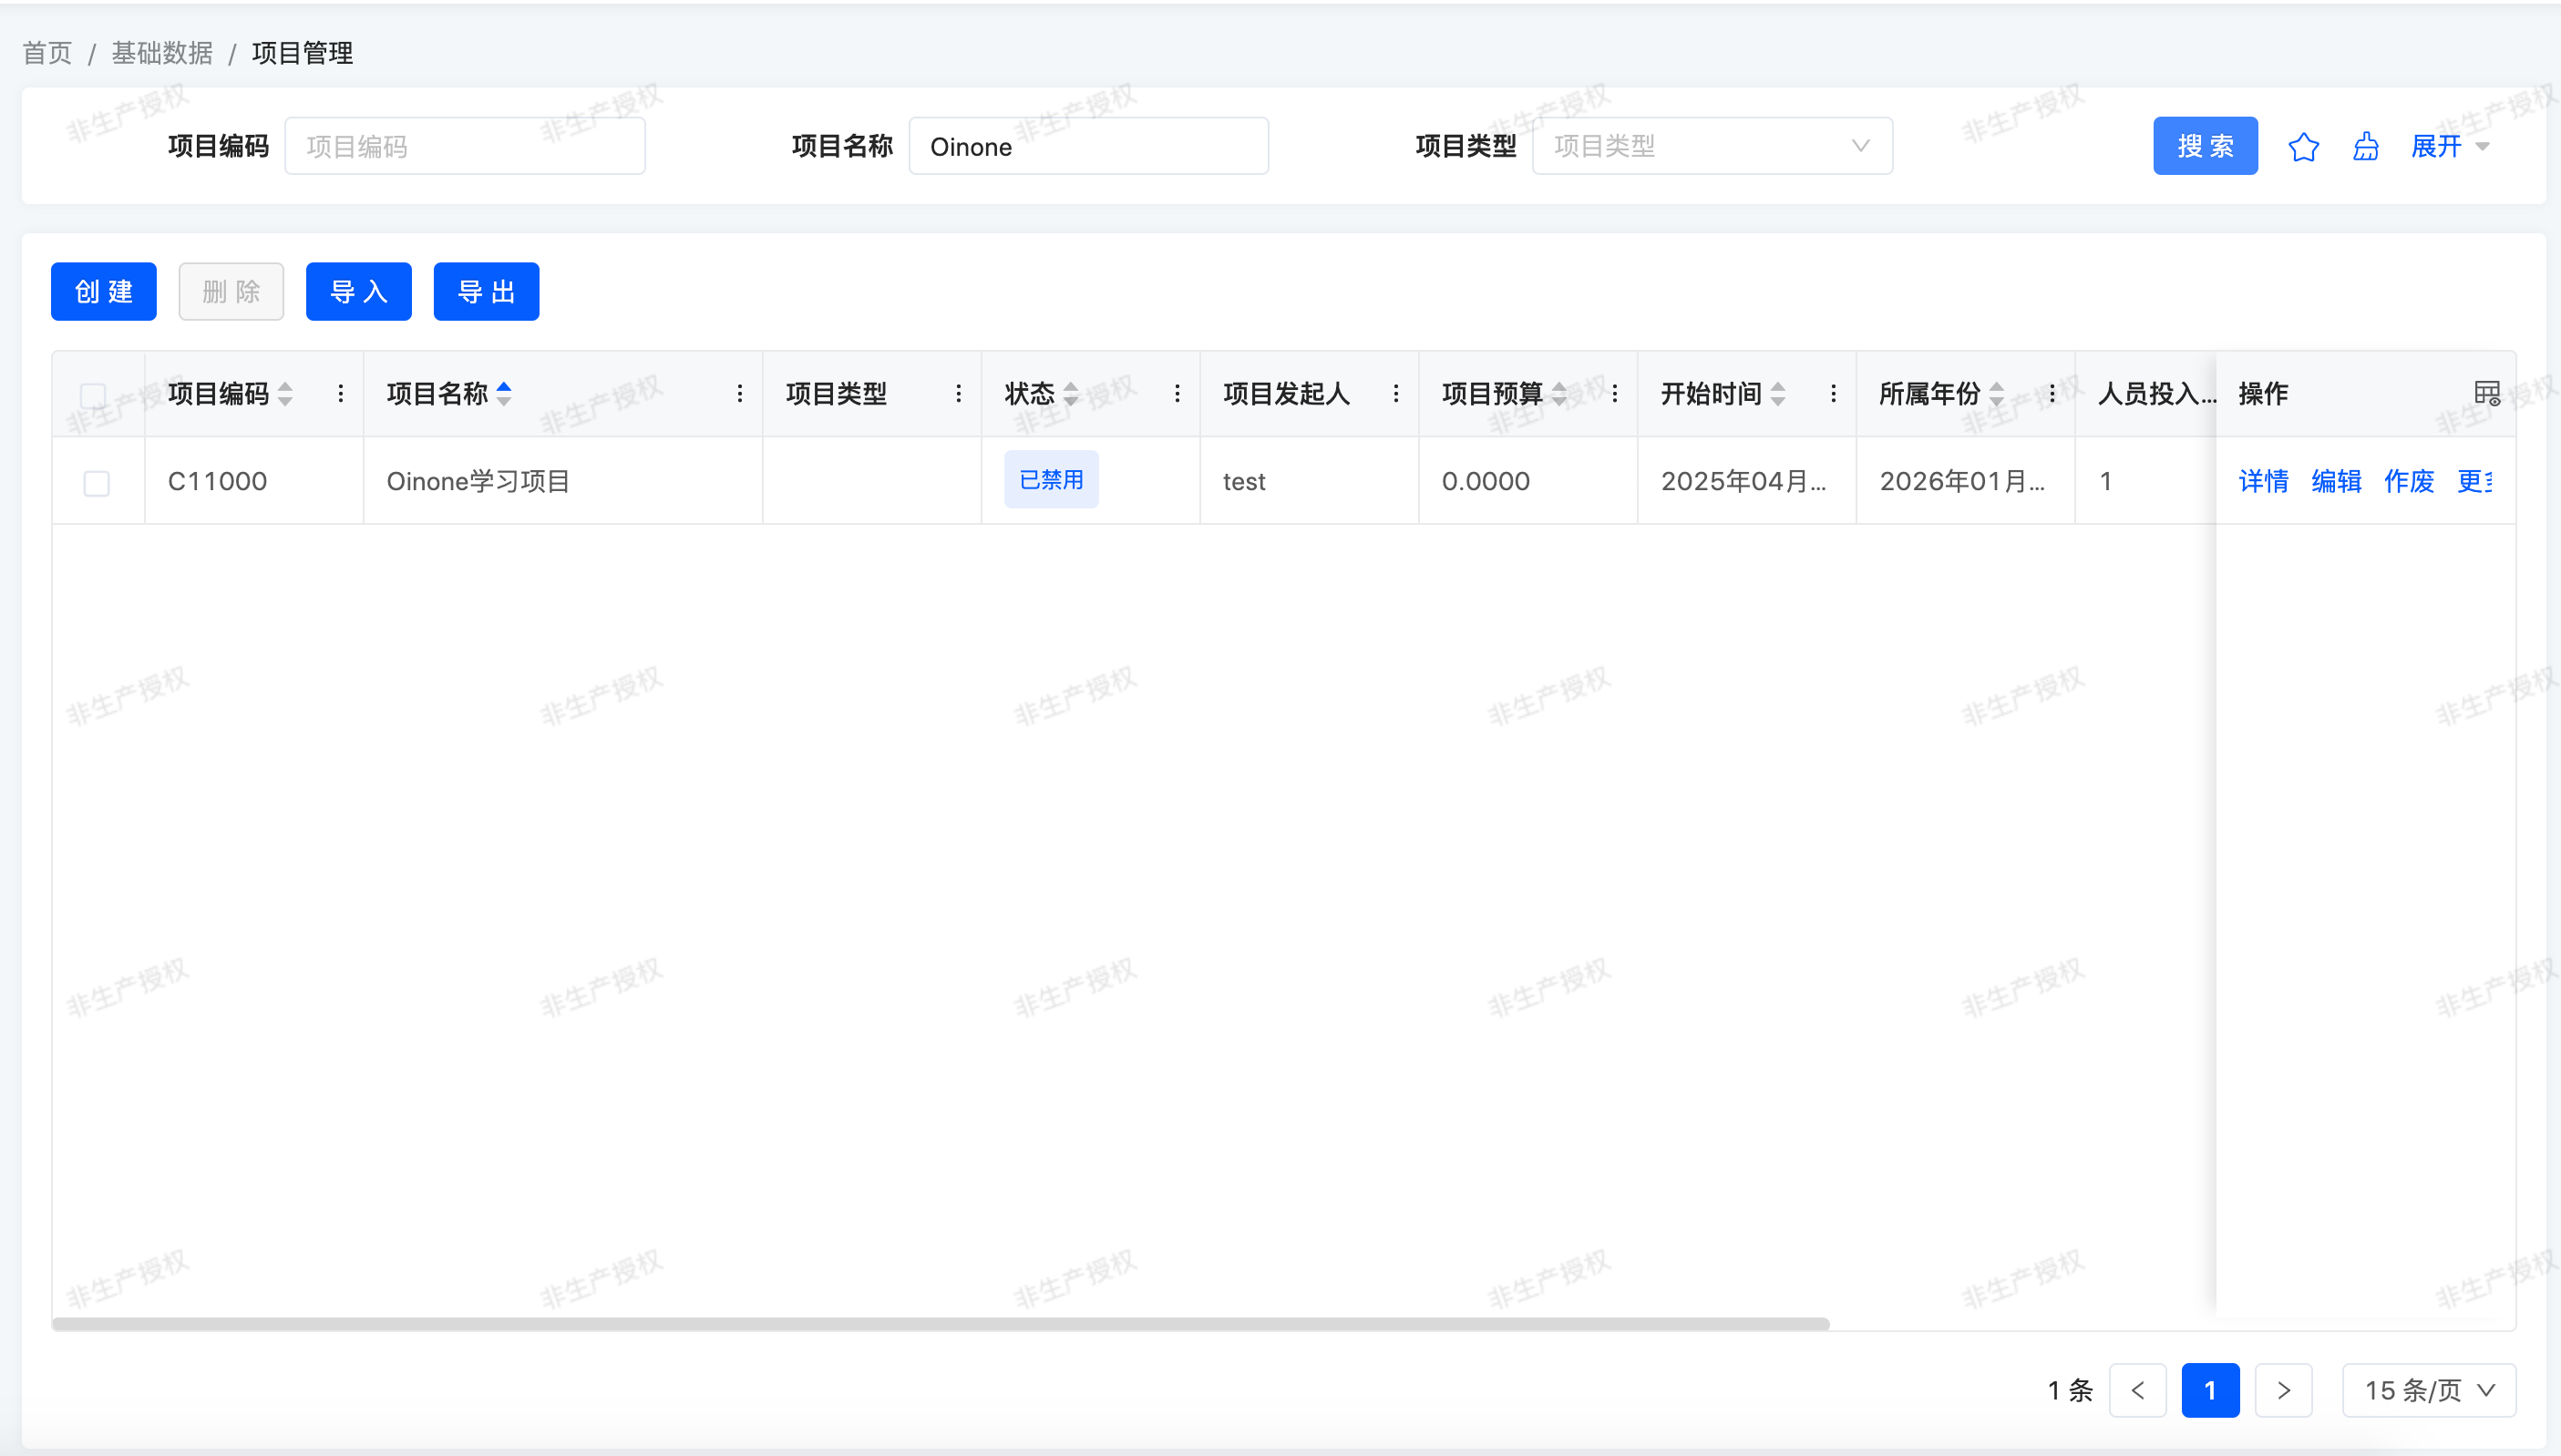
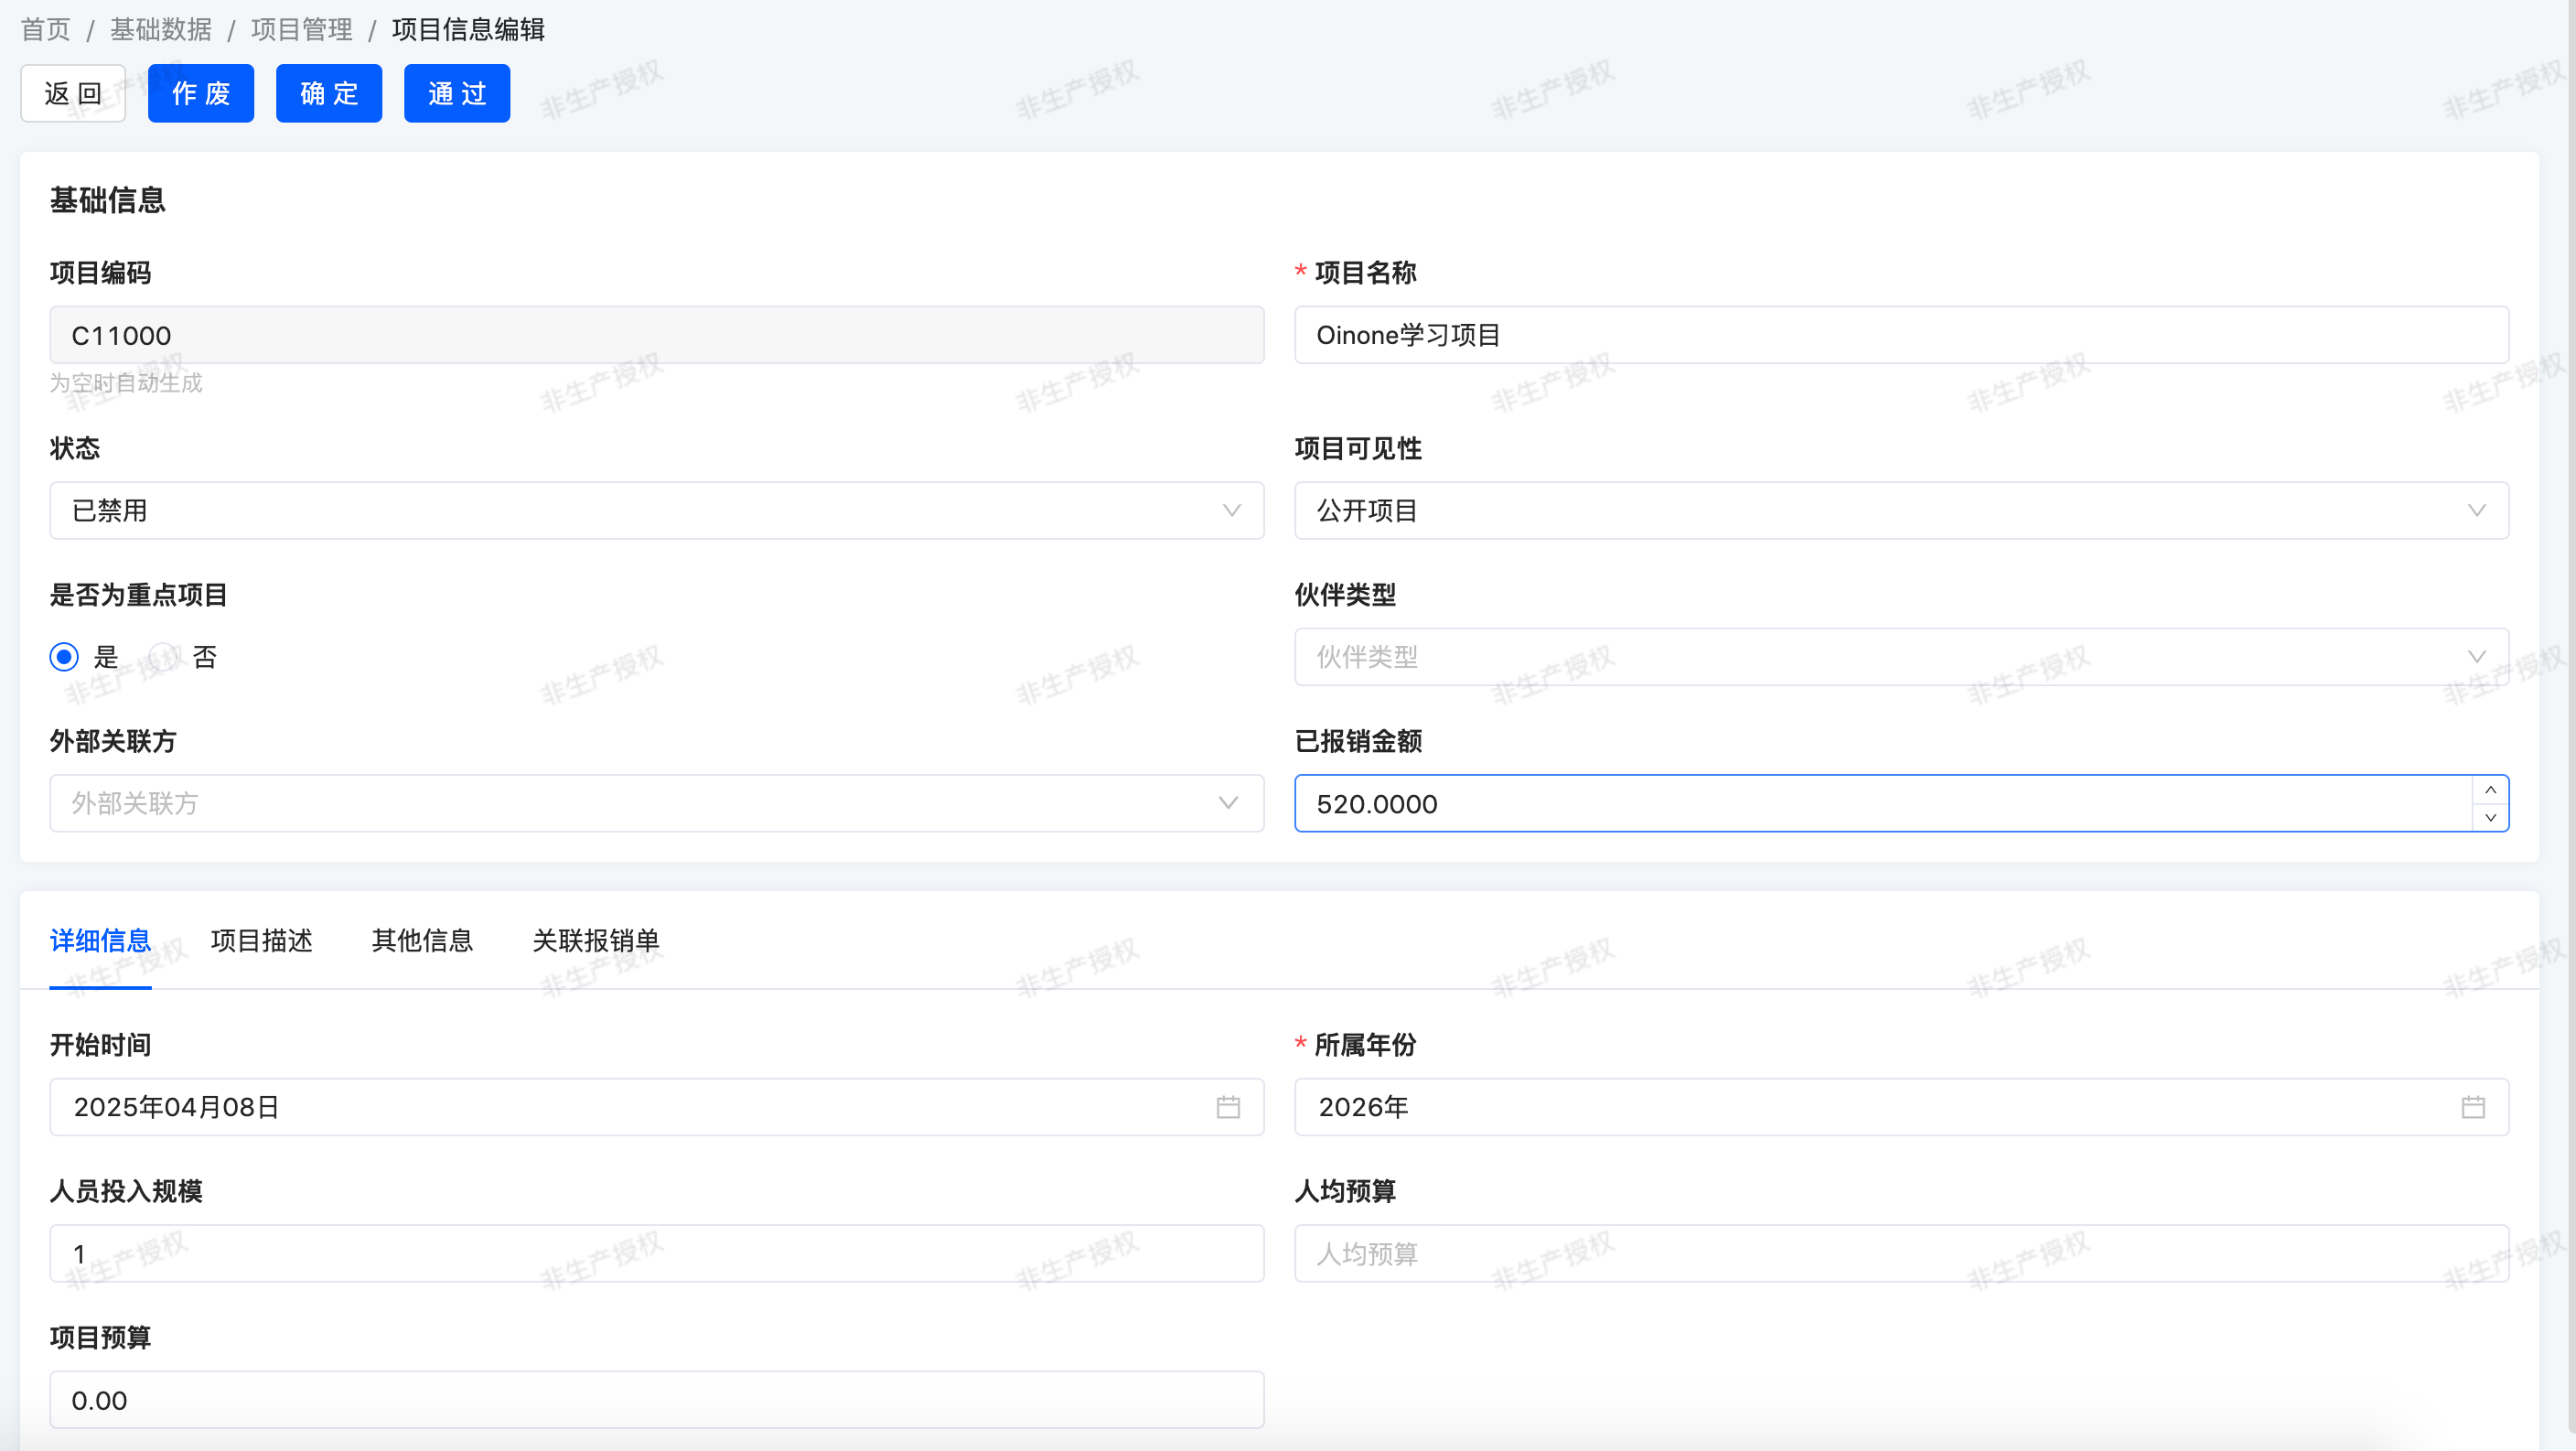
The top area of the form view summarizes key project information, such as project name, status, total reimbursed amount, project level, etc. The first tab contains budget-related information describing the project: staff size, budget per capita, project budget, start time, etc.
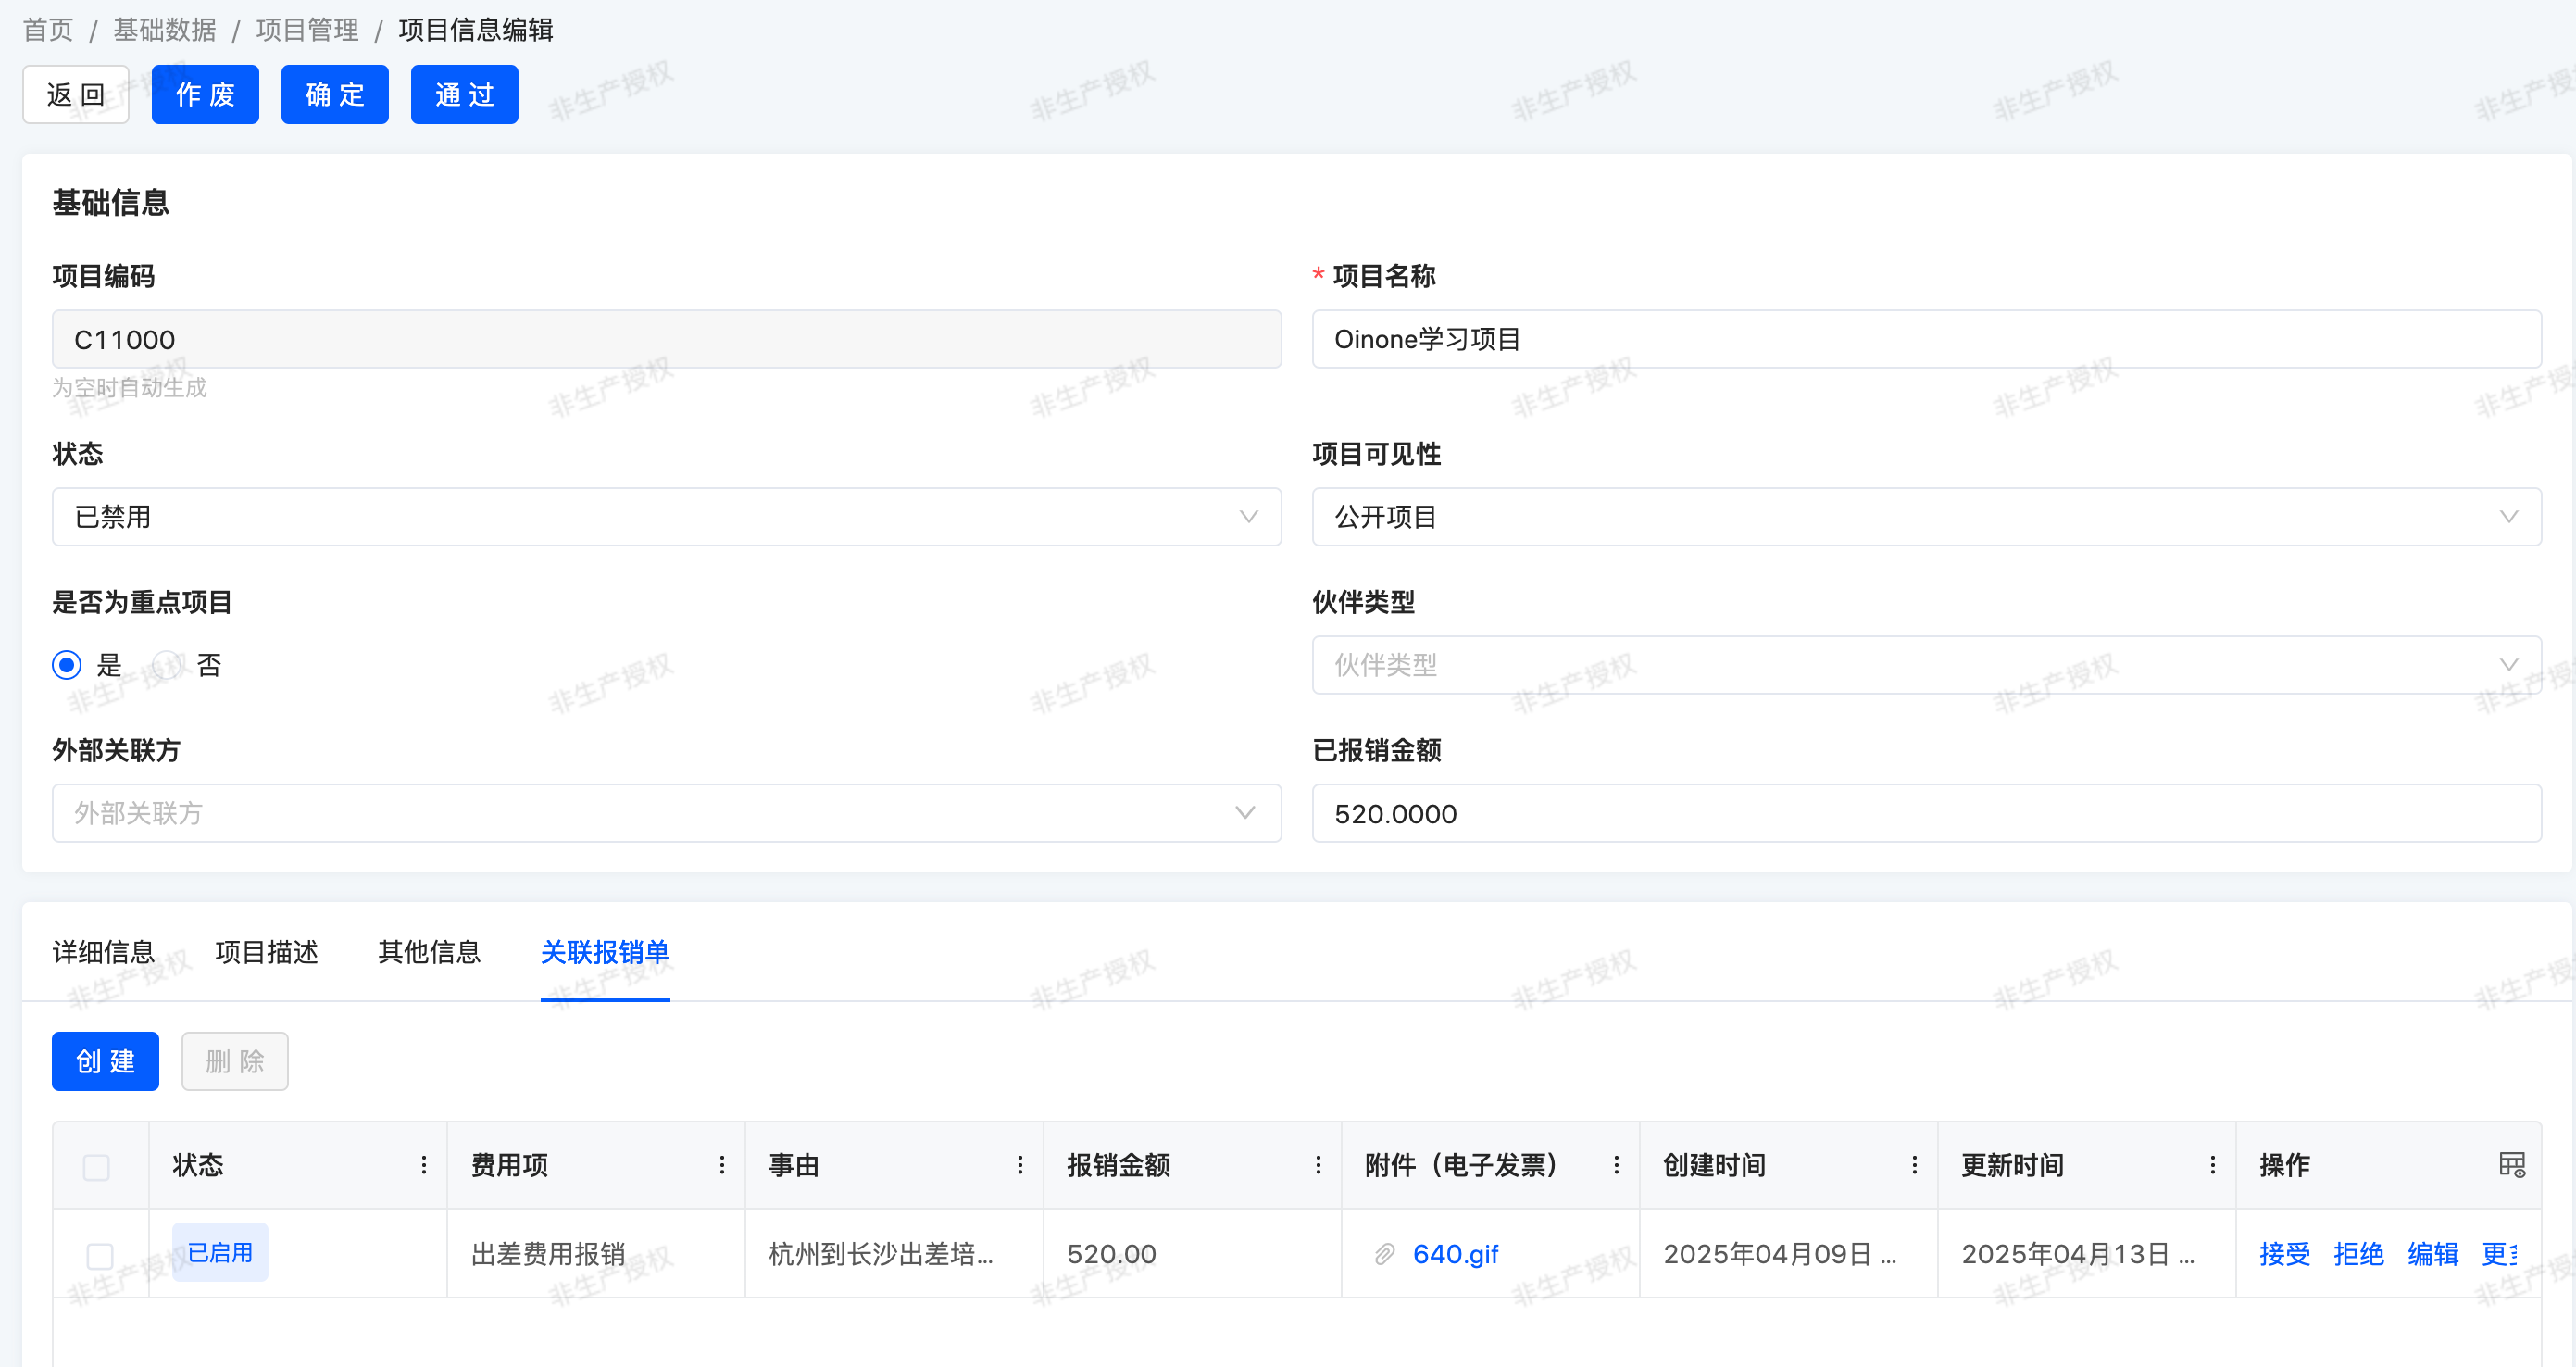
The fourth tab lists the reimbursement forms associated with the project, including expense items, reasons, reimbursement amounts, reimbursement status, etc.
III. How to Create an Expense Module
(I) Build the Java Project for the Expense Module
1. Build the Parent Module trutorials-expenses
In the oinone-backend-tutorials directory, open a terminal and execute the following command to create a new module, taking trutorials-expenses as an example:
cd oinone-backend-tutorials
mvn archetype:generate -DgroupId=pro.shushi.oinone.trutorials -DartifactId=trutorials-expenses -DarchetypeArtifactId=maven-archetype-quickstart -DinteractiveMode=false -Dversion=1.0.0-SNAPSHOTgroupId: Typically the inverted domain name of the company or organization, here usingpro.shushi.oinone.trutorialsas an example.artifactId: The name of the module, i.e.,trutorials-expenses.archetypeArtifactId: Usesmaven-archetype-quickstartto quickly create a simple Maven project structure.
Note
Although the default maven-archetype-quickstart skeleton creates a jar-type project, you can use a skeleton specifically designed for aggregated modules. However, Maven does not directly provide a standard aggregated module skeleton, so you can customize a skeleton or search for available community skeletons.
Here we will manually configure the pom.xml file.
2. Configure the Parent Module pom.xml File
In the trutorials-expenses directory, find the pom.xml file, set its packaging tag to pom to indicate it's an aggregated module. Also, add the modules tag to include submodules:
<?xml version="1.0" encoding="UTF-8"?>
<project xmlns="http://maven.apache.org/POM/4.0.0"
         xmlns:xsi="http://www.w3.org/2001/XMLSchema-instance"
         xsi:schemaLocation="http://maven.apache.org/POM/4.0.0 http://maven.apache.org/xsd/maven-4.0.0.xsd">
    <modelVersion>4.0.0</modelVersion>
    <parent>
        <groupId>pro.shushi.oinone.trutorials</groupId>
        <artifactId>oinone-trutorials</artifactId>
        <version>1.0.0-SNAPSHOT</version>
    </parent>
    <groupId>pro.shushi.oinone.trutorials</groupId>
    <artifactId>trutorials-expenses</artifactId>
    <version>1.0.0-SNAPSHOT</version>
    <packaging>pom</packaging>

    <modules>
    </modules>

</project>Note
As a parent module (aggregated module), trutorials-expenses can have its useless src folder manually deleted.
3. Create Submodules
In the trutorials-expenses directory, create api and core submodules respectively:
cd trutorials-expenses
mvn archetype:generate -DgroupId=pro.shushi.oinone.trutorials -DartifactId=trutorials-expenses-api -DarchetypeArtifactId=maven-archetype-quickstart -DinteractiveMode=false -Dversion=1.0.0-SNAPSHOT
mvn archetype:generate -DgroupId=pro.shushi.oinone.trutorials -DartifactId=trutorials-expenses-core -DarchetypeArtifactId=maven-archetype-quickstart -DinteractiveMode=false -Dversion=1.0.0-SNAPSHOT4. Configure Pom Dependencies for Each Module
In the pom.xml file under the oinone-backend-tutorials directory, add dependency management in its dependencyManagement tag: trutorials-expenses-api and trutorials-expenses-core:
<dependencyManagement>
  <dependencies>
    <dependency>
      <groupId>pro.shushi.oinone.trutorials</groupId>
      <artifactId>trutorials-expenses-api</artifactId>
      <version>${project.version}</version>
    </dependency>
    <dependency>
      <groupId>pro.shushi.oinone.trutorials</groupId>
      <artifactId>trutorials-expenses-core</artifactId>
      <version>${project.version}</version>
    </dependency>
  </dependencies>
</dependencyManagement>In the pom.xml file under the trutorials-expenses directory, add dependency management in its dependencyManagement tag: trutorials-expenses-api and trutorials-expenses-core:
<dependencyManagement>
  <dependencies>
    <dependency>
      <groupId>pro.shushi.oinone.trutorials</groupId>
      <artifactId>trutorials-expenses-api</artifactId>
      <version>${project.version}</version>
    </dependency>
    <dependency>
      <groupId>pro.shushi.oinone.trutorials</groupId>
      <artifactId>trutorials-expenses-core</artifactId>
      <version>${project.version}</version>
    </dependency>
  </dependencies>
</dependencyManagement>In the pom.xml file under the trutorials-expenses-api directory, add the dependency pamirs-base-standard in its dependencies tag:
<dependencies>
    <dependency>
        <groupId>pro.shushi.pamirs.boot</groupId>
        <artifactId>pamirs-base-standard</artifactId>
    </dependency>
</dependencies>In the pom.xml file under the trutorials-expenses-core directory, add the dependency trutorials-expenses-api in its dependencies tag:
<dependencies>
  <dependency>
    <groupId>pro.shushi.oinone.trutorials</groupId>
    <artifactId>trutorials-expenses-api</artifactId>
  </dependency>
</dependencies>In the pom.xml file under the trutorials-boot directory, add the dependency trutorials-expenses-core in its dependencies tag:
<dependencies>
  <dependency>
      <groupId>pro.shushi.oinone.trutorials</groupId>
      <artifactId>trutorials-expenses-core</artifactId>
  </dependency>
</dependencies>So far, the project corresponding to the expenses module is complete, which is no different from an ordinary Java project.
(II) Define Oinone's Expense Module
1. Create package
In the src/main/java directory of the trutorials-expenses-api module, create folders according to the hierarchy pro/shushi/oinone/trutorials/expenses/api to build the specified package.
2. Create the ExpensesModule Class
Create the ExpensesModule class under the pro.shushi.oinone.trutorials.expenses.api package. Here is the complete code:
package pro.shushi.oinone.trutorials.expenses.api;

import org.springframework.stereotype.Component;
import pro.shushi.pamirs.meta.annotation.Module;
import pro.shushi.pamirs.meta.base.PamirsModule;
import pro.shushi.pamirs.meta.common.constants.ModuleConstants;

@Component
@Module(
    name = ExpensesModule.MODULE_NAME,
    displayName = "Expense Management",
    version = "1.0.0",
    priority = 1,
    dependencies = {ModuleConstants.MODULE_BASE}
)
@Module.module(ExpensesModule.MODULE_MODULE)
@Module.Advanced(selfBuilt = true, application = true)
public class ExpensesModule implements PamirsModule {

    public static final String MODULE_MODULE = "expenses";

    public static final String MODULE_NAME = "expenses";

    @Override
    public String[] packagePrefix() {
        return new String[]{
            "pro.shushi.oinone.trutorials.expenses"
        };
    }
}Code Explanation:
packageDeclaration:package pro.shushi.oinone.trutorials.expenses.api;clarifies thepackageto which this class belongs.- Import Necessary Classes: Introduces Spring's
@Componentannotation and custom module-related annotations and interfaces. - Class Definition: The
ExpensesModuleclass implements thePamirsModuleinterface. - Annotation Usage:
@Component: Marks the class as a Spring component for automatic scanning and management by Spring.@Module: Defines module metadata, including module name, display name, version, priority, and dependencies.@Module.module: Specifies the module's identifier.@Module.Advanced: Sets advanced module attributes, such as whether it's a self-built module or an application module.
- Constant Definitions: Defines
MODULE_MODULEandMODULE_NAMEconstants, representing the module's identifier and name, respectively.
| Attribute | Default Value Rule | Naming Convention |
|---|---|---|
| module | No default value Developer-defined specification example: {project name}_ | 1. Use underscore naming 2. Only support numbers, uppercase/lowercase letters, underscores 3. Must start with a letter 4. Cannot end with an underscore 5. Length must be ≥4 and ≤128 characters |
| name | No default value | 1. Use camel case 2. Only support numbers, letters 3. Must start with a letter 4. Length must be ≤128 characters |
- Method Implementation: The
packagePrefix()method returns the array ofpackageprefixes included in this module.
Note
The application attribute of @Module.Advanced configures whether the module is an application (a module with visual interaction pages). Non-application modules have no interaction entry.
Warning
The module package path is returned by the packagePrefix method. If different Oinone modules include the same package path, it will cause metadata loading issues.
(III) Configure the Startup Project's YAML File
Add configurations related to the expenses module to the application-dev.yml configuration file provided in the src/main/resource/config directory of the trutorials-boot project. Append the expenses module to the pamirs.boot.modules list, and also add the corresponding data source mapping in pamirs.framework.data.ds-map.
pamirs:
  framework:
    data:
      ds-map:
        expenses: biz
  boot:
    modules:
- expensesNote
Before starting through trutorials-boot, check the application's port number and middleware IP. Refer to the configuration content about YAML files in the Installation and Upgrade chapter for the corresponding installation mode.
The system will install this module when restarting! But obviously, it's just an empty shell, so no menus will appear.
Tip
The default administrator login account and password are: admin\admin.
Warning
If a startup error occurs, please first check whether the database installation is correct. Common Issues with Database Configuration
Is everything okay? If so, let's create our first model!