Pages serve as the entry points for data CRUD (Create, Read, Update, Delete) operations. Data entry and viewing can be presented and interacted with through pages. With the UI Designer, you can conveniently manage pages, including adding, deleting, modifying, and querying pages, as well as designing and laying out pages. By configuring various components on the page, you can implement a series of functions such as data entry, viewing, and filtering.
In the UI Designer, the page list is presented in card form by default. You can preview the basic information of the page on the page card, including the page title, page thumbnail, view, the model name corresponding to the page, and the page description.
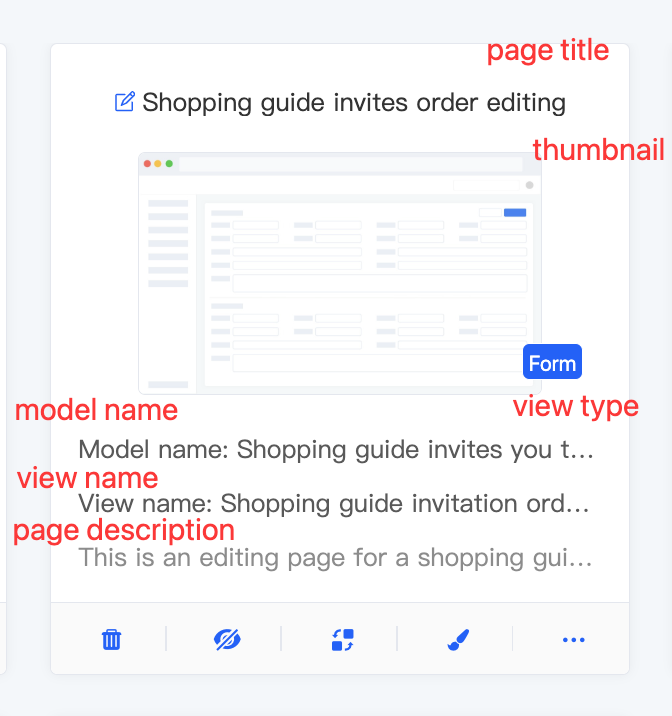
- Page Title and Page Description: Define the name of the page and provide a detailed description of the page in text.
- Page Thumbnail: Preview the general layout style of the current page through an image in the page list. You can upload your own image. If no image is uploaded, the system default image will be displayed.
- View Type: Different business types have different view types (currently, only the operation management business type is provided). The view types in operation management include form, detail, table, gallery, and tree view. (See the view type documentation for details.)
I. Filtering
1. Function Introduction
According to actual business requirements, you can customize page filtering conditions, including the application/module, model, business type, view type, and grouping settings, to precisely filter pages. Under the current filtering conditions, the corresponding page list will be displayed, facilitating the design and editing of different pages.
Note
When selecting the application/module filter option in the dropdown menu, it only provides a preliminary filter for the applications or modules on the platform. In actual filtering operations, you still need to further select specific applications or modules to complete the configuration. Similarly, only when all filter options are correctly configured can the correct pages be filtered out.
2. Operation Method
Select or enter conditions in the filtering area to filter pages.

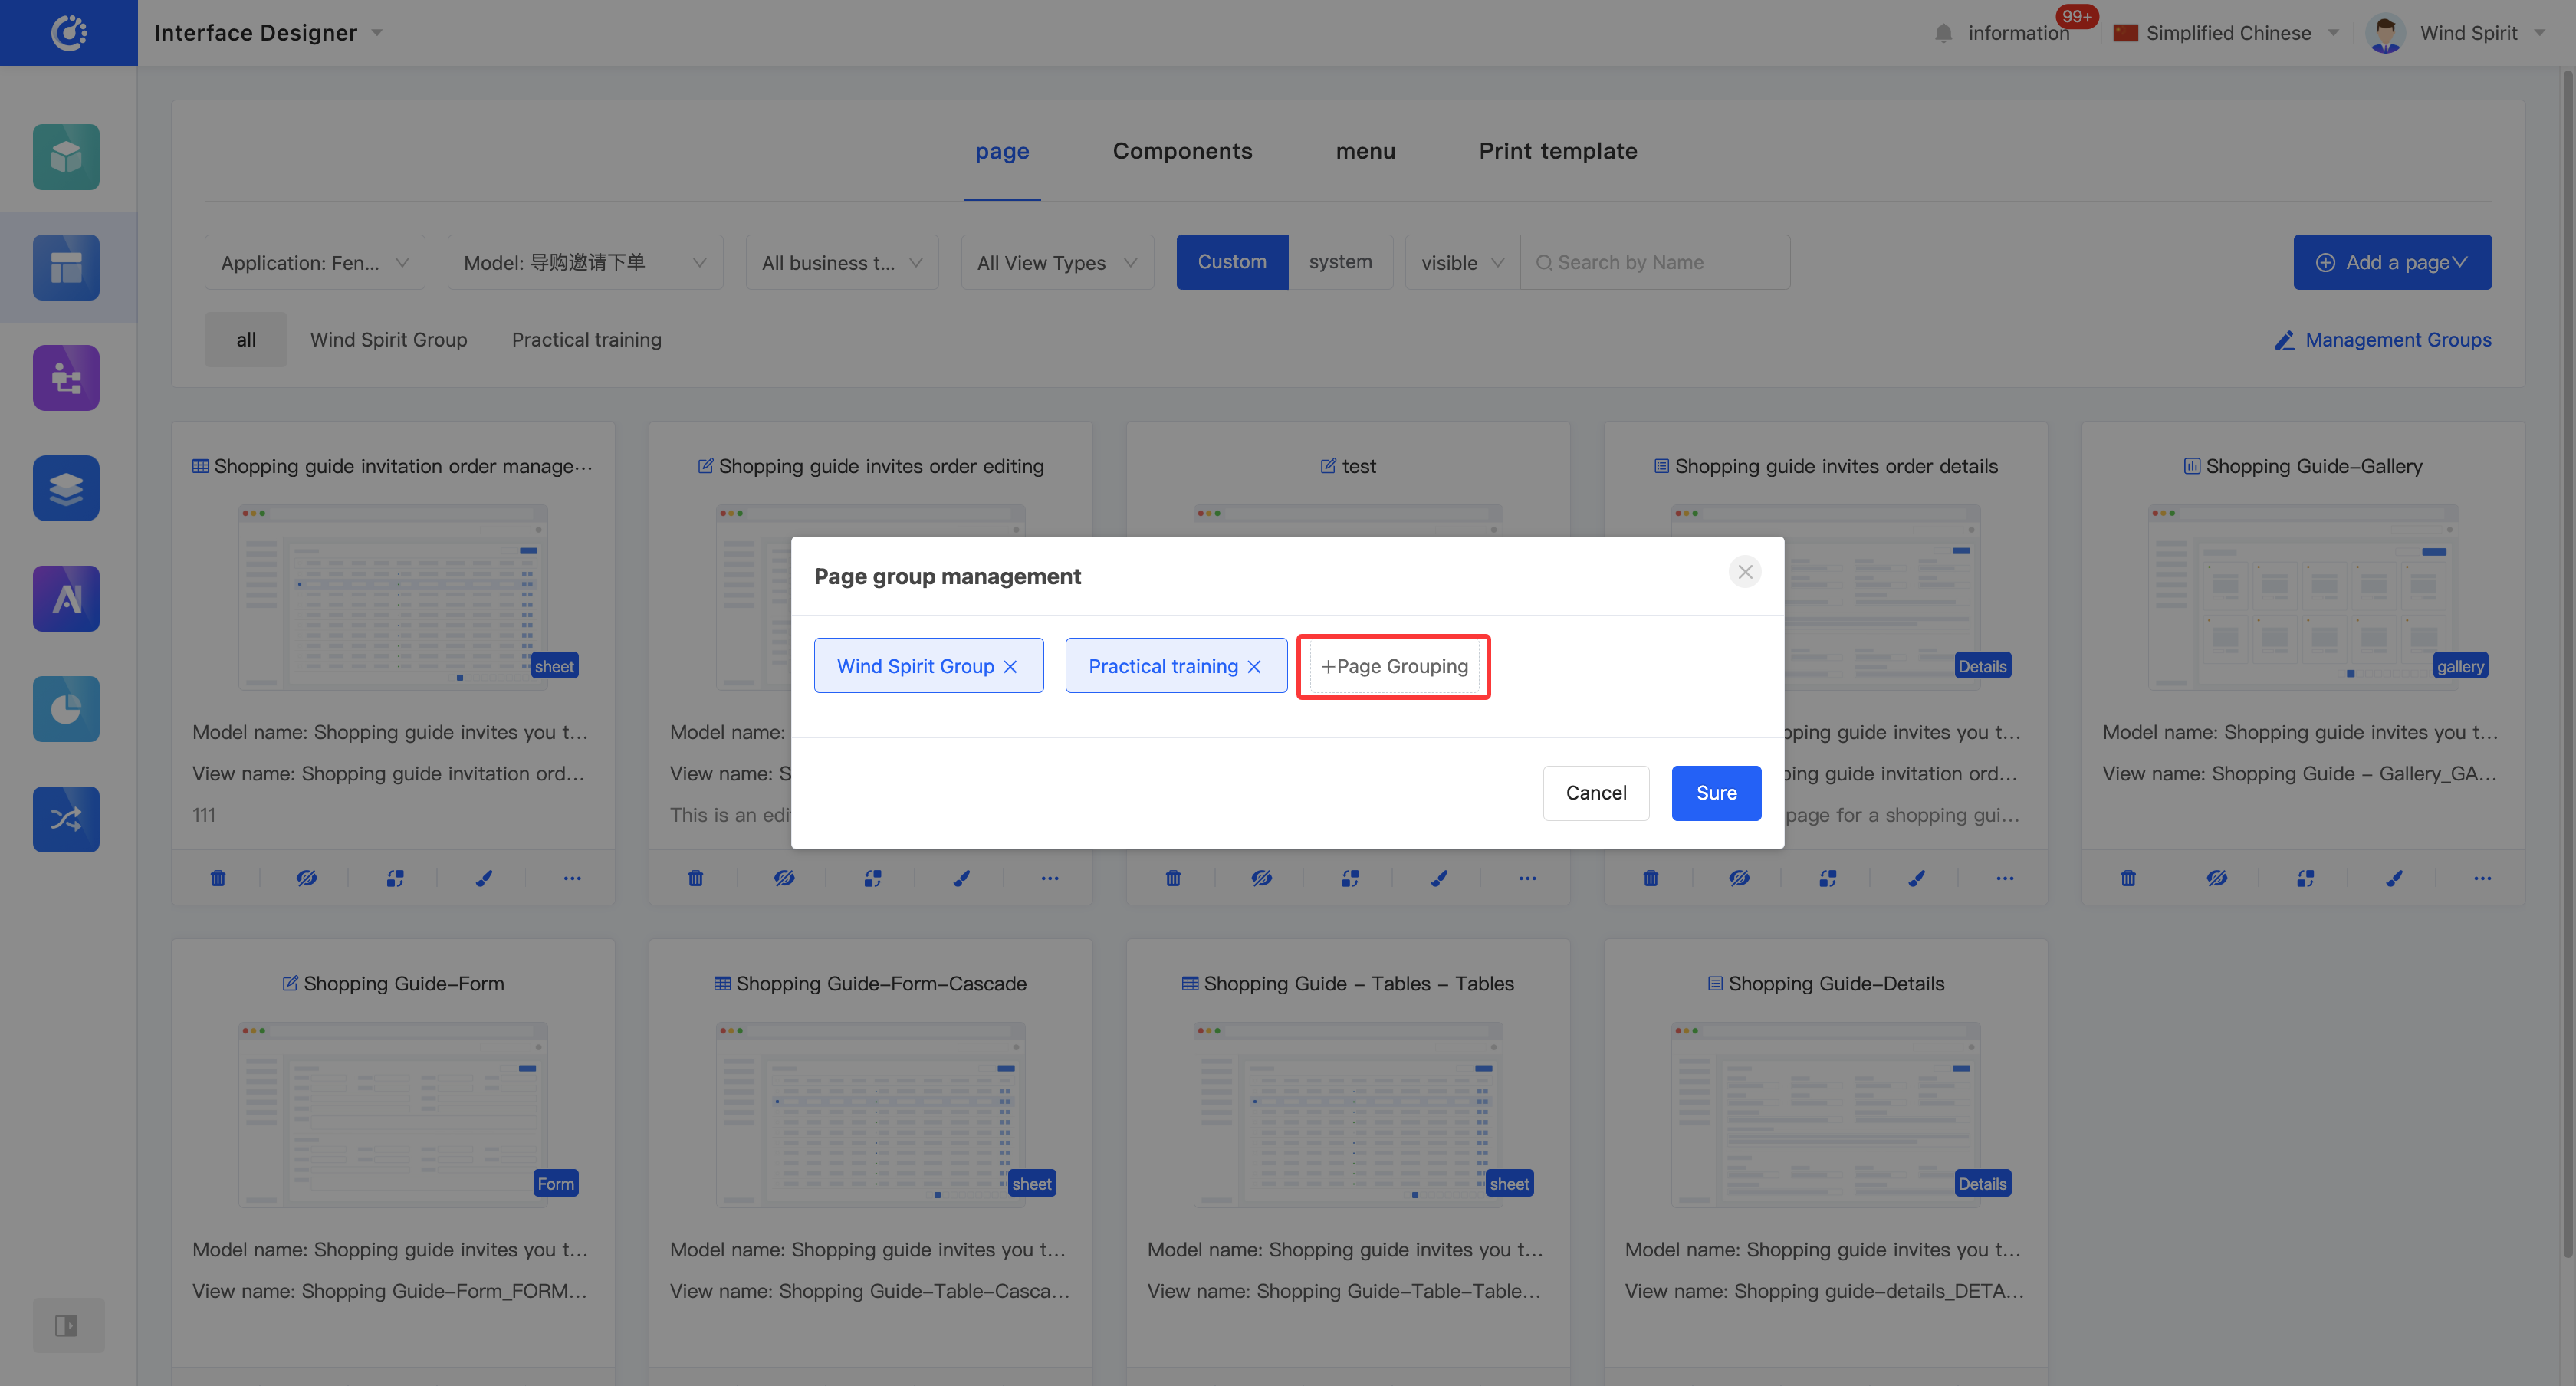
II. Group Management
1. Function Introduction
You can use the grouping function to classify and manage pages (including adding, modifying, and deleting). You can customize and add up to 15 groups as needed.
2. Operation Method
- Manage Groups: Click "Manage Groups" and manage groups in the pop-up window.

- Add a Group: Click "+ Page Group", enter the group name, and press Enter; or select a group used in other applications.
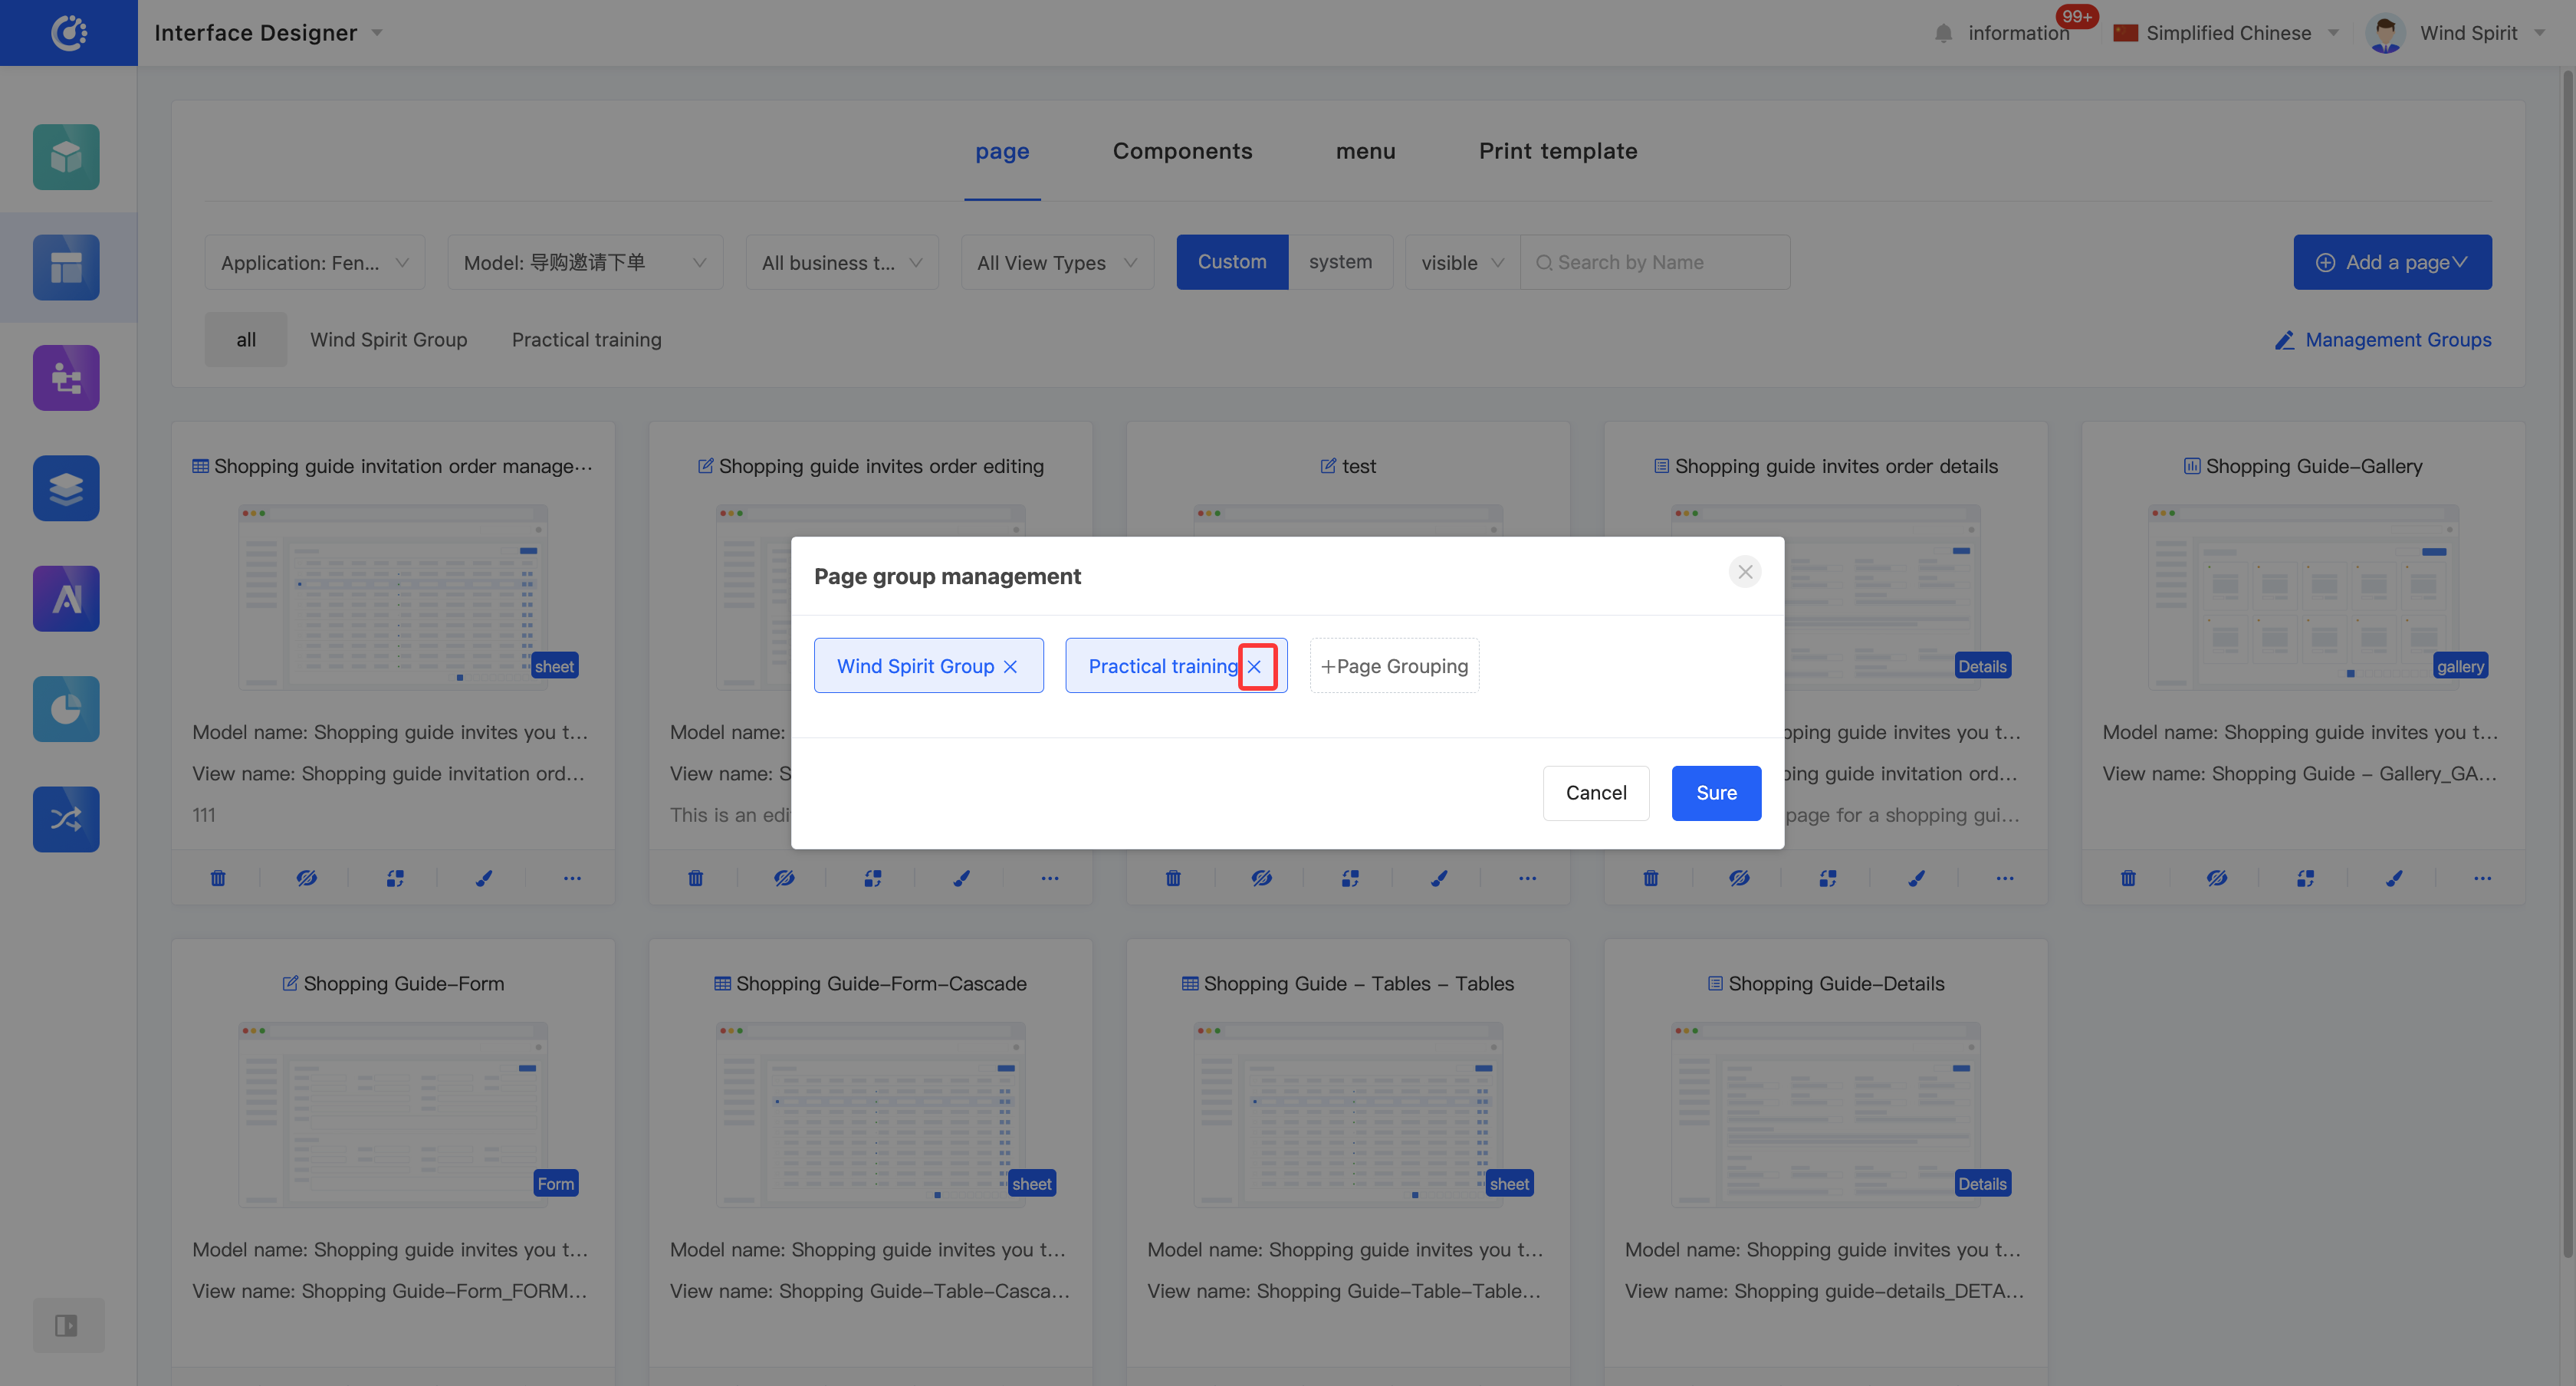
- Modify a Group: Double-click the group label, make modifications, and press Enter to save.
Note
If the group is also used in other applications, the name will be updated synchronously.
- Delete a Group: Click the "Delete" icon after the group to delete the group.
Note
If there are models under the group, it cannot be deleted.
III. Add a Page
1. Function Introduction
Use the UI Designer to create a page. You can edit page information during the creation process. The created page can be used in various scenarios such as menu display and page calls.
2. Operation Method
Click "Add Page" - "Create Directly", fill in the information correctly in the pop-up window, and click "OK" to successfully create the page.

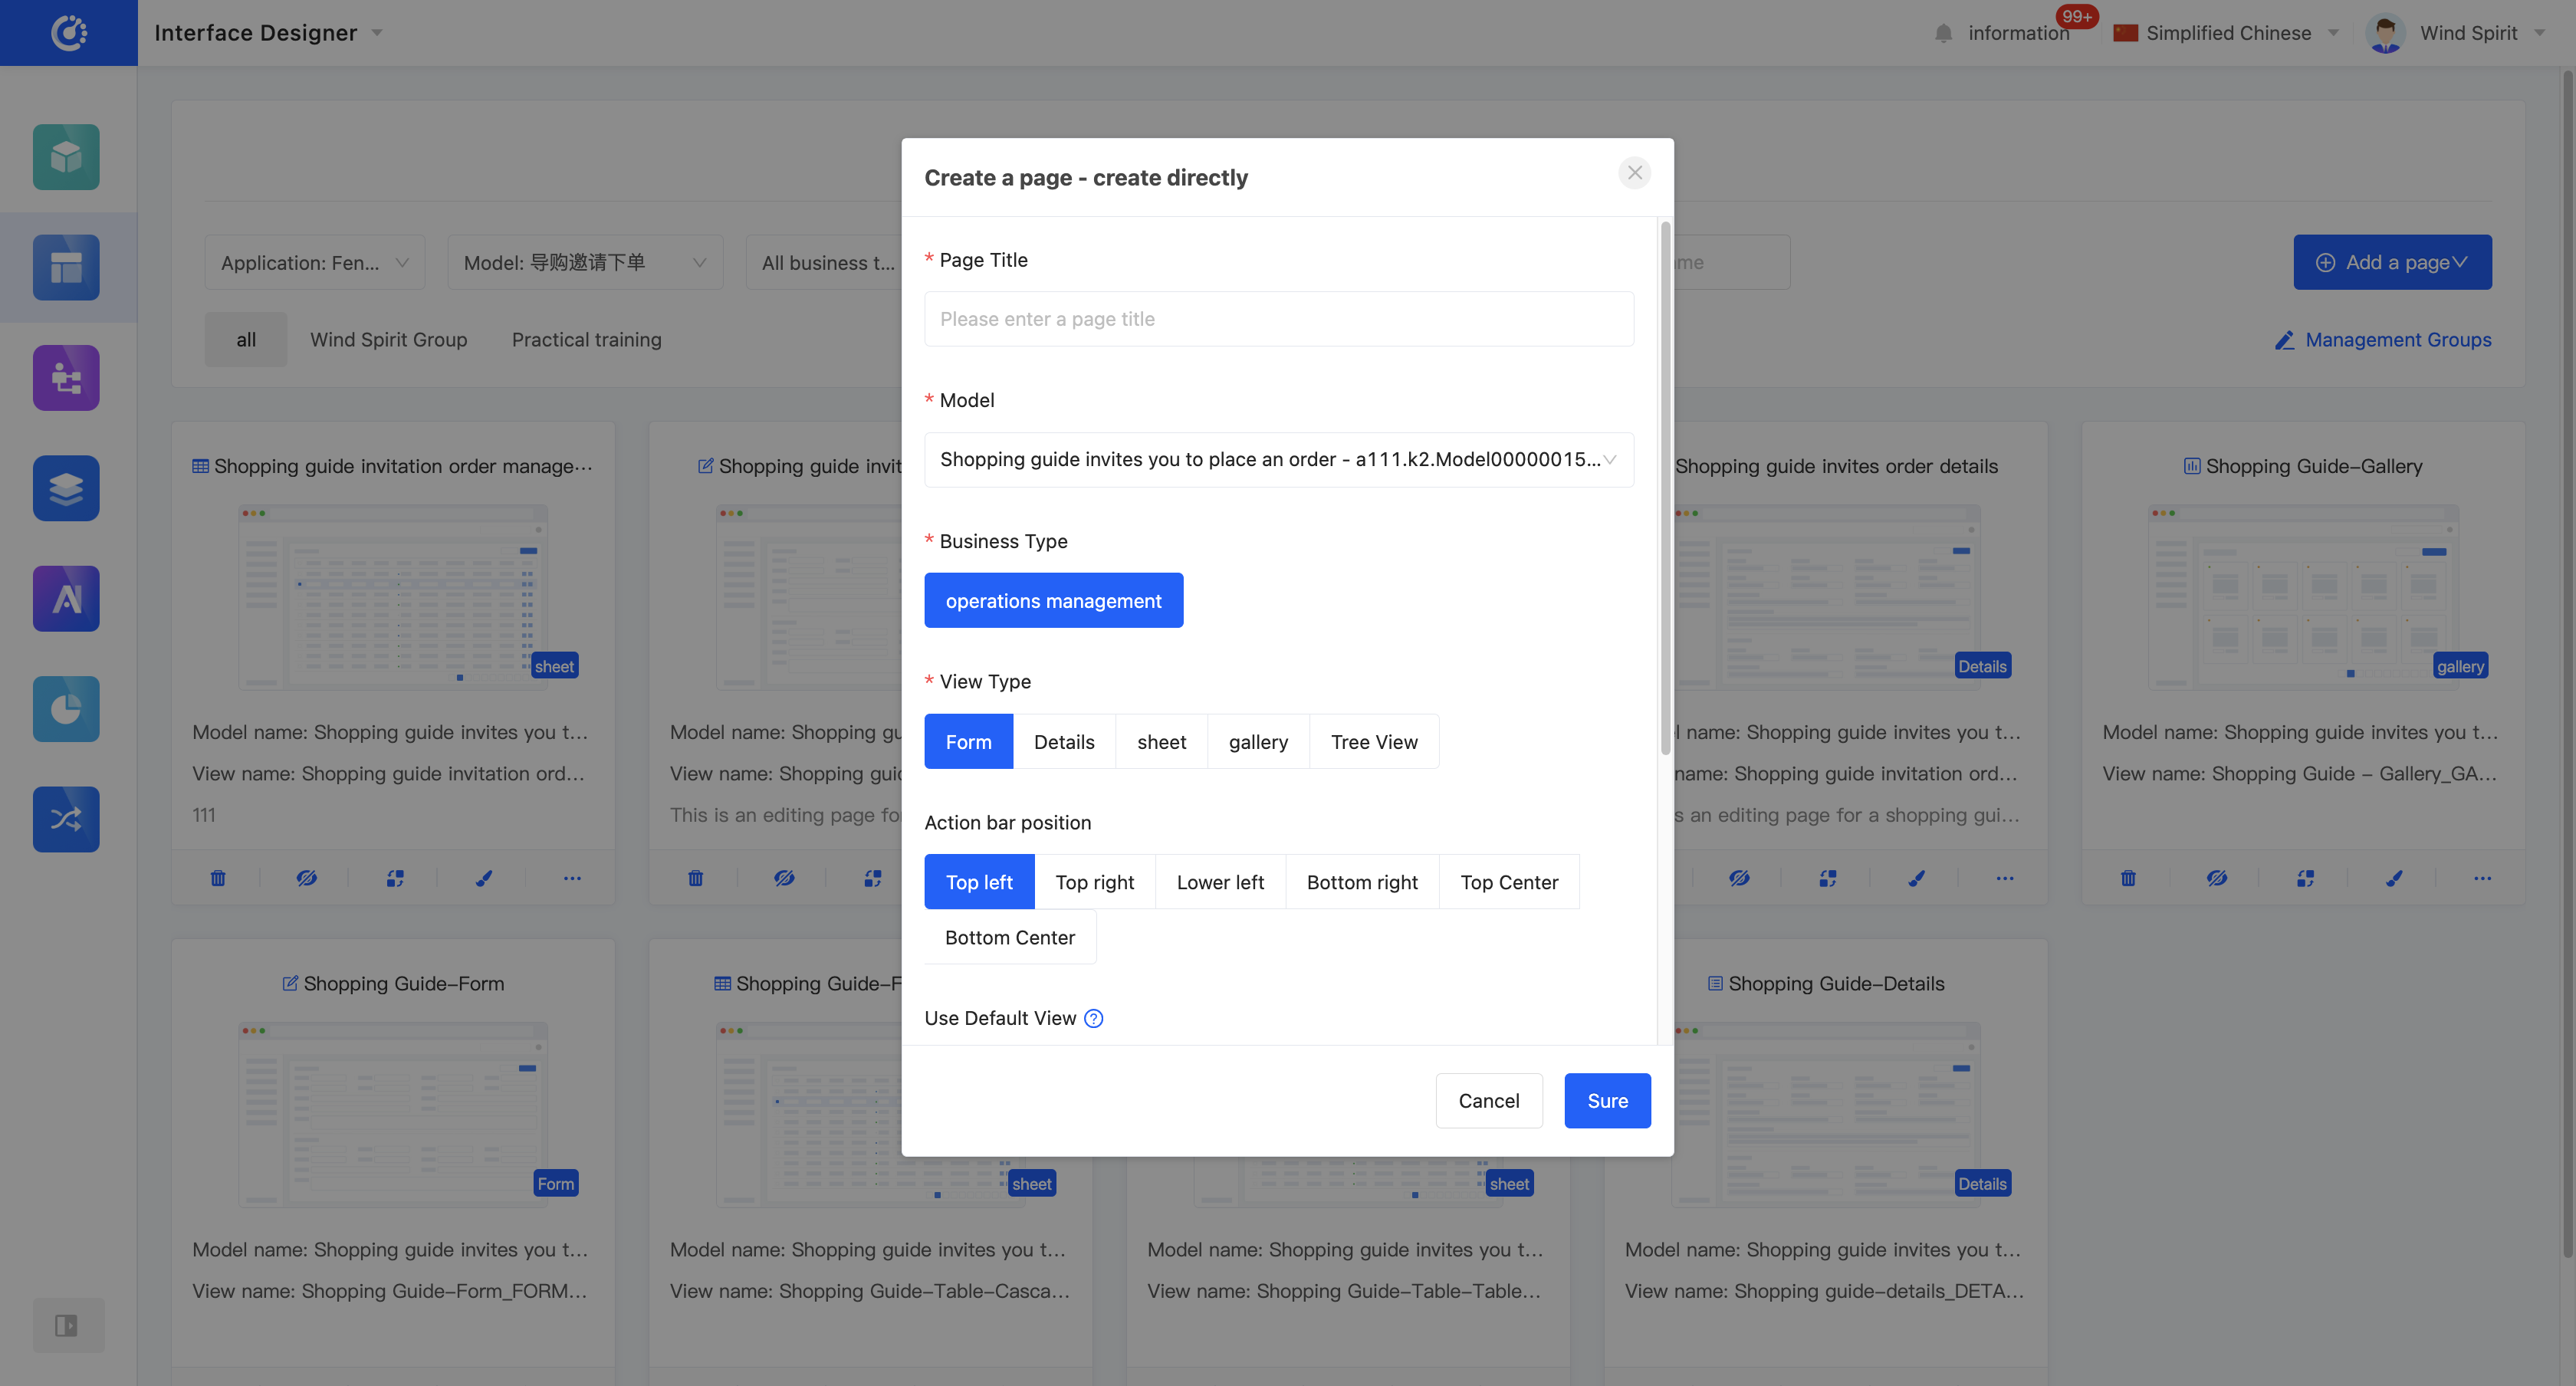
Tip
When creating a page, if you enable the "Use Default View" option, the system will automatically generate a default view based on the model information and view type, simplifying the page design process. After enabling this option, you can also select the default width, which sets the default size of the components in the generated default view on the page.
IV. Edit a Page
1. Function Introduction
Successfully created pages can be edited.
Note
Only some information can be modified. Some information is fixed during creation, so please fill it in carefully when creating.
2. Operation Method
Note
The thumbnail in the page card can only be edited and modified through "Method 2".
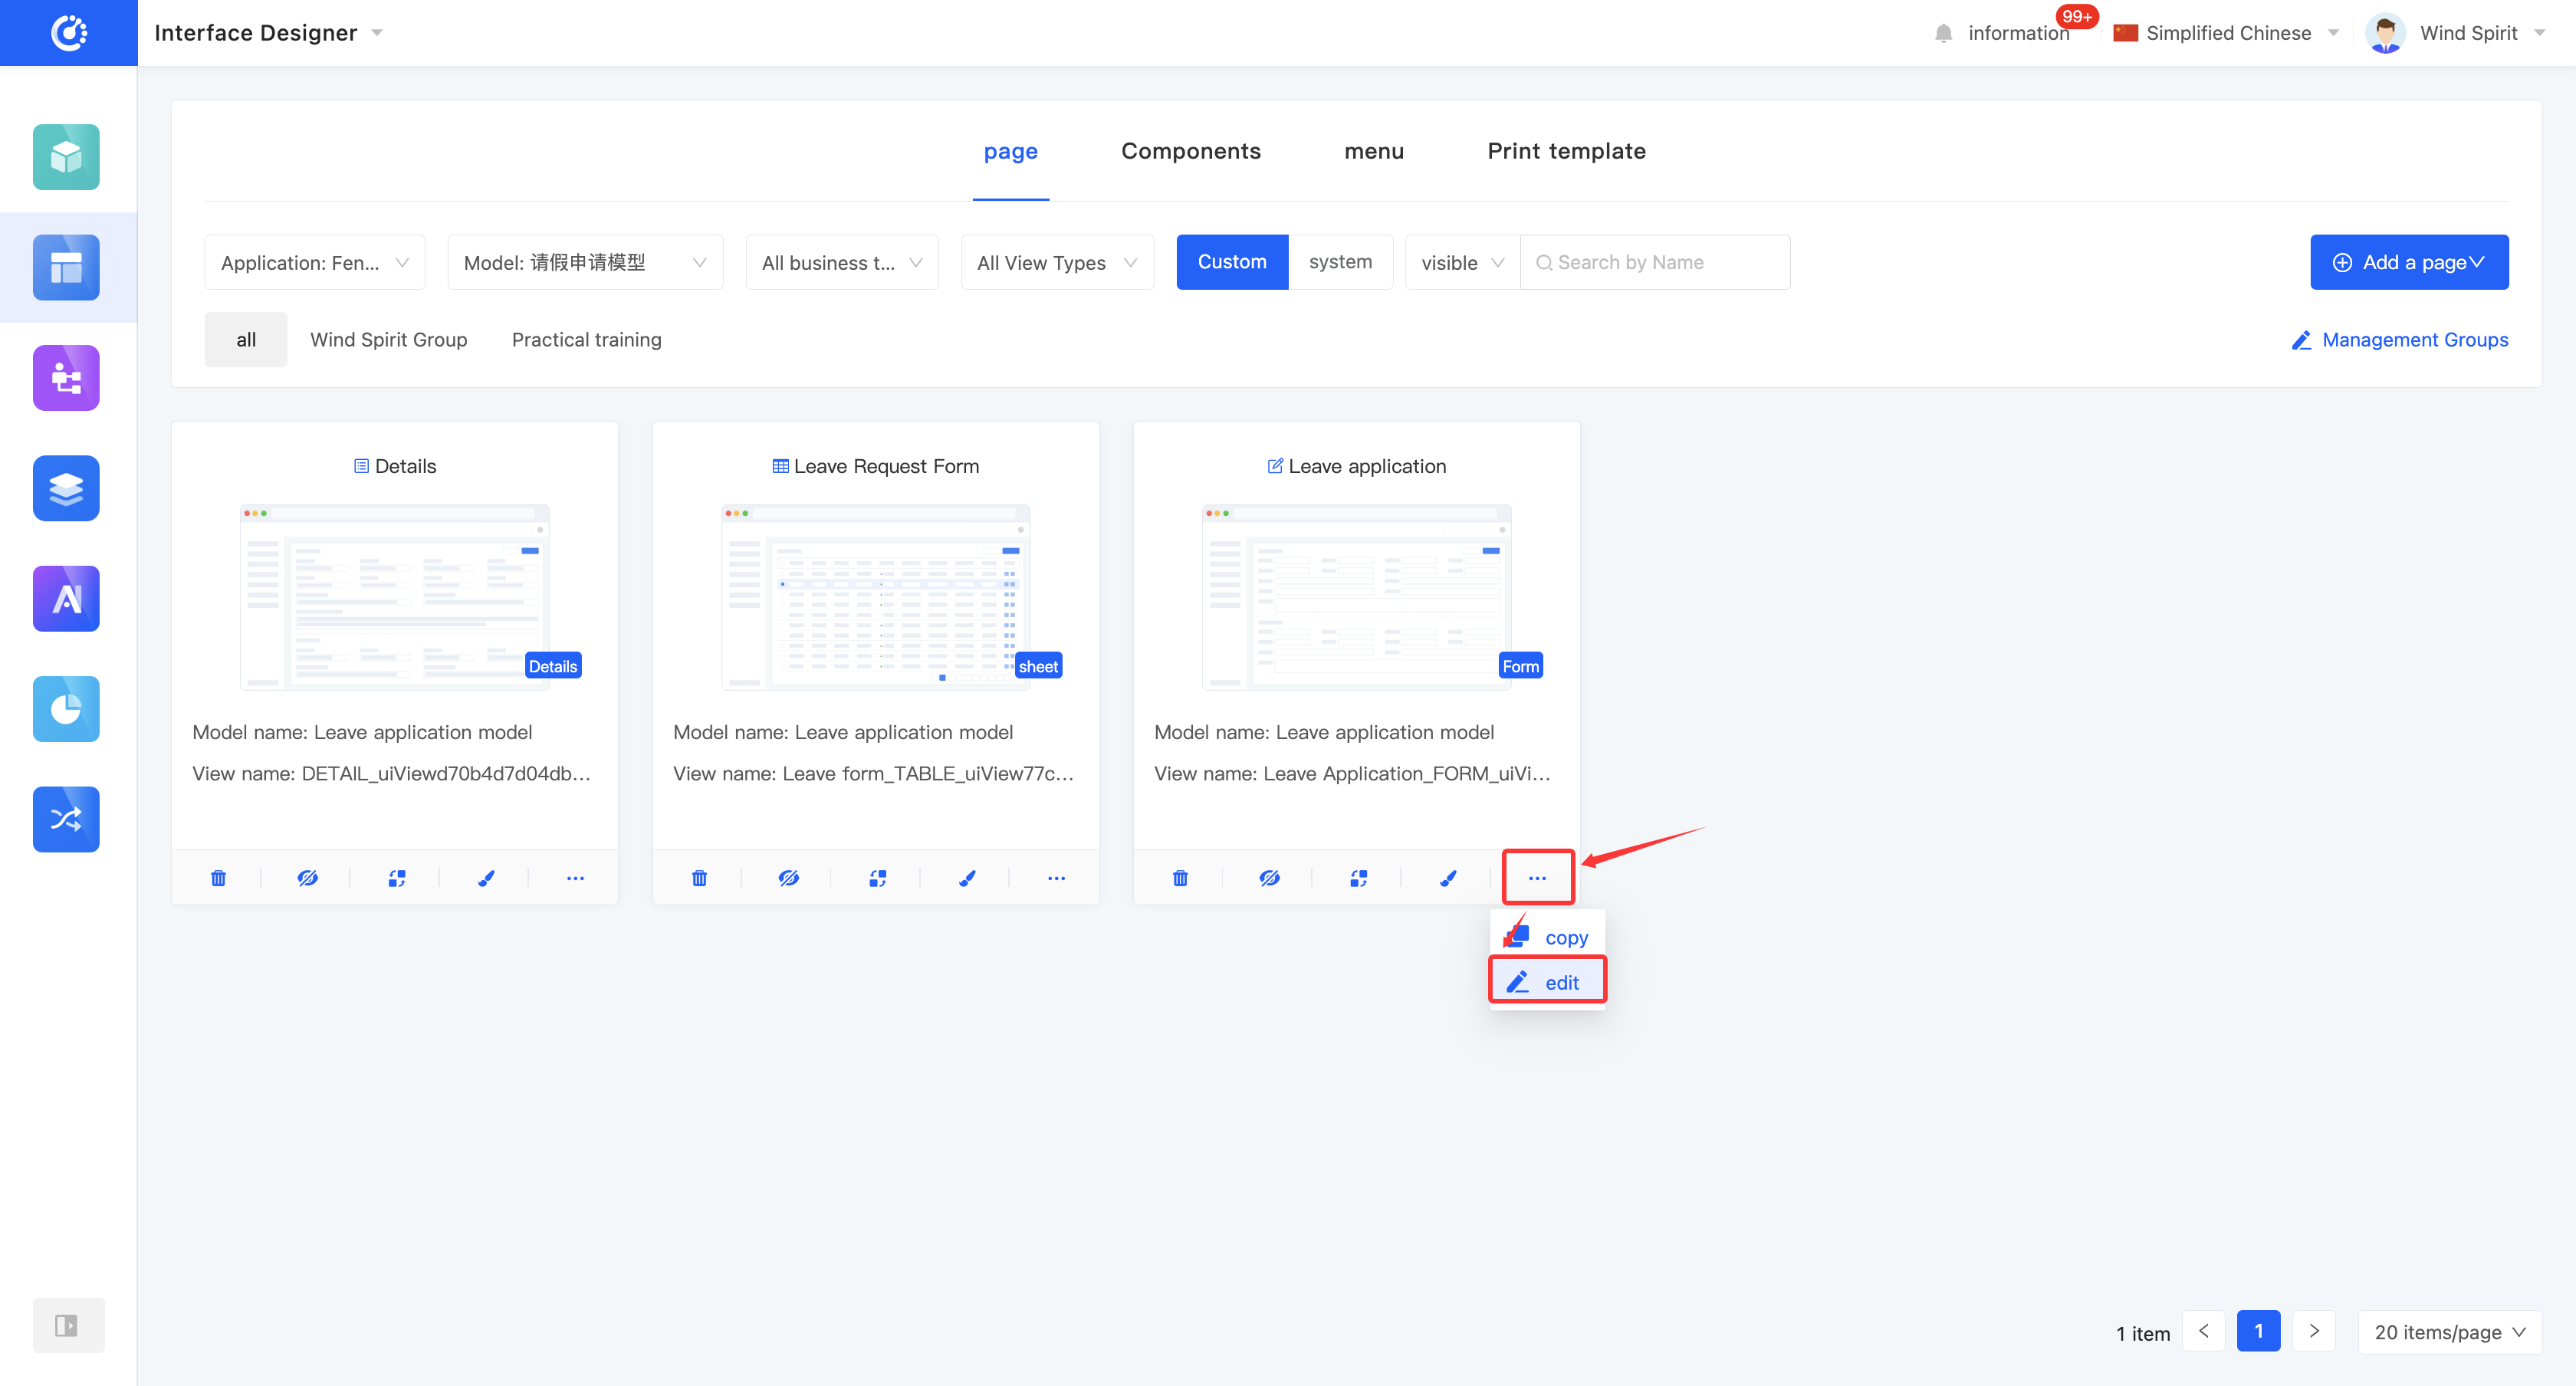
Method 1: Click "Edit" and edit the page in the pop-up editing window.
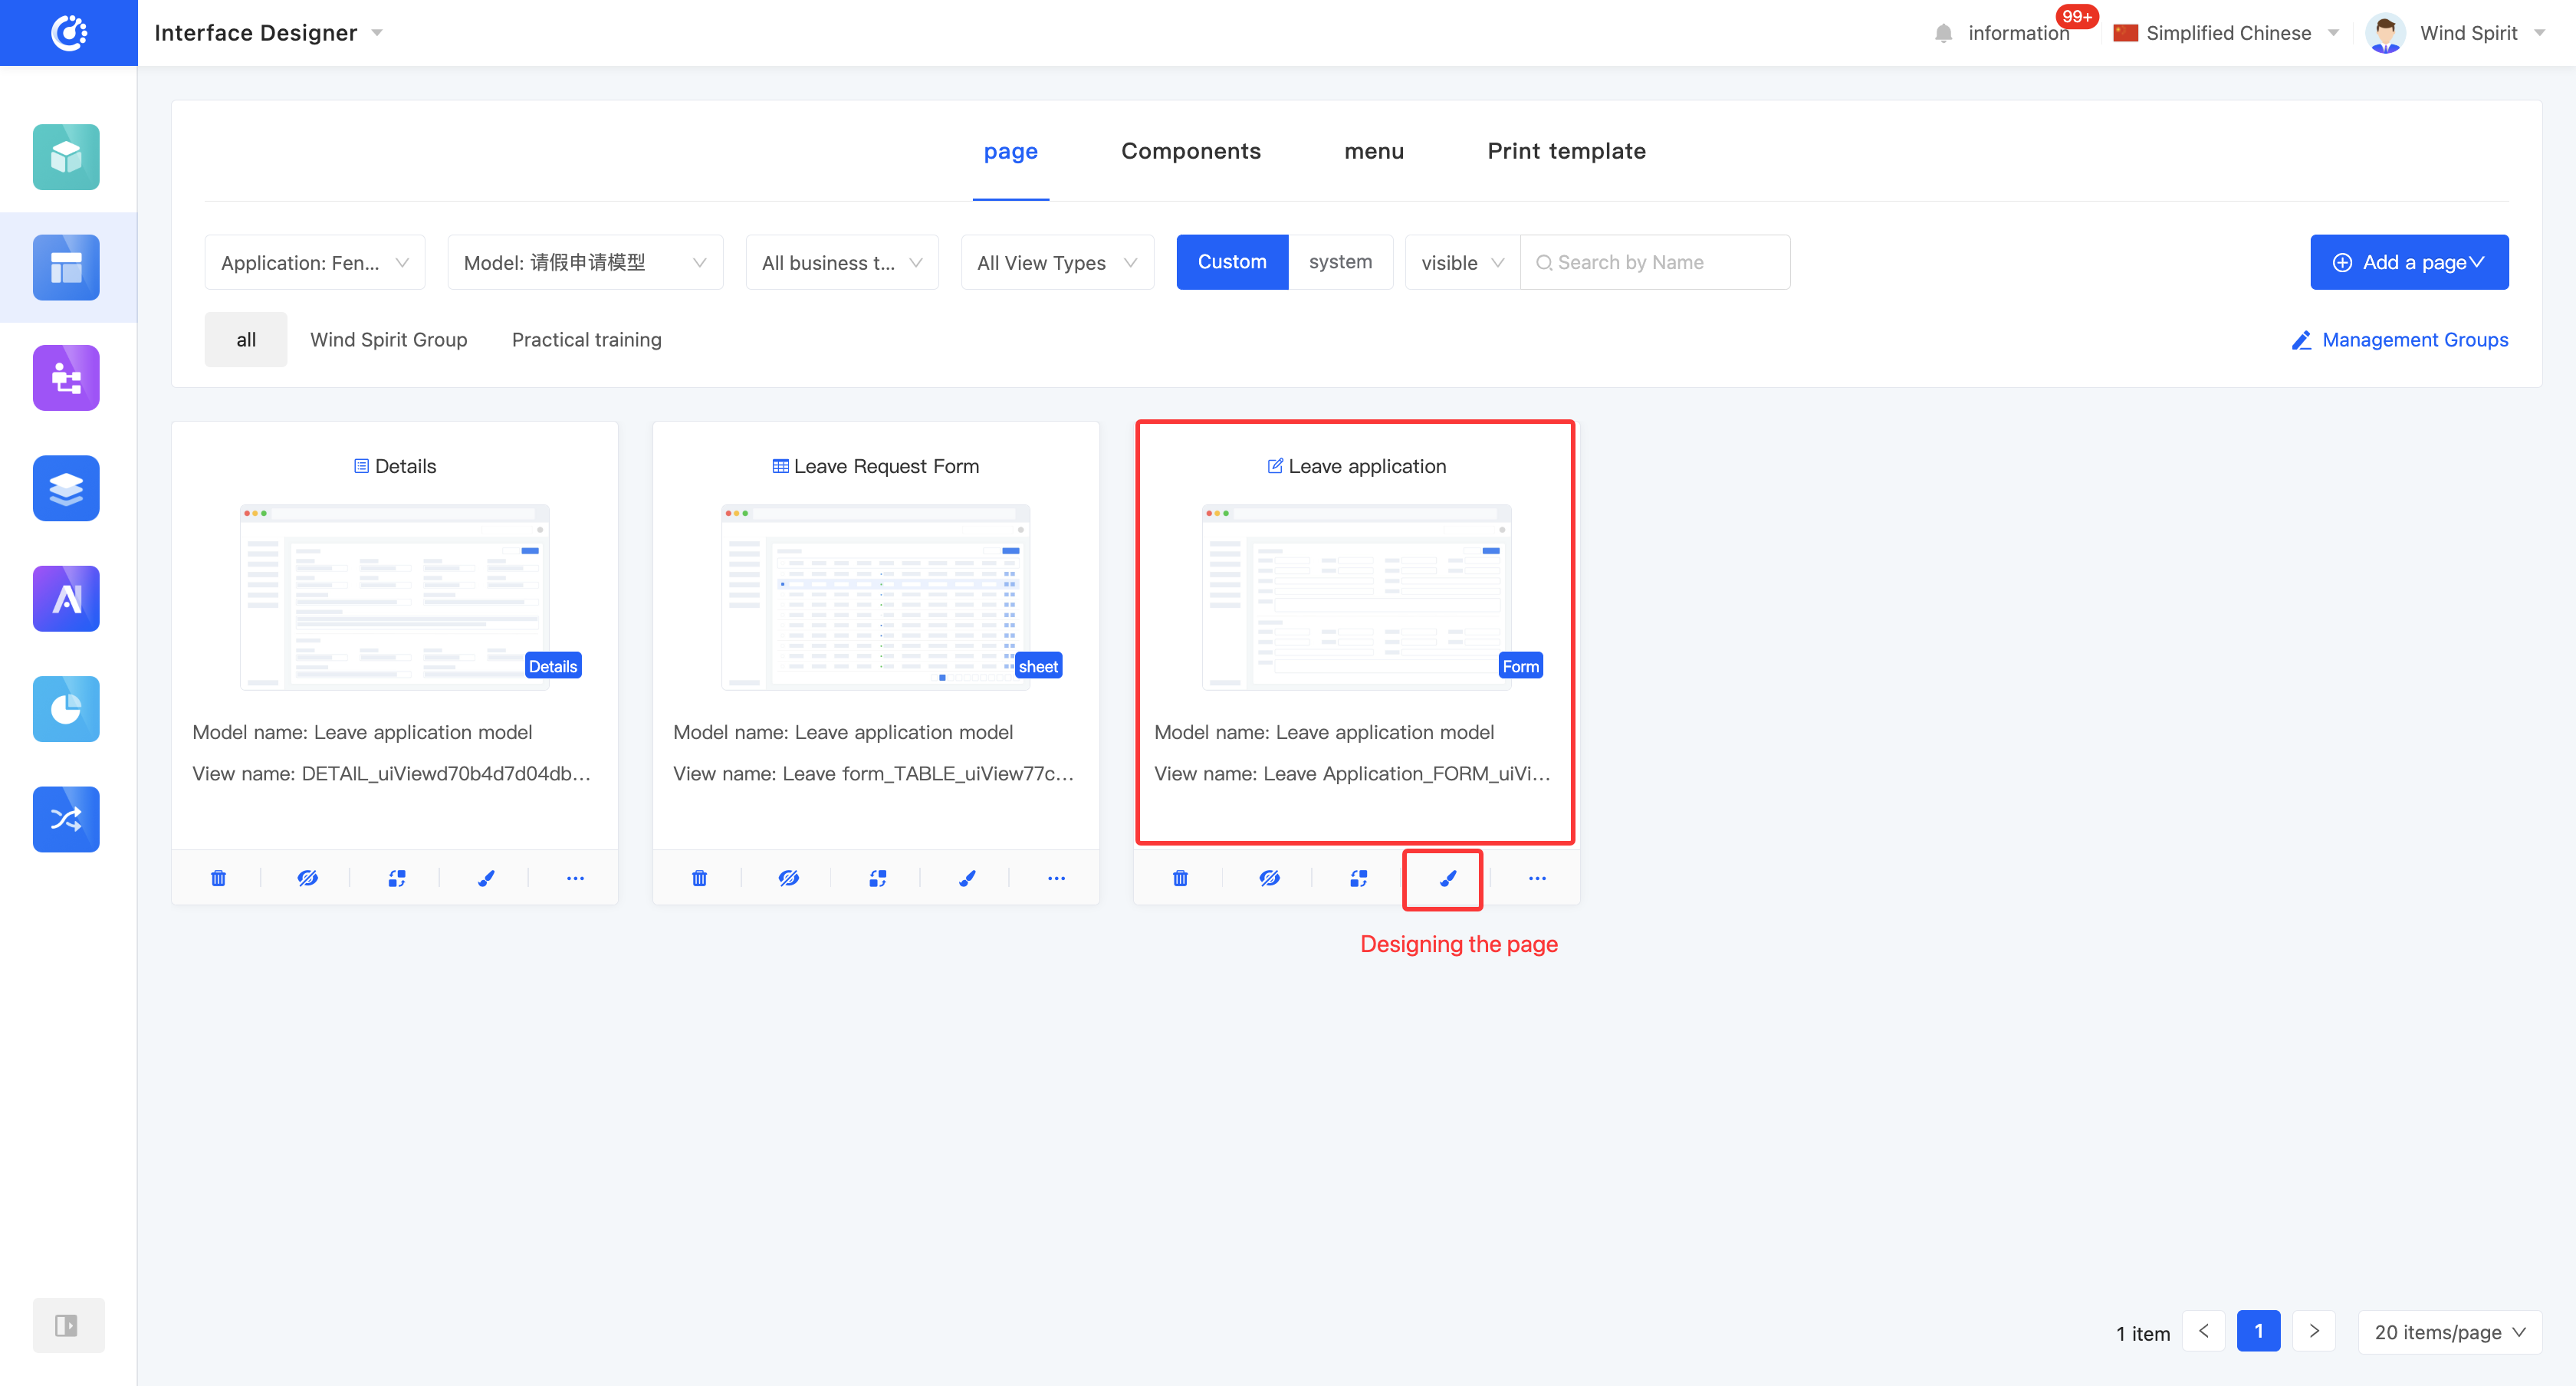
Method 2: Click the main body of the page card or click "Design Page" to enter the page design interface, and then enter "Page Settings" to edit it.
V. Design a Page
1. Function Introduction
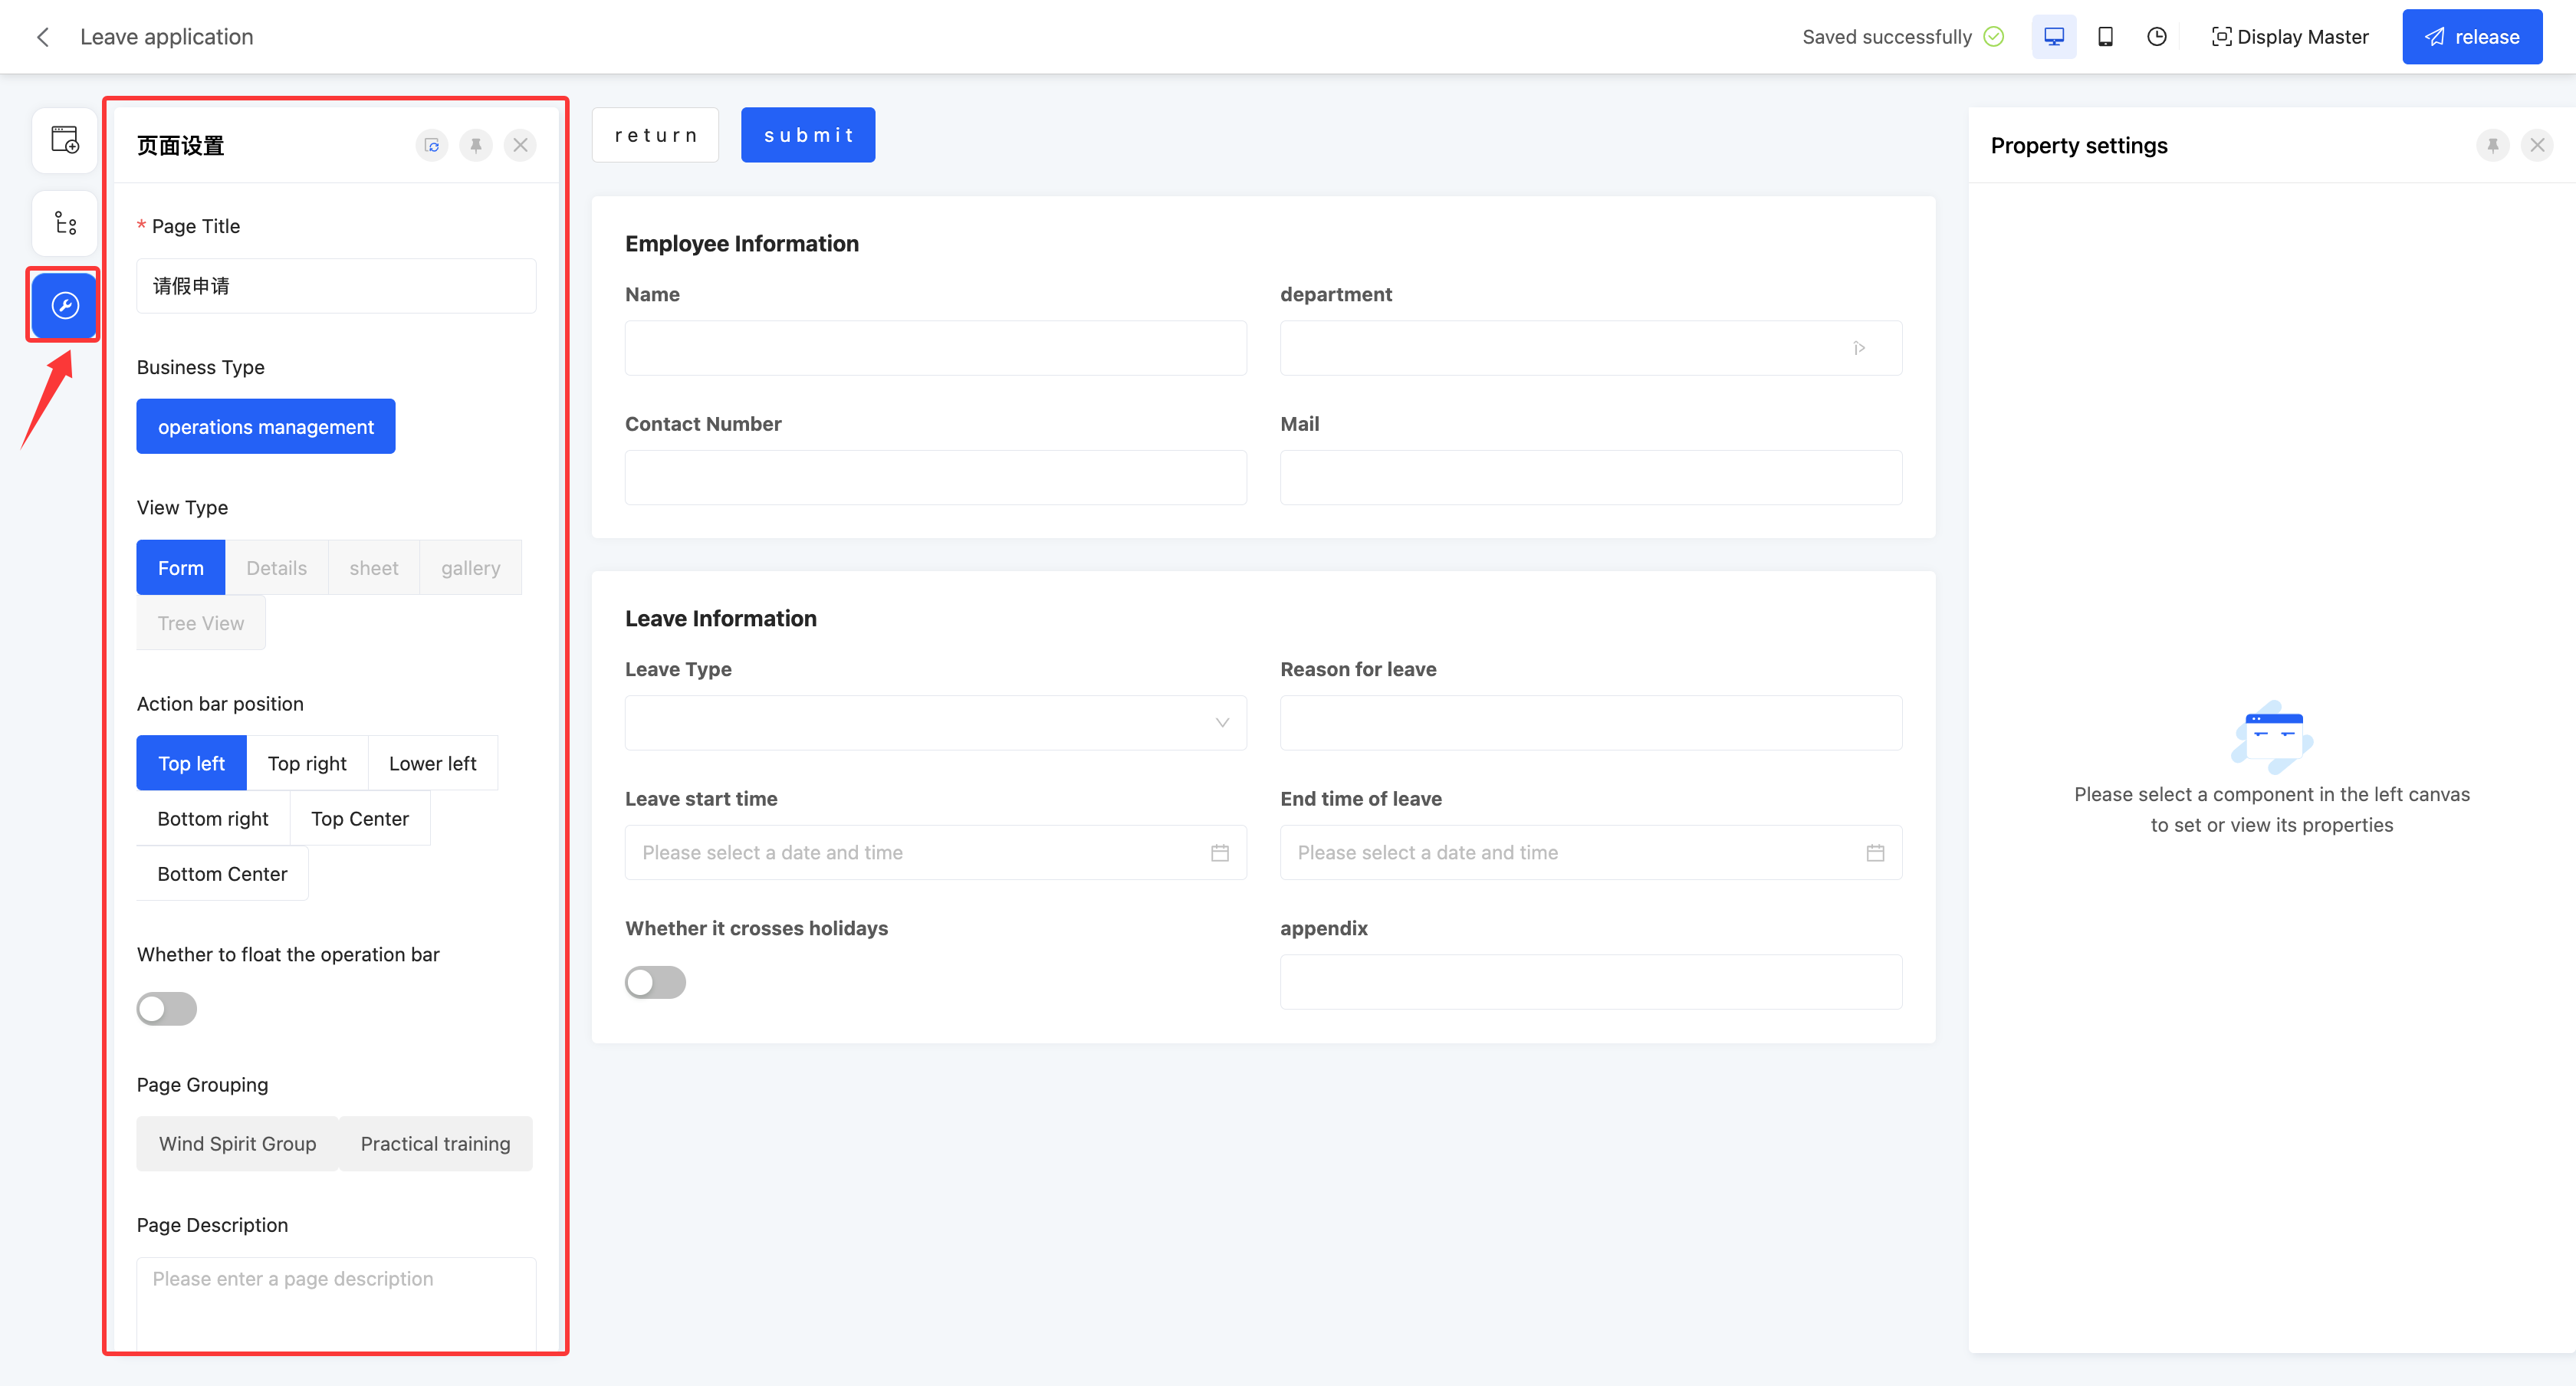
When designing the page interface, you can perform page settings, construction, design, and layout work. By using various components, you can customize the page design layout to meet different needs and styles.
2. Operation Method
Click the main body of the page card or the "Design Page" section to enter the page design interface (see the page design documentation for details).
VI. View Reference Information
1. Function Introduction
Through this function, you can view various elements that have a reference relationship with the page, including other views and menus. Each relationship is displayed in a list, and the list items are links that can lead to the corresponding design pages; the content is the corresponding information.
2. Operation Method
Click the "View Referenced Information" icon to view the reference information.
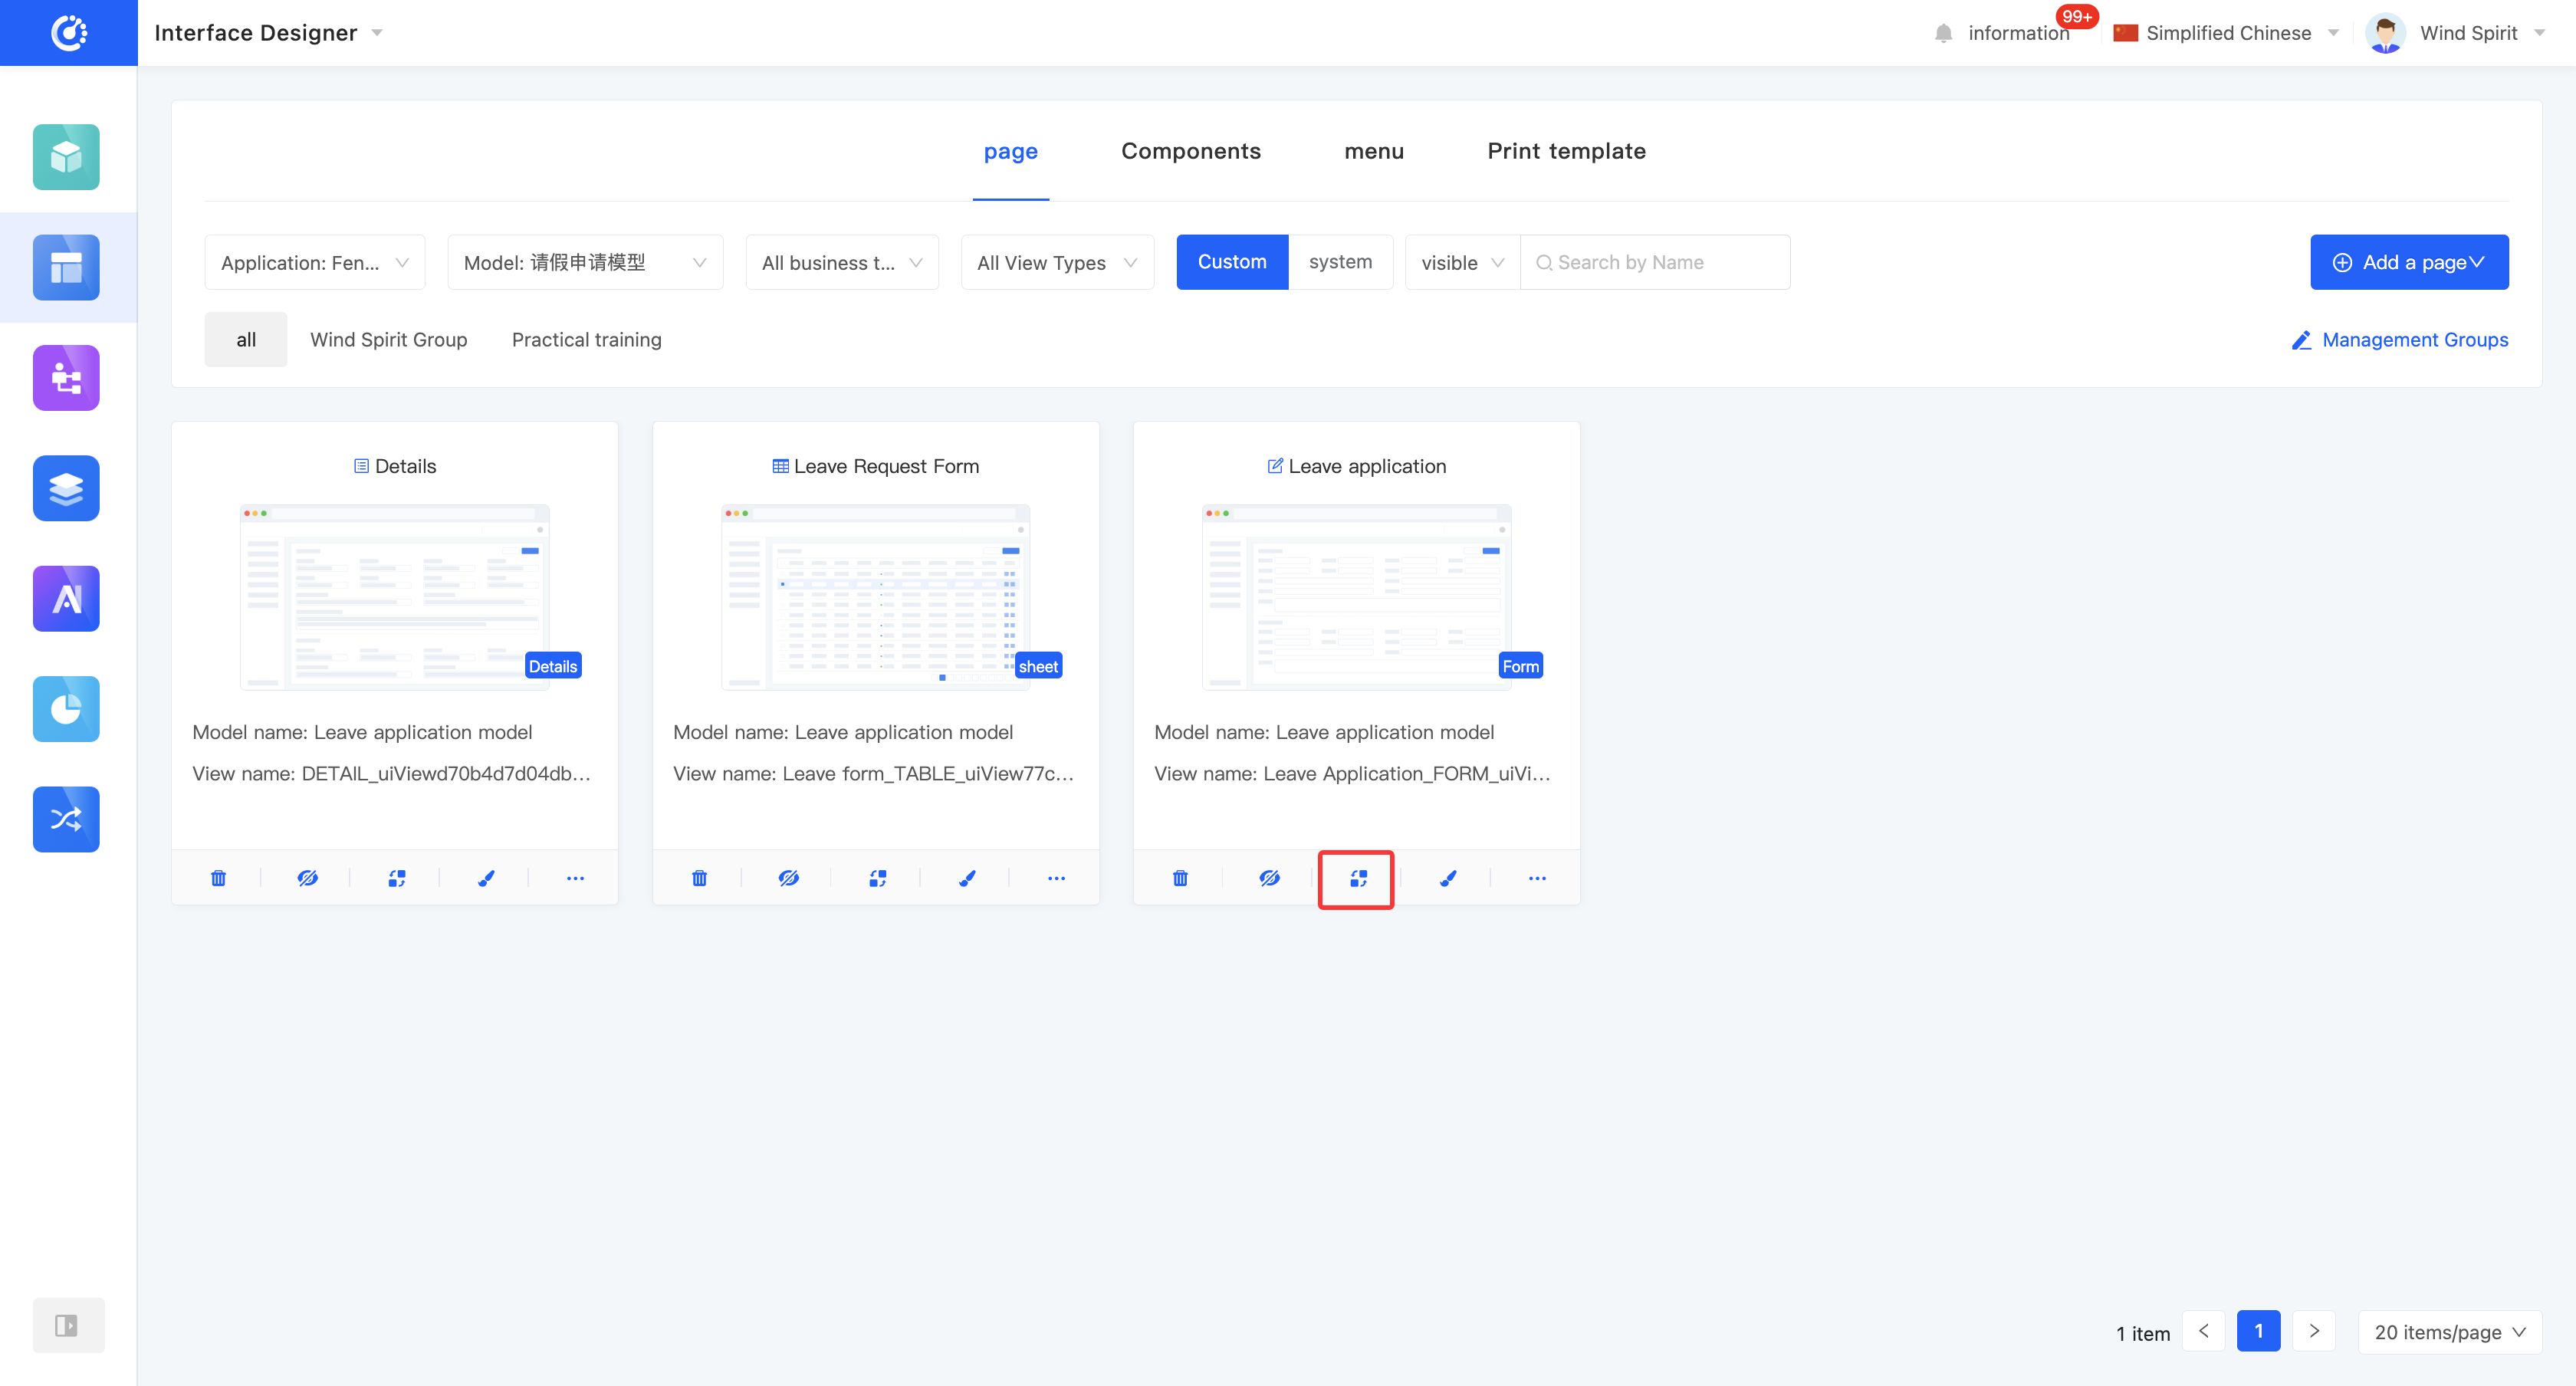
VII. Copy a Page
1. Function Introduction
When you need to design multiple pages with similar content or want to copy a page to another application, the platform provides a "Copy Page" function. Through this function, you can quickly copy a new page, simplifying the design process and improving work efficiency.
Note
- During the page copying process, you can change the associated model. However, note that the newly selected model must be the original page's associated model or its sub-model.
- During the page copying process, if the original page's view type is form or detail, you can choose to change the view type to detail or form when copying.
2. Operation Method
Click "Copy", edit the information in the pop-up page copying window, and click "OK" to complete the copying.

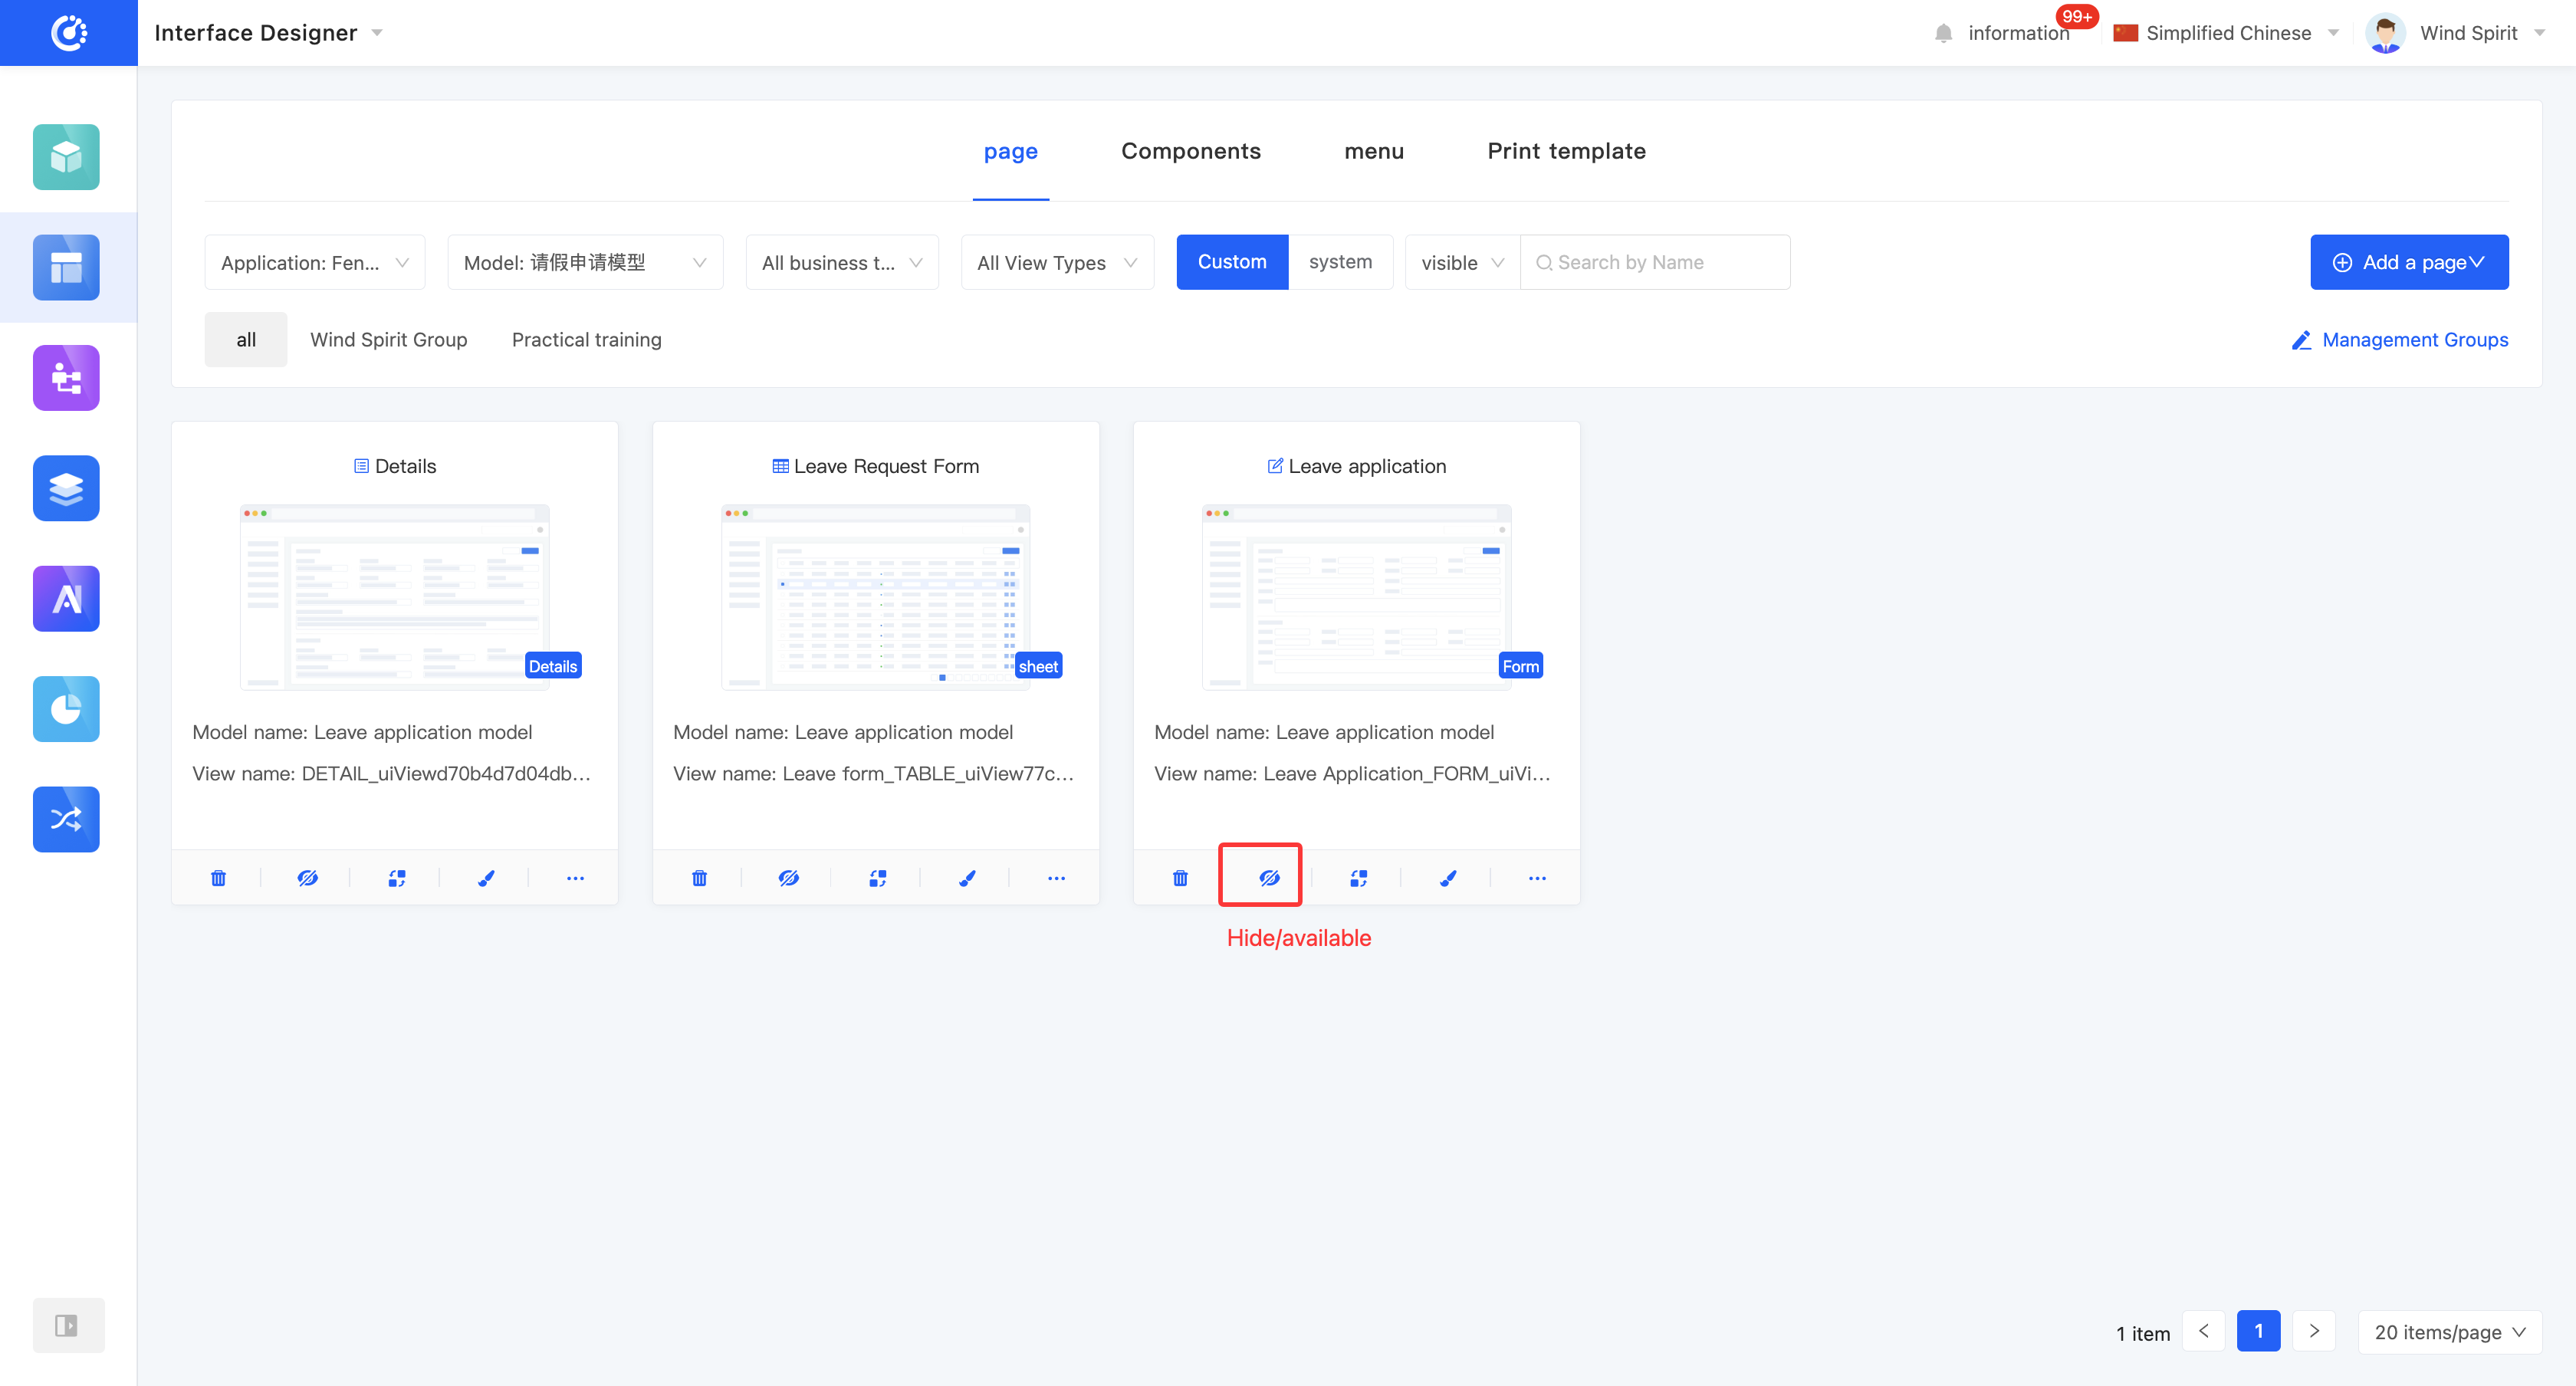
VIII. Hide/Show a Page
1. Function Introduction
For pages that are not currently in use, you can perform a hide operation. If needed in the future, simply set the hidden page to the visible state to reuse it. In addition, hidden pages still support editing and other operations.
Note
Hidden pages will no longer be displayed in the optional list when binding pages to menus or selecting pages for jump actions. Hiding a page that is already in use does not affect its usage.
2. Operation Method
Click "Hide" to set the page to the hidden state, and the button will change to "Set to Visible"; click it again to set the page to the visible state.
Tip
If you need to operate on a hidden page but cannot find it in the list, switch the "Visibility" filter option. The page list displays all "visible" pages by default. Switch to "All" or "Hidden" to find the hidden page.

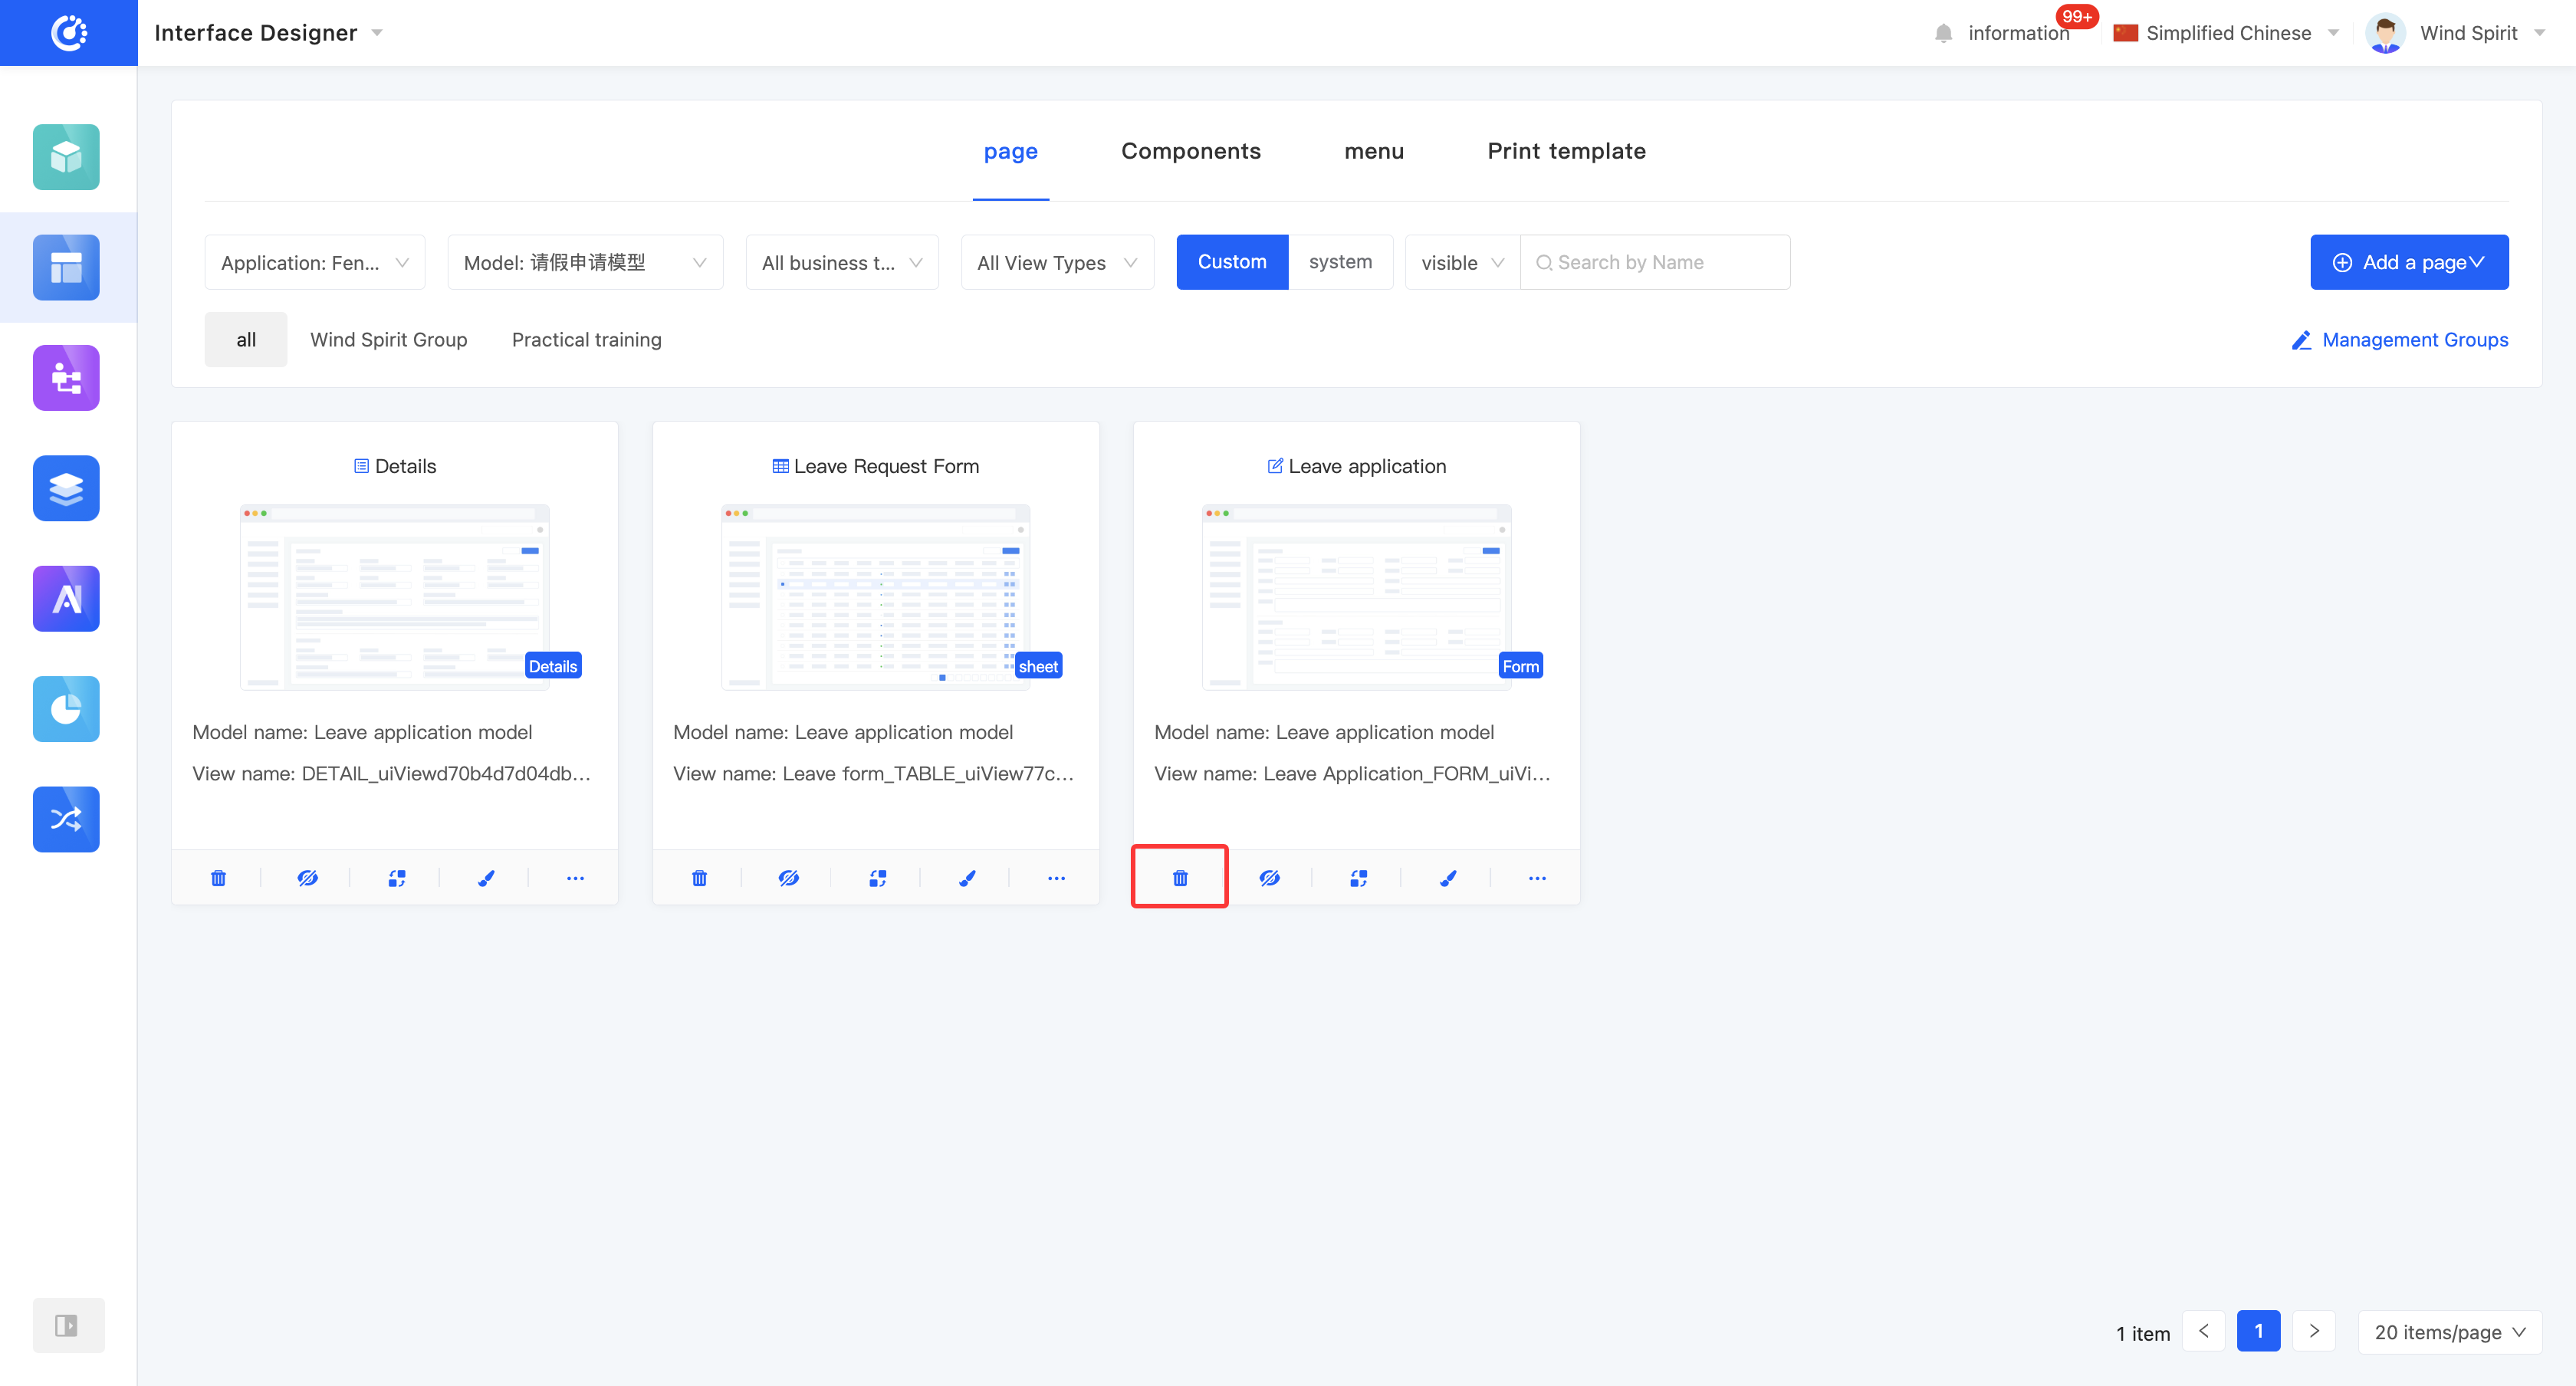
IX. Delete a Page
1. Function Introduction
When a page is no longer needed, you can choose to delete it. If you are unsure whether to delete a page, you can hide it first.
Note
Before deleting, ensure that the page is not referenced by other views or menus; otherwise, the deletion operation will fail.
Warning
Once a page is deleted, it cannot be recovered. Please operate with caution!
2. Operation Method
Click the "Delete" icon and confirm the deletion to delete the page.