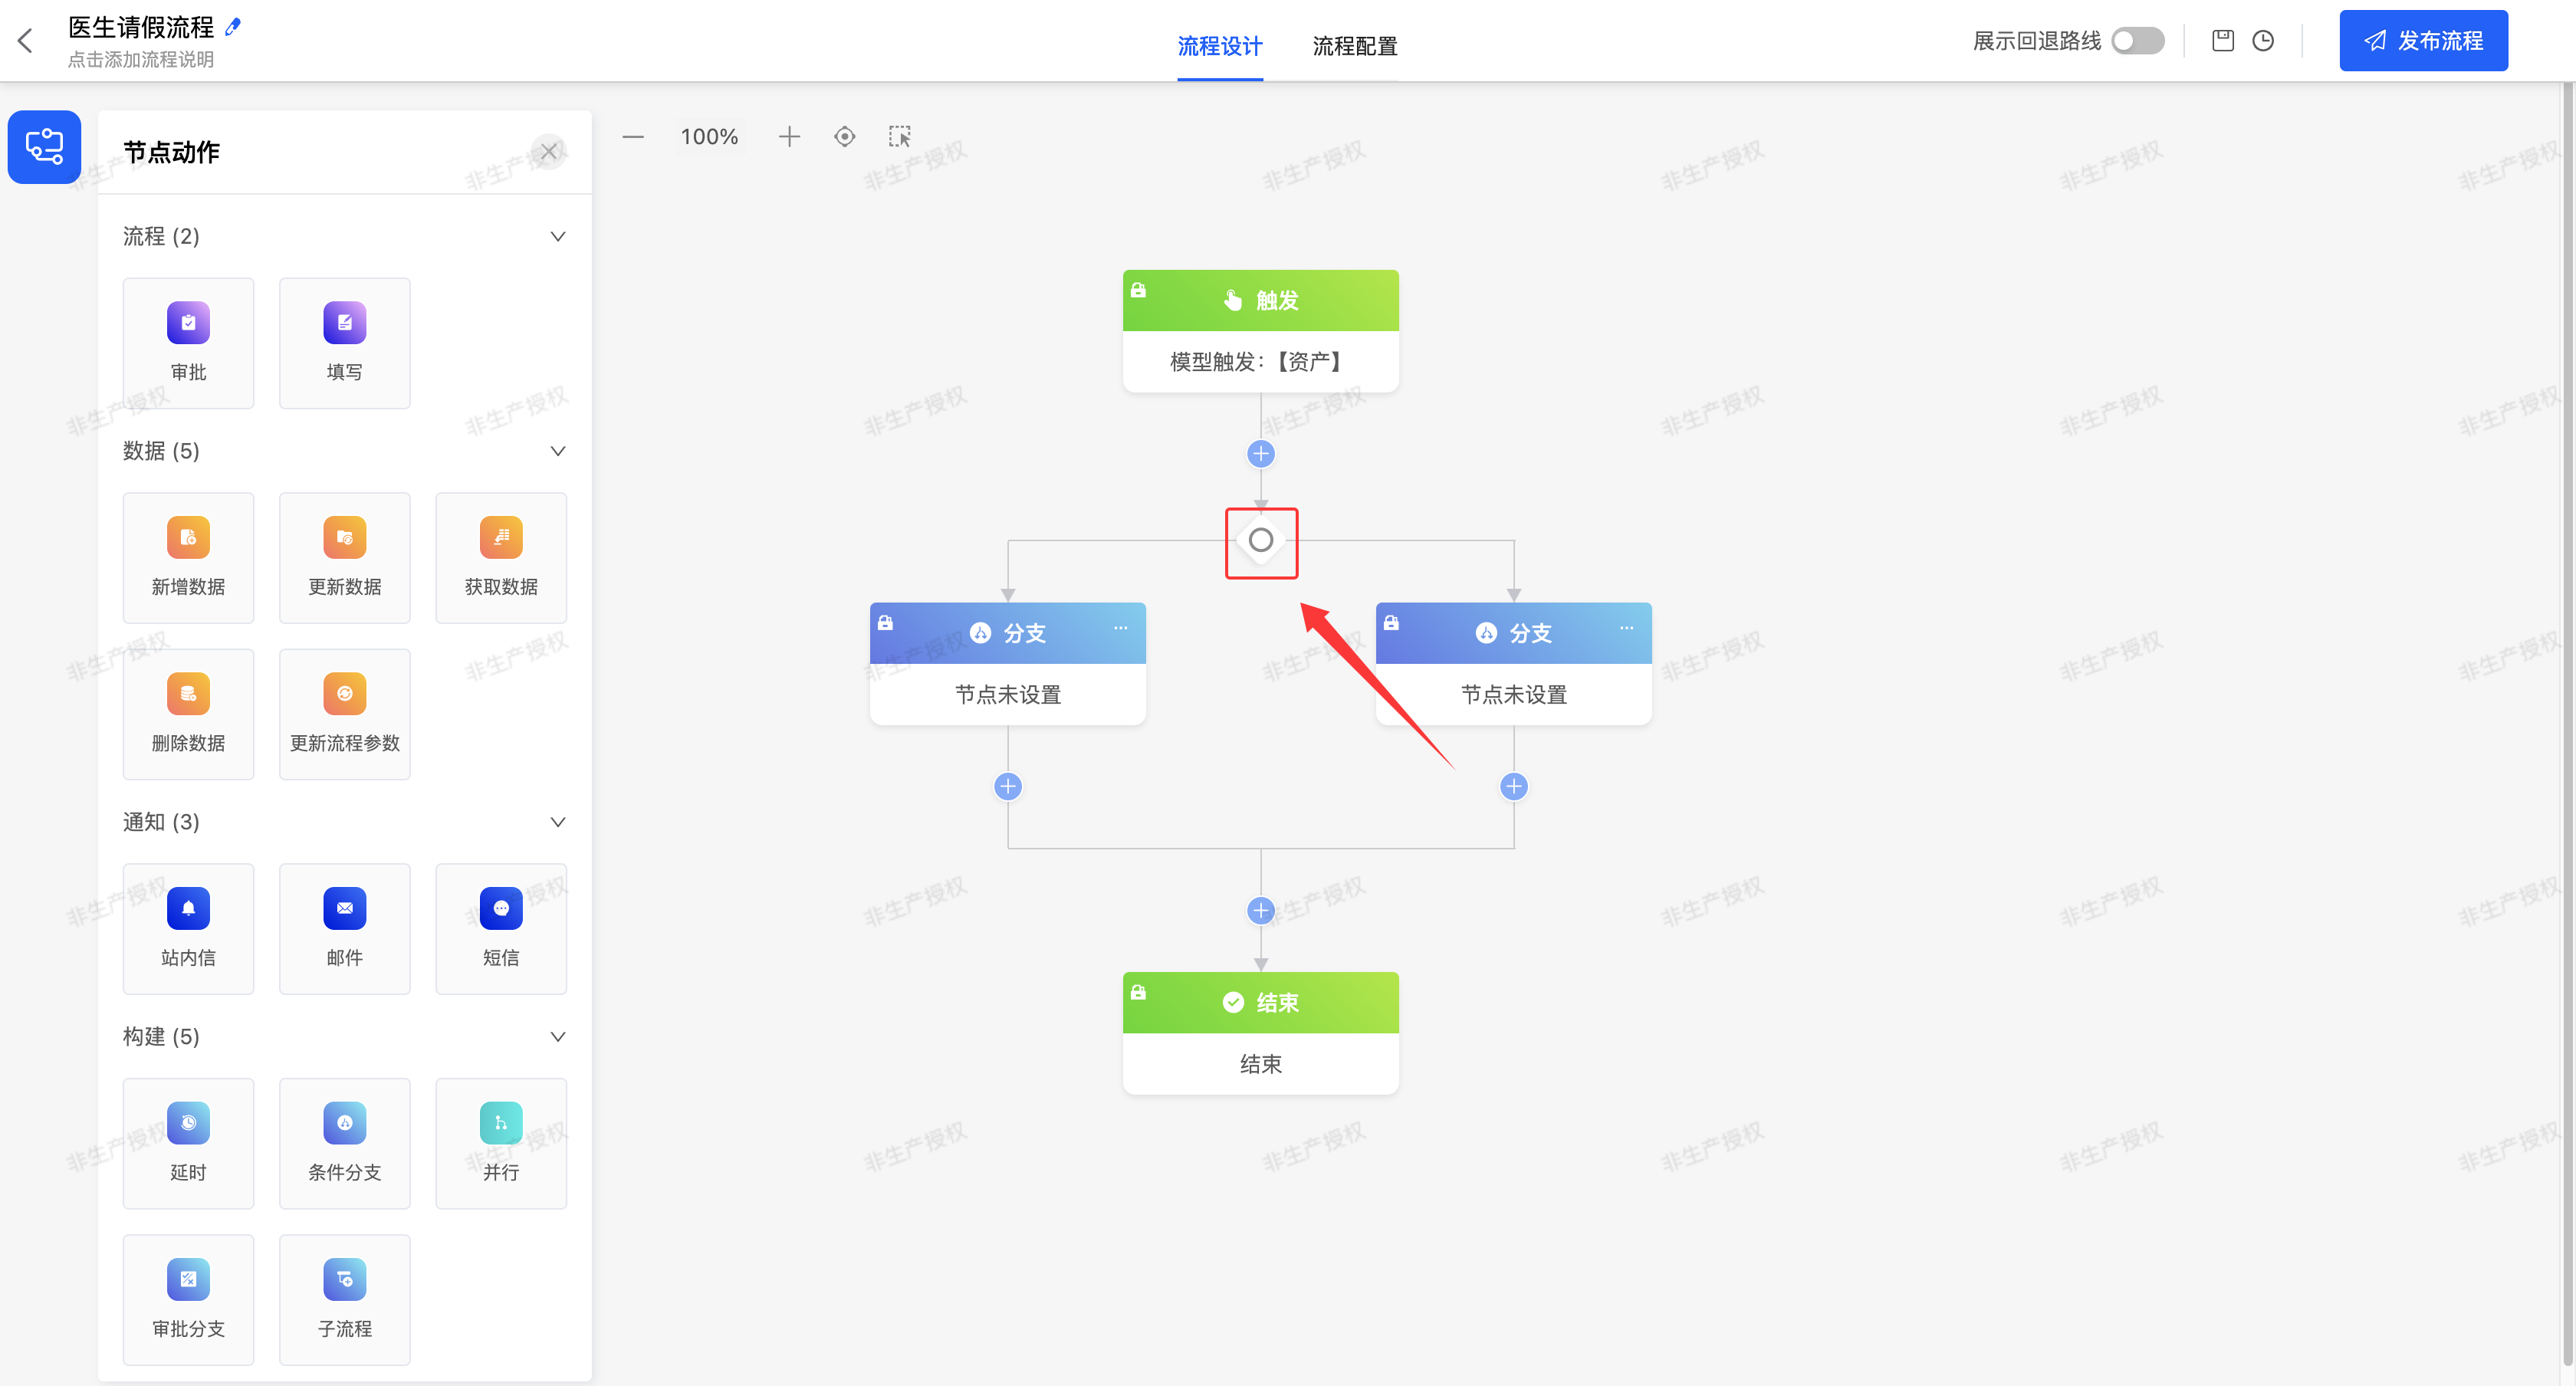
I. Trigger Nodes
The newly added process design page by default includes two core nodes: one is the process trigger node, used to define the conditions for starting the process; the other is the process end node, used to mark the termination of the process.
Example
There are three ways to trigger a process, namely: model trigger, scheduled trigger, and date trigger, to meet the needs of different scenarios.
Note
- If the process trigger node is not set, you cannot continue to add other subsequent nodes, and the process cannot be published.
- After the trigger node is configured, there must be at least one node action between the trigger node and the end node; otherwise, the process cannot be published.
- Model Trigger: Suitable for scenarios where the process is automatically triggered when the data fields in a model change, such as an employee leave approval process.
- Select Application: You can choose the application to which the model that the process is triggered by belongs.
- Select Model: You can choose the models contained in the selected application.
- Trigger Scenario: You can choose to trigger the process when data in the model is added, deleted, or modified.
- Select Updated Fields: This property is displayed when the trigger includes data updates. The process will only be triggered when the set fields are updated.
- Filter Conditions: You can set specific conditions for the data. The process will only be triggered when the data updates meet these conditions.
- Enable Manual Code Trigger: After enabling, you can use code to manually trigger the process.
Tip
For the filling of custom expressions in the filter conditions, you can refer to the "Custom Expressions" document.
Note
If you do not select updated fields or filter conditions, the process will be triggered when any field in the model changes according to the set scenario.
Example
Select the model trigger as the process trigger method, and trigger the workflow when new data is added to the model.
- Scheduled Trigger: Suitable for scenarios where the process is called periodically, such as a warehouse periodic inventory process.
- Select Start Time: You can set the time when the process is executed for the first time.
- Cycle Interval: You can customize the interval of the cycle. You need to enter a number.
- Select Cycle Period: You can choose the period, including minutes, hours, days, weeks, months, and years.
Note
When the period is set to weeks, the process will also be executed on the selected days of the current week.
For example:
- Start Time: January 14, 2022 (Thursday)
- Cycle Interval: 1 week, and custom settings are from Monday to Friday.
Then the process operation will also be executed on January 15, 2022 (this Friday).
Example
Select the scheduled trigger as the process trigger method, and trigger it on the 15th of each month.

- Date Trigger: Suitable for scenarios where the process is triggered by using the date and time fields in a model, such as a process of sending birthday wishes to employees.
- Select Application: You can choose the application to which the model that the process is triggered by belongs.
- Select Model: You can choose the models contained in the selected application.
- Specify Date and Time Field: You can choose the date-type or date-time-type fields contained in the selected model.
- Specify Time: You can specify the trigger time.
- Select Start Time: You can choose to trigger the process immediately at the specified time or trigger it in advance or delay it.
- Time Offset Value: You can set the offset value.
- Time Offset Unit: You can set the unit of the offset value, including minutes, hours, and days.
- Cycle Period: You can choose the period, including no cycle, annually, and monthly.
- Filter Conditions: You can set specific conditions for the data changes. The process will only be triggered when the data updates meet these conditions.
Tip
For the filling of custom expressions in the filter conditions, you can refer to the "Custom Expressions" document.
Example
Select the date trigger as the process trigger method, and use the date field of the "Sales Data" model to execute the process monthly.
II. Process Nodes
(I) Approval
If the current process requires approval, you can add an approval node to the process.
Example
Note
The approval node can only be placed on the process link where there is data to be approved; otherwise, the configuration will not succeed.
The following are the attributes included in the approval node. You can view them by clicking on the node:
Dynamic Form: If you enable the dynamic form, it will match the corresponding task node with the same name as the node, and then jump to the corresponding form.
Tip
For detailed information about the dynamic form, refer to the "Workflow" document.
- Data Source: This attribute is displayed when the dynamic form is enabled. The data source includes all the data that can be obtained before the approval node.
Note
When the data source model is inconsistent with the model to which the dynamic form function belongs, the current node serves as the data source.
- Dynamic Form Function: This attribute is displayed when the dynamic form is enabled. It is the function executed when obtaining the dynamic form.
- Approval Model: This attribute is displayed when the dynamic form is disabled. You can choose the corresponding model of all the data that can be obtained before the approval node.
- Select View: This attribute is displayed when the dynamic form is disabled. You can choose a page with a form view type under the approval model.
Data Saving Method: You can set the method of saving the node data, including saving immediately after the node is executed, not saving the data, and saving the data after the entire process is executed.
Example
Select the model at the time of workflow trigger as the approval model, select the approval view under this model (which has been designed in the interface designer), and save the data after the node is executed.
1.Approval Type
Supports two types, regular approval and step - by - step approval, to adapt to the needs of different business scenarios.
Note
- Regular Approval: Flexibly specify approvers, suitable for simple and direct approval scenarios (such as daily administrative applications, simple expense reimbursements).
- Step - by - step Approval: Automatically flows according to the organizational structure level, suitable for processes that require multiple levels and standardization (such as procurement reimbursement, project declaration).
- Regular Approval:
- Add Approvers: You can select from personal, department, role, and model - related fields, and multiple selections are allowed.
- Custom Approvers: When the system's optional approvers cannot meet the requirements, you can add approvers through code.
- Approver Data Nodes: Include all data that can be obtained before the approval node.
- Select Custom Function: That is, the function for customizing approvers through code.
- Empty Approvers: When there is no valid object for the configured approvers, the following rules can be set:
- Terminate the Process: The process is abnormally interrupted (for example, enabled when there is no supervisor at a key level).
- Automatic Approval: Handled automatically by the system according to preset rules (such as "default approval", "default rejection"), only applicable to nodes with empty approvers.
- Automatic Transfer: Specify a fixed transferee (such as "department assistant", "system administrator"), and empty pending tasks will automatically flow.
- Step - by - step Approval:
Approval Starting Point: Define the initial flow level of the process, which needs to be configured in conjunction with the "organizational structure":
Note
- Employee as the starting point: You can choose the direct supervisor (the employee's direct superior) or the department supervisor (the person in charge of the employee's department); since an employee may be in multiple departments, it is necessary to specify the department to which the process belongs (to avoid level confusion).
- Department as the starting point: Only the department supervisor can be selected.
- When the direct supervisor is empty, the approval pending task will be sent to the department supervisor.
Approval End Point: Control the termination condition of the process flowing upward
- Specify Level: Clearly indicate the level to which it flows (such as "flow upward to the 2nd level starting from the employee").
- Step - by - step Approval: Specify a fixed number of levels to flow upward (such as "flow upward 3 levels of supervisors starting from the department").
Note
- The judgment of the approval level is based solely on the department level in the organizational structure.
- Even if "direct supervisor" is selected as the approval line, the level still strictly follows the department level rules.
The approval node is configured as

Example illustration:
- The product department has employees A, B, and C, among whom B is A's direct supervisor and C is B's direct supervisor.
- The superior department of the product department is the technical department, and the supervisor of this department is employee D.
When employee A initiates an approval and the approval is set to "flow according to the direct supervisor level", the specific flow path is:
Employee A → Direct Supervisor B → B's Direct Supervisor C → Superior Department Supervisor D
(Note: The flow path strictly follows the department level relationship in the organizational structure, not just based on personal job titles.)
Empty Approvers: Same as the logic of regular approval, supporting:
- Terminate the Process: The process is abnormally interrupted (for example, enabled when there is no supervisor at a key level).
- Automatic Transfer: Specify a fixed transferee (such as "department assistant", "system administrator"), and empty pending tasks will automatically flow.
Example
Example diagram of organizational structure
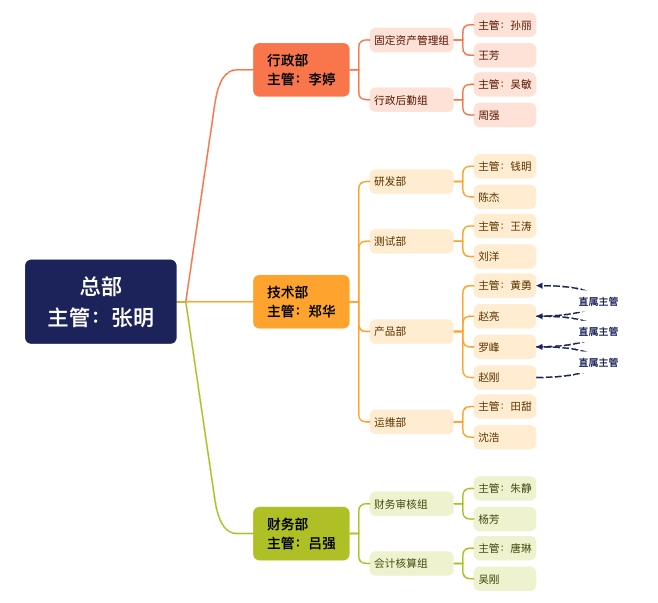
Scenario 1: Administrative Department Office Supplies Procurement
- Organizational Structure Association: The administrative logistics team is subordinate to the administrative department, and the administrative department and the finance department are at the same level (both are managed by a higher level).
- Process Operation Route: Employee of the administrative logistics team (Wang Fang) → Supervisor of the administrative logistics team (Wu Min) → Supervisor of the administrative department (Li Ting) → Financial Audit Department (Yang Fang) → Supervisor of the Financial Audit Department (Zhu Jing)
The configuration items of the approval node are:
Starting from the administrative logistics team, it advances 2 levels upward along the department supervisor line. That is, the supervisor of the administrative logistics team (Wu Min) is the 1st level, and the supervisor of the administrative department (Li Ting) is the 2nd level. After completing these two levels of approval, it enters the subsequent finance department process.
Scenario 2: Product Function Confirmation Process
- Organizational Structure Association: Product managers are subordinate to the product department, and the product department and the technical department are at the same level (both are managed by a higher level).
- Process Operation Route: Product Manager (Zhao Liang) → Product Leader (Luo Feng) → Product Department Supervisor (Huang Yong) → Technical Department Supervisor (Zheng Hua)
The configuration items of the approval node are:

Starting from product manager Zhao Liang, it advances 2 levels upward along the direct supervisor line. The first level is the direct supervisor line within the product department (Zhao Liang → Luo Feng → Huang Yong), and the 2nd level is the supervisor of the superior department of the product department (Zheng Hua). After completing these two levels of approval, it enters the subsequent technical department supervisor process.
2.Automatic Approval
After enabling this function, preset conditions are supported. If the conditions are met, the approval will be completed automatically, which can improve approval efficiency.
Basic Configuration: You need to select "Auto Approve" or "Auto Reject" to determine the default operation of the system when the conditions are met.
Condition Settings
Add Conditions: Multiple conditions can be added. You can manually drag and drop conditions to adjust the order, and the execution priority will change accordingly. If no conditions are set and automatic approval is enabled, the system will complete the automatic approval, and the configured approver information will not be displayed.
Condition Expression: Custom rules can be set (for example, "Amount < 100"). When the rules are met, the system will automatically complete the approval, and the preset approver information will not be displayed.
Approvers: You can select automatic approvers from the organizational structure or dynamic approvers. When the actual approvers include the automatic approvers configured here, the approver will automatically complete the approval, while other approvers still need to operate manually. The final approval result will be handled according to the preset multi - approver rules.
Note
If both the condition expression and the approver are set under the same condition, they are processed in an "and" relationship.
Approval Comments: The comment will be displayed during automatic approval, and variables are supported to make the comment content more flexible.
Example
When the asset price is ≤ 200, the approval will be automatically passed, and the approval comment "Approved" will be displayed.
3.Approval Method for Multiple Approvers
This attribute is displayed when there are approvers. It includes two methods: any-sign and all-sign.
- Any-Sign: Only one approver's approval or rejection is needed to determine the approval result. After the approval is completed, other approvers cannot enter the approval operation, but they will receive a message prompt about the approval result.
- All-Sign: It includes two methods. One is "approval is only valid when all approvers agree, and rejection is valid when one approver rejects"; the other is "approval is valid when one approver agrees, and rejection is only valid when all approvers reject".
- Custom Approval Method: When the system's available approval methods cannot meet your requirements, you can customize the addition of an approval method through code.
- Approval Method Data Node: It includes all the data that can be obtained before the approval node.
- Select Custom Function: It is the function to customize the approval method through code.
Note
- If a person is selected repeatedly among different types of personnel, they will only receive one approval pending task.
- In the case of multiple approvers, the approvals are carried out synchronously.
Example
Add two approvers with the roles of "FL-Role" and "Leader", and set the approval method for multiple approvers to all-sign (approval is only valid when all approvers agree, and rejection is valid when one approver rejects).
4.Approval Deadline
You can set a deadline rule for the current approval node to ensure the timely progress of the approval process.
- Deadline Rule: There are three options for the deadline rule, including specifying a date and time, limiting the duration, and specifying a field value.
- When specifying a date and time, you need to set the specific deadline.
- When limiting the duration, you can set the time length and its unit.
- When specifying a field value, you can choose a field of date or date-time type. When choosing a date field, you need to specify the trigger time.
- Reminder Before Deadline: You can choose whether to remind the approver before the approval deadline to ensure that the approver can handle it in time.
- Deadline Reminder Time and Unit: You can set the specific time and unit of the reminder before the deadline.
- Deadline Reminder Content: The reminder content supports customization to meet the needs of different scenarios.
Example
Set a 5-day duration limit for the approval process, and configure the corresponding reminder time and reminder content.
5.Copy in
- Add Copy Recipients: You can select from individuals, departments, roles, and model-related fields, and multiple selections are allowed. Copy recipients can view the approval information but cannot operate on it.
- Custom Copy Recipients: When the system's available copy recipients cannot meet your requirements, you can customize the addition of copy recipients through code.
- Copy Recipient Data Node: It includes all the data that can be obtained before the approval node.
- Select Custom Function: It is the function to customize copy recipients through code.
- Custom Copy Recipients: When the system's available copy recipients cannot meet your requirements, you can customize the addition of copy recipients through code.
- Read Confirmation: If you enable this function, a "Read" button will be displayed when the copy recipient views the approval progress.
- Timing: The timing of sending the copied content includes at the start of the node, at the end of the node, when the approval is approved, and when the approval is rejected.
Example
Add the employee "R & D Employee 1" as a copy recipient, enable the read confirmation button, and set the timing of sending the copied content to be when the approval is approved.
6.Transfer of
- Allow Reassignment: You can choose whether to allow the current approval to be reassigned to others. The added reassignees are the candidate list for reassignment.
- Selection Scope: Refers to the range of personnel that can be selected when transferring a pending task, with two options provided: "Transfer to All Members" and "Transfer to Designated Members".
- Add Transferee: This function is visible when "Transfer to Designated Members" is selected. You can select from fields related to employees, departments, roles, and models, and multiple selections are allowed. Transferees have the same rights as approvers.
- Custom Reassignees: When the system's available reassignees cannot meet your requirements, you can customize the addition of reassignees through code.
- Reassignee Data Node: It includes all the data that can be obtained before the approval node.
- Select Custom Function: It is the function to customize reassignees through code.
- Custom Function Execution Timing:Refers to the specific timing for executing the custom function, which mainly includes two scenarios: taking effect when the task is created and taking effect when the user approves.
7.Add to signature
- Allow Additional Signatories: You can choose to temporarily add other approvers during the approval process. The added additional signatories will be part of the candidate list for countersigning.
- Selection Scope: Refers to the range of personnel that can be selected when handling pending tasks, with two options provided: "All Members" and "Designated Members".
- Add Additional Signatories: This function is visible when "Designated Members" is selected. You can select from fields related to employees, departments, roles, and models, and multiple selections are allowed.
- Custom Additional Signatories: When the system's available additional signatories cannot meet the requirements, you can custom-add additional signatories through code.
- Additional Signatory Data Nodes: Include all data that can be obtained before the approval node.
- Select Custom Function: A function for customizing additional signatories through code.
- Custom Function Execution Timing:Refers to the specific timing for executing the custom function, which mainly includes two scenarios: taking effect when the task is created and taking effect when the user approves.
- Countersign Methods: Supports two countersign methods: countersign before approval and countersign after approval.
- Countersign Before Approval: Push the current approval task to the additional signatories. During this period, the approver cannot perform approval operations; the task will be pushed back to the approver for processing only after the additional signatories approve it.
- Countersign After Approval: After the current approver completes and approves the task, the system will automatically push the task to the additional signatories for subsequent processing.
- User's Choice: In the user's pending task countersign pop-up window, two options, "Countersign Before Approval" and "Countersign After Approval", will be displayed, allowing users to independently choose the countersign method according to actual needs.
Note
When the functions of allowing reassignment or allowing additional signing are enabled and the relevant configurations are correct, the reassignment and additional signing buttons will appear on the approval page. If these two functions are not enabled, the corresponding buttons will not be displayed on the approval page.
Example
Enable the functions of allowing reassignment and allowing additional signing, and add reassignees and additional signers for them.
Effect preview:
8.Return
- Rejection Reason Required: After enabling this function, the approver must fill in the rejection reason when rejecting the approval.
Manual Return: When this function is enabled, you can choose to return to any approval or filling node before the current approval node.
- Return Methods:
- All Nodes Above: When a user performs a return operation in pending tasks, the selectable nodes are all approval nodes and filling nodes above the current node.
- Specified Nodes: Supports customizing the nodes that users can select when performing return operations in pending tasks.
- After Resubmission of Returned Node: Refers to the operation rules of the process after the returned node is resubmitted, including the following two types:
- Execute in Process Order: When resubmitting after return, the process starts from the returned node and executes all subsequent nodes in sequence according to the original process path.
- Directly to Current Node: When resubmitting after return, the process jumps directly back to the current node, and intermediate nodes will not be executed repeatedly.
Note
When multiple people approve and the approval method is countersign where "one person's approval counts as approval, and all people's rejection counts as rejection", return is not allowed.
9.Others
- Automatic Return: When this function is enabled, the system will automatically return to the specified node when the data meets the preset conditions.
- Condition Settings: Supports adding multiple conditions. You can manually drag to adjust the order of conditions, and the execution priority will change synchronously with the order. It specifically includes the following settings:
- Return Condition: Custom rules can be set. When the rules are met, the system will automatically return the node to the specified node without displaying preset approver information.
- Specified Node: You can select a manual node (approval node or filling node) before the current node.
- After Resubmission of Returned Node: Refers to the operation rules of the process after the returned node is resubmitted, including the following two types:
- Execute in Process Order: When resubmitting after return, the process starts from the returned node and executes all subsequent nodes in sequence according to the original process path.
- Directly to Current Node: When resubmitting after return, the process jumps directly back to the current node, and intermediate nodes will not be executed repeatedly.
- Rejection Reason: This text will be displayed during automatic return. Variables are supported to make the content more flexible.
- Condition Settings: Supports adding multiple conditions. You can manually drag to adjust the order of conditions, and the execution priority will change synchronously with the order. It specifically includes the following settings:
Note
After enabling the return function, whether it is manual return or automatic return, if the node to which it is returned has automatic approval set, the automatic approval function will be invalid.
- Automatic Reassignment at Deadline: This is displayed after setting the approval deadline rule. You can customize the reassignee. When the deadline is reached, the system will automatically reassign the approval matter to the specified person.
Note
The automatic reassignees must include at least one user other than the current operator; otherwise, the deadline rule setting will be invalid.
Automatic Approval at Deadline: This is displayed after setting the approval deadline rule. When the deadline is reached, the system will automatically approve the approval.
Data Permissions: After selecting a view, the data fields under this view will be automatically displayed. You can choose the permissions of viewing, editing, and hiding data fields. By default, all fields can be viewed.
Note
If there is a sub-table in the view selected by the current node, you can control the permissions of the fields in the sub-table in the data permissions.
- If a sub-table field is set to "View", only the visibility of the fields in the sub-table can be set.
- If a sub-table field is set to "Edit", the permissions of the fields and actions in the sub-table can be set.
Reminder
When the view bound to an approval node is changed, click the "Refresh" button in the upper right corner of the property panel to synchronize and obtain the latest data permissions.

- Duplicate Participants: You can select the provided duplicate scenarios. When the approval process meets the selected scenario, the system will automatically approve the process.
- Execute Function Before Approval Starts: After enabling this function, you can execute the selected custom function before the approval starts.
- Execute Function After Pending Operation Submission: After enabling this function, you can execute the selected custom function after the pending task is submitted.
- Approval Operation Data Function: After enabling this function, you can execute the selected custom function during the approval process.
(II) Filling
When the process requires some people to submit data to continue, you can use the filling node.
Example
Note
- The filling node can only modify the view form associated with the current trigger model.
- The data update in the data-type nodes can modify the data of other models.
The attributes of the filling node are roughly the same as those of the approval node (for details, see the approval section). The differences are as follows:
- Add Fillers: You can select from individuals, departments, roles, and model-related fields, and multiple selections are allowed.
- Custom Fillers: When the system's available fillers cannot meet your requirements, you can customize the addition of fillers through code.
- Filler Data Node: It includes all the data that can be obtained before the filling node.
- Select Custom Function: It is the function to customize fillers through code.
- Custom Fillers: When the system's available fillers cannot meet your requirements, you can customize the addition of fillers through code.
- Data Permissions: After selecting a view, the data fields under this view will be automatically displayed. You can choose the permissions of viewing, editing, and hiding data fields. By default, all fields can be viewed. There must be at least one field that can be edited in the data permissions of the filling node.
Note
If there is a sub-table in the view selected by the current node, you can control the permissions of the fields in the sub-table in the data permissions.
- If a sub-table field is set to "View", only the visibility of the fields in the sub-table can be set.
- If a sub-table field is set to "Edit", the permissions of the fields and actions in the sub-table can be set.
Example
Set a filling node for the "Sales Data" model, and specify employees to fill in the sales volume information.
III. Data Nodes
(I) Add Data
The add data node can add data to any model through expressions.
Example
The following are the attributes included in the add data node. You can view them by clicking on the node:
- Select Application: You can choose any application.
- Model: Under the selected application, you can choose any model.
- Whether to Add Data in Bulk: You can choose whether to add data in bulk. After enabling this function, you can choose the bulk data source. The data source includes all the data that can be obtained before the current node.
- Data Saving Method: You can choose the current node's data saving method, including saving after the node is executed, not saving, and saving after the entire process is executed.
Note
If you choose not to save or save after the entire process is executed, the settings of applying this data source will be cleared. Because not saving or saving after the entire process is executed may make the reference or settings of this data source temporary.
- Add Data List: After clicking the "Create" button, you can set expressions for the fields under the selected model. When the data meets these expressions, the operation of adding data will be triggered. In addition, you can also set a custom function. Data will be added when the conditions of the custom function are met.
Tip
For the filling of custom expressions, you can refer to the "Custom Expressions" document.
- Enable Process Trigger on Data Update: After enabling this function, you can trigger the process when the data is updated.
Example
After obtaining data from the "Sales Data" model, add the data to the "Sales and Advertising Data" model.
(II) Update Data
The update data node can update data in any model through expressions.
Example
The following are the attributes included in the update data node. You can view them by clicking on the node:
- Update Model: You can choose the corresponding model of all the data that can be obtained before the update node.
- Data Saving Method: You can choose the current node's data saving method, including saving after the node is executed, not saving, and saving after the entire process is executed.
- Update Data List: After clicking the "Create" button, you can set expressions for the fields under the selected model. When the data meets these expressions, the operation of updating data will be triggered. In addition, you can also set a custom function. Data will be updated when the conditions of the custom function are met.
Tip
For the filling of custom expressions, you can refer to the "Custom Expressions" document.
- Enable Process Trigger on Data Update: After enabling this function, you can trigger the process when the data is updated.
Example
Update the sales amount in the "Sales and Advertising Data" model to 1.5 times the original.
(III) Get Data
The get data node can obtain data from models other than the trigger model for the process.
Example
The following are the attributes included in the get data node. You can view them by clicking on the node:
- Get Type: You can choose to get single data or multiple data.
- Select Application: You can choose any application.
- Model: Under the selected application, you can choose any model.
- Filter Conditions: You can set specific conditions for the data. Only when the data updates meet these conditions will the data be obtained.
Tip
For the filling of custom expressions in the filter conditions, you can refer to the "Custom Expressions" document.
- Sorting Field: When filter conditions are set or multiple fields are obtained, you can set the sorting field to sort the obtained fields.
- Handling When No Data is Obtained: You can choose the execution method when no data is obtained.
- Continue Execution: Skip this data acquisition and continue to execute the process.
- Add Data to the Model and Then Continue Execution: Add data for subsequent nodes to use, and save the added data to the database at the same time.
- Terminate the Process: End the process, regardless of whether there are other nodes after this node.
Example
Get the data in the "Sales Data" model.
(IV) Delete Data
The delete data node can delete the model data on the process node from the database.
Example

The following are the attributes included in the delete data node. You can view them by clicking on the node:
- Delete Model: You can choose the corresponding model of all the data that can be obtained before the delete node.
- Data Saving Method: You can choose the current node's data saving method, including saving after the node is executed, not saving, and saving after the entire process is executed.
Example
Delete the data in the "User Behavior" model (there is currently one piece of data).
After the process is executed, this piece of data in the "User Behavior" model is deleted.
(V) Update Process Parameters
You can modify the "Process Parameters" in the "Process Configuration".
Example

Note
Only the updated process parameters can be used in other nodes.
The following are the attributes included in the update process parameters node. You can view them by clicking on the node:
- Set Parameters: You can choose the process parameters created in the process configuration, and set the data that is consistent with the parameter type and can be obtained before this node as the value of the parameter.
Example
A process parameter tid has been added in the process configuration. Now set this process parameter to the name of the "Sales Data" model.
IV. Notification Nodes
(I) In-App Message
The in-app message node can send messages to users.
Example
The following are the attributes included in the in-app message node. You can view them by clicking on the node:
- Add Recipients: You can select from individuals, departments, roles, and model-related fields, and multiple selections are allowed.
- Custom Notification Recipients: When the system's available notification recipients cannot meet your requirements, you can customize the addition of notification recipients through code.
- Notification Recipient Data Node: It includes all the data that can be obtained before the in-app message node.
- Select Custom Function: It is the function to customize notification recipients through code.
- Notification Title: You can set a title for the sent message.
- Notification Content: A built-in text editor is provided to facilitate writing and editing the content of the sent message.
Note
The in-app messages sent after the node is triggered can be viewed in the Workbench - In-App Messages.
Example
Send reminder messages to employees regularly.
(II) Email
The email node can send emails to specified email addresses.
Example
The following are the attributes included in the email node. You can view them by clicking on the node:
Recipients: You can directly enter email addresses, or select from individuals, departments, roles, and model-related fields. Multiple selections are allowed. You can also customize the recipients through code.
Subject: You can customize the subject of the email.
Body: You can customize the body of the email.
Note
In the email body, expressions are supported to flexibly represent various variables, making the email content more dynamic and customizable.
Sender: You can set the name of the sender.
Reply Email: You can fill in the reply email address.
Example
Send an email to employees.
(III) SMS
The SMS node can send SMS messages to specified recipients.
Example
The following are the attributes included in the SMS node. You can view them by clicking on the node:
- Recipients: You can directly enter mobile phone numbers, or select from individuals, departments, roles, and model-related fields. Multiple selections are allowed. You can also customize the recipients through code.
- Select SMS Template: SMS templates can be set in "Workflow" - "System Settings" - "SMS Templates". They can be used after being approved.
- SMS Content: It has been preset in the selected SMS template.
- Set SMS Content Variables: You can set expressions for the variables in the SMS.
Example

V. Construction Nodes
(I) Delay
The delay node can delay the action of the next node for a period of time before execution.
Example

The following are the attributes included in the delay node. You can view them by clicking on the node:
The delay node includes two delay methods, namely delaying until a specified date and delaying for a period of time.
- Delay Until a Specified Date: You can choose the time selection type to be delaying until the time of a model field or a custom time.
- Specify Model: This attribute is displayed when the time type is delaying until a model field. You can choose the corresponding model of all the data that can be obtained before the delay node.
- Specify Model Field: This attribute is displayed when the time type is delaying until a model field. You can choose a date field or a date-time field in the specified model.
- Specify Date: This attribute is displayed when the time type is a custom time. You can customize the specific date.
- Trigger Timing: You can choose to trigger the process immediately at the specified date or trigger it in advance or delay it.
- Days: When choosing to advance or delay the specified date, you can set the offset value in days.
- Specify Time: If the custom time or model field is a date field, you must set the specified time.
- Delay for a Period of Time: You can customize at least one of "days, hours, minutes".
Example
Delay the process until 5 days later.
(II) Conditional Branch Node
A conditional branch node enables data that meets different conditions to execute different branch processes.
Example
Note
- You can add or delete conditional branches. When there are only two branches, deleting either branch will delete the entire conditional branch.
- When a branch is deleted, all nodes under that branch will be deleted simultaneously.
Reminder
Supports moving the target branch to the desired position.

The following are the attributes included in the conditional branch node, which will be displayed when you click the node:
- Execution Rules: The rules used when conditional branches are executed, including Parallel Execution and First Match Execution.
- Parallel Execution: All branches that meet the conditions are triggered simultaneously. After all branches are executed, the process continues to run downward.
- First Match Execution: According to the priority order, only the first branch path that meets the conditions is executed, and other branches are automatically ignored.
- Branch Conditions: You can customize node rule expressions to configure different conditions for branches.
Note
Branch condition expressions are not allowed to be empty; otherwise, the process cannot run normally.
Example
Take the order amount in "Shopping Guide Invites Order Placement" as the branch condition to create a conditional branch for the workflow, so that different processes can be completed under different amount scenarios.
(III) Parallel
The parallel node can make the branches that meet the conditions execute simultaneously.
Example

Note
- You can add or delete parallel branches. When there are only two branches, deletion is not allowed.
- When deleting a branch, all nodes under this branch will also be deleted.
The following are the attributes included in the parallel node. You can view them by clicking on the node:
- Branch Conditions: You can customize the parallel rule expressions to configure different conditions for the branches.
Example
Converge the data branches with an order amount less than or equal to 50 in the "Guide Invitation to Place an Order" model into one branch for subsequent process operations.
(IV) Approval Branch
The approval branch is a special conditional branch and can only be added below the approval node. The approval branch only has two conditions: approval and rejection, and no other conditions can be added.
Example
Note
- If the approval node is deleted, the approval branch node will also be deleted at the same time.
- Deleting any branch will delete the entire approval branch at the same time.
(V) Sub-process
Some highly repetitive process nodes can be created as sub-processes. By referencing the sub-process node in the main process, you can reduce the repeated configuration of the process.
Example

Note
- Sub-processes are different from ordinary processes and do not include a trigger method. When an ordinary process reaches the sub-process node, it is the trigger condition for the sub-process.
- For single data, the system will only initiate one corresponding sub-process; when processing multiple data, the system will initiate multiple sub-processes accordingly.
The following are the attributes included in the sub-process node. You can view them by clicking on the node:
- Select Model: You can choose the corresponding model of all the data that can be obtained before the sub-process node.
- Select Sub-process: It includes two ways: creating a new sub-process and selecting an existing sub-process.
- Create a New Sub-process: After entering the sub-process name and saving, a sub-process will be created.
- Select an Existing Sub-process: You can choose the sub-processes under the models used in the current process.
- Sub-process Execution Method: You can choose "execute the sub-process and subsequent nodes simultaneously" or "start the next node after the sub-process is executed".
- Parameter Configuration: If there are created process parameters in the selected sub-process, you can set data for the parameters here.
Example
Create a sub-process for the current process.
VI. Developer Nodes
(I) WebHook
The WebHook node can send requests to third-party systems and also obtain data from other systems.
Example

The following are the attributes included in the WebHook node. You can view them by clicking on the node:
DingTalk Robot Notification
- WebHook URL: Copy the URL address of the time or group chat robot that needs to be notified.
Example
For DingTalk, you can add a robot in the robot management of the DingTalk group settings and copy the corresponding Webhook address.
- Signature Secret Key: Check the signature in the DingTalk group robot management and copy the corresponding secret key.
- Notification Content: You can customize the notification content.
Enterprise WeChat Robot Notification
- WebHook URL: Copy the URL address of the time or group chat robot that needs to be notified.
- Notification Content: You can customize the notification content.
Others
- Request Method: Supports GET and POST request methods.
- WebHook URL: Fill in the HTTP address to send the request.
- Headers: That is, the request headers. You can create or edit keys and values. The values support configuration through expressions.
- Notification Content: That is, the request body. When the request method is POST, you can customize the notification content.
Example
Set up a DingTalk robot, and the robot notifies "Welcome to the group 👏🏻".

(II) Call Function
When the existing node actions cannot meet the business requirements, you can use the call function node to call a custom function.
Example

The following are the attributes included in the call function node. You can view them by clicking on the node:
- Data Node: You can choose all the data that can be obtained before the call function node.
- Select Function: You can choose a custom function.
Example
Add the function of updating records according to the primary key to the "Get Data" node in the process.