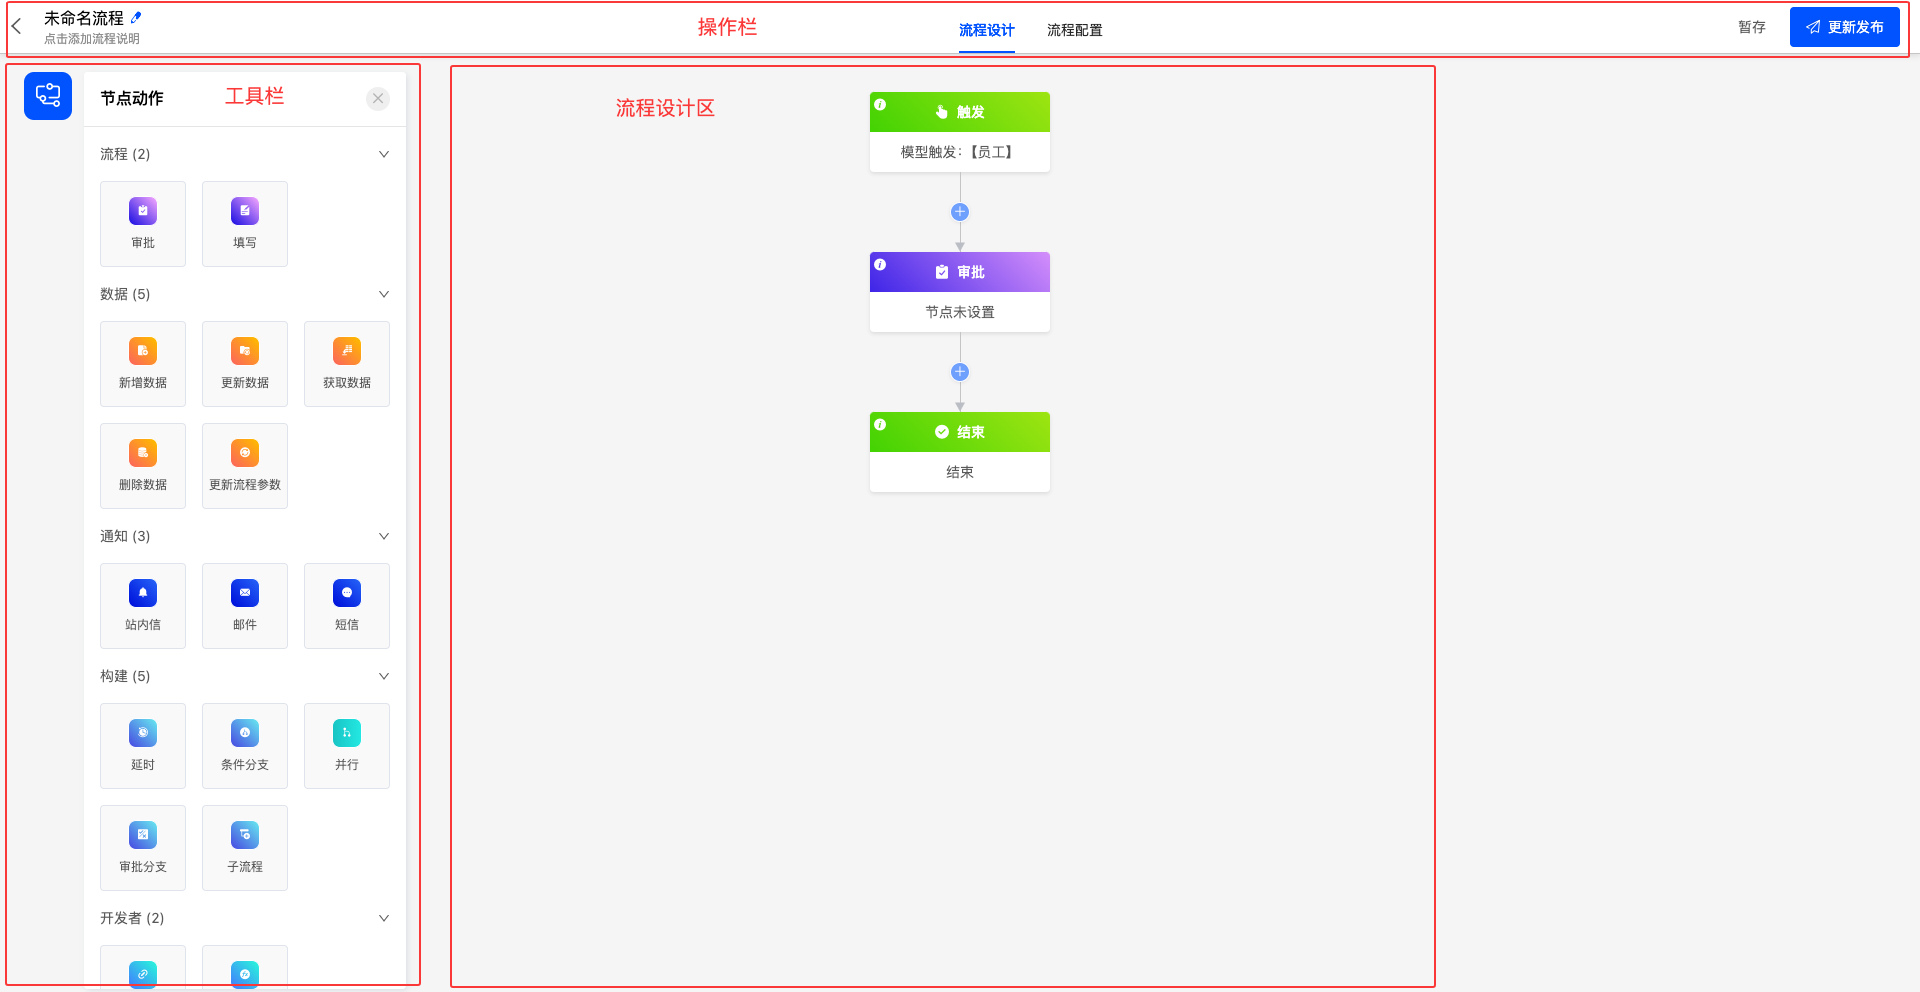
In the process design page, comprehensive process design and process configuration can be carried out. Process design is mainly divided into four functional areas, namely: Operation Bar, Toolbar, Process Design Area, and Property Panel
- Operation Bar: Provides a series of common operation buttons and menu options, allowing operations such as modifying the process name, saving, and publishing.
- Toolbar: Provides a series of common node actions for the process.
- Process Design Area: The main area for process design, where node actions can be added to improve the process by dragging and dropping or directly adding them in the process.
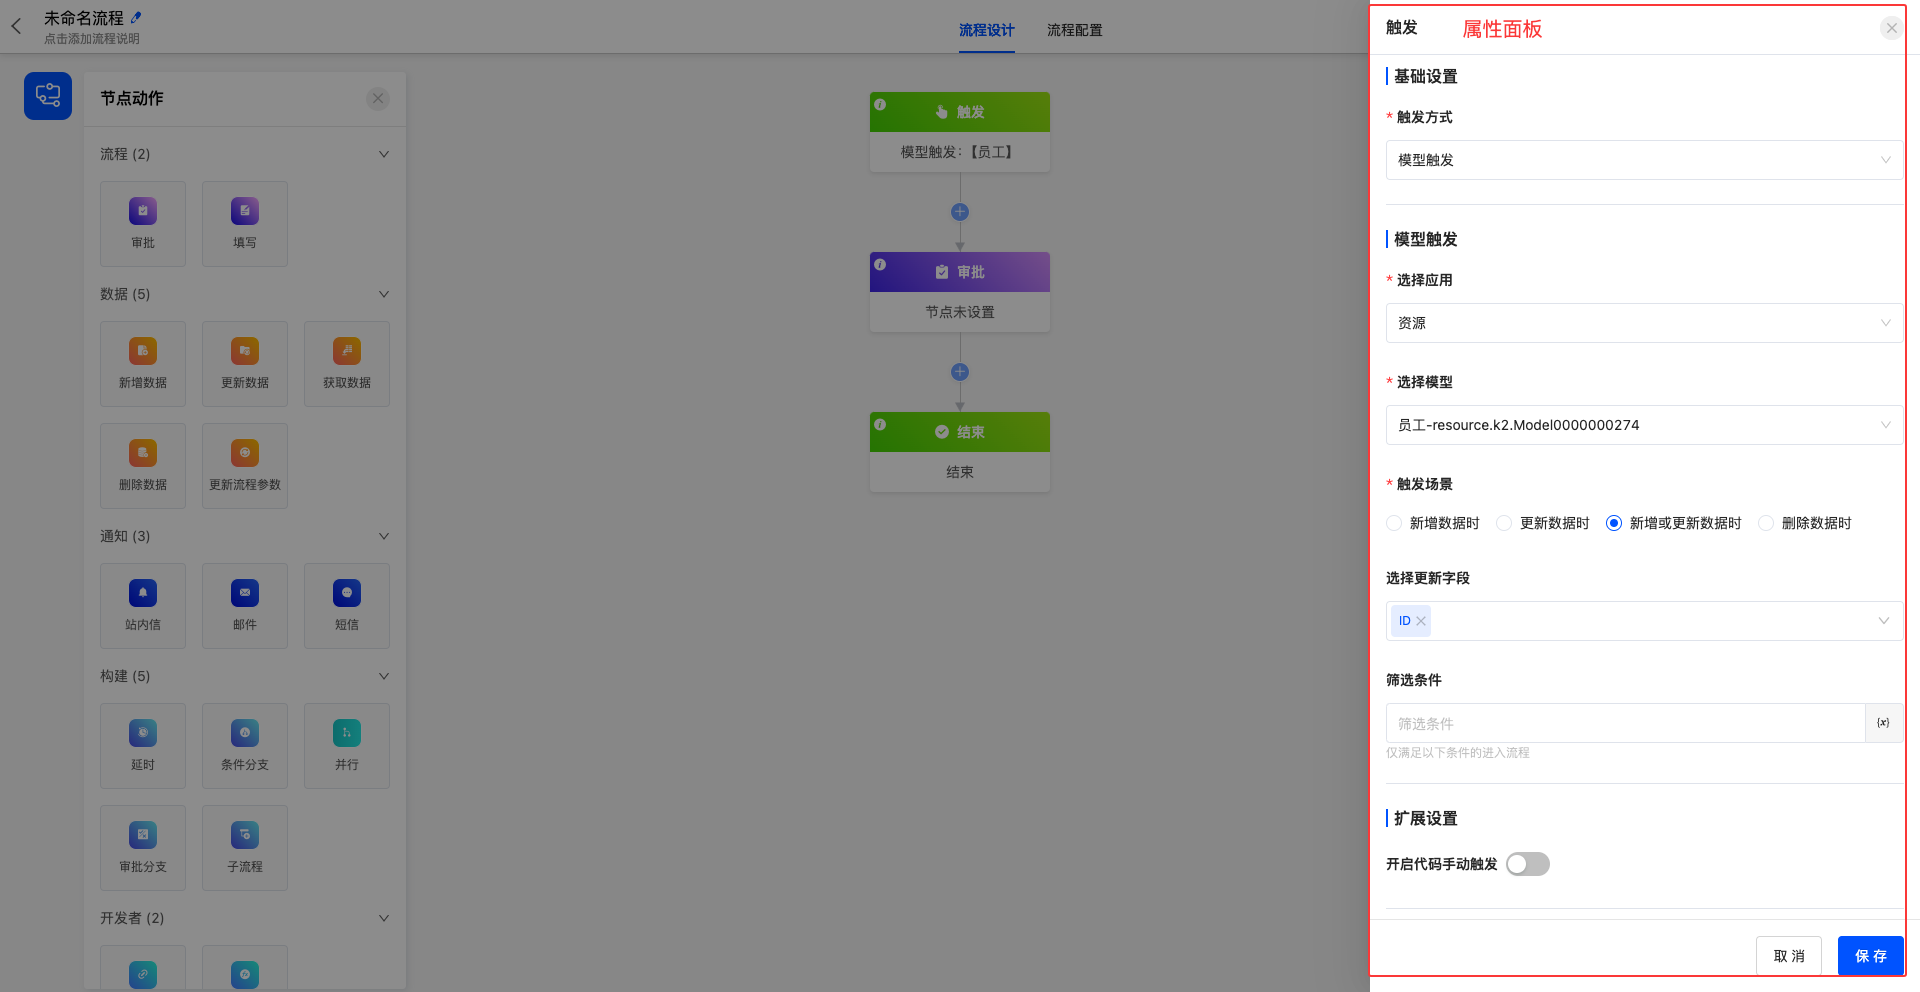
- Property Panel: Displays when a node action is clicked. Relevant attributes of the node can be adjusted in this panel.
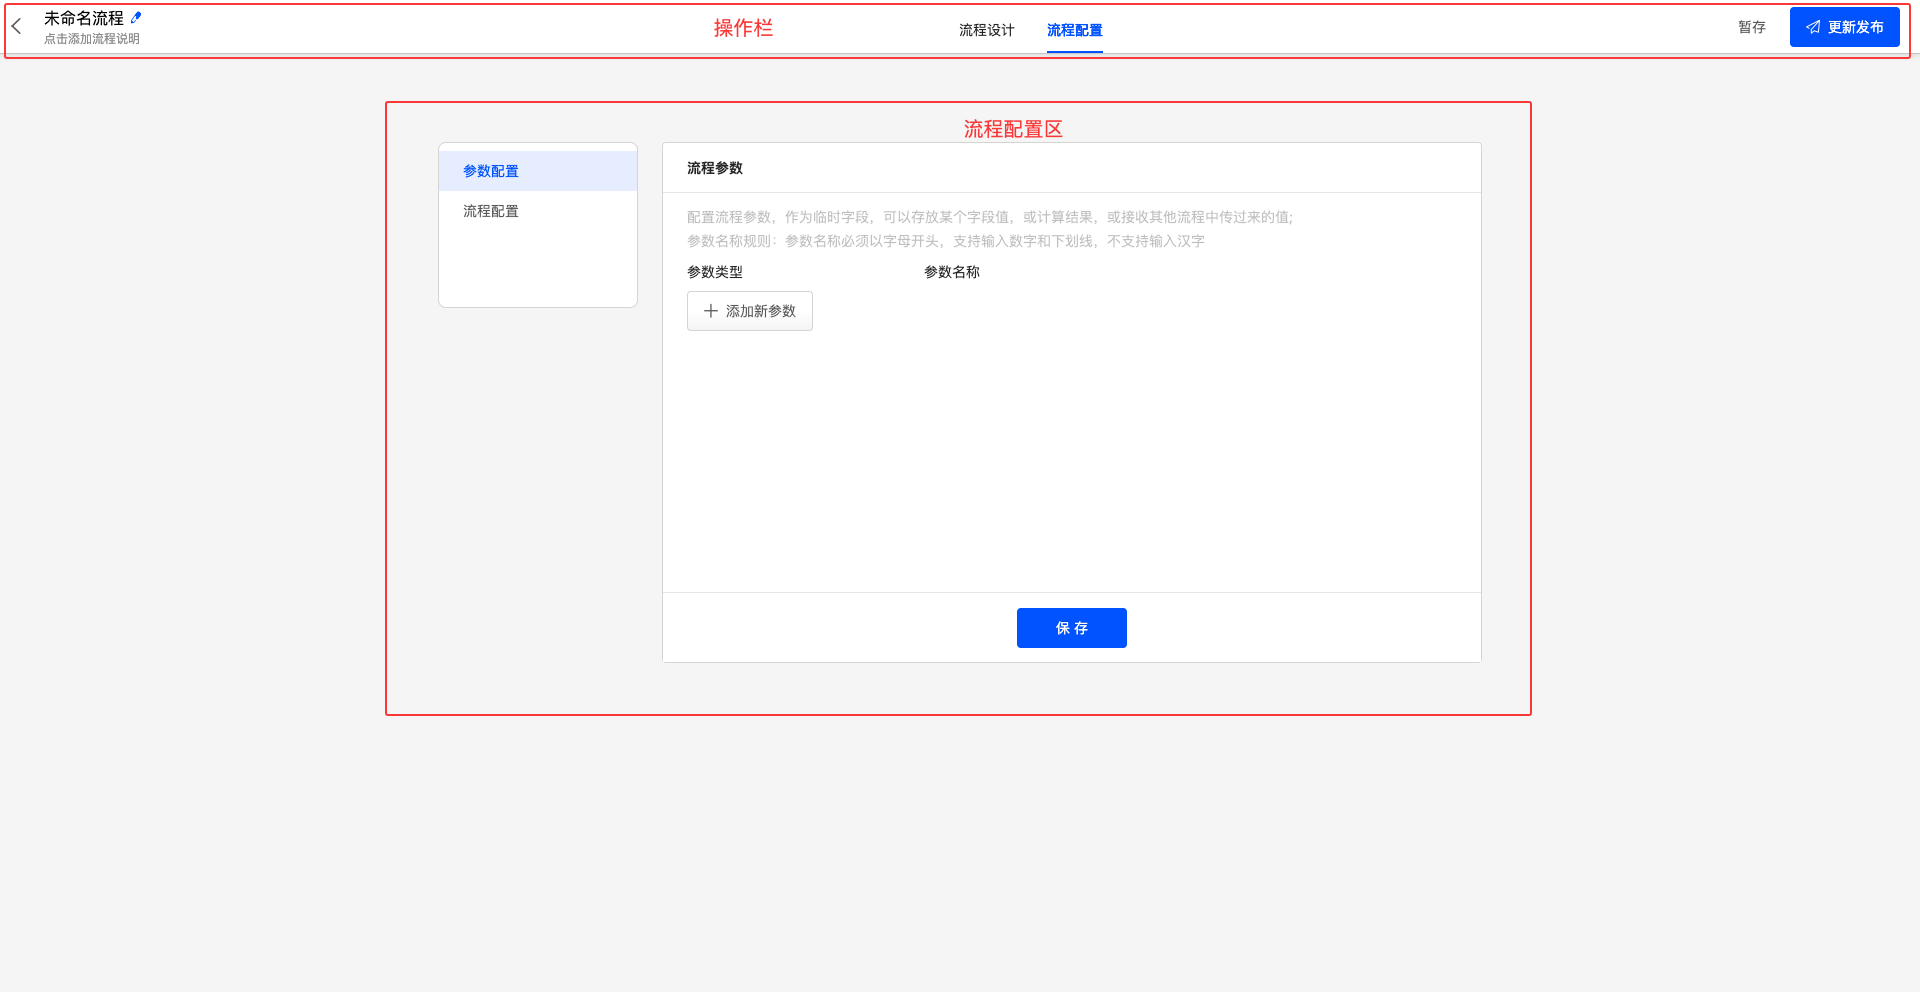
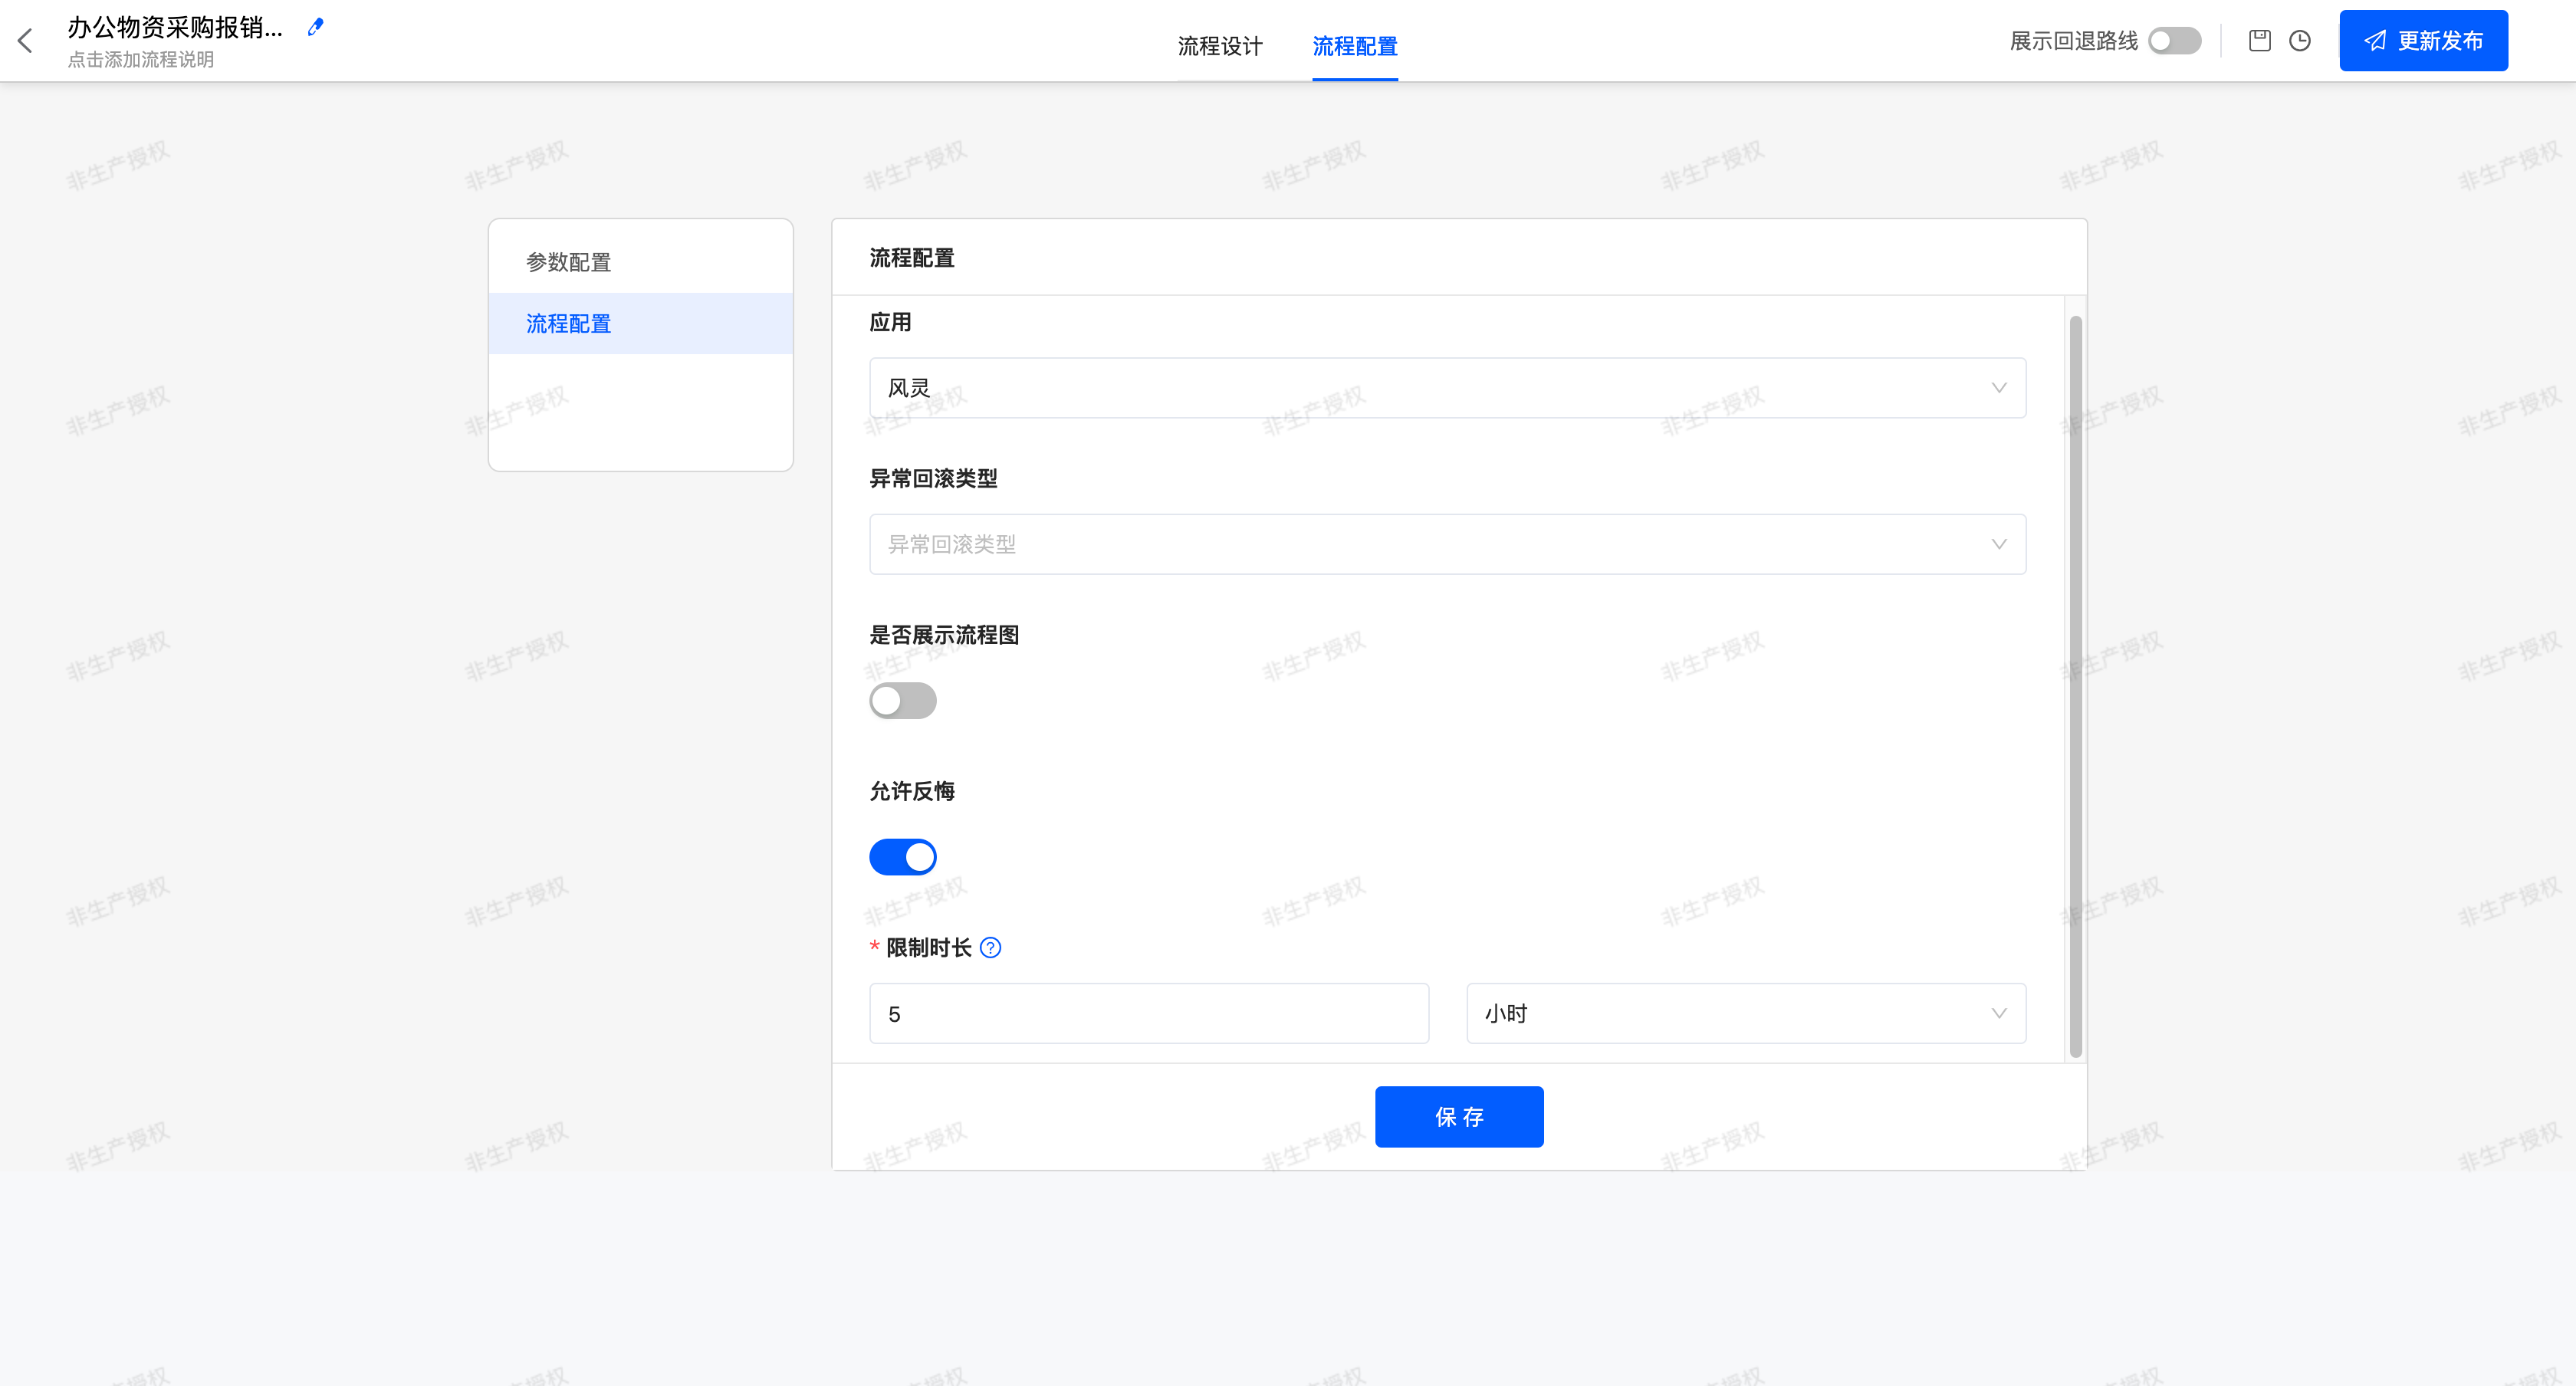
 Process configuration is mainly divided into two functional areas, the Operation Bar and the Process Configuration Area
 - Operation Bar: Consistent with the operation bar of process design.
- Process Configuration Area: Here, process parameters can be configured as temporary fields, or the application to which the process belongs can be changed.
I. Process Design
(Ⅰ) Operation Bar
1. Edit Process Name and Description
I. Function Introduction
The name and description of the process can be edited on the left side of the operation bar. The modified name and description will be displayed in the process list or card.
Note
After editing the name or description, it needs to be saved temporarily or published; otherwise, the changes cannot be saved.
II. Operation Method
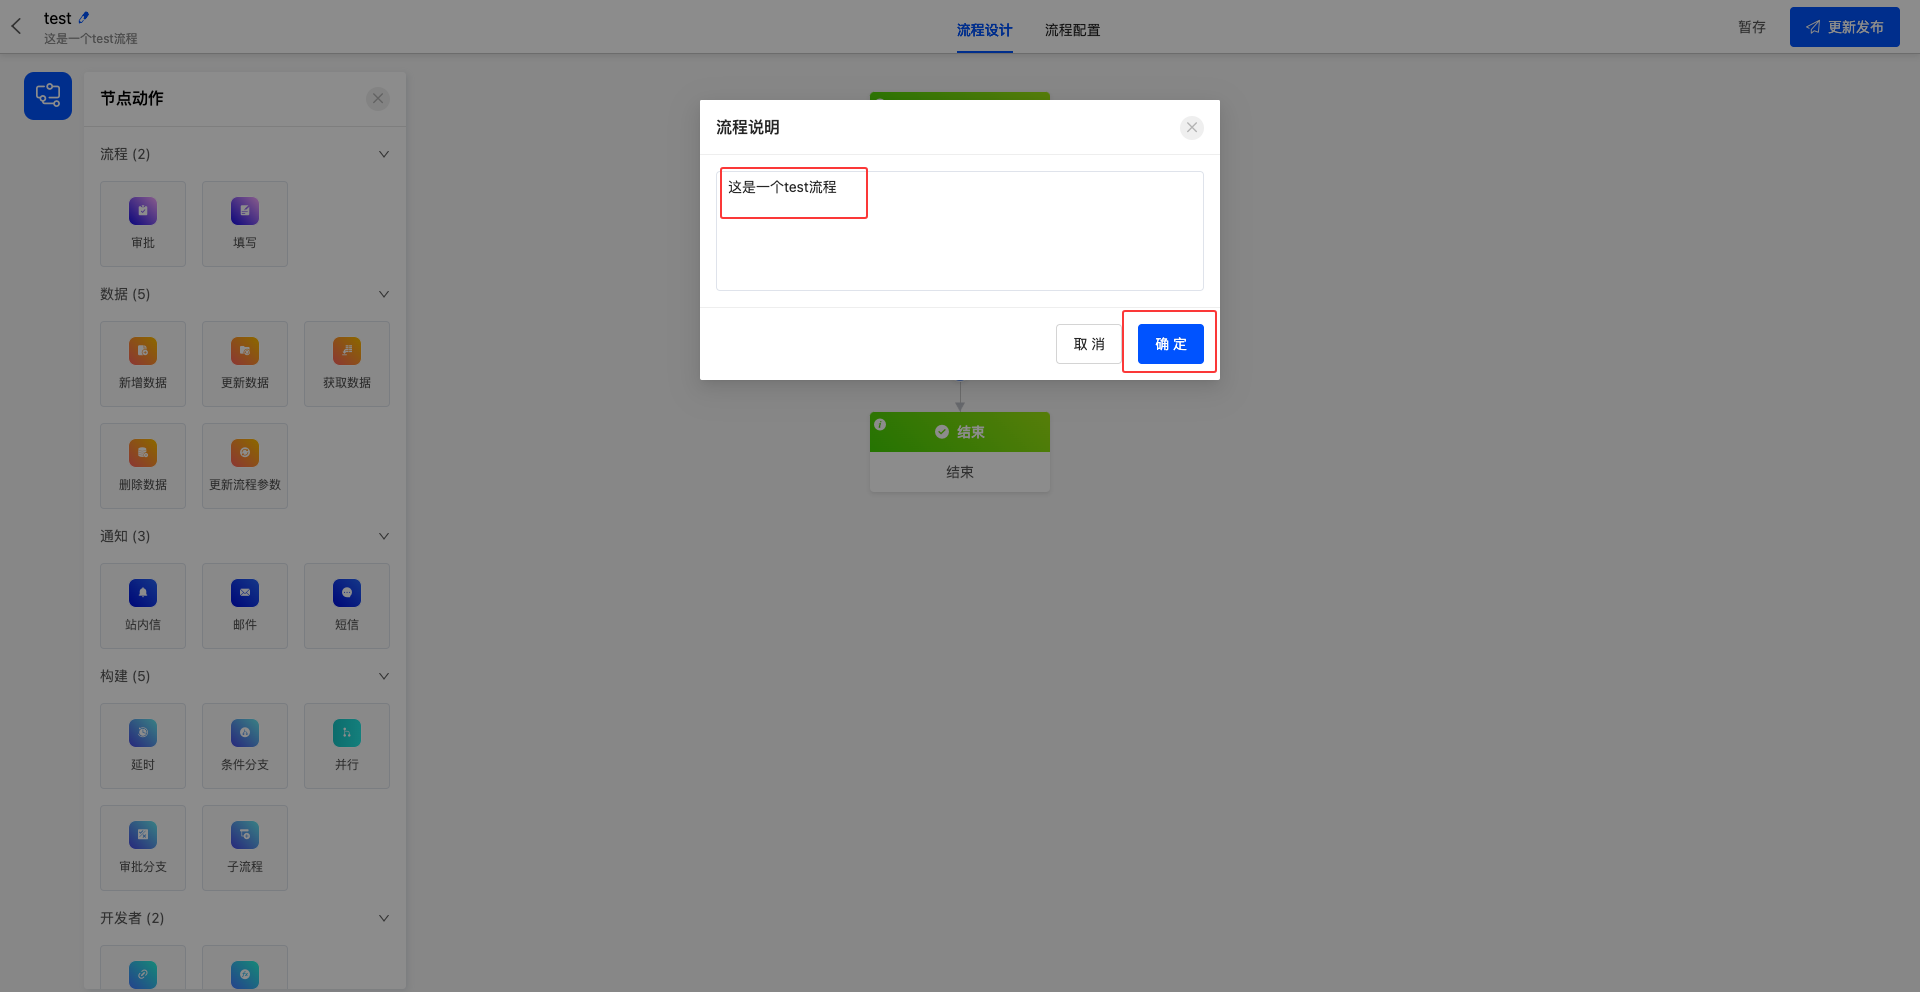
- Edit Name: Click the "Edit" icon, enter the name in the input box, and click anywhere outside the input box to complete the editing.

- Edit Description: Click the description area under the name, enter the description in the pop-up window, and click "OK" to complete the editing.

2. Switch Menus
I. Function Introduction
When designing a process, if temporary parameters or changes to the application to which the process belongs are required, the menu can be switched in the operation bar to complete the operation.
II. Operation Method
Click the menu area in the operation bar to switch between process design and process configuration.
3. Display Rollback Routes
I. Feature Introduction
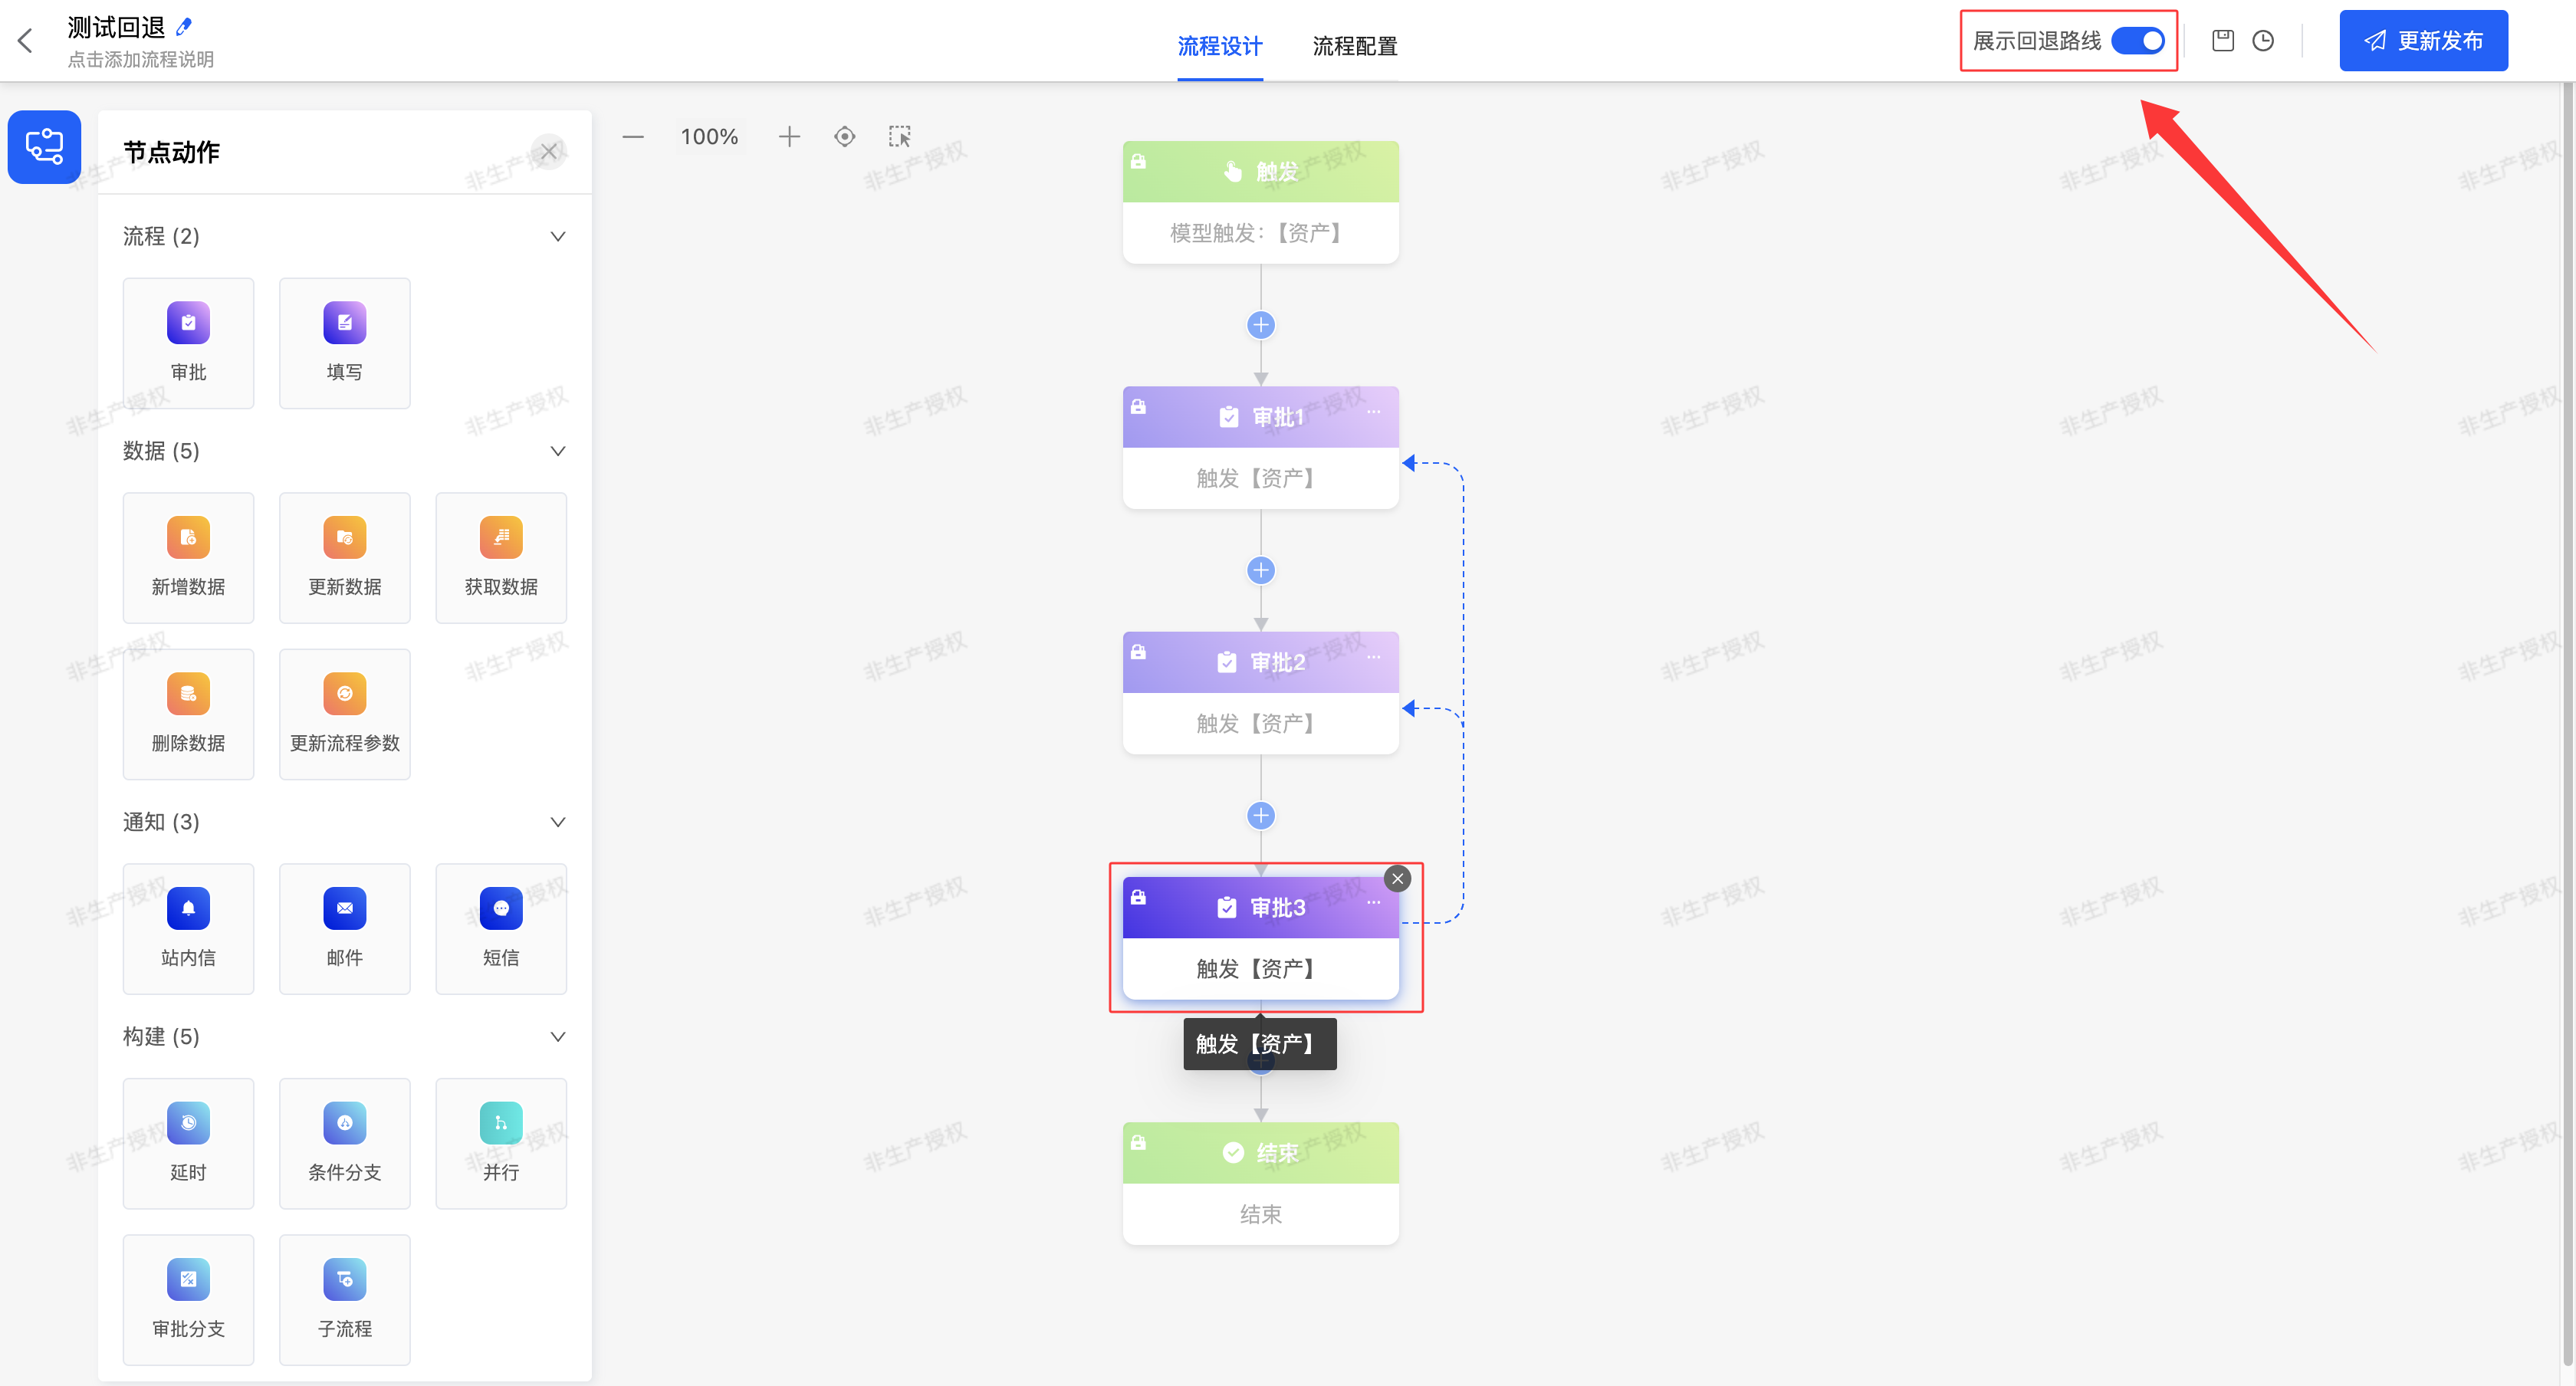
Visually presents the preset rollback routes for manual nodes, clearly guiding the operation process and helping users quickly grasp the node backtracking logic.
II. Operation Method
- Toggle on the "Display Rollback Routes" switch.
- Select the manual node configured with the rollback function.
- The system will automatically display the corresponding rollback routes.
4. Save Draft
I. Function Introduction
Supports archiving and saving the process design. Even if the process design is not complete, you can choose to save the current design progress temporarily. When entering the process design page next time, the system will automatically load and display the previously saved design page, facilitating the continuation of the process improvement.
Tip
When the process design is complete but not yet published, you can choose to enable the process directly. The enable operation will automatically trigger the release process of the current version, making the design take effect immediately and put into use.
II. Operation Method
Click "Save Draft" to archive and save the current design progress.
5. View History Records
I. Feature Introduction
The View History Records feature provides users with a convenient way to trace the past states of content. It allows users to query and browse version records that were either saved as drafts or published at different time points.
Additionally, this feature supports saving a specific history record as a formal version. Each version can be named individually, making it easier for users to distinguish and manage different versions—further enhancing the convenience of version management.
II. Operation Method
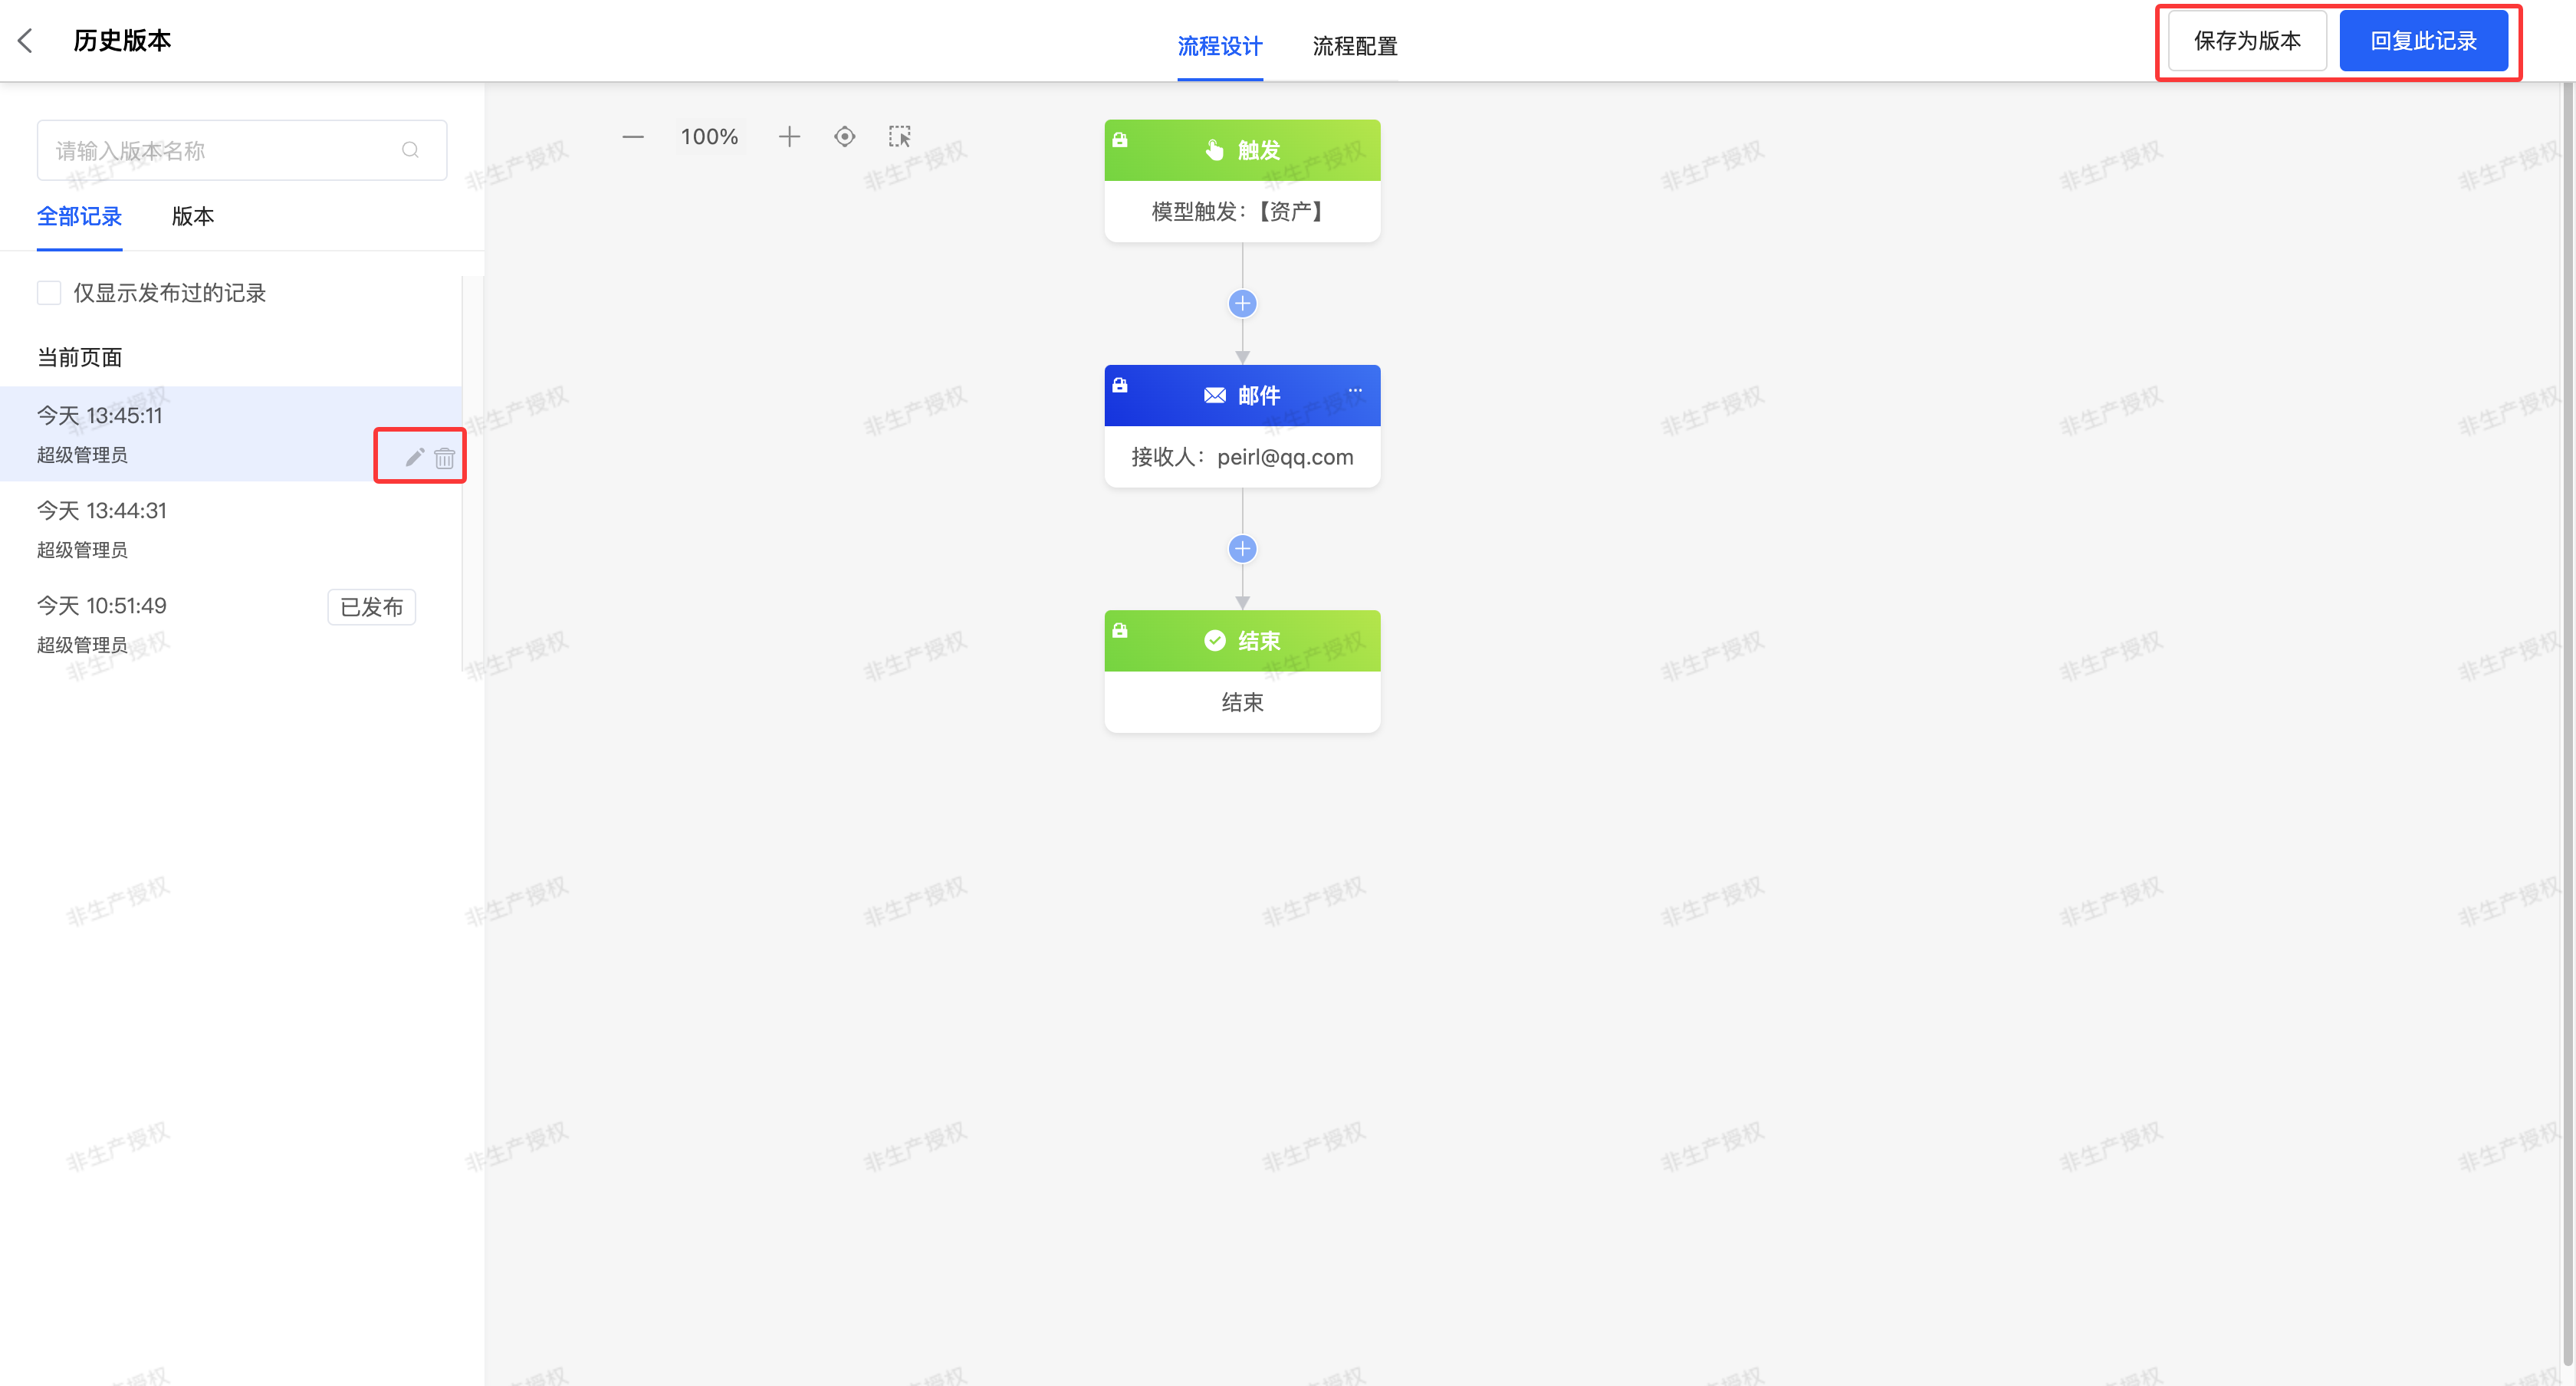
Access Entry: In the top operation bar, click the "History Records" icon to navigate to the History Versions page.

Version Filtering & Display: The system displays all draft or published version records in chronological order. Each record is labeled with its creation time and the operator, enabling users to quickly locate the target version.
View Version Content: When a user selects a historical version, the system displays the complete content of that version, consistent with its state when it was saved as a draft or published.
Save as Formal Version: Select a historical record and click "Save as Version", then enter a name to save the record as a formal version. Alternatively, click the floating "Edit" icon below the record, enter a name, and also save it as a formal version.
Restore Historical Version: Select a historical record and click "Restore This Record" to revert the content to the state of that historical version.
Delete Historical Record: Select a historical record and click "Delete" to remove the record.
6. Publish/Update Publish
I. Function Introduction
After the process design is completed, it can be published to make the process officially take effect and put into use. For processes that have not been published before, the publish button will display the word "Publish". For processes that have been published, the publish button will change to "Update Publish".
Note
After modifying a published and enabled process, before updating and publishing, these modifications will not affect the currently used process version.
- In tile mode, the process card will prompt "There are unpublished changes".
- In list mode, the update status will show "Not updated". Only after completing all modifications and performing an update publish will the new process version officially take effect and replace the previous version.
Note
When publishing a process, it is necessary to ensure that there is at least one valid node between the trigger node and the end node, and all nodes have been configured. If these conditions are not met, the process cannot be published.
II. Operation Method
Click the "Publish/Update Publish" button to publish the current process design.
(Ⅱ) Toolbar
1. Function Introduction
The toolbar integrates various node actions required for process design, and the node actions in the toolbar can be placed at the specified position of the process.
2. Operation Method
Node actions in the toolbar can be dragged, or the "+" sign between nodes in the process can be clicked to place the nodes at the specified positions. 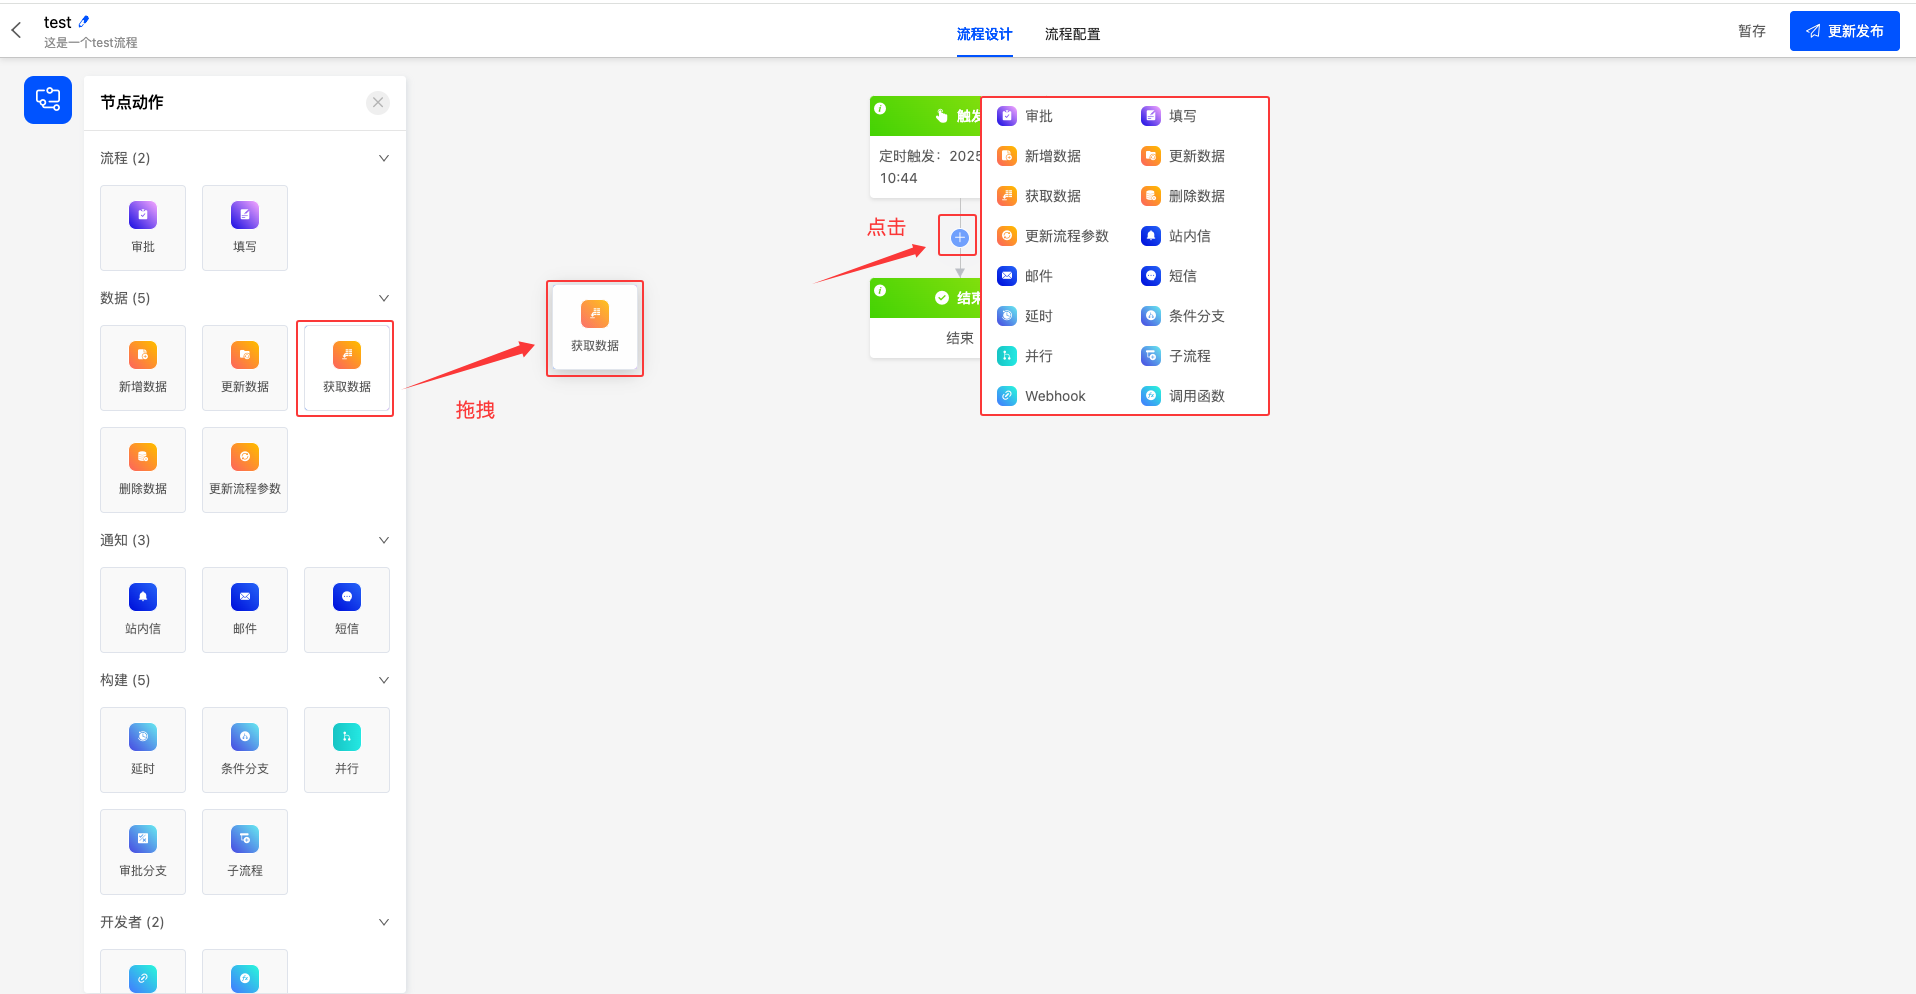
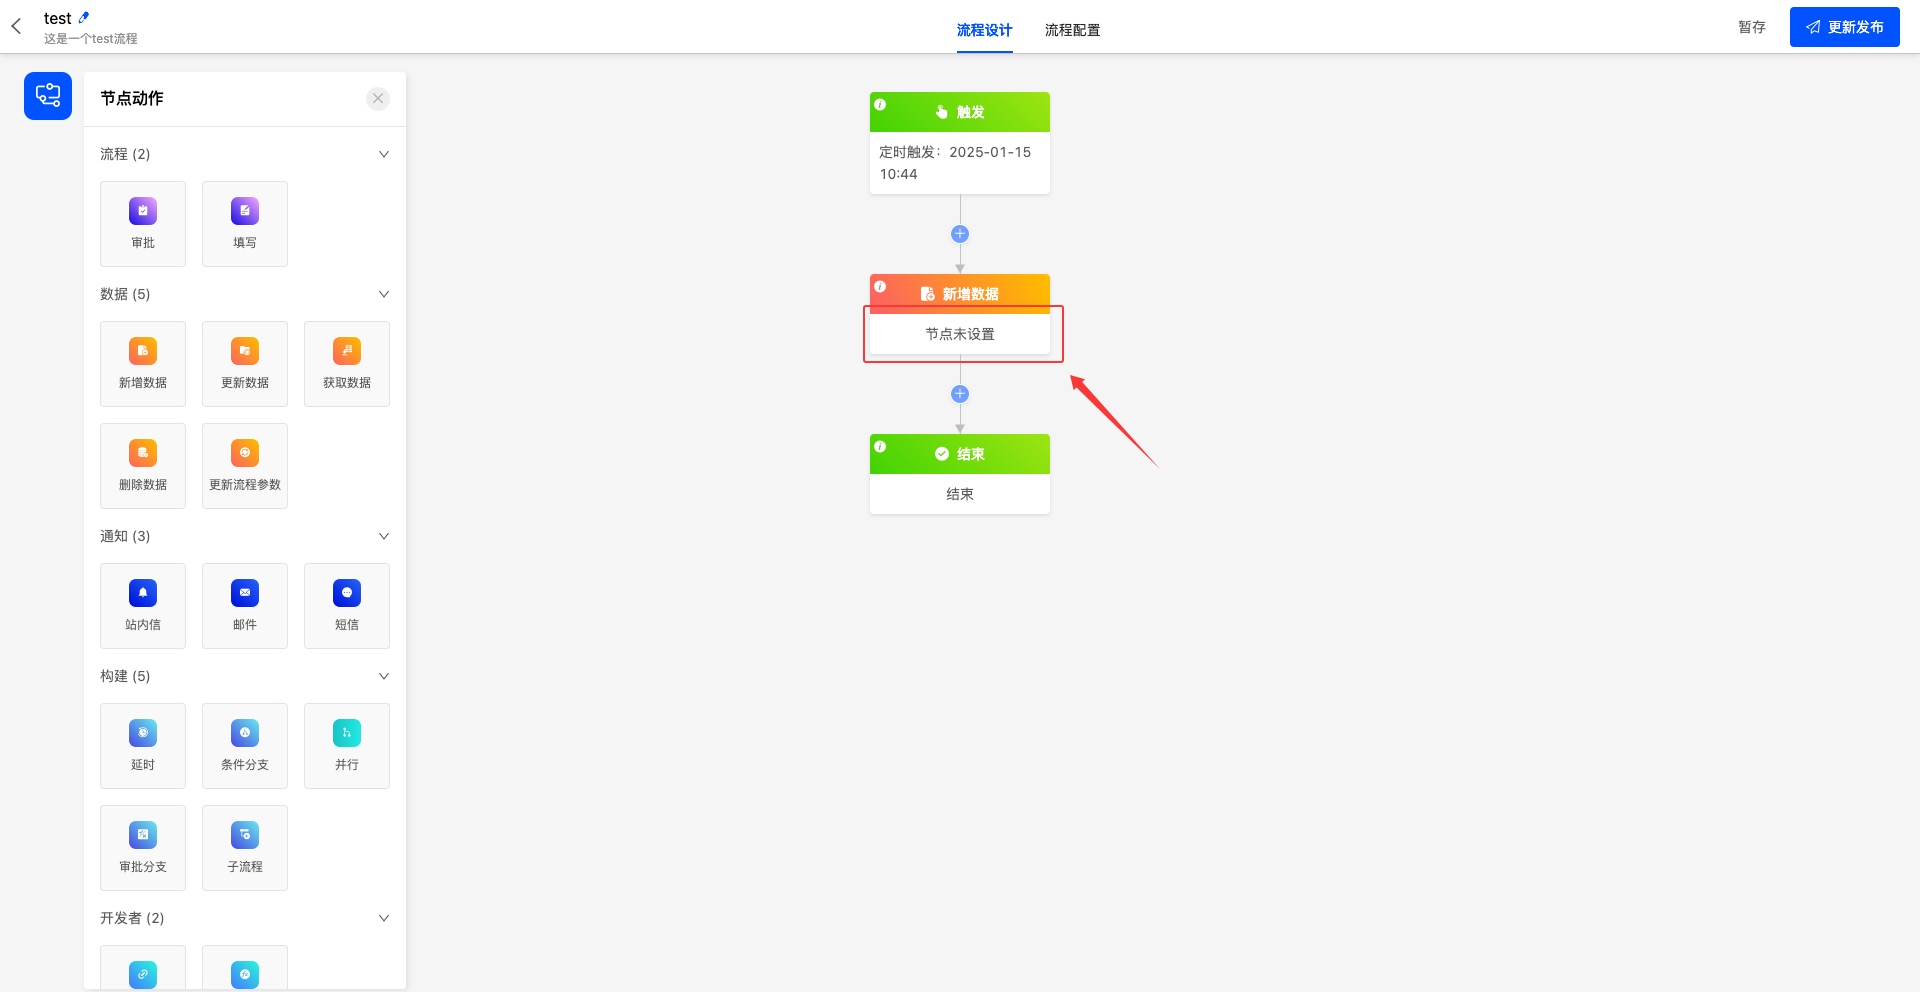
(Ⅲ) Process Design Area
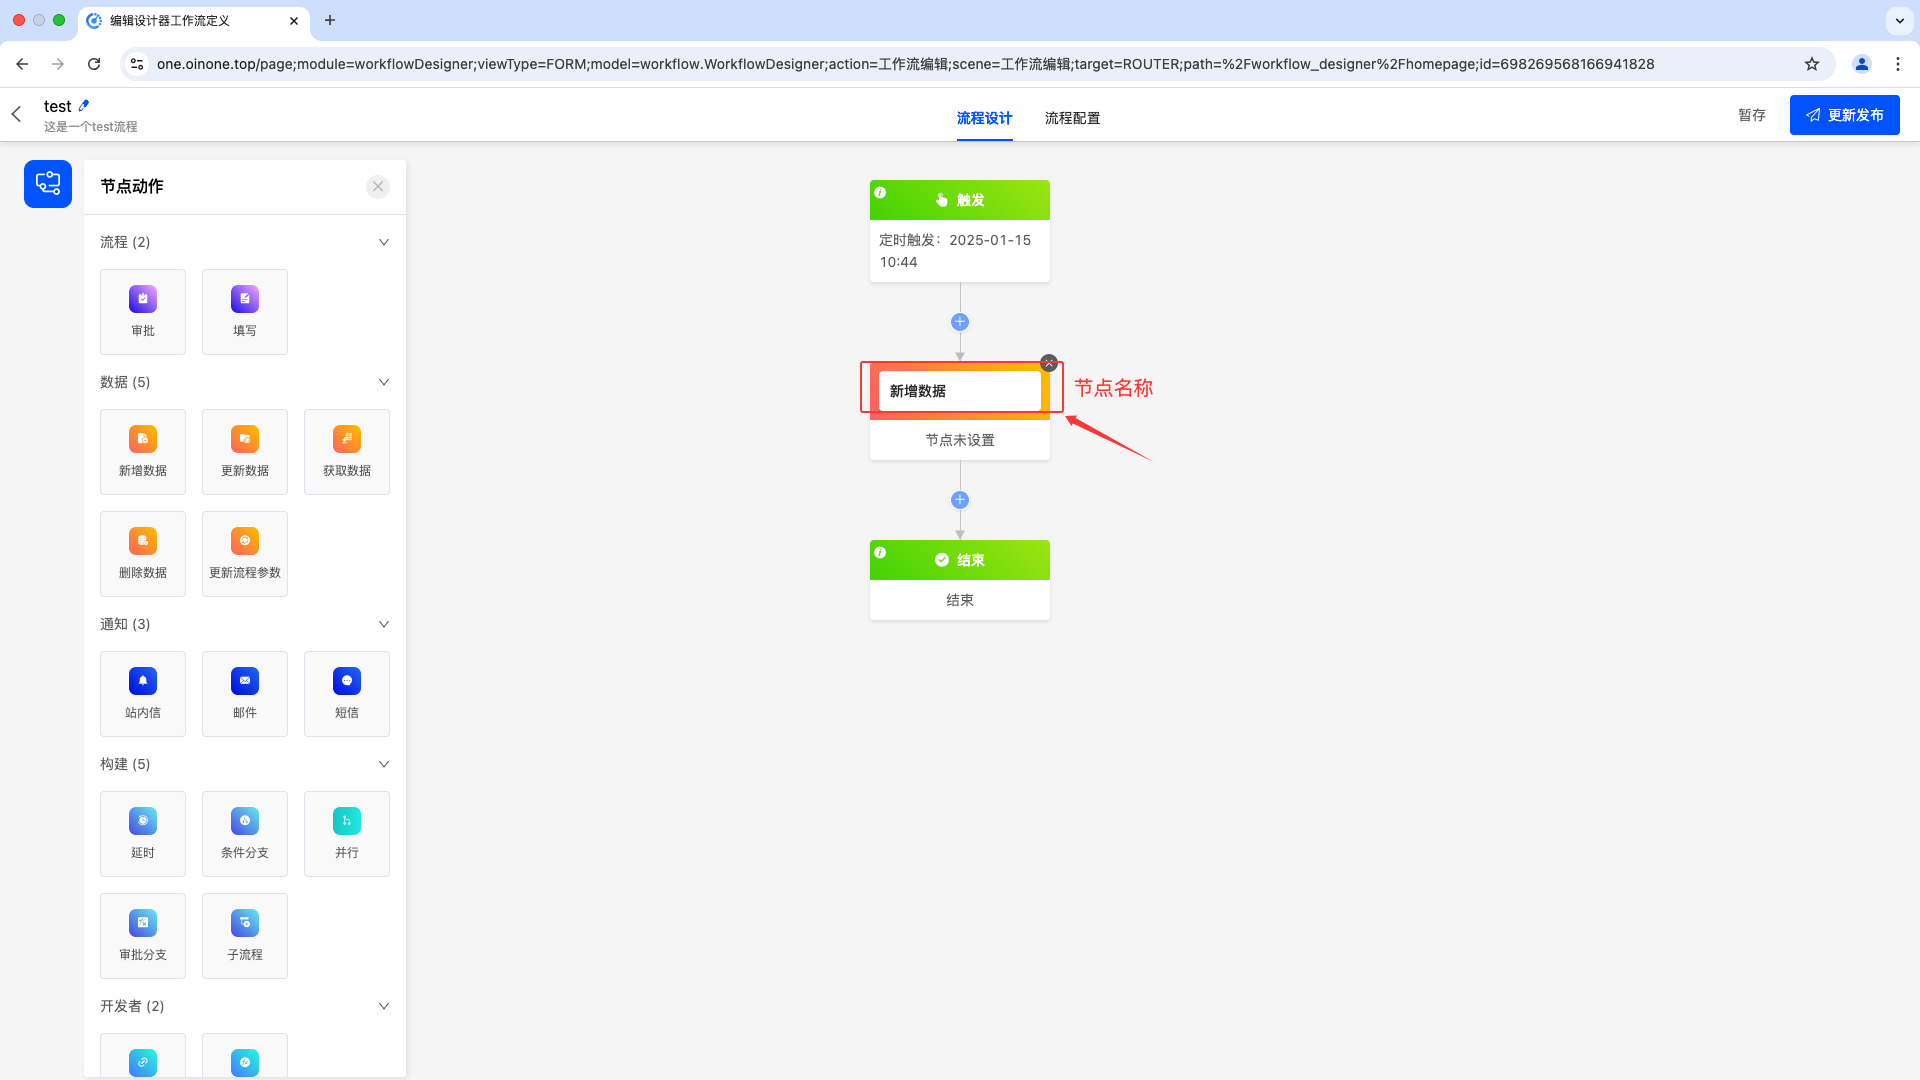
1. Edit Nodes
I. Function Introduction
After adding nodes to the process, you can modify their names, edit descriptions, and delete unnecessary nodes to better facilitate process design.
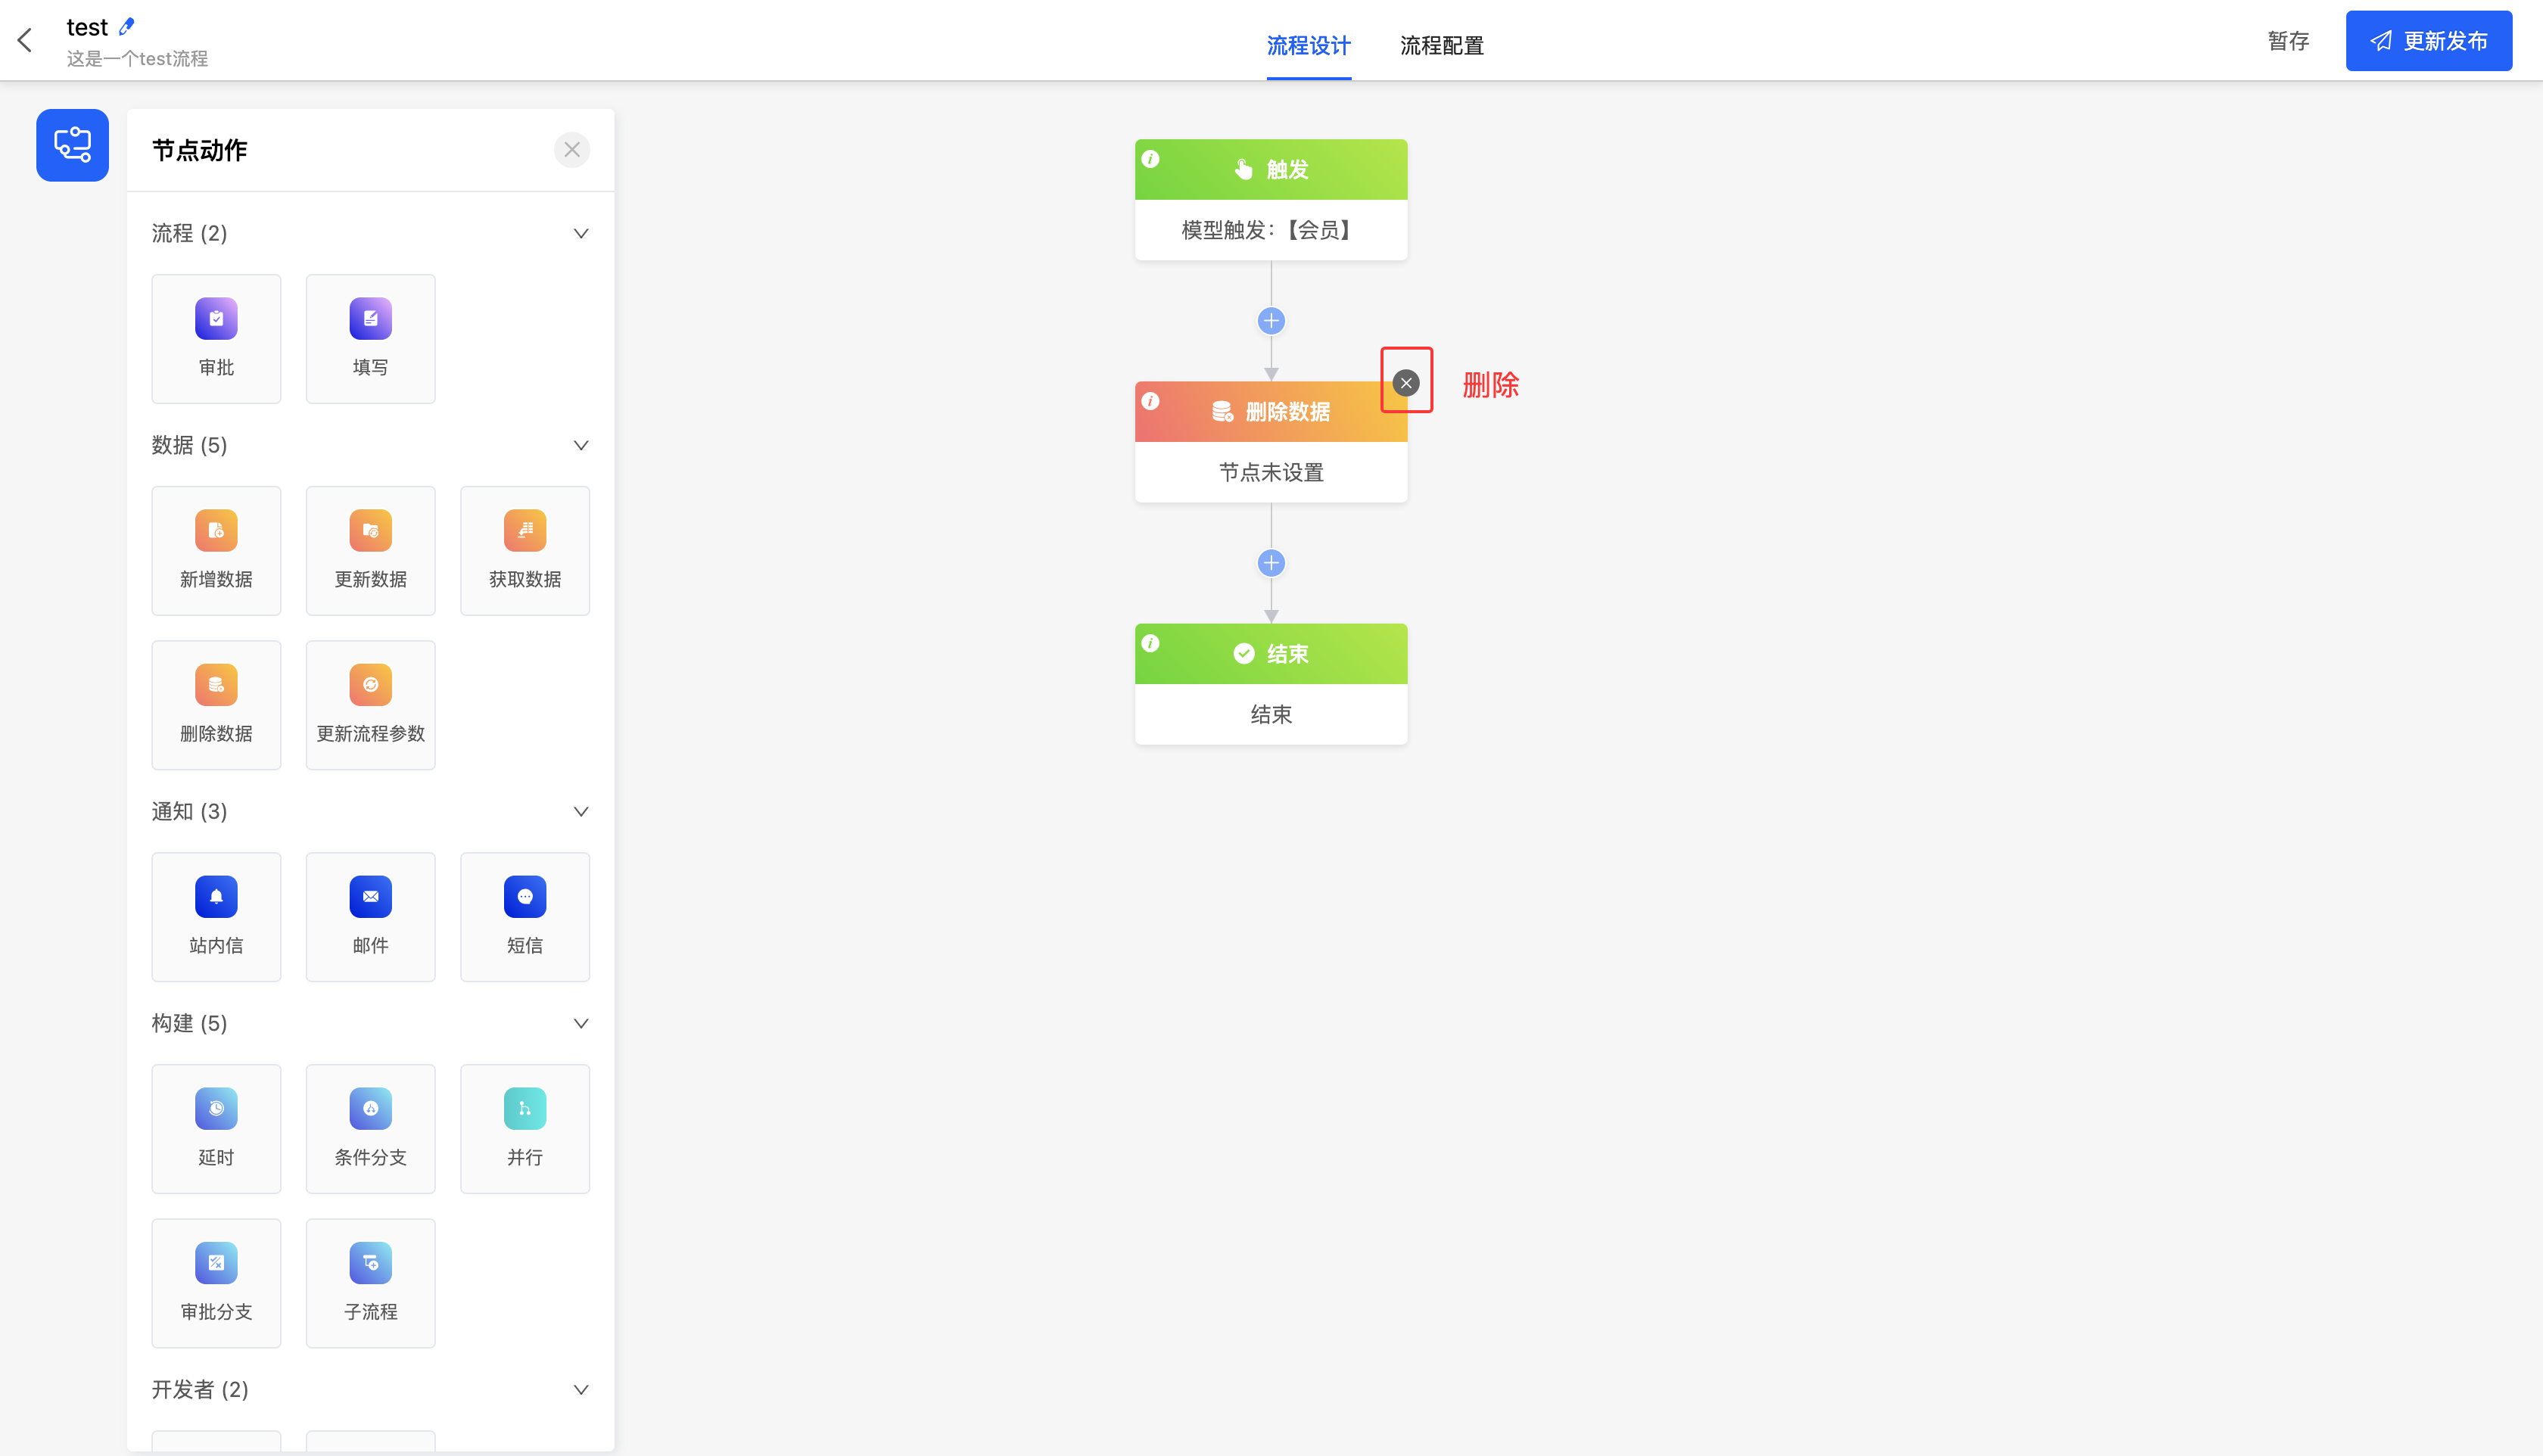
Warning
Deleted nodes cannot be recovered. Please operate with caution!
II. Operation Methods
- Click on the 「Node Name」 to modify the name in the input box.
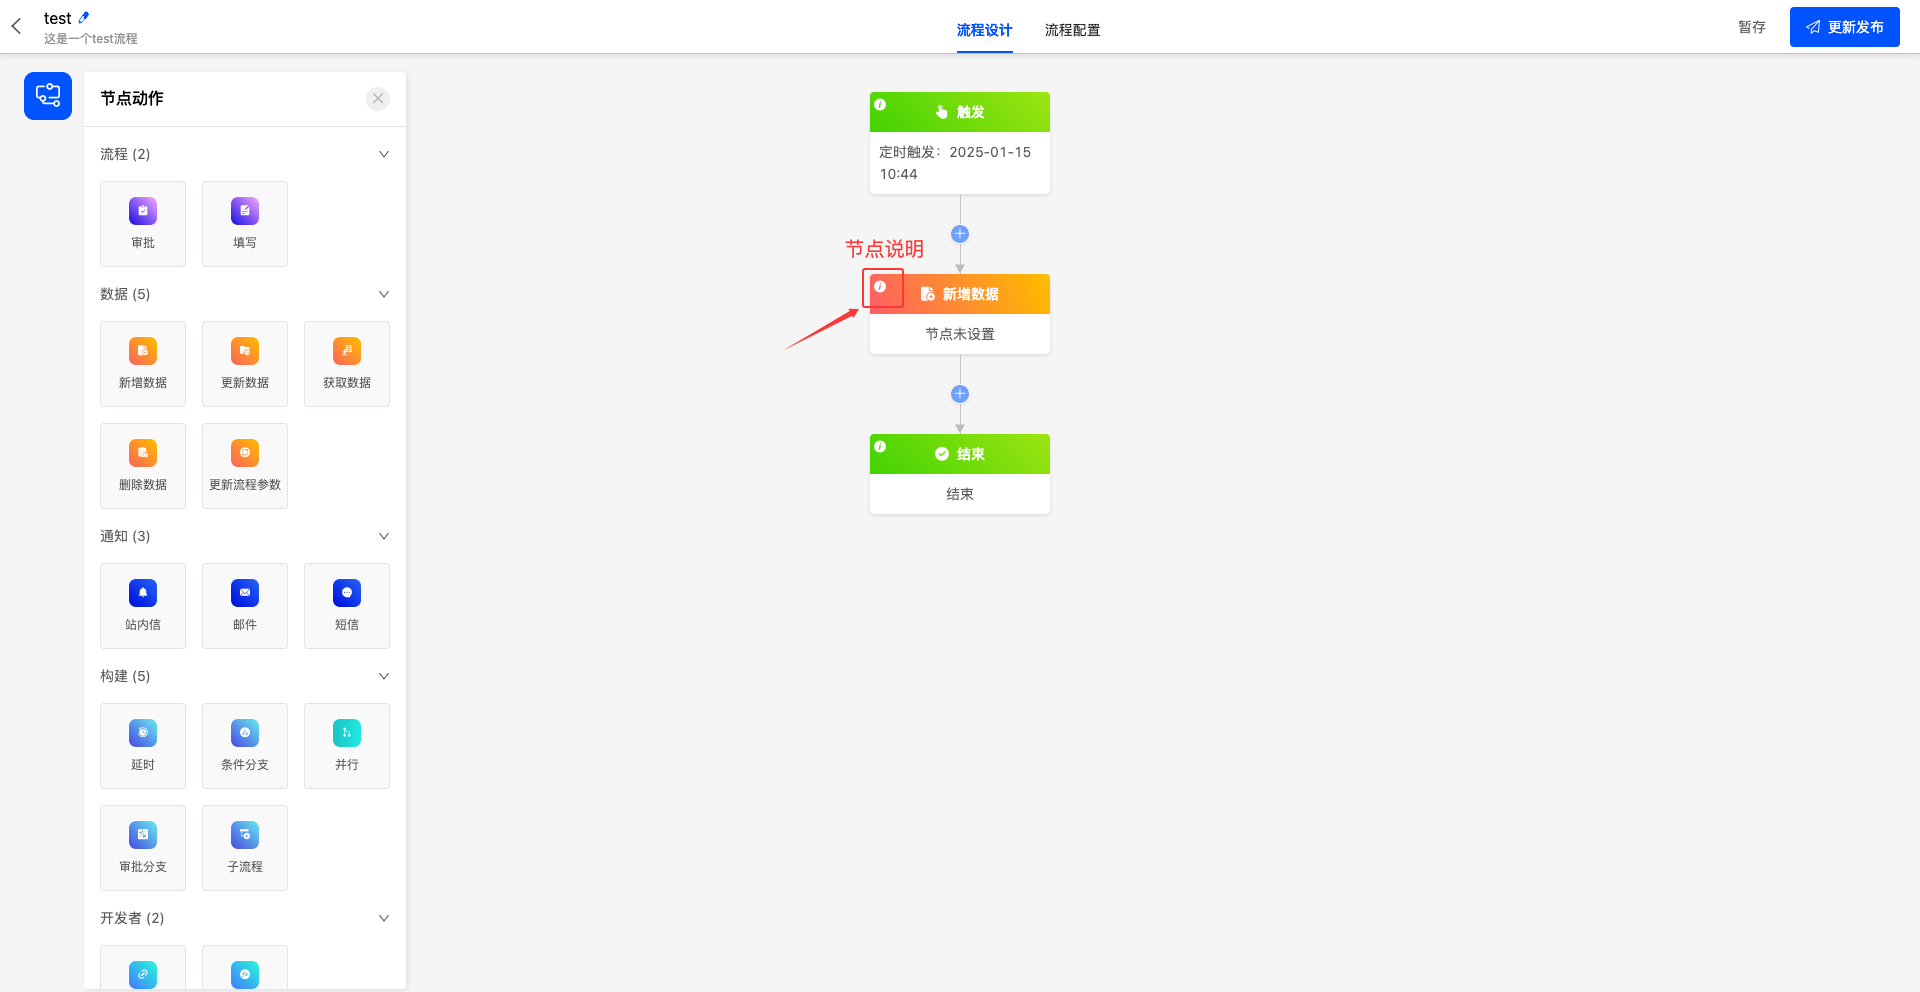
- Click on the 「Node Description」 icon, enter the node description in the pop-up window, and click 「Confirm」 to successfully edit the node description.
- Click on the 「Delete」 icon, then click 「Confirm」 in the pop-up window to delete the node.
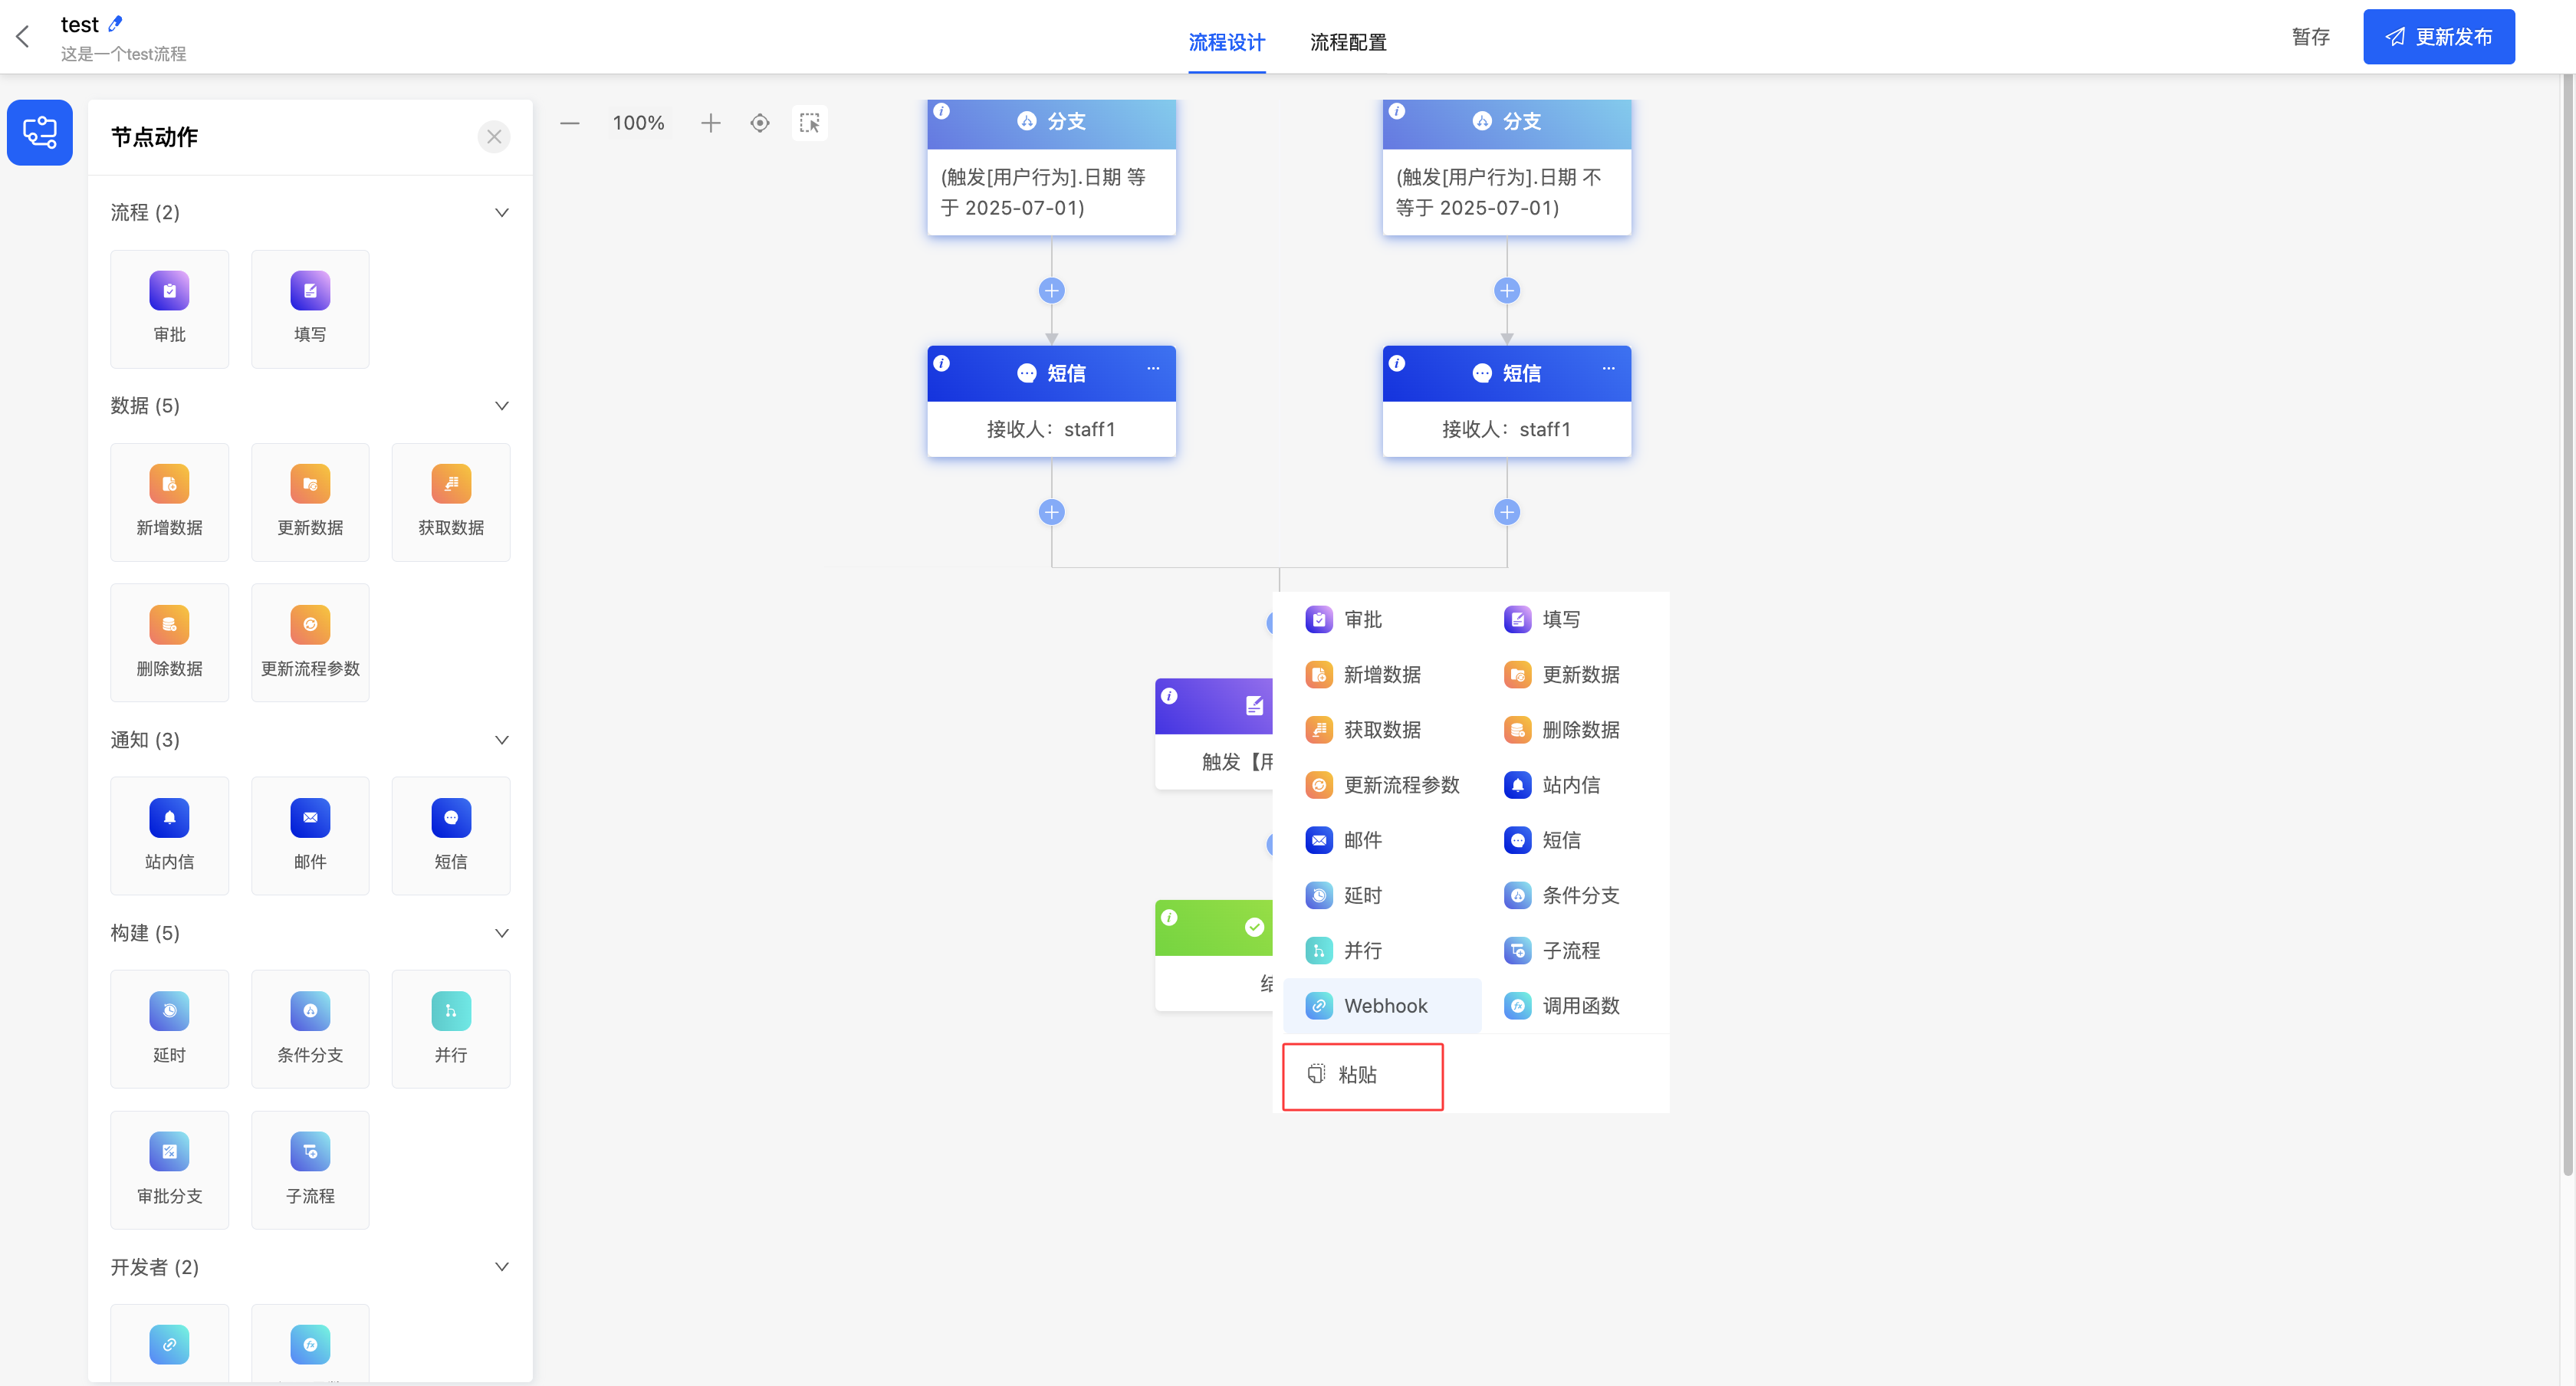
2. Cut/Copy Nodes
I. Function Introduction
Supports copying, cutting, and pasting nodes to move and rearrange them.
Note:
- Supports box selection of single or multiple nodes.
- Start and end nodes do not support copy/cut operations.
- If a single branch is box-selected under a branch node (conditional branch / parallel branch / approval branch), only the process nodes within it will be copied/cut (conditions will be removed).
- If multiple branches are box-selected under a branch node (conditional branch / parallel branch / approval branch), the conditions must be box-selected simultaneously; otherwise, the copy/cut operation will not take effect.
- If copying/cutting a node causes subsequent nodes to fail to correctly obtain required nodes, the system will clear the configuration of subsequent nodes.
- If copying/cutting a node makes it impossible to maintain the configuration data within the node, the system will clear the configuration of that node.
II. Operation Methods
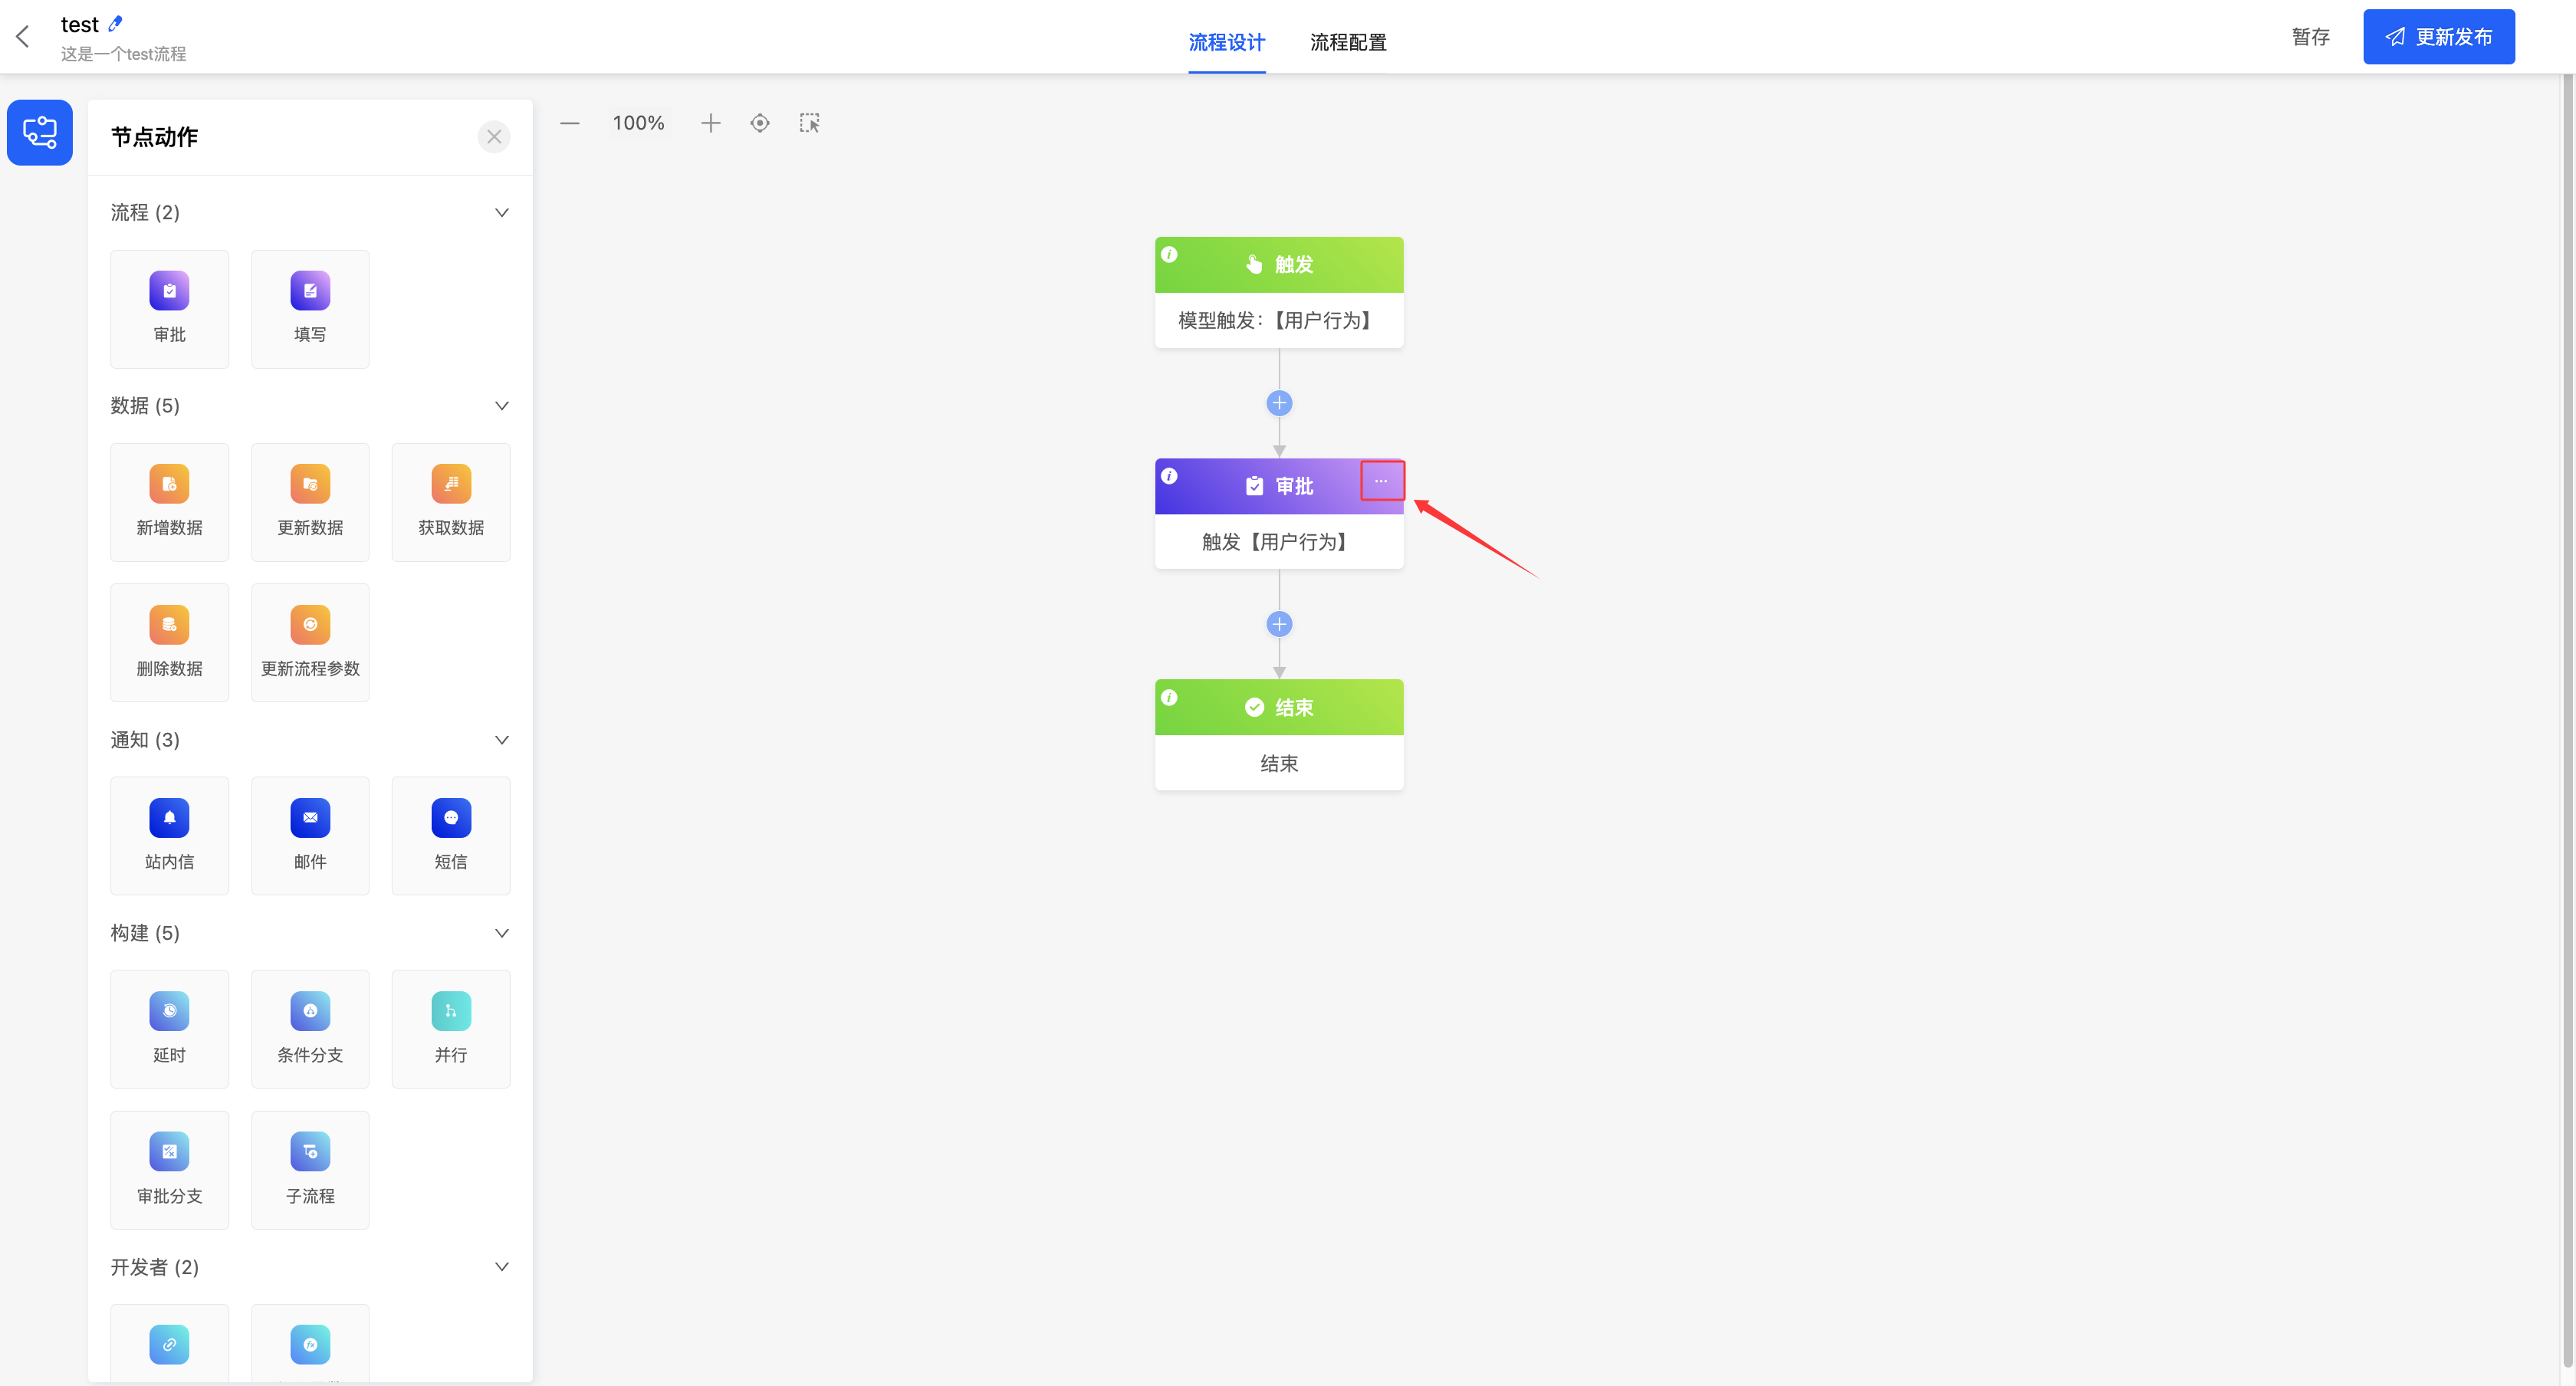
- Single node: Click 「More」 in the upper right corner of the node to select Copy / Cut the current node.
- Multiple nodes: Click the 「Box Selection」 icon to enter the box-selectable state. After框选 (box-selecting) the nodes to be copied/cut, perform the copy or cut operation.

- Paste: Click the 「Add Node」 icon at the target location to paste the newly copied/cut nodes here.
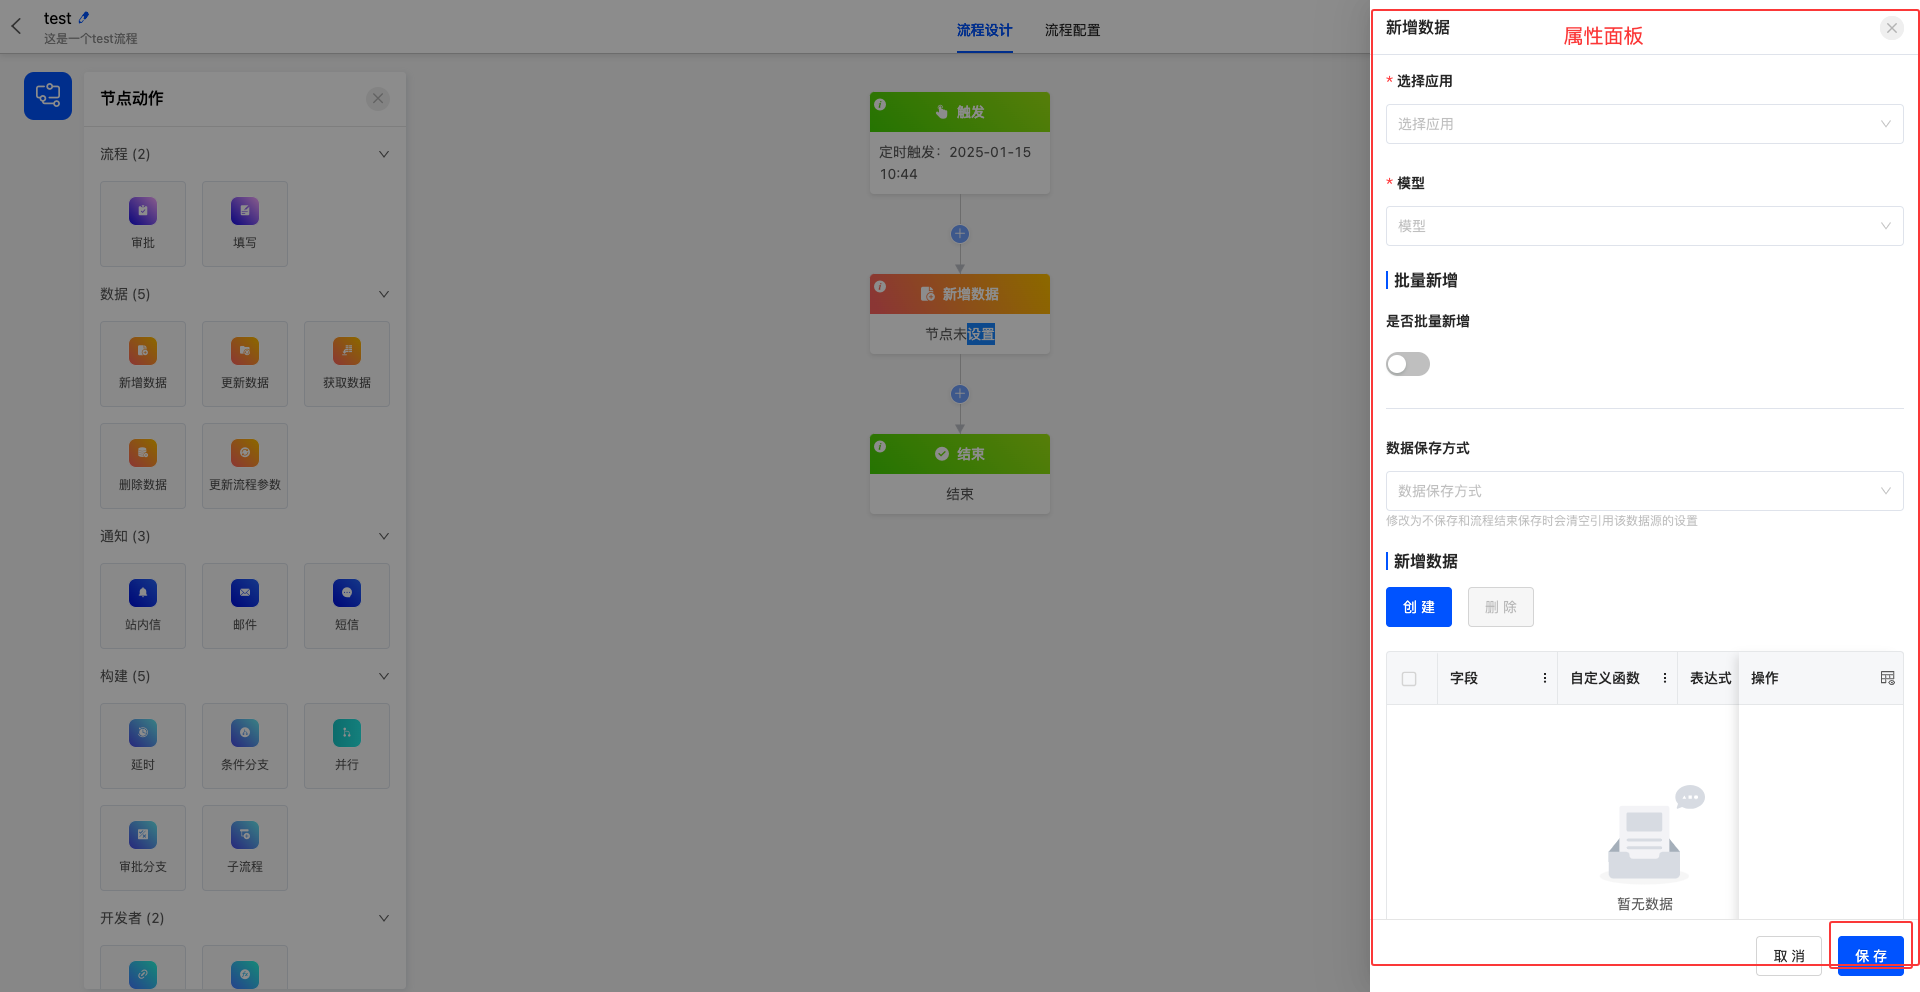
(Ⅳ) Property Panel
1. Function Introduction
In the property panel, various attributes can be configured for node actions.
2. Operation Method
Click the main body of the node, configure the attributes in the pop-up window on the right according to business requirements, and click "Save".
Note
Required information in the attributes must be filled in; otherwise, saving will not be possible.
Ⅱ. Process Configuration
1. Function Introduction
- Application: The associated application is selected when creating a process. If you find an incorrect application selection or need to change the associated application, you can perform the editing operation here.
Note
When viewing process instances in "Workflow" - "Process Execution Records":
- If process instances were generated before the application change, these instances will remain stored in the application prior to the change.
- Newly generated instances after the application change will be stored in the updated application.
- Exception Rollback Type: Refers to the handling method when an exception occurs in a node, including the following two types:
- Node Exception Termination: When an exception occurs in the node, the process will terminate immediately.
- Node Exception Rollback: When an exception occurs in the node, the system will roll back the node's status to the unexecuted state for reprocessing.
Note
This exception handling mechanism only takes effect for manual nodes.
- Whether to Display Process Diagram: Used to set whether to display the process diagram during process execution. After enabling, the process diagram can be viewed in the pending tasks.
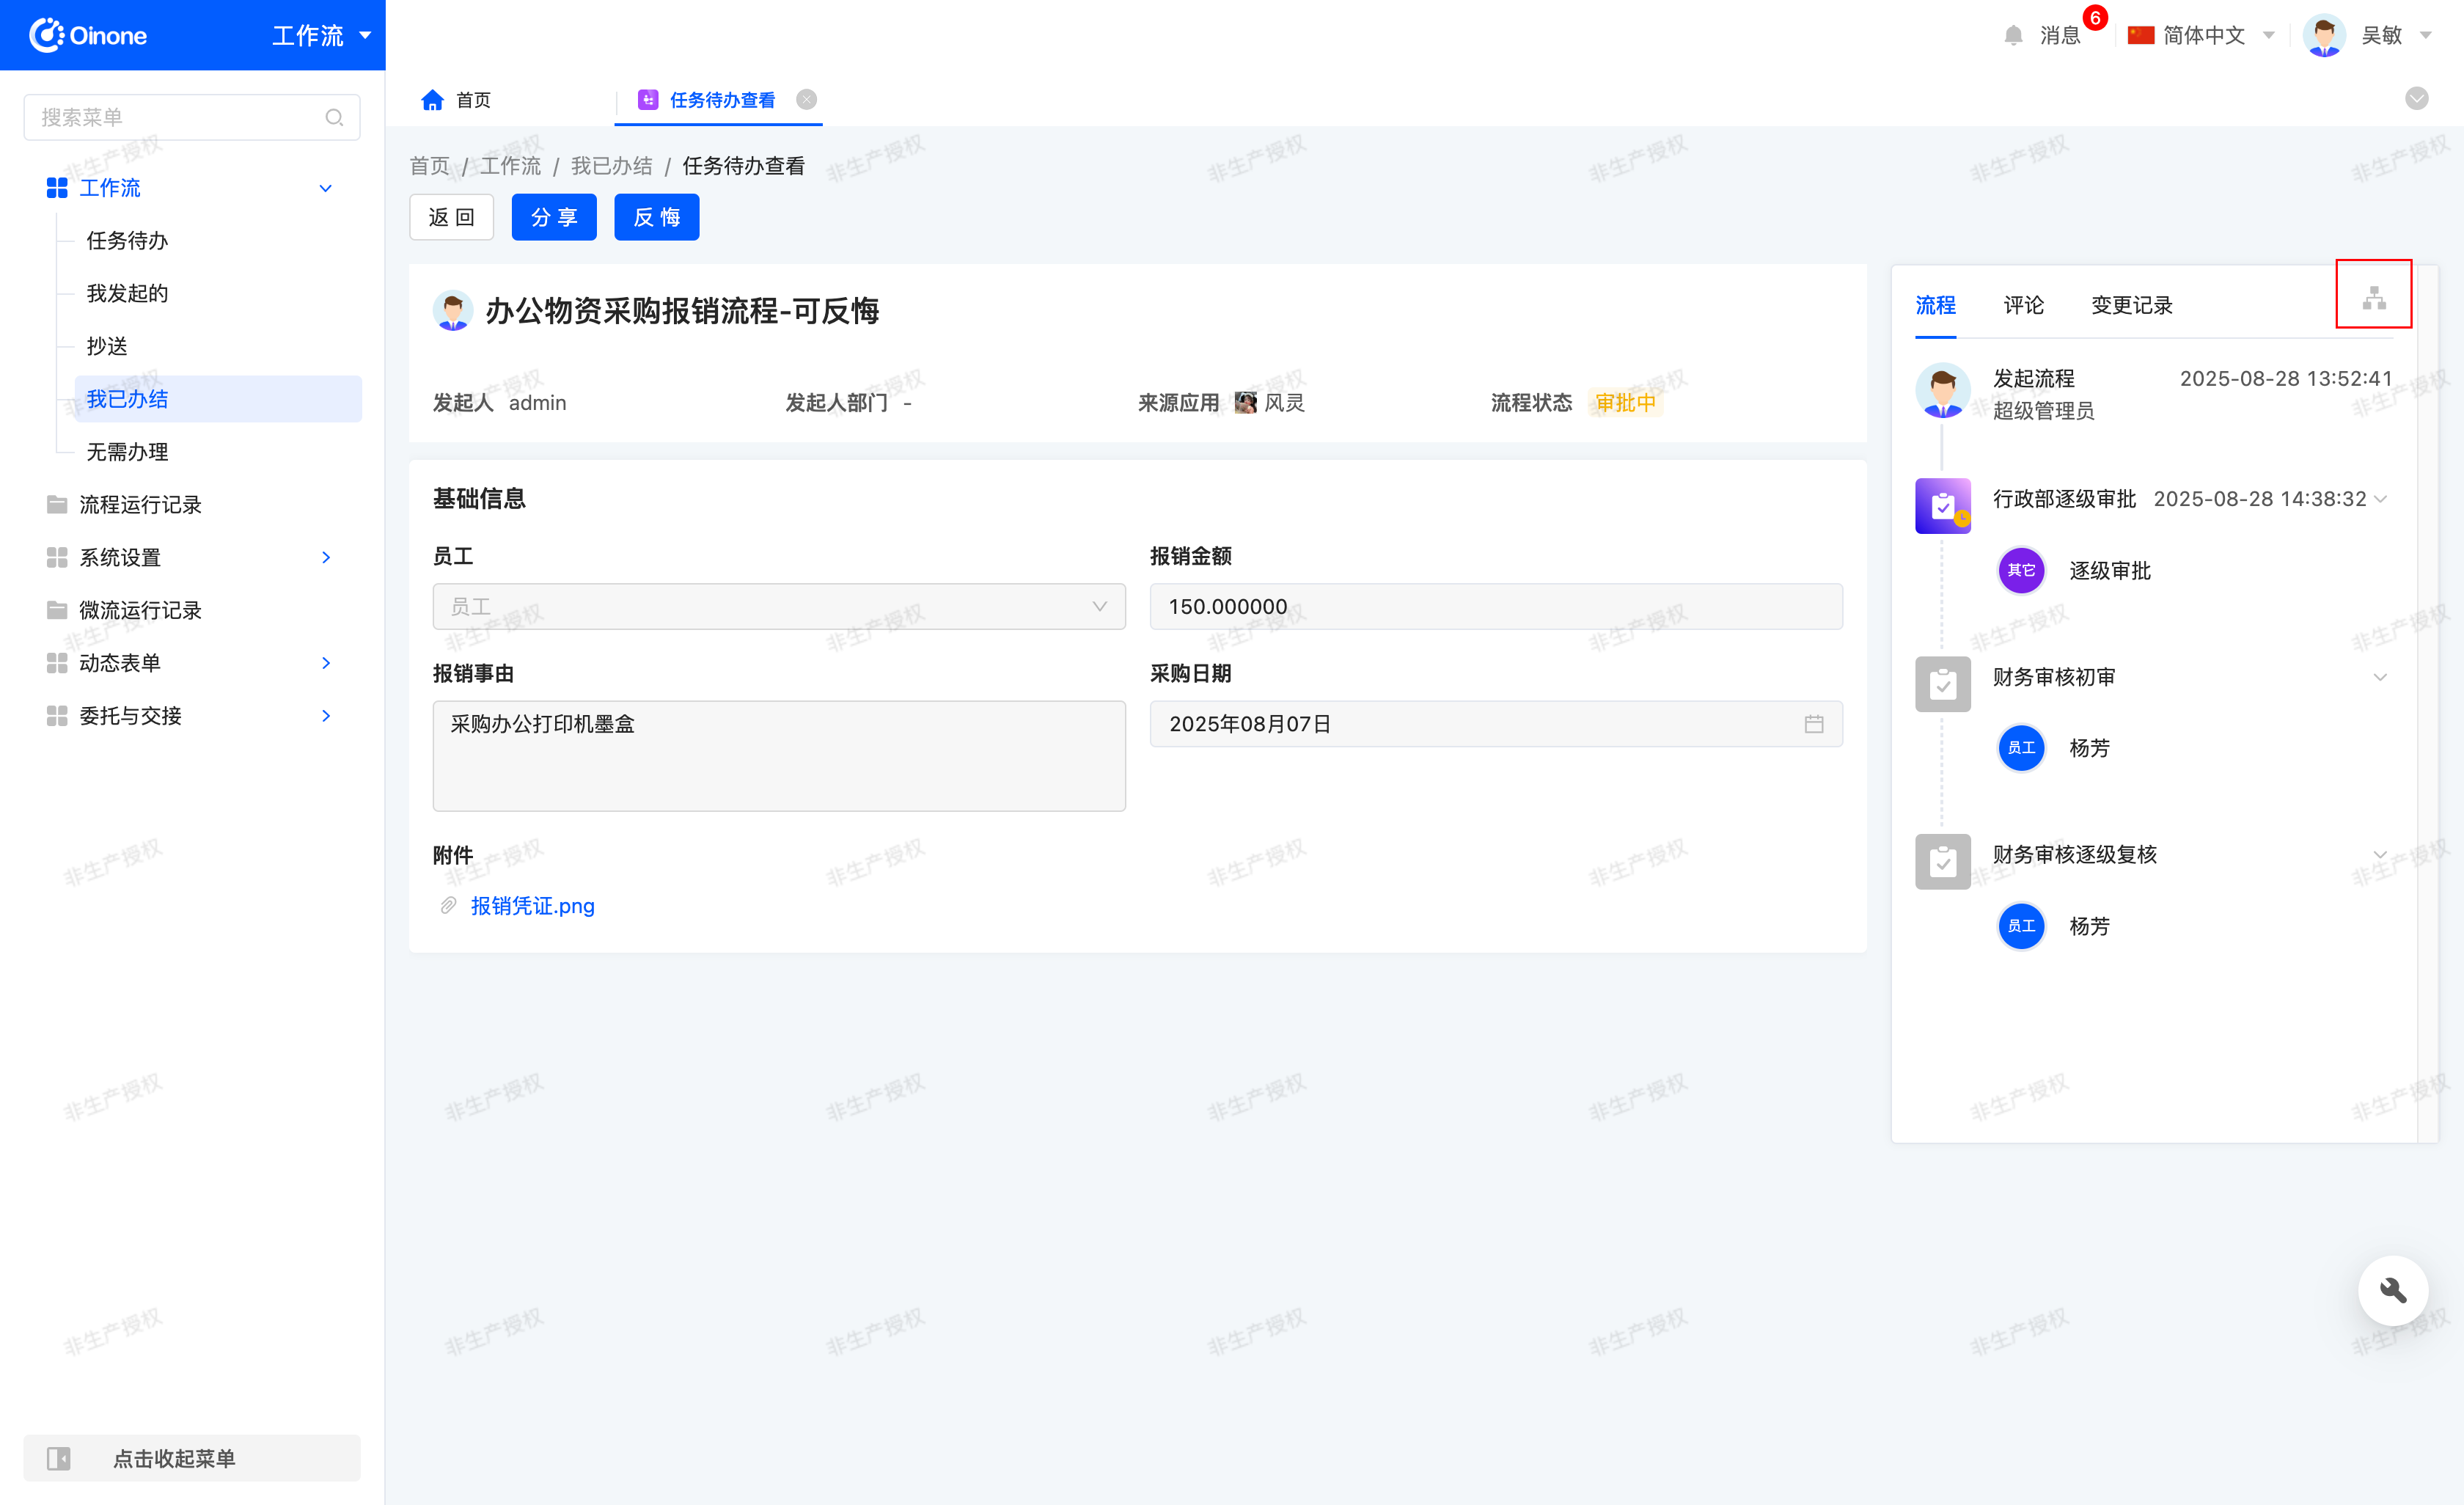
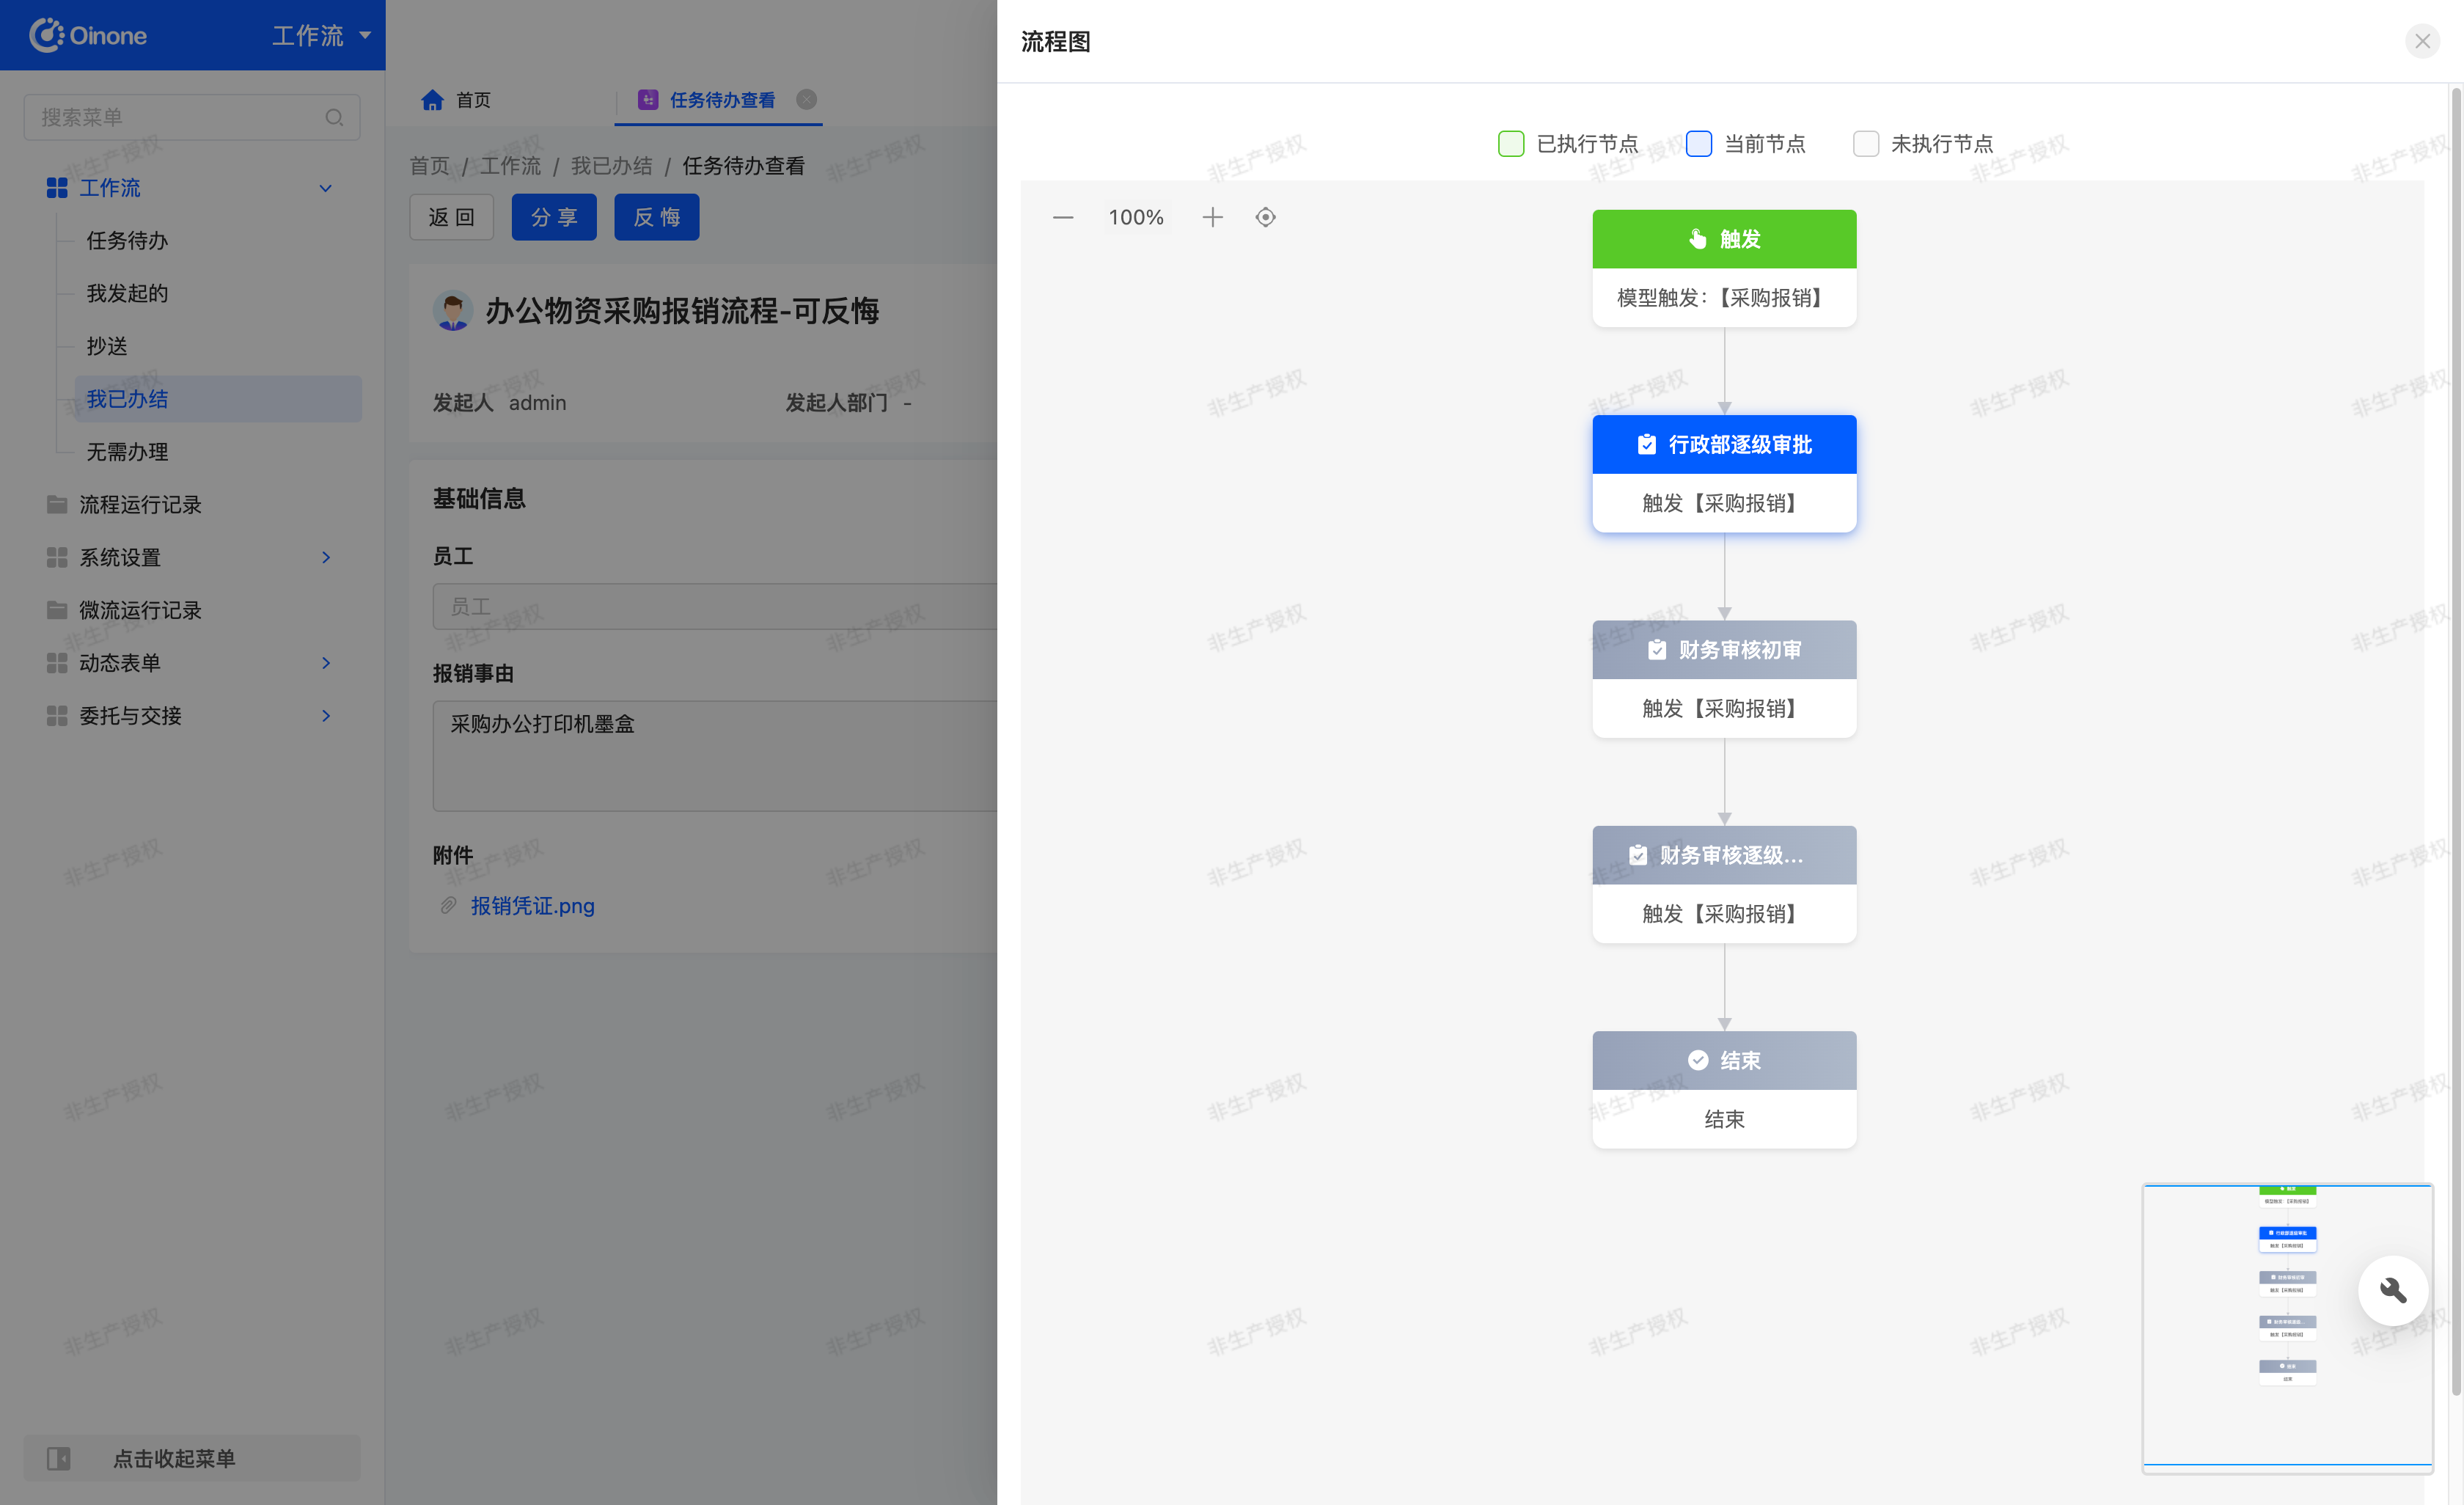
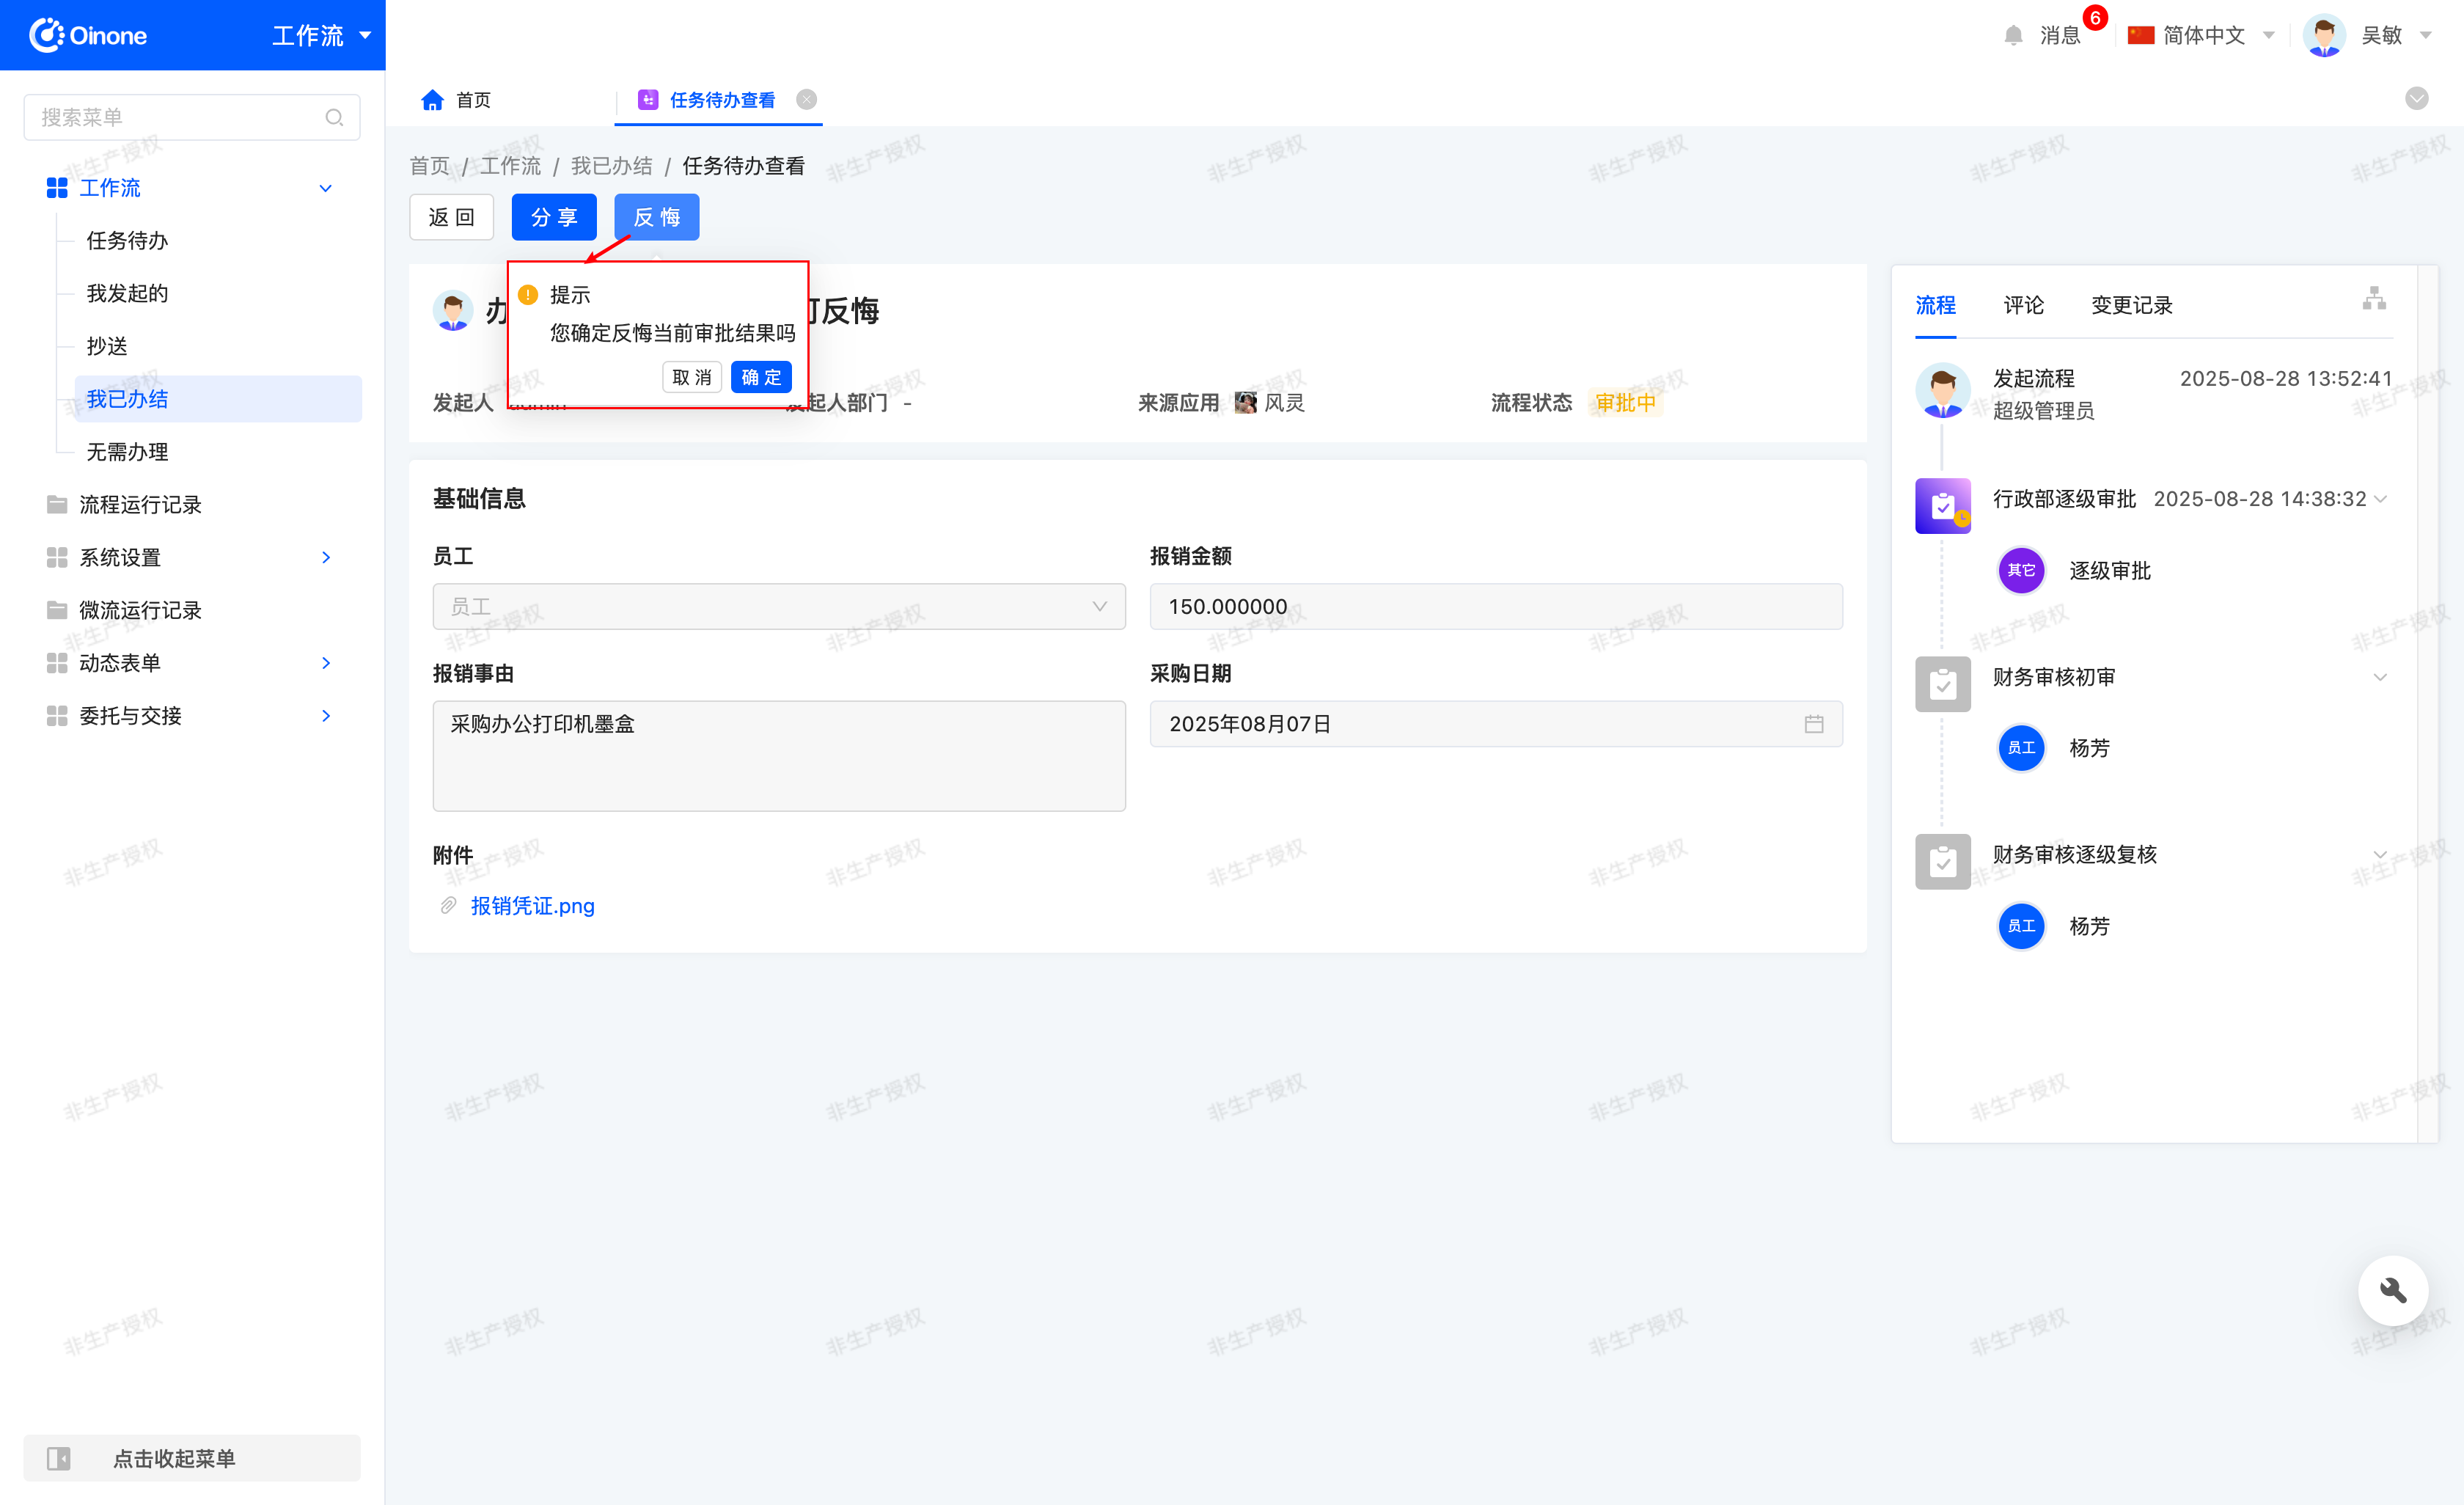
- Allow Reversal: Supports reversing the result of pending tasks. After enabling, all manual nodes can perform the reversal operation. A Time Limit can be set, which refers to the time range within which the last manual node can be reversed; beyond this duration, reversal is prohibited.
Reminder
- Basic Rules
- Reversal requires secondary confirmation: A pop-up window will prompt "Are you sure you want to reverse the current approval/filling result?" during operation, and the reversal will be executed after confirmation.
- After reversal, the result of the current node is revoked, the process rolls back to the previous node, and the relevant subsequent pending tasks are cancelled.
- Node Processing Status Rules
- Current Pending Task: Resume the pending status.
- Subsequent Manual Nodes Not Processed: Reversal is allowed, and the pending task is cancelled.
- Subsequent Manual Nodes Viewed but Not Processed: Reversal is allowed, and the subsequent personnel will be prompted "Your pending task has been withdrawn and cannot be operated on".
- Subsequent Manual Nodes Processed: Reversal is prohibited.
- Additional Signatory Rules
- Additional Signatory Before Approval: If the approver has already given a result, the additional signatory cannot reverse it.
- Additional Signatory After Approval: If the additional signatory has already given a result, the approver cannot reverse it.
- Last Manual Node Rules
- The last manual node can be reversed, but the operation must be performed within the configured Time Limit.
- If the time limit is exceeded, reversal is prohibited.
2. Operation Method
- Under Process Configuration, select an application and click "Save" to successfully modify the application.
- Under Process Configuration, you can select the exception rollback type from the drop-down menu, including Node Exception Termination and Node Exception Rollback.
- Under Process Configuration, you can select whether to display the process diagram in pending tasks.
- Reversal:
- Under Process Configuration, check the "Allow Reversal" switch. If enabled, you need to set a Time Limit (Unit: Minutes/Hours/Days).
- Enter "My Completed Tasks" and open the details of the completed pending task.
- If the node supports reversal, a "Reversal" Button will be displayed in the operation area. After clicking, the system will pop up a prompt: "Are you sure you want to reverse the current approval/filling result?"
- Click Cancel: No operation is performed, and the process remains unchanged.
- Click Confirm: Execute the reversal, revoke the result of this node and subsequent pending tasks.