I. Role Types
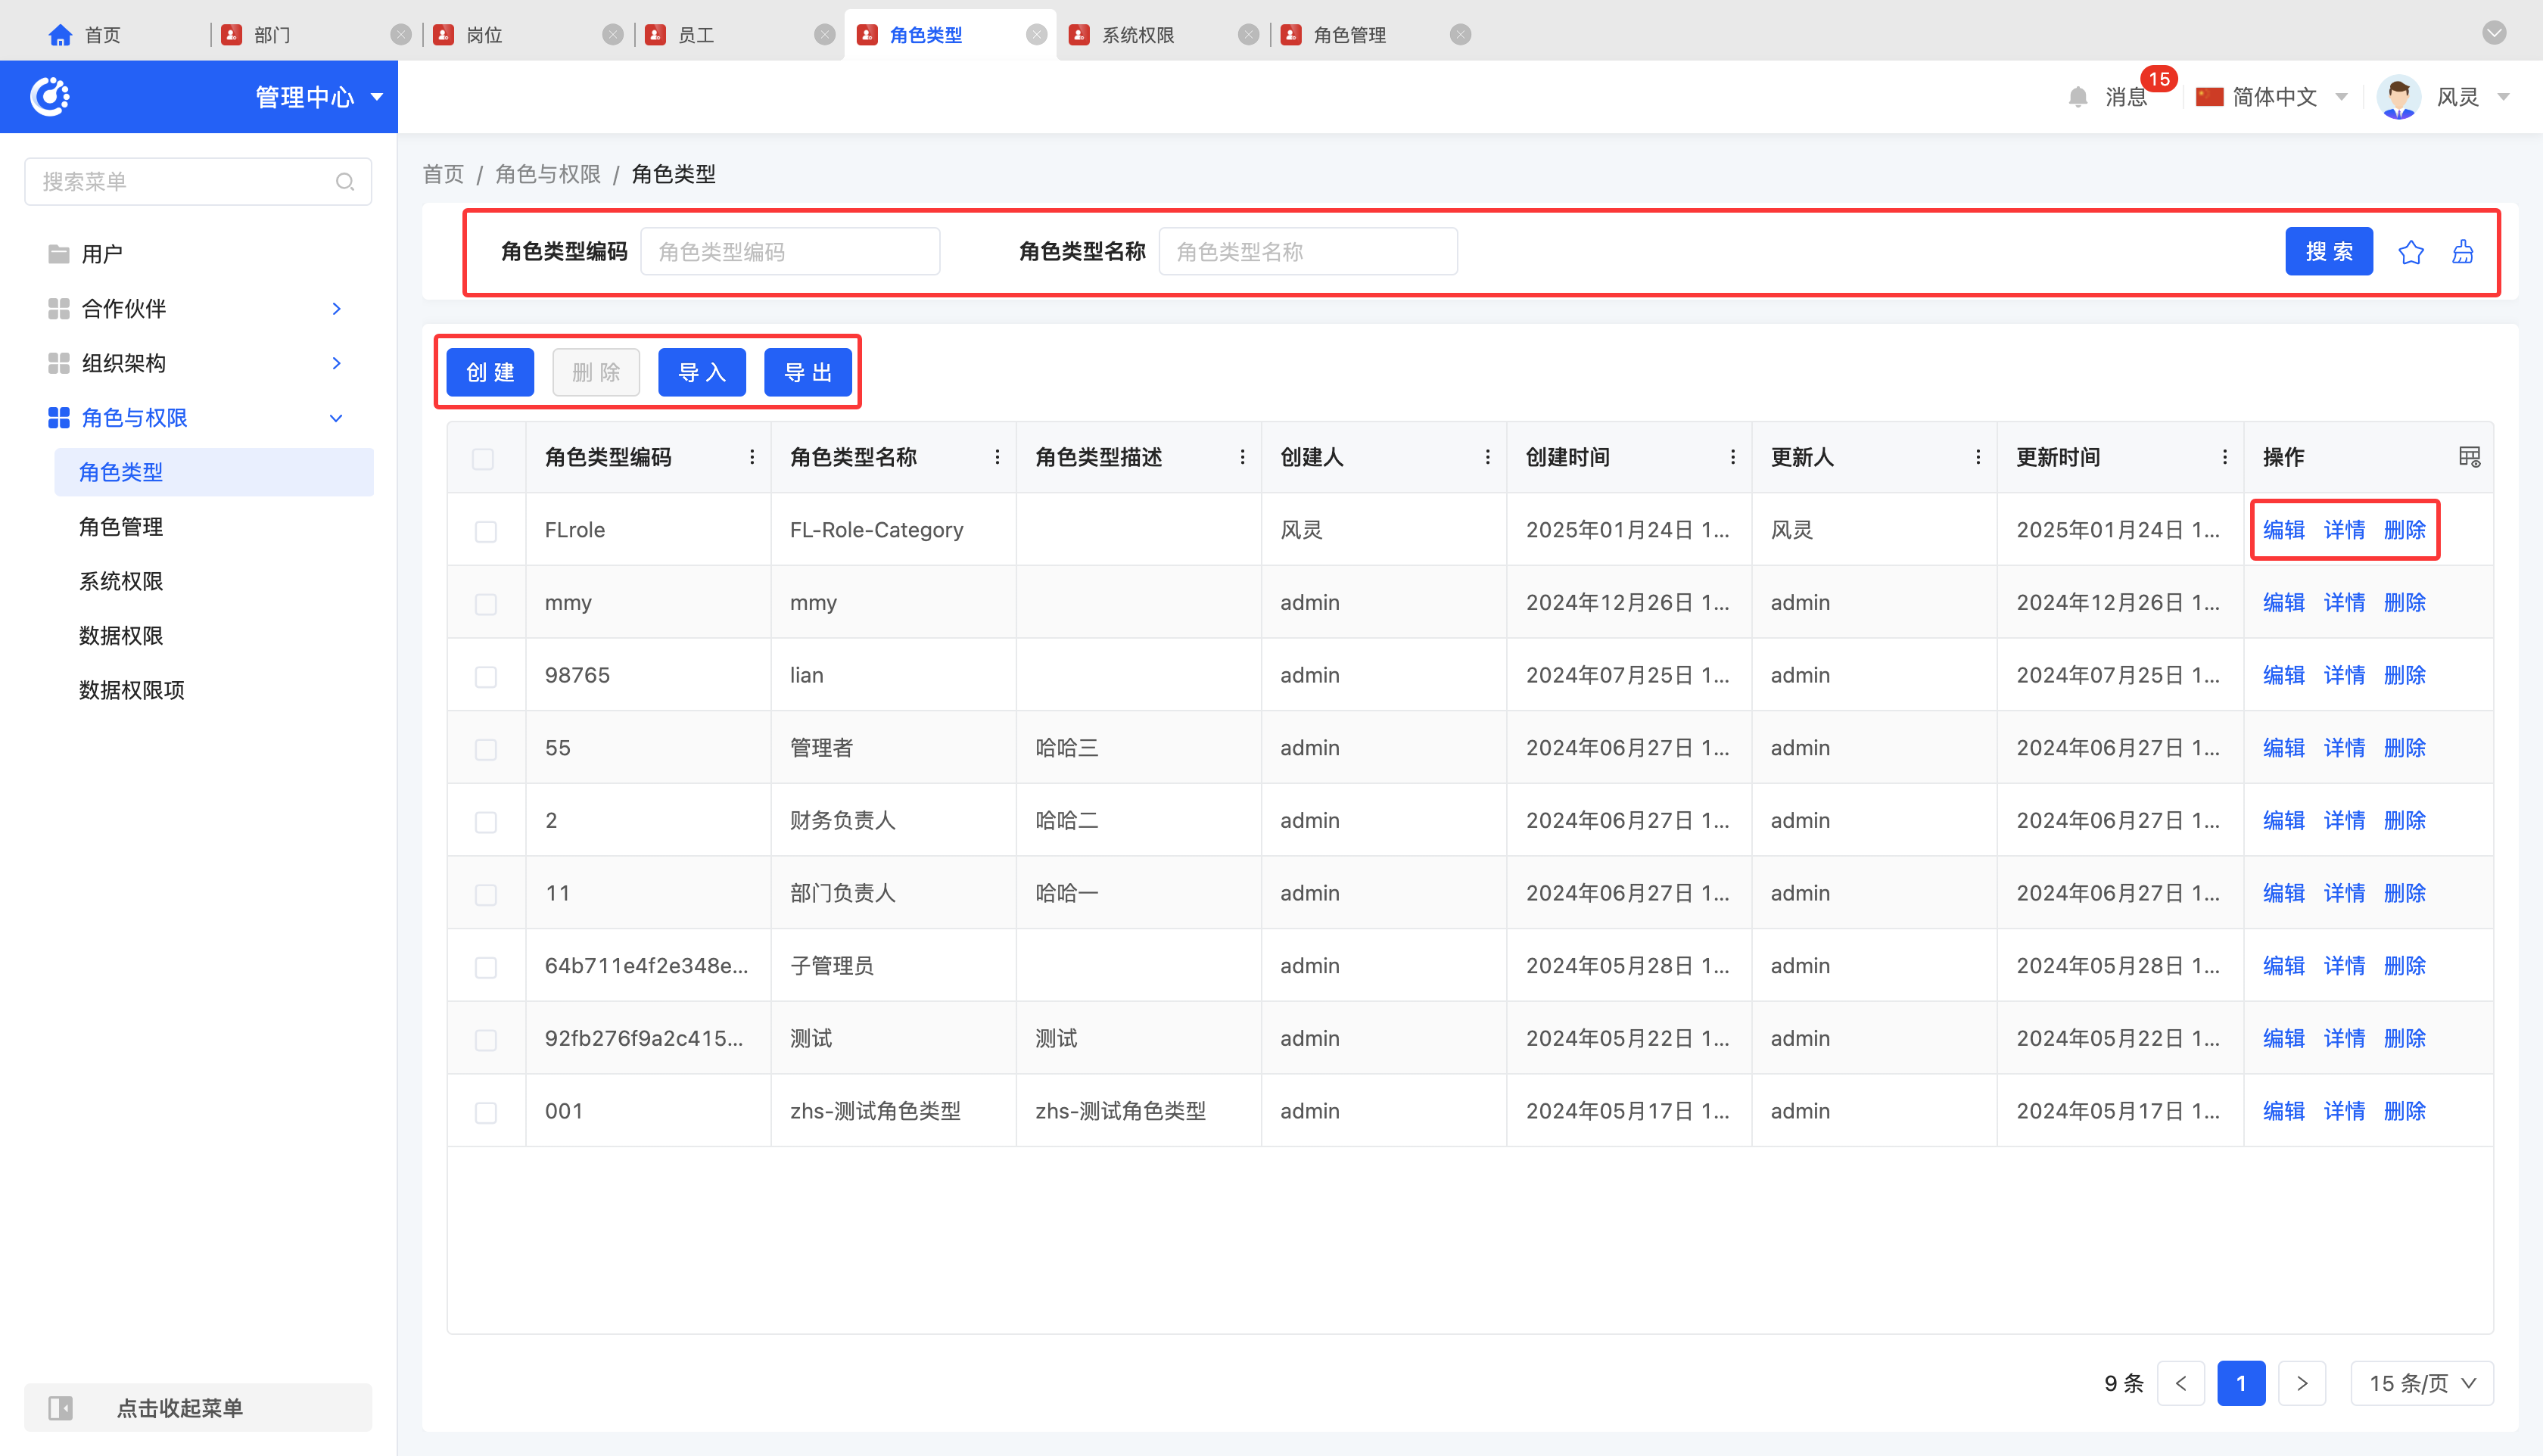
1. Function Introduction
This function supports the classification and management of user roles and can be flexibly customized according to the company's business requirements, such as administrators, ordinary users, and guests.
2. Operation Methods
- Filter: Enter or select the corresponding filter conditions according to the actual scenario requirements to filter role types.
- Add: Click "Create", enter the required configuration information, and save it to successfully create a new role type.
- Delete: Select a role type and click "Delete" to delete it.
- Import: Support importing role type information using a file. You can download the import template. After filling in the information completely, upload the file to complete the import.
- Export: Support exporting role types. You can choose to use the preset export template or customize the export fields according to actual needs.
- Edit: Click "Edit" to update or modify the relevant information of the role type.
- Details: Click "Details" to view the detailed information of the selected role type.
II. Role Management
1. Function Introduction
Role management is the core basic function of the permission system, responsible for the creation, maintenance, and management of specific roles. It supports detailed permission configuration for roles to ensure that each role has appropriate access and operation permissions.
Note
To make the resource management permissions effective, the role needs to have access to the "Management Center" first.
In the permission configuration, there are four major permissions, namely resource access permission, resource management permission, field permission, and data permission.
- Resource Access Permission: Roles with access permission can access the selected applications or menus.
Note
If only the permissions of the secondary menu are authorized without authorizing the corresponding primary menu, even if you have the permissions of the secondary menu, you cannot access it.
- Resource Management Permission: Roles with management permission can further authorize the management permission to other users and distribute it downward.
Note
- If the management permission is granted to an application, all menus under this application will also be granted the management permission. In addition, you can also grant the management permission to specific menus under an application separately.
- The platform uses a permission control method that independently manages parent and child nodes, providing greater flexibility for users. Given the independent nature of parent and child nodes, the system has specially added a "Select All" function to simplify the permission configuration process, avoid the tedious operation of checking items one by one, and significantly improve the efficiency of permission configuration.
- When we adjust the permissions for applications or menus in the "System Permissions", the changes will be synchronized to the permission configuration in the "Role Management". However, when we modify the permissions in the "Role Management", the system will not synchronize the changes to the permission configuration in the "System Permissions".
Example
Select an application in the "System Permissions" menu and add a role named "Test Only" to the "Access Permission" permission group of this application. Then, go to the "Permission Configuration" module in the "Role Management" to make modifications and see what happens.
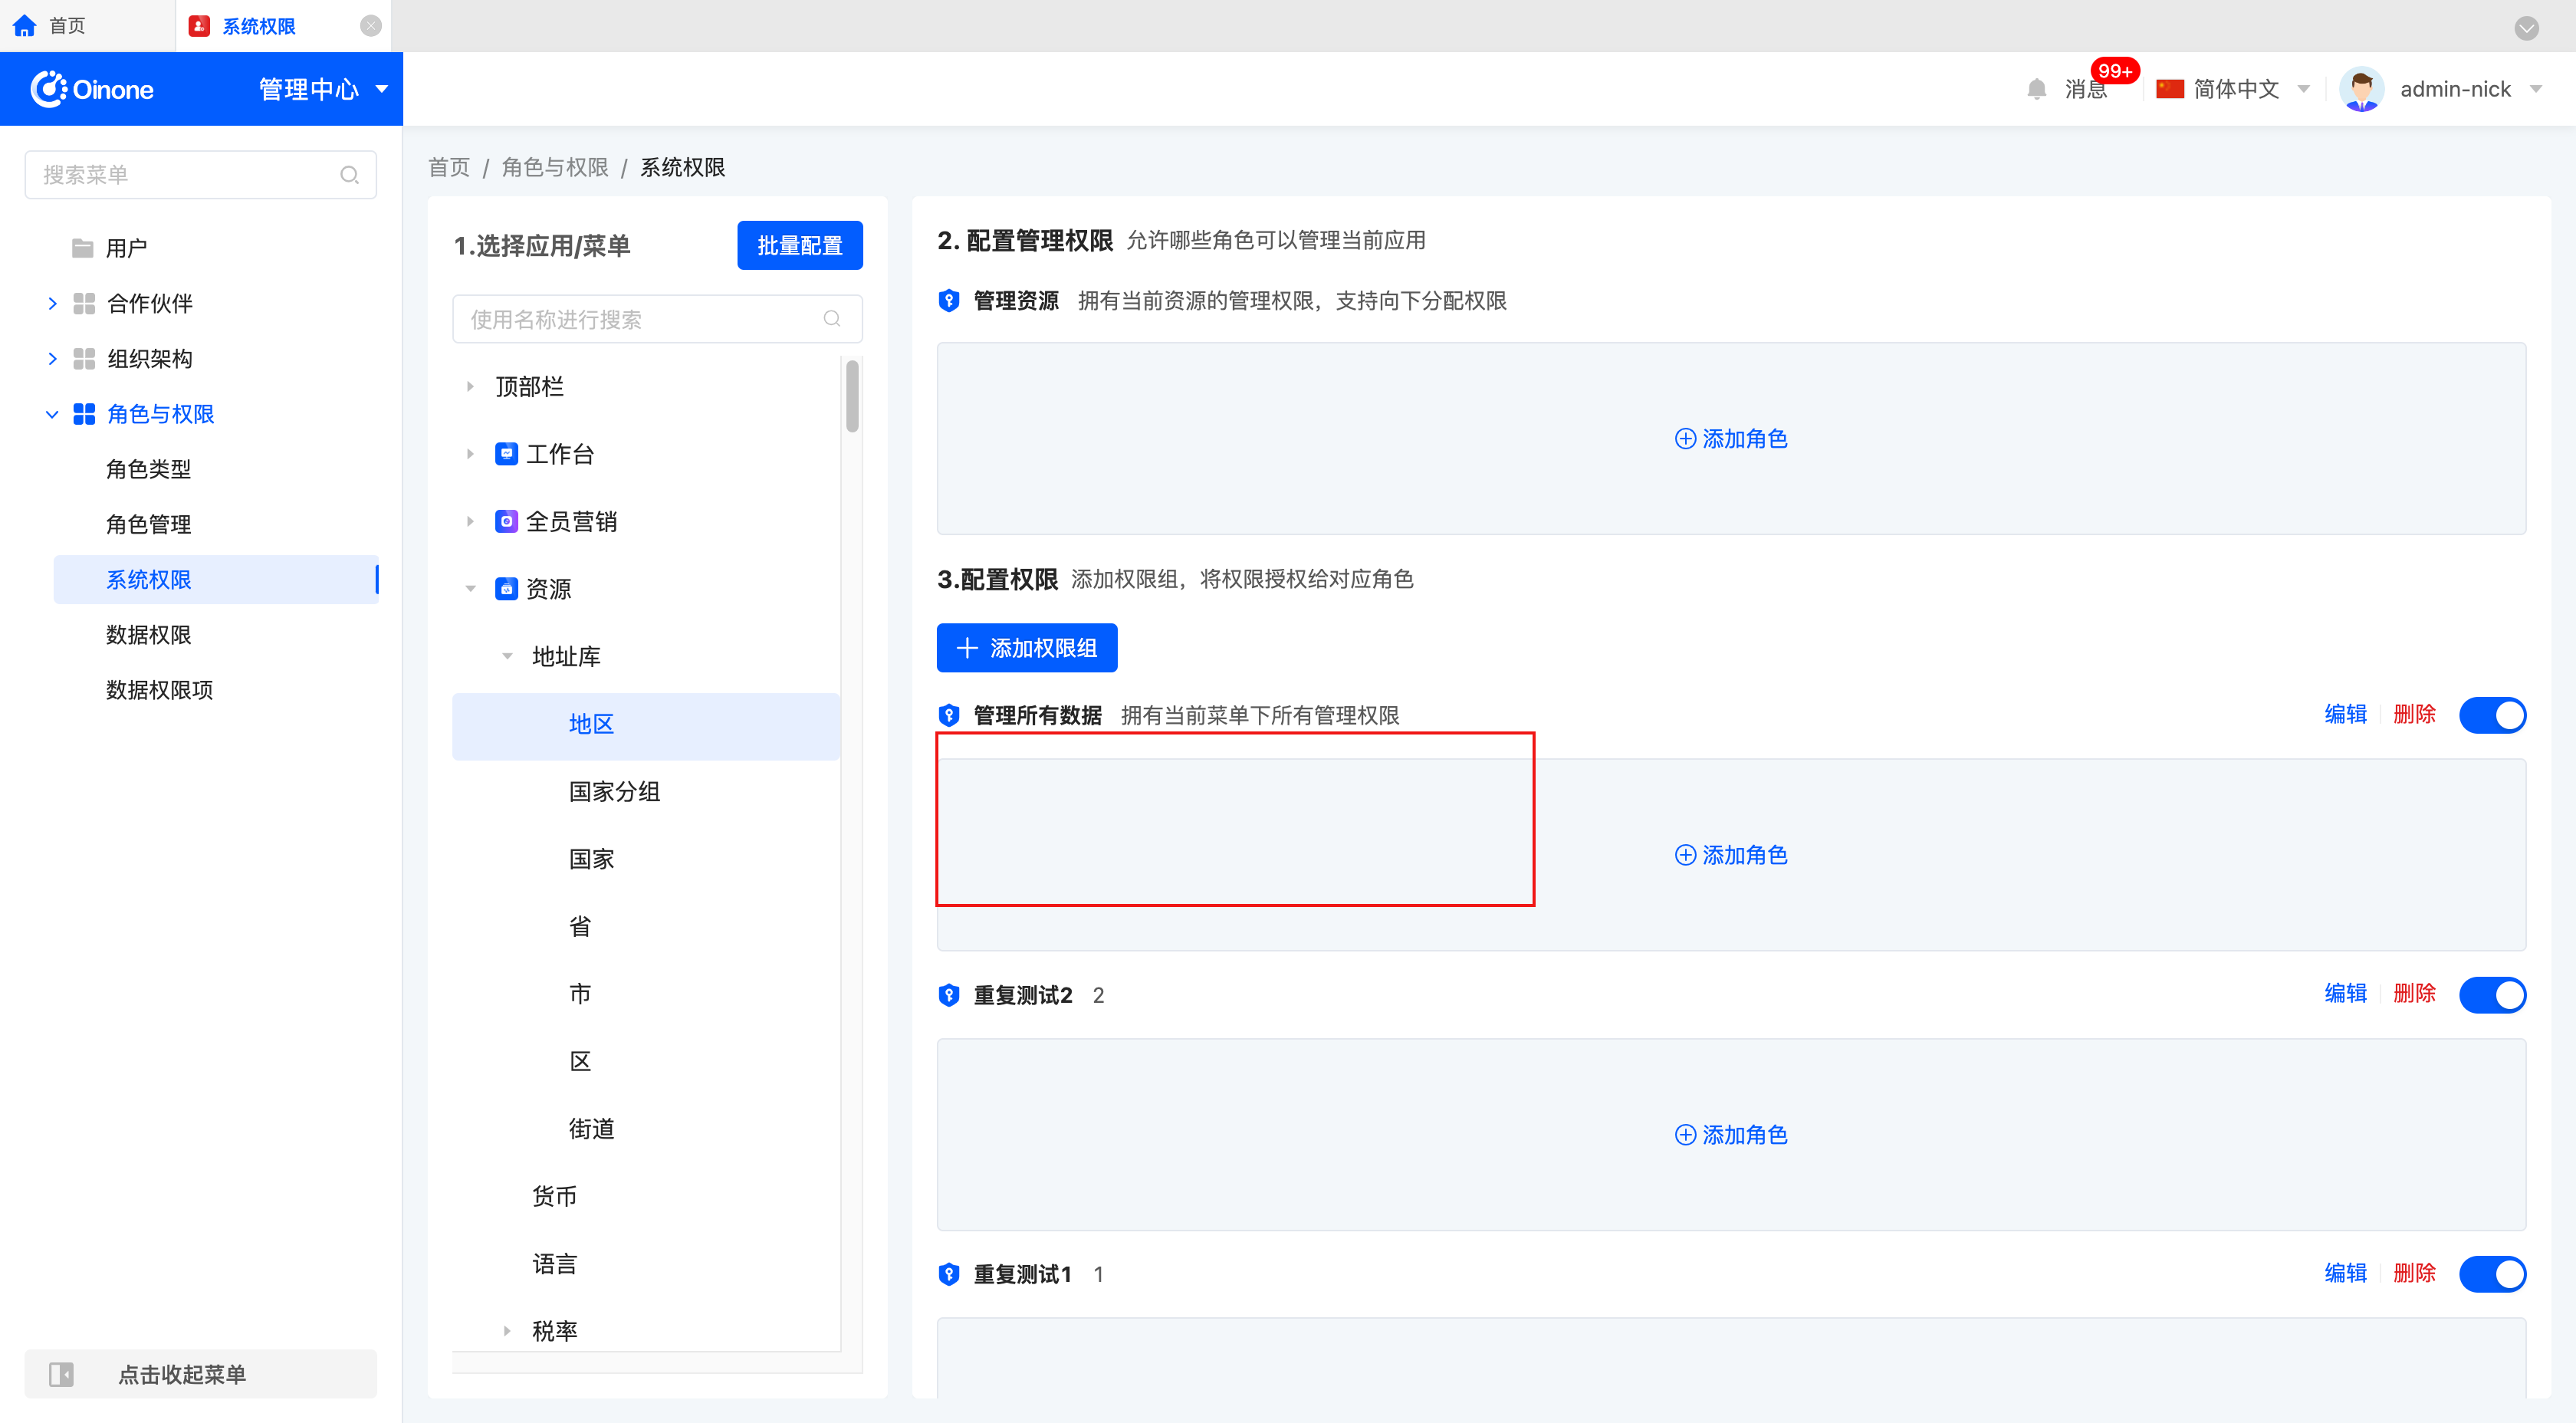
- First, add the "Test Only" role to "Resource - Address Library - Region" in the "System Permissions".
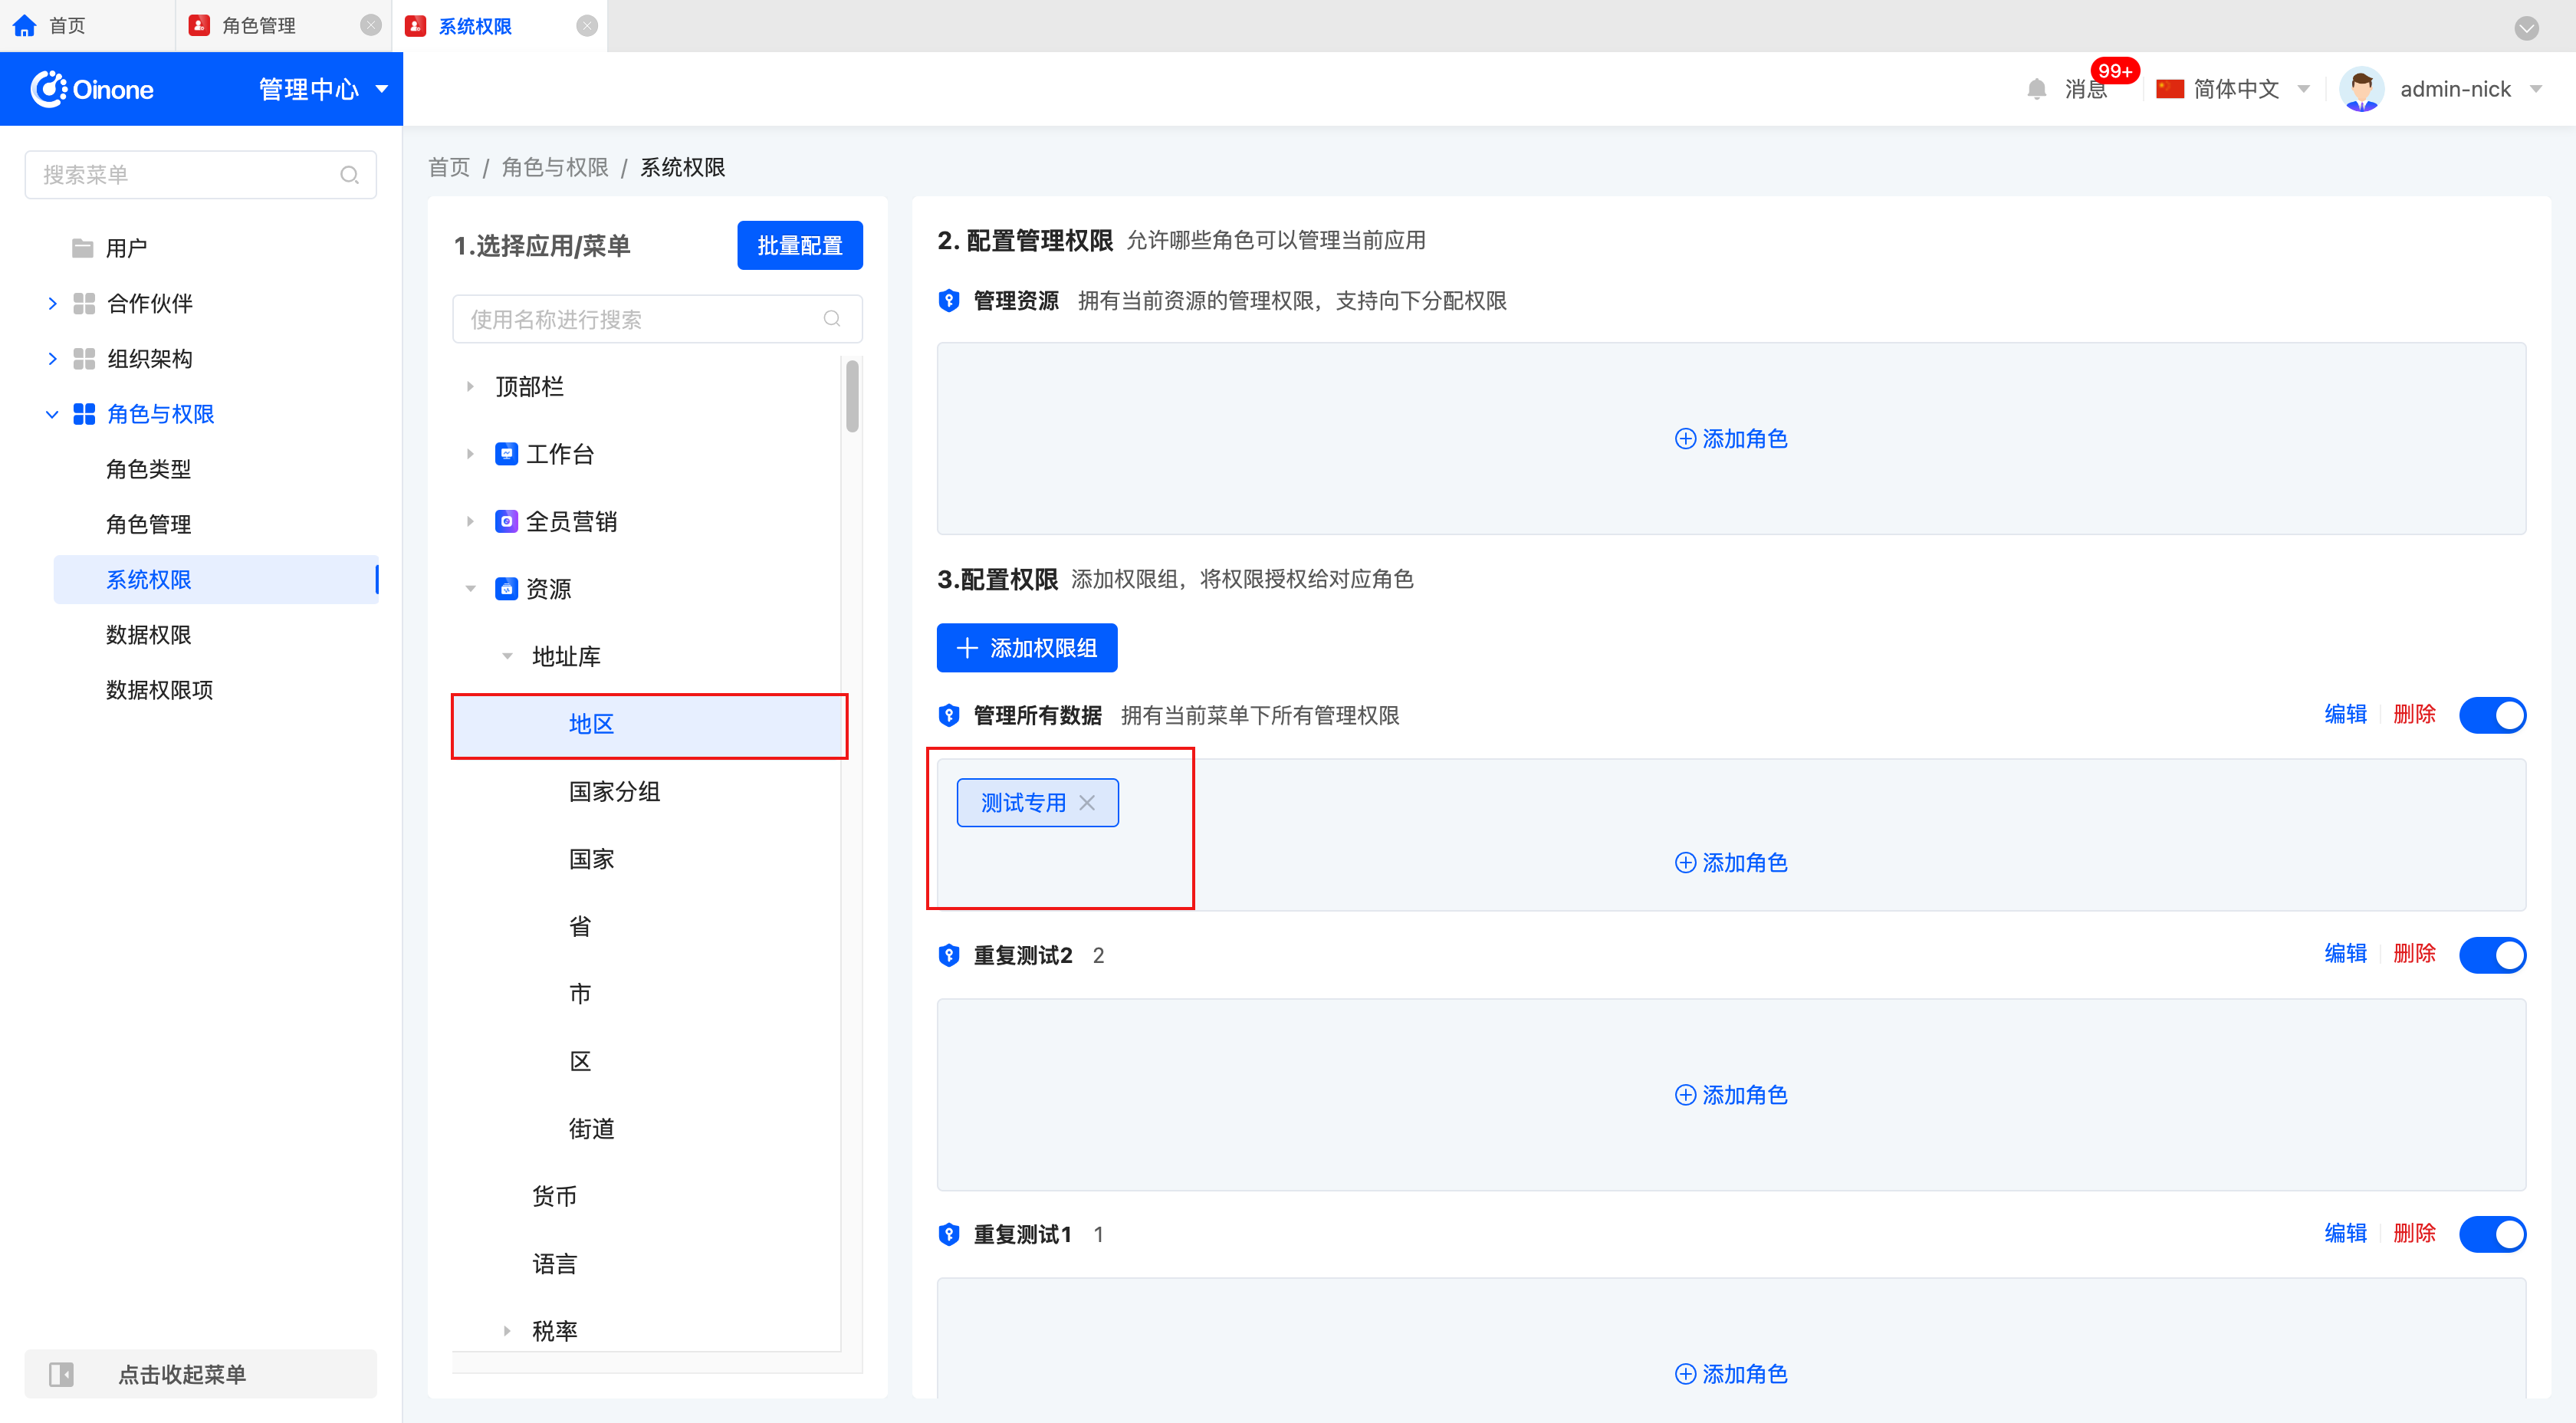
- Then, enter the "Role Management" module, find the "Test Only" role, and click "Permission Configuration". At this time, you can see that this role already has access to "Resource - Address Library - Region".
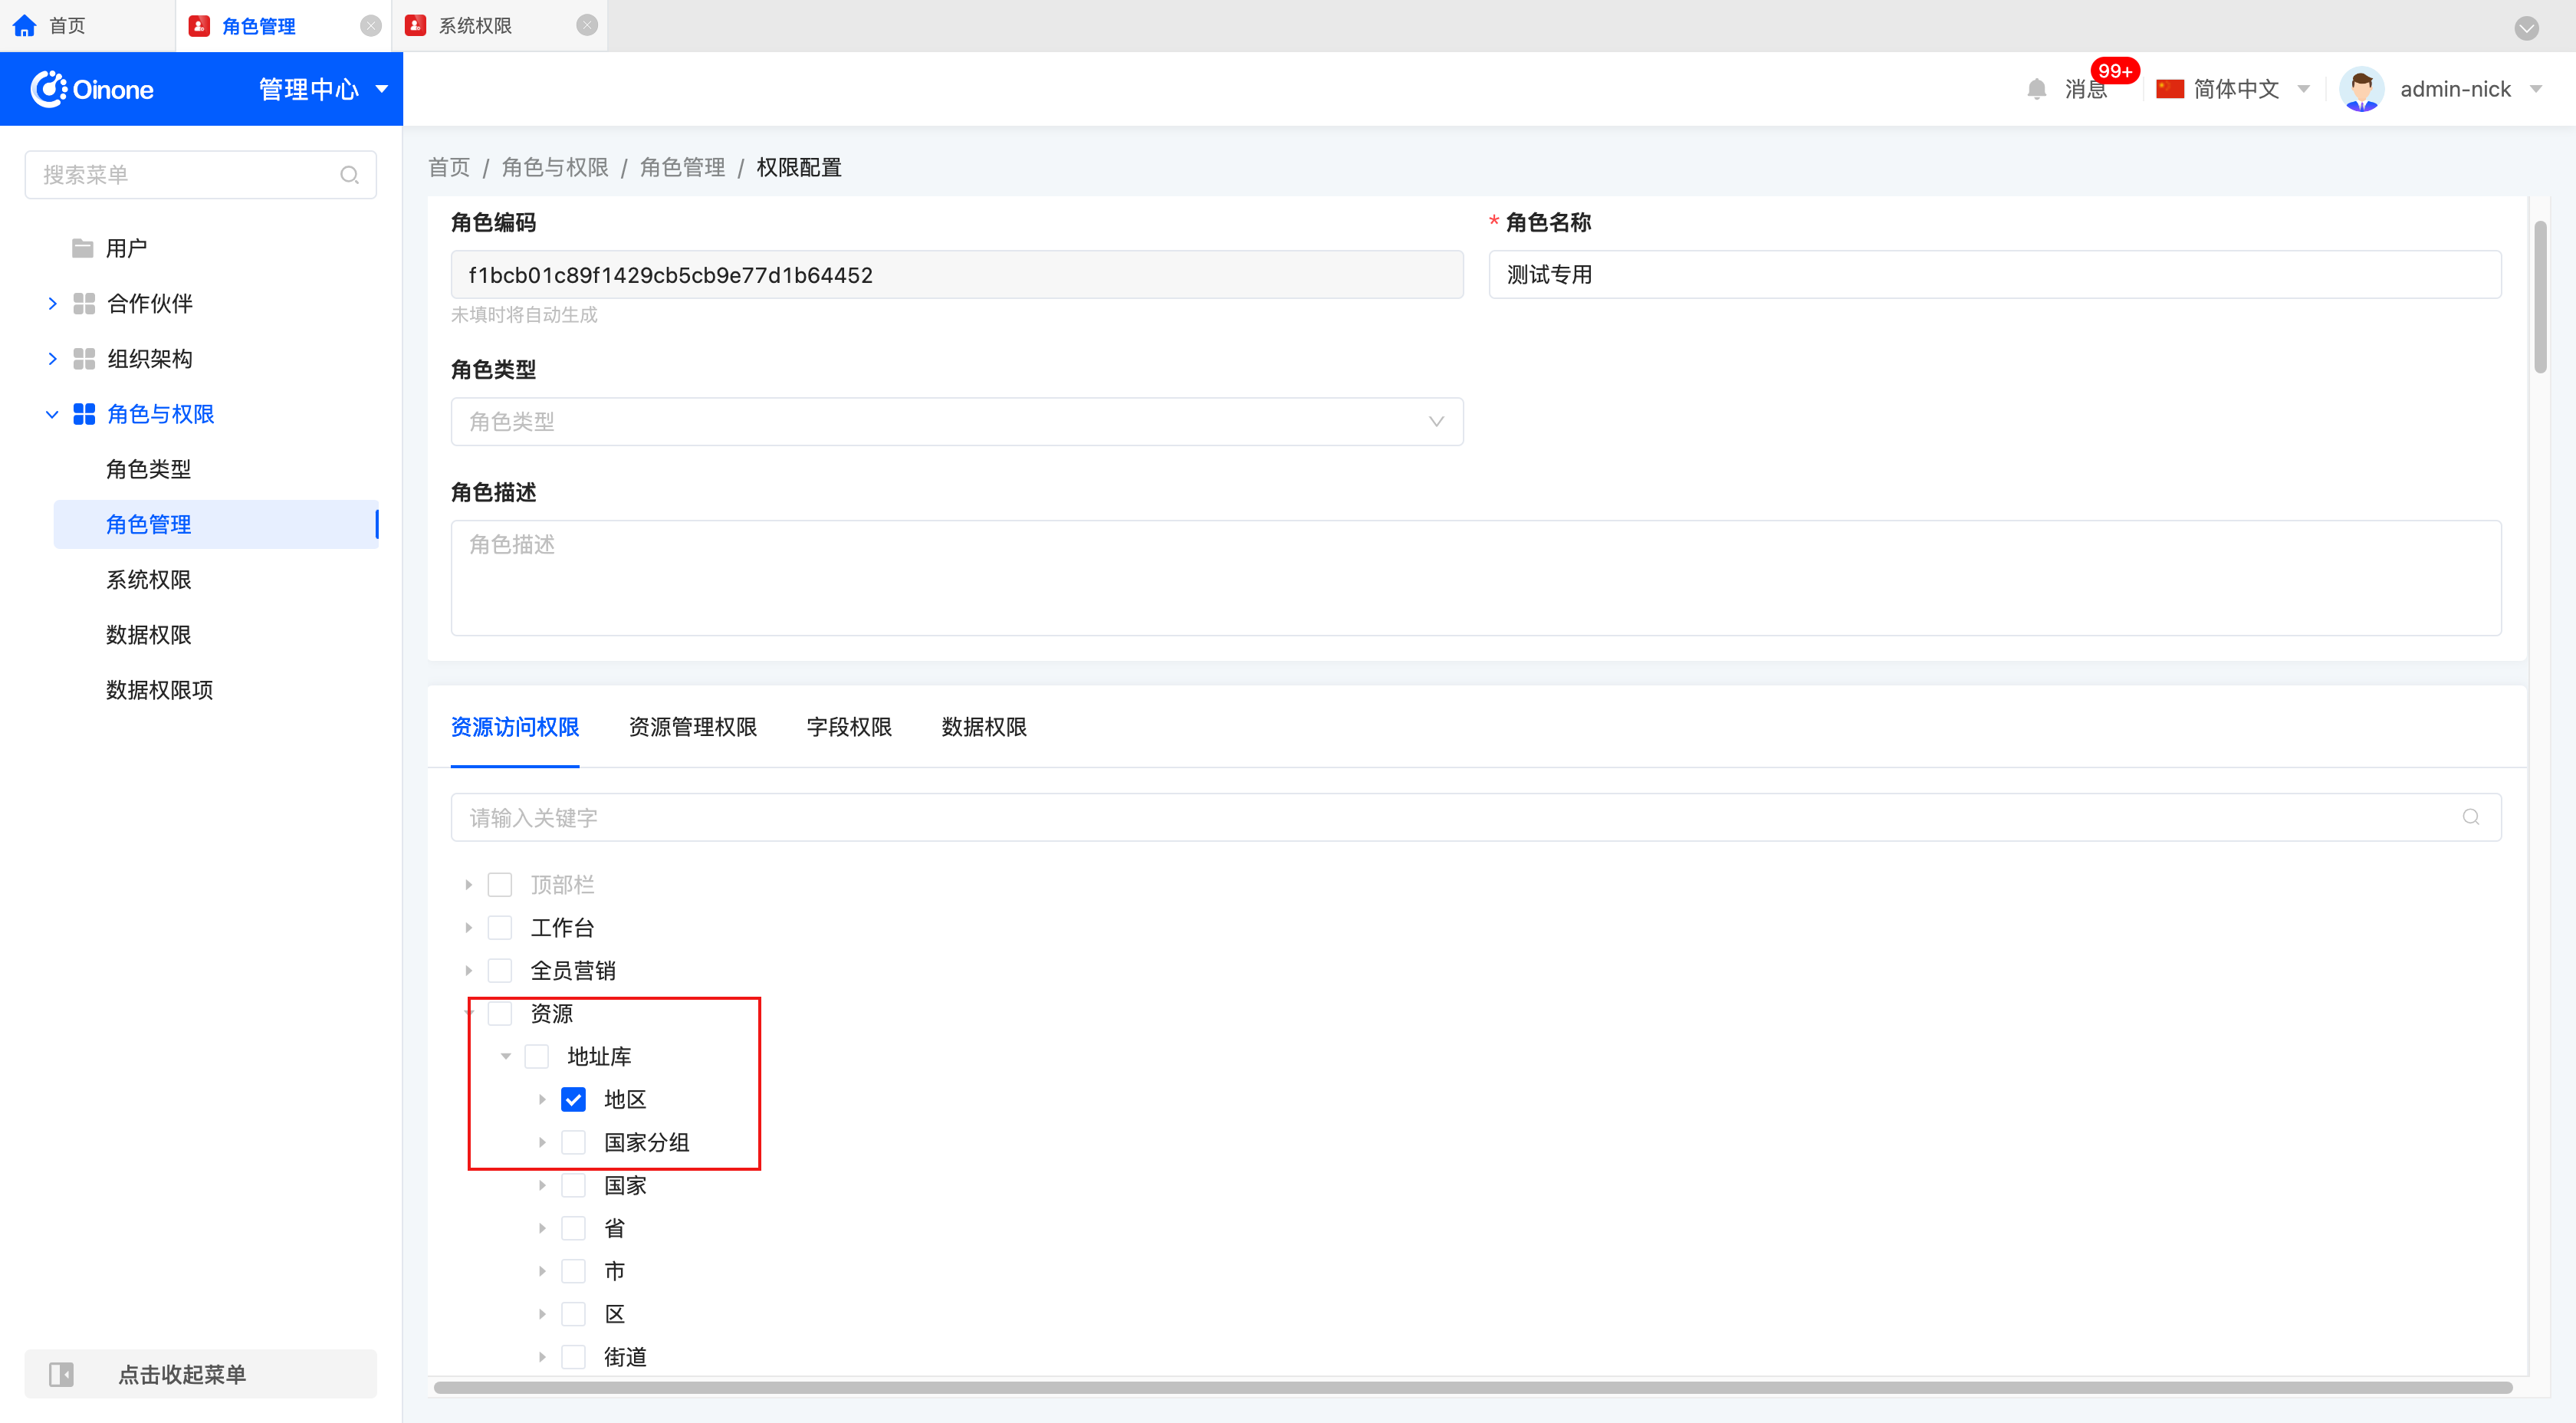
- Next, make modifications in the "Role Management", such as checking the access permission of "Country Group". After completion, return to the "System Permissions" to view.
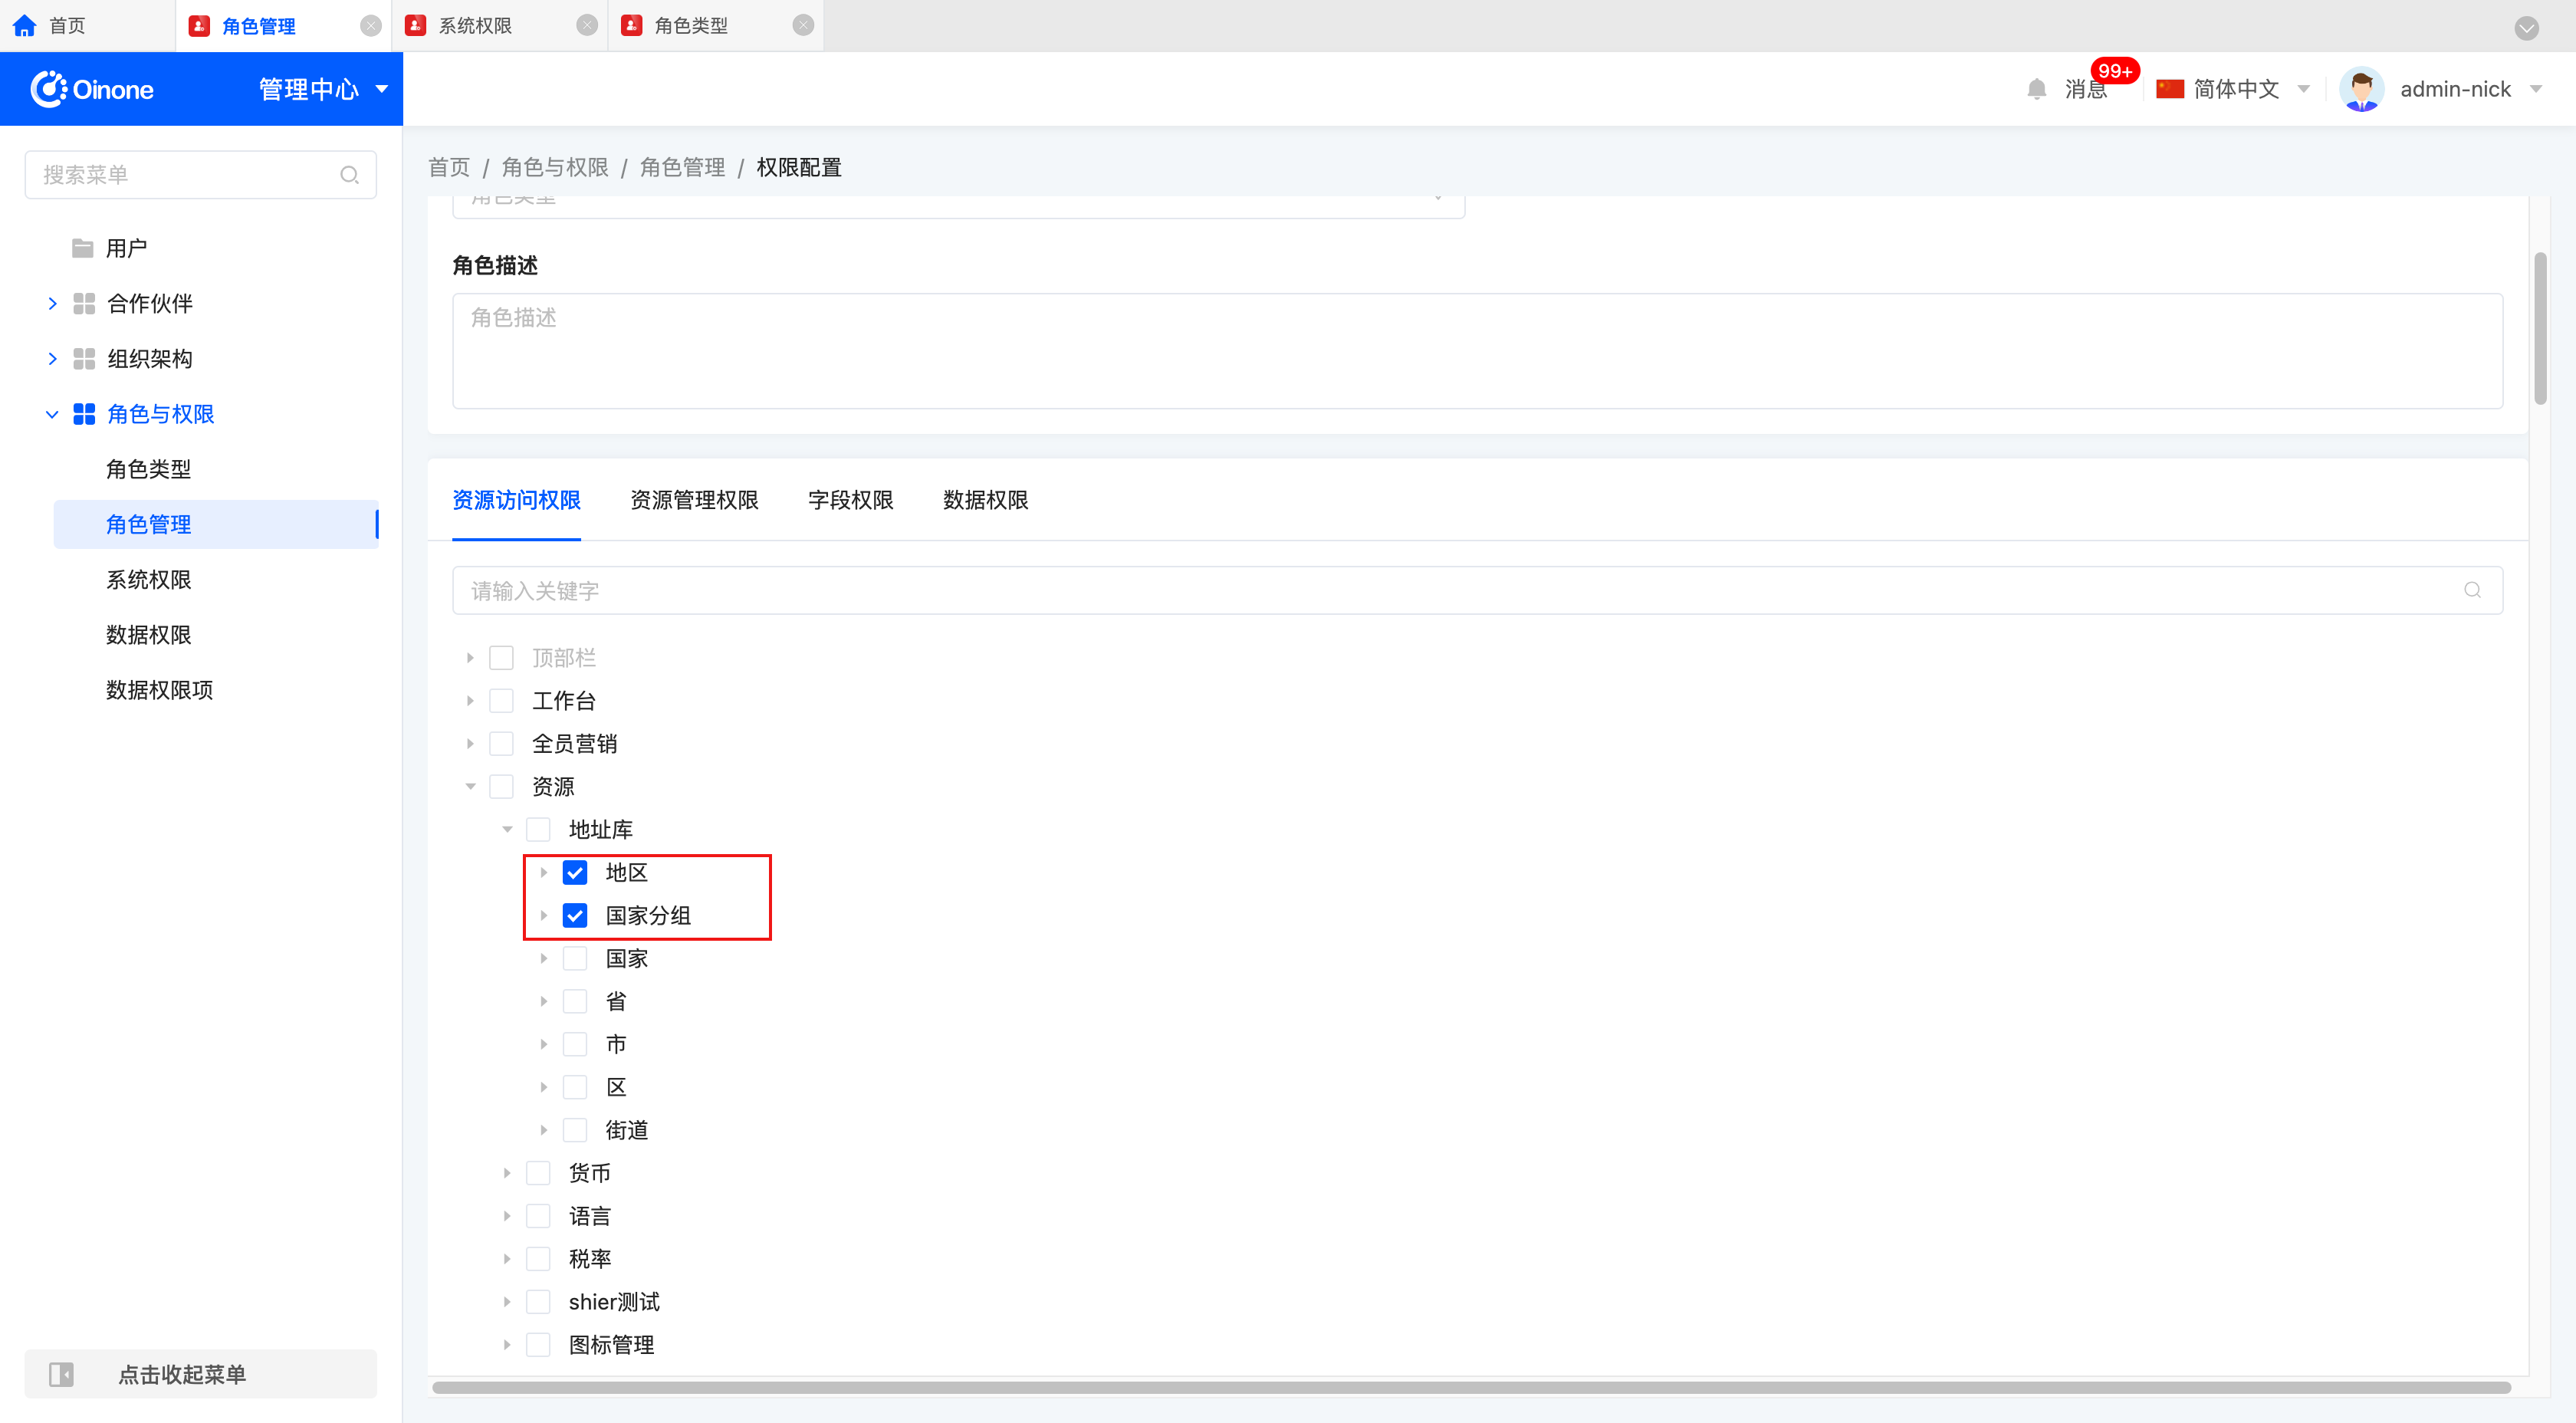
- It is found that the "Test Only" role just added has been removed from the "System Permissions".
This is because the system does not synchronize the permission modifications at the role level back to the menu level. Instead, it directly removes the role to ensure the accuracy and consistency of permission configuration.
- Field Permission: You can view and manage all models and their field permissions of a certain role. The system provides two search boxes for easy search:
- Search Box 1: Allows users to quickly search by the model's code or name to locate specific models conveniently.
- Search Box 2: Users can filter models by permission status, choosing to display models that the role has permissions for or view all models in the system.
You can use these two search boxes to quickly find and modify the permissions of relevant models or fields, including read and write permissions.
- Data Permission: Refers to setting data permission items for specific roles. You can filter fields in the model according to actual needs, allowing users of different roles to obtain different information.
Note
Data permission items can be managed and maintained in "Management Center - Role and Permission - Data Permission Items".
Tip
The system provides two ways to set data permissions for roles:
- In "Role Management", you can configure data permission items for specific roles in "Permission Configuration - Data Permission".
- In "Data Permission", you can quickly configure data permission items for one or more users.
2. Operation Methods
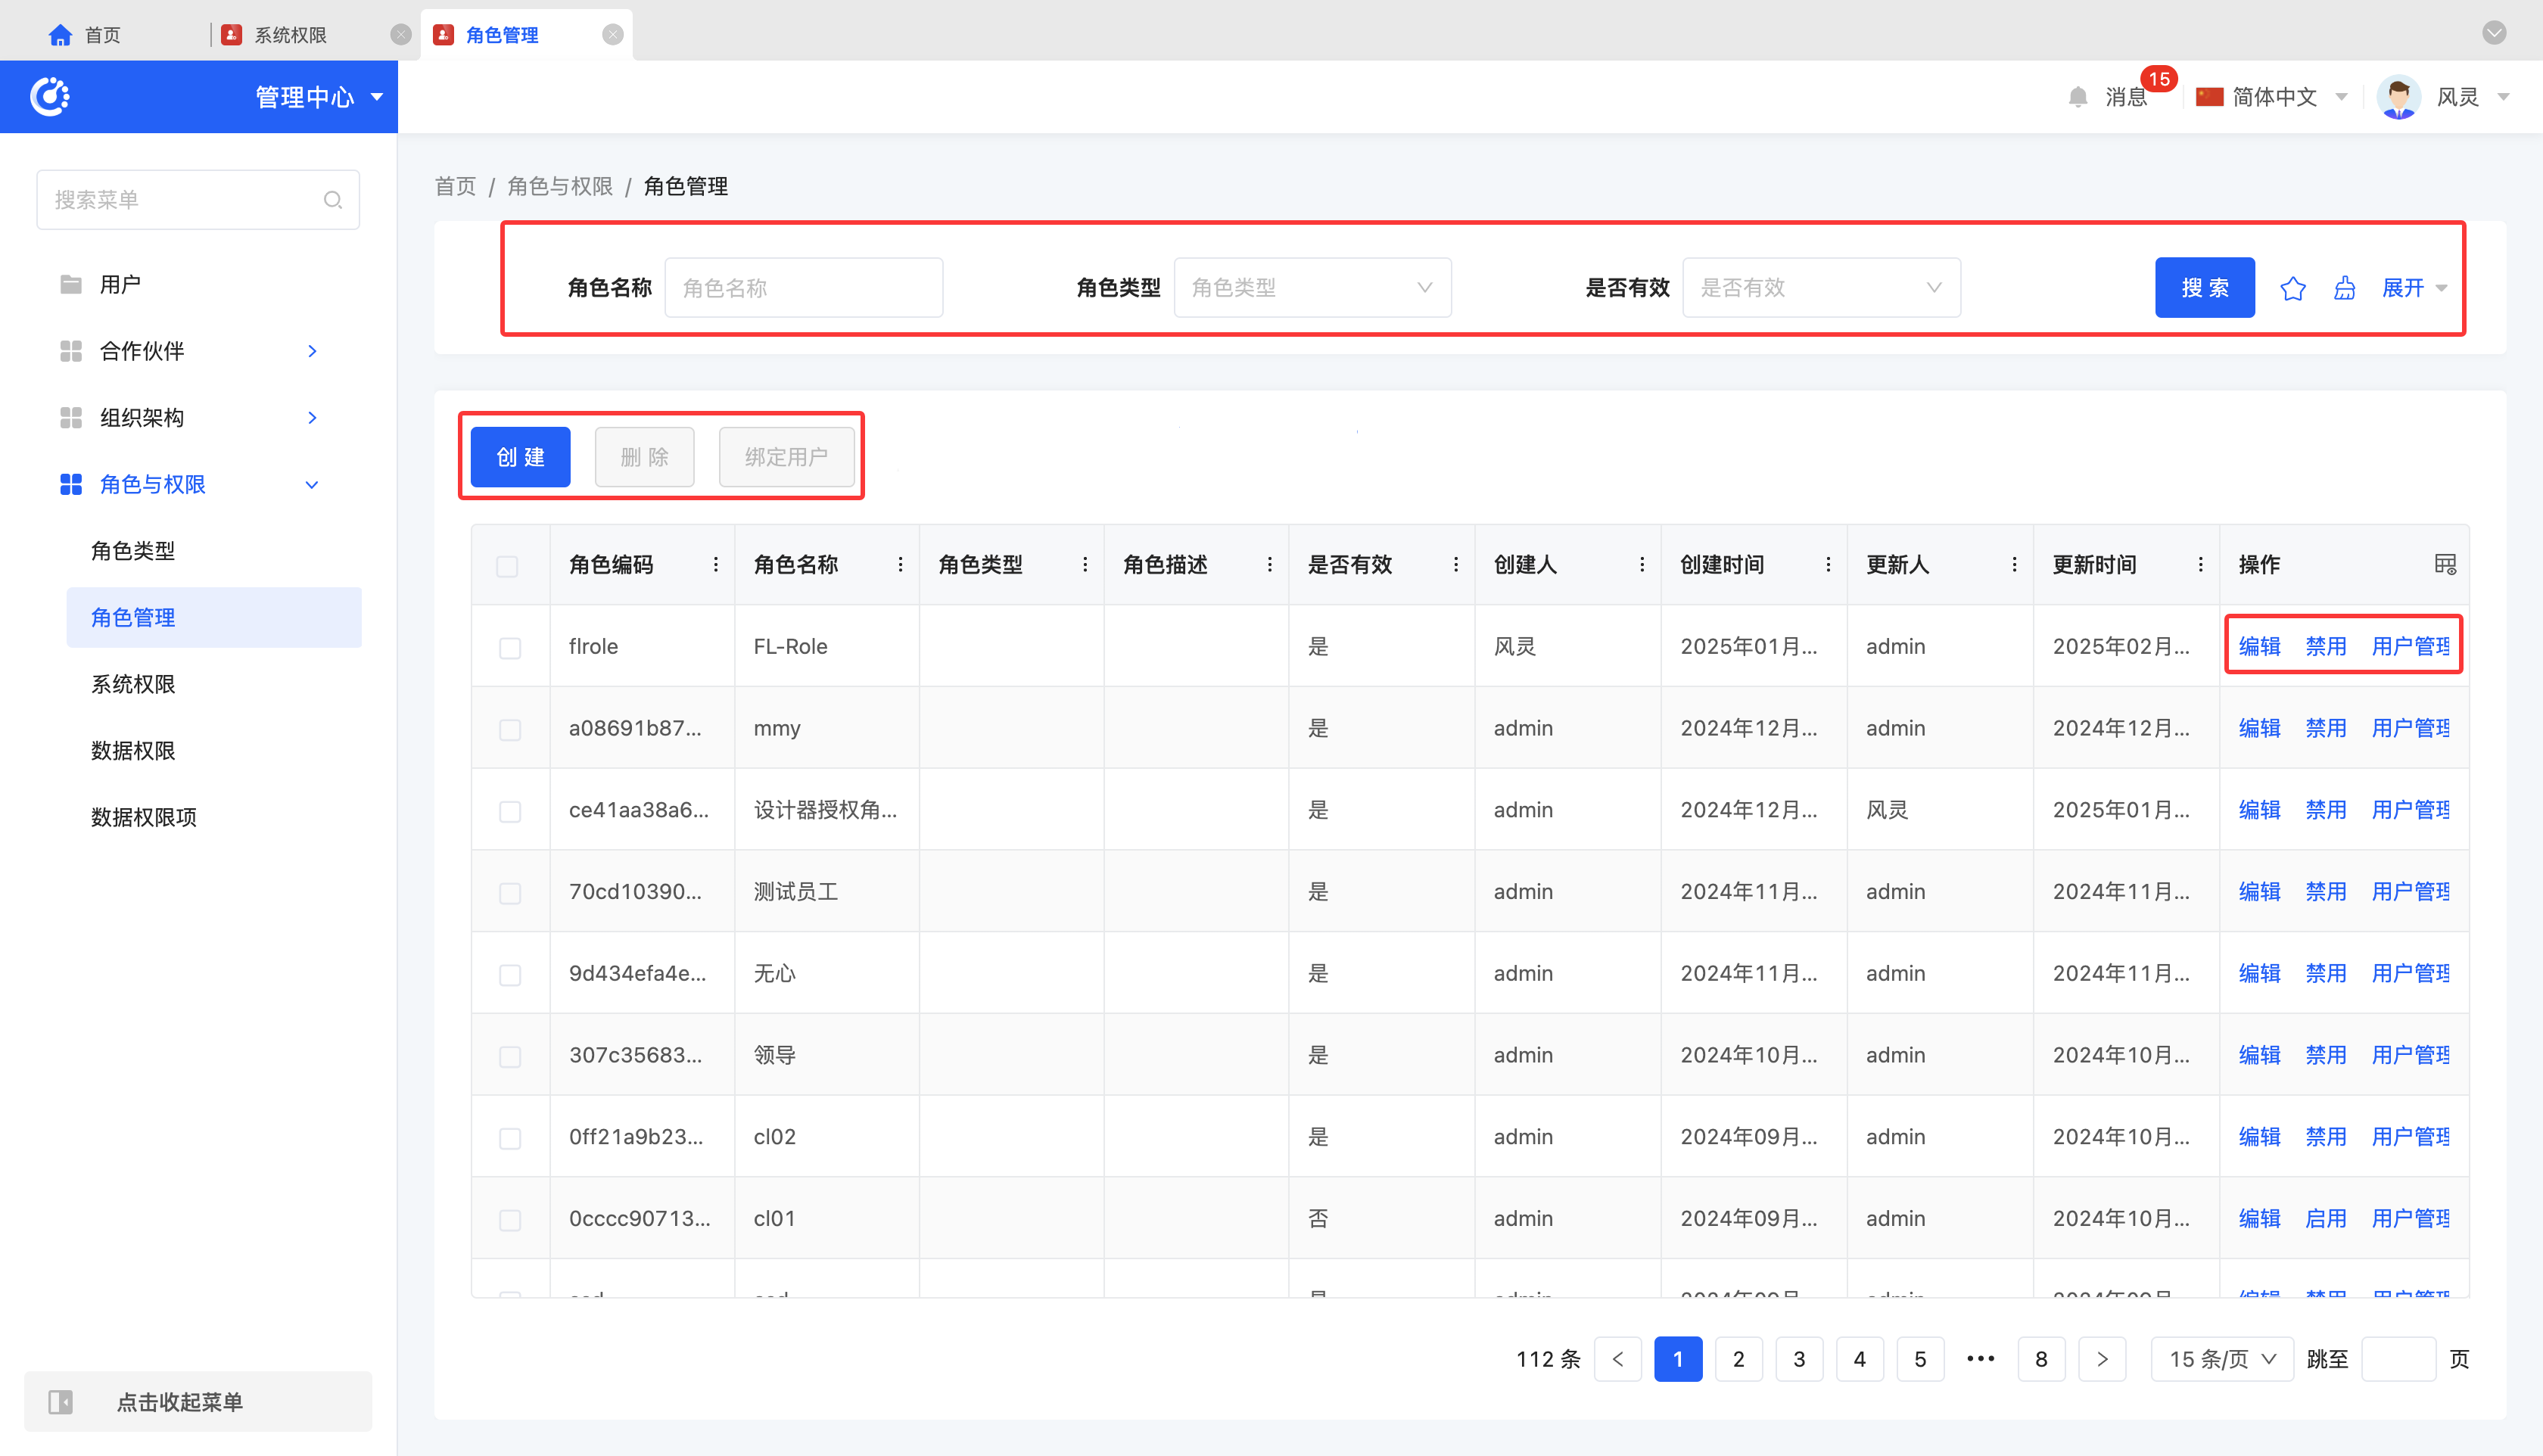
- Filter: Enter or select the corresponding filter conditions according to the actual scenario requirements to filter specific roles.
- Add: Click "Create", enter the required configuration information, and save it to successfully create a new specific role.
- Edit: Click "Edit" to update or modify the relevant information of the specific role.
- Disable/Enable: When a role is no longer in use, click "Disable" to deactivate it. When you need to use it again, click "Enable" to restore it.
- User Management: Click "User Management" or select a role and click "Bind Users" to configure multiple users for the selected role uniformly.
- Permission Configuration: Click "Permission Configuration" to view and configure various permissions of the role.
III. System Permissions
1. Function Introduction
In permission management, you can configure permissions for applications or menus, including management permissions and access permissions.
- Management Permission: Grants the selected role full management permissions for the current application/menu, including the ability to distribute permissions downward, ensuring that the role can fully manage and maintain the application/menu.
- Access Permission: Allows the selected role to access the current application/menu, ensuring that it can perform corresponding operations and functions. Multiple permission groups can be configured for access permissions, and different permission groups can be authorized to different roles.
Note
- When you have the management permission for an application, all menus under this application will also be granted the management permission. In addition, you can also grant the management permission to specific menus under an application separately.
- When a role with the resource management permission is specified for a menu, even if the role does not have the management permission for the application to which the menu belongs, it can still further distribute subordinate permissions for the menu in the management center.
- Having access permission does not mean having management permission. Similarly, having management permission does not mean having access permission. These two permissions need to be authorized separately and have no direct relationship.
- Collect Permission Items: When there are new or upgraded functions in the major designers provided by the platform (including model designer, interface designer, process designer, integration designer, data visualization, and microflow designer), you can grant new function permissions to the user designers with one click.
Note
Only platform designers support collecting permission items. Other applications or modules do not support it for now.
2. Operation Methods
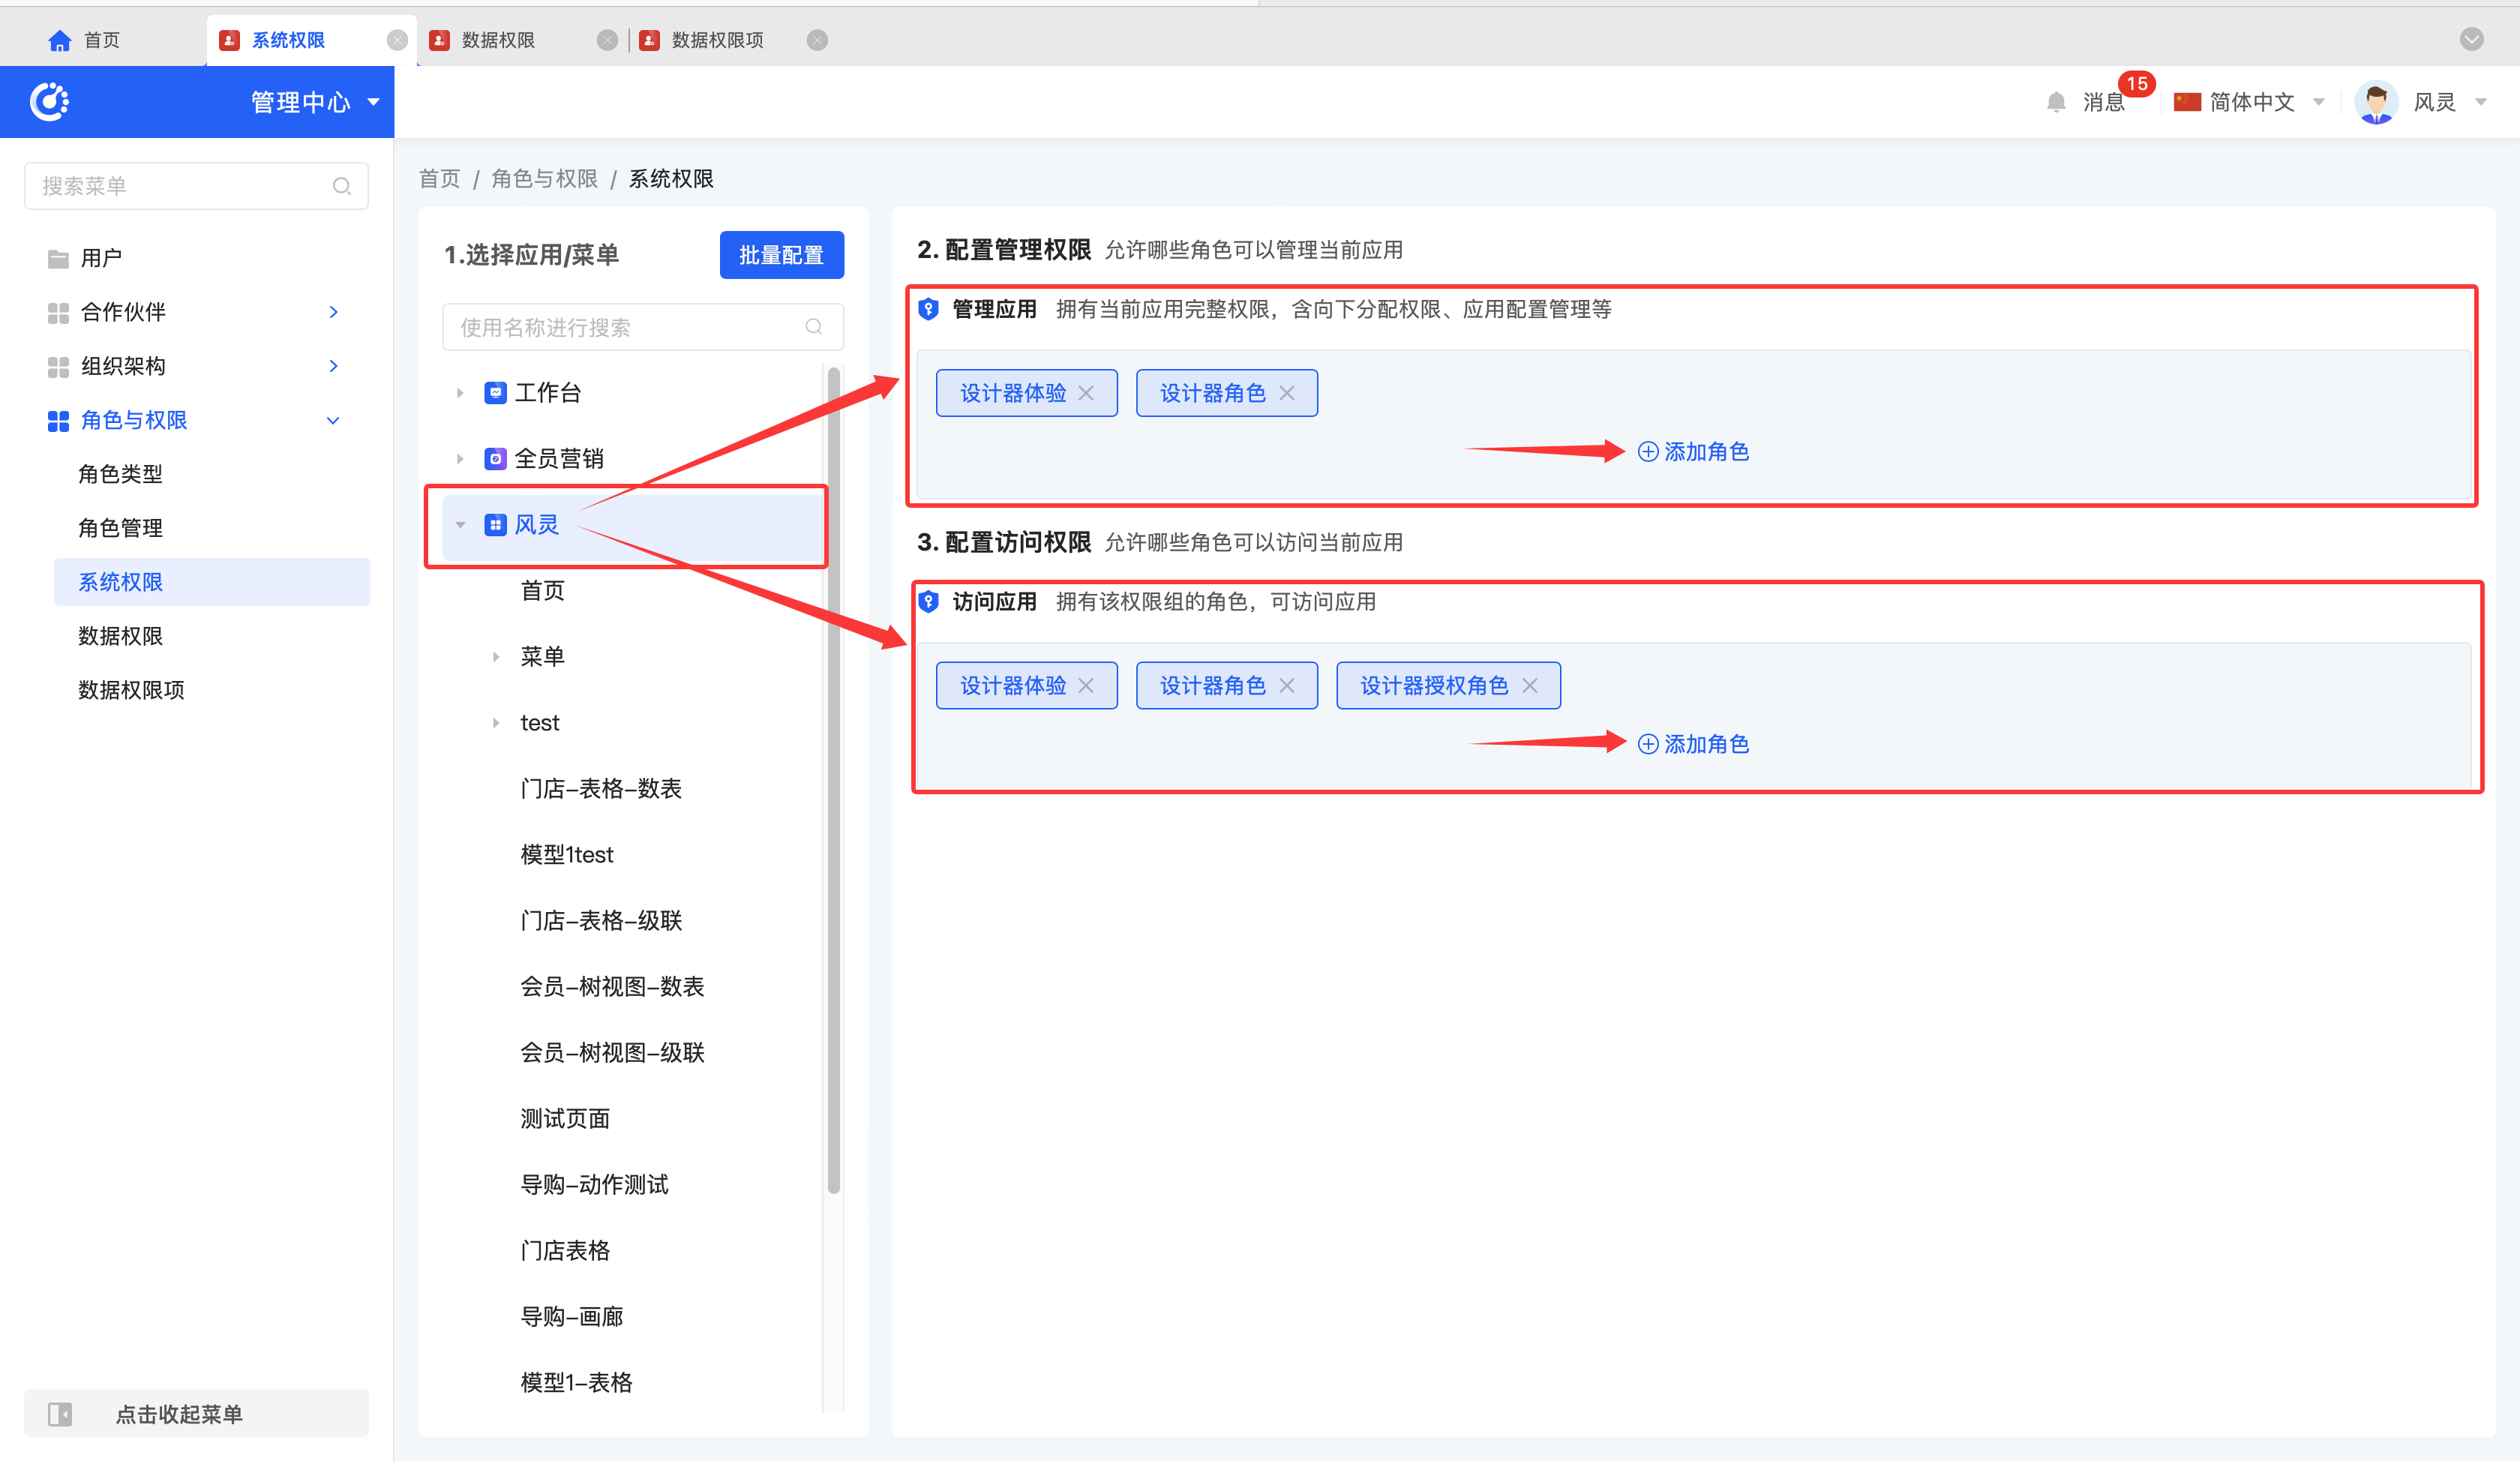
- Application
- Configure Management Permission: Select an application, add the corresponding role in "Manage Application", and the added role will have the management permission for this application.
- Configure Access Permission: Select an application, add the corresponding role in "Access Application", and the added role will have the access permission for this application.
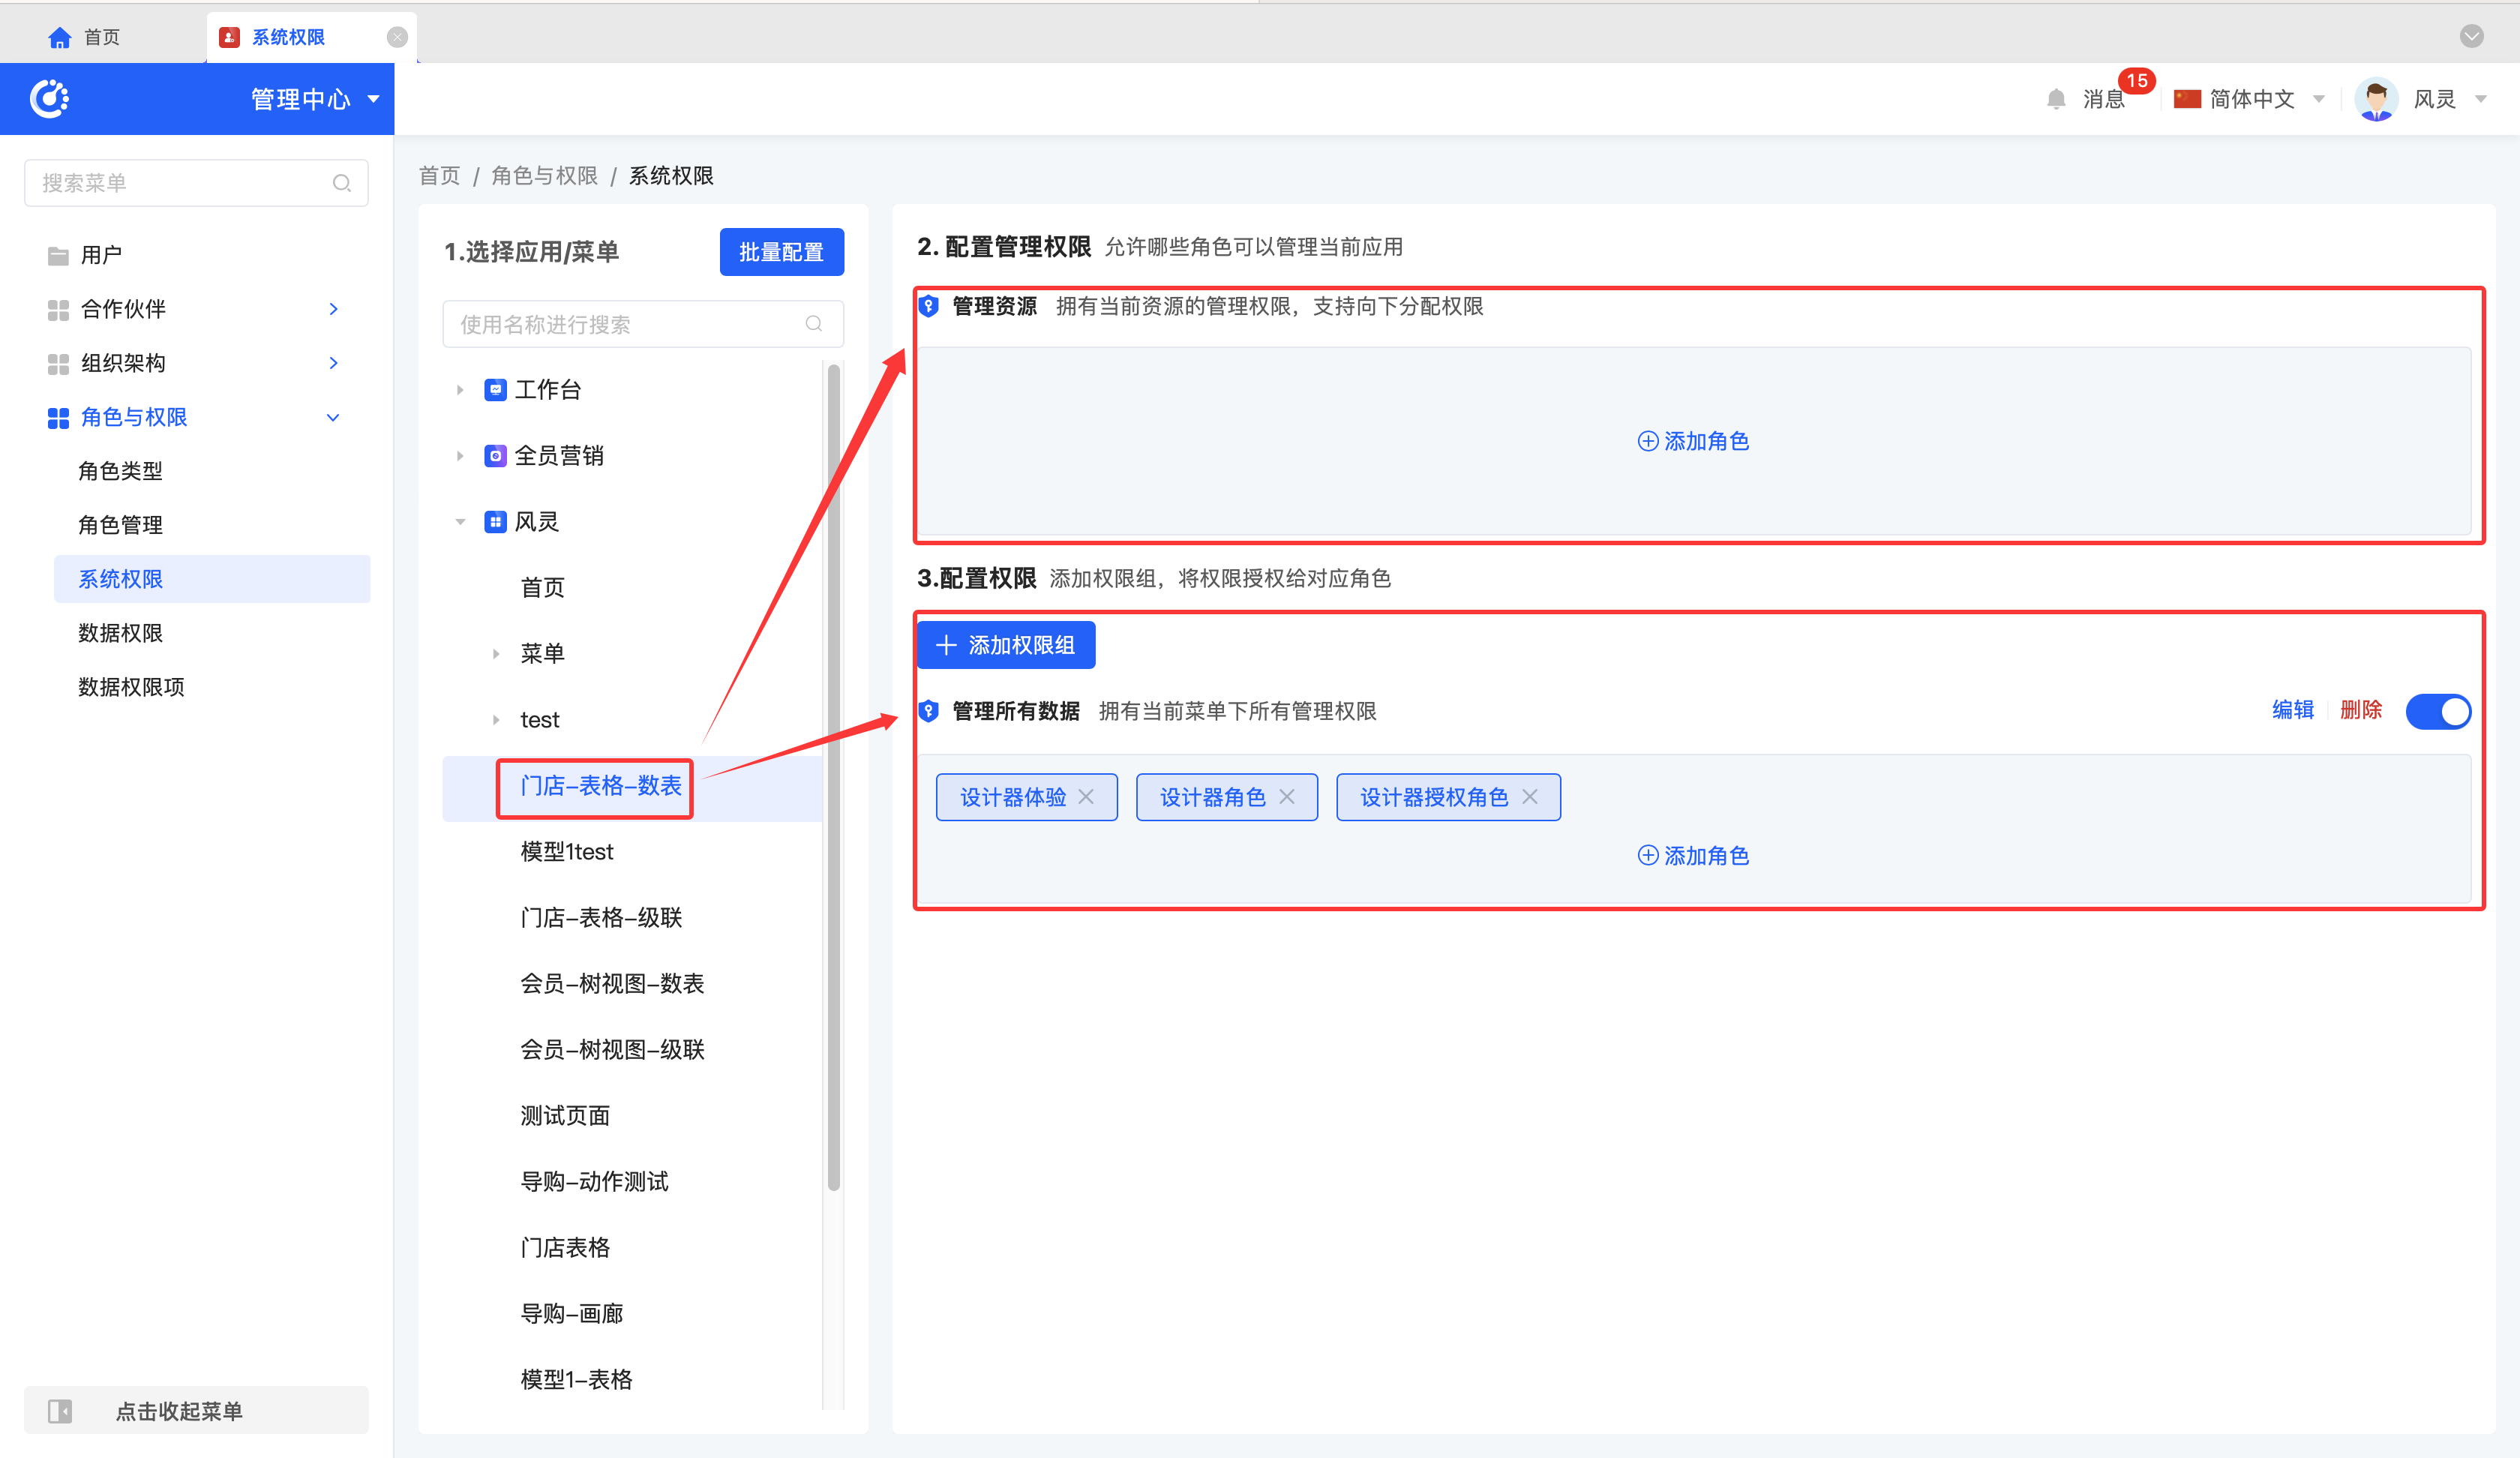
- Menu
- Configure Management Permission: Select a menu, add the corresponding role in "Manage Resource", and the added role will have the management permission for this menu.
- Configure Access Permission:
- Add: Select a menu, add a permission group for it. In the permission group, you can set the action permissions, field permissions, and data permissions for the menu. After configuration, click "OK" to add a permission group. Add roles to this permission group, and the added roles will have the permissions configured in the permission group.
Note
- Action Permission: You can customize which action operation permissions are included in the menu under this permission group. Actions that do not follow Oinone's Action R & D specification will not be subject to permission control.
- Field Permission: You can customize the field permissions of the main model associated with the menu. It should be noted that only after turning off the corresponding switch in the "All" option, the specific permission settings of the following fields will take effect.

- Data Permission: You can customize the filtering conditions to set the data permissions that the current permission group has. If not set, it will be considered to have all data permissions. The data permission items automatically generated here can be viewed in the bound roles (Role Management - Permission Configuration - Data Permission).
- Edit: Support updating and modifying the relevant information and permissions of existing permission groups.
- Delete: Support deleting permission groups that are no longer needed.
- Disable/Enable: When a permission group is no longer in use, turn off the switch to deactivate it. When you need to use it again, turn on the switch to restore it.
- Batch Authorization: Click "Batch Settings", select single or multiple applications or menus, and add roles to them to grant corresponding access permissions. After the addition is completed, click "Cancel Batch".
Note
- Batch authorization can only add access permissions to applications or menus.
- During the batch authorization process, the platform will automatically create a default permission group. This permission group gives users the ability to manage all data and all management permissions under the current menu.
- The default permission group will only follow the action permission rules at the time of the first creation. If batch operations are performed again later, the default permission group will not be created again, but the default permission group created for the first time will be used, and the previous action permissions will be followed.
- Collect New Permissions: Click "Collect New Permissions" to add new function permissions to the designer.

IV. Data Permissions
1. Function Introduction
You can set data permission items for roles, filter fields in the model according to actual needs, and allow users of different roles to obtain different information.
Note
- Roles can be managed and maintained in "Management Center - Role and Permission - Role Management".
- Data permission items can be managed and maintained in "Management Center - Role and Permission - Data Permission Items".
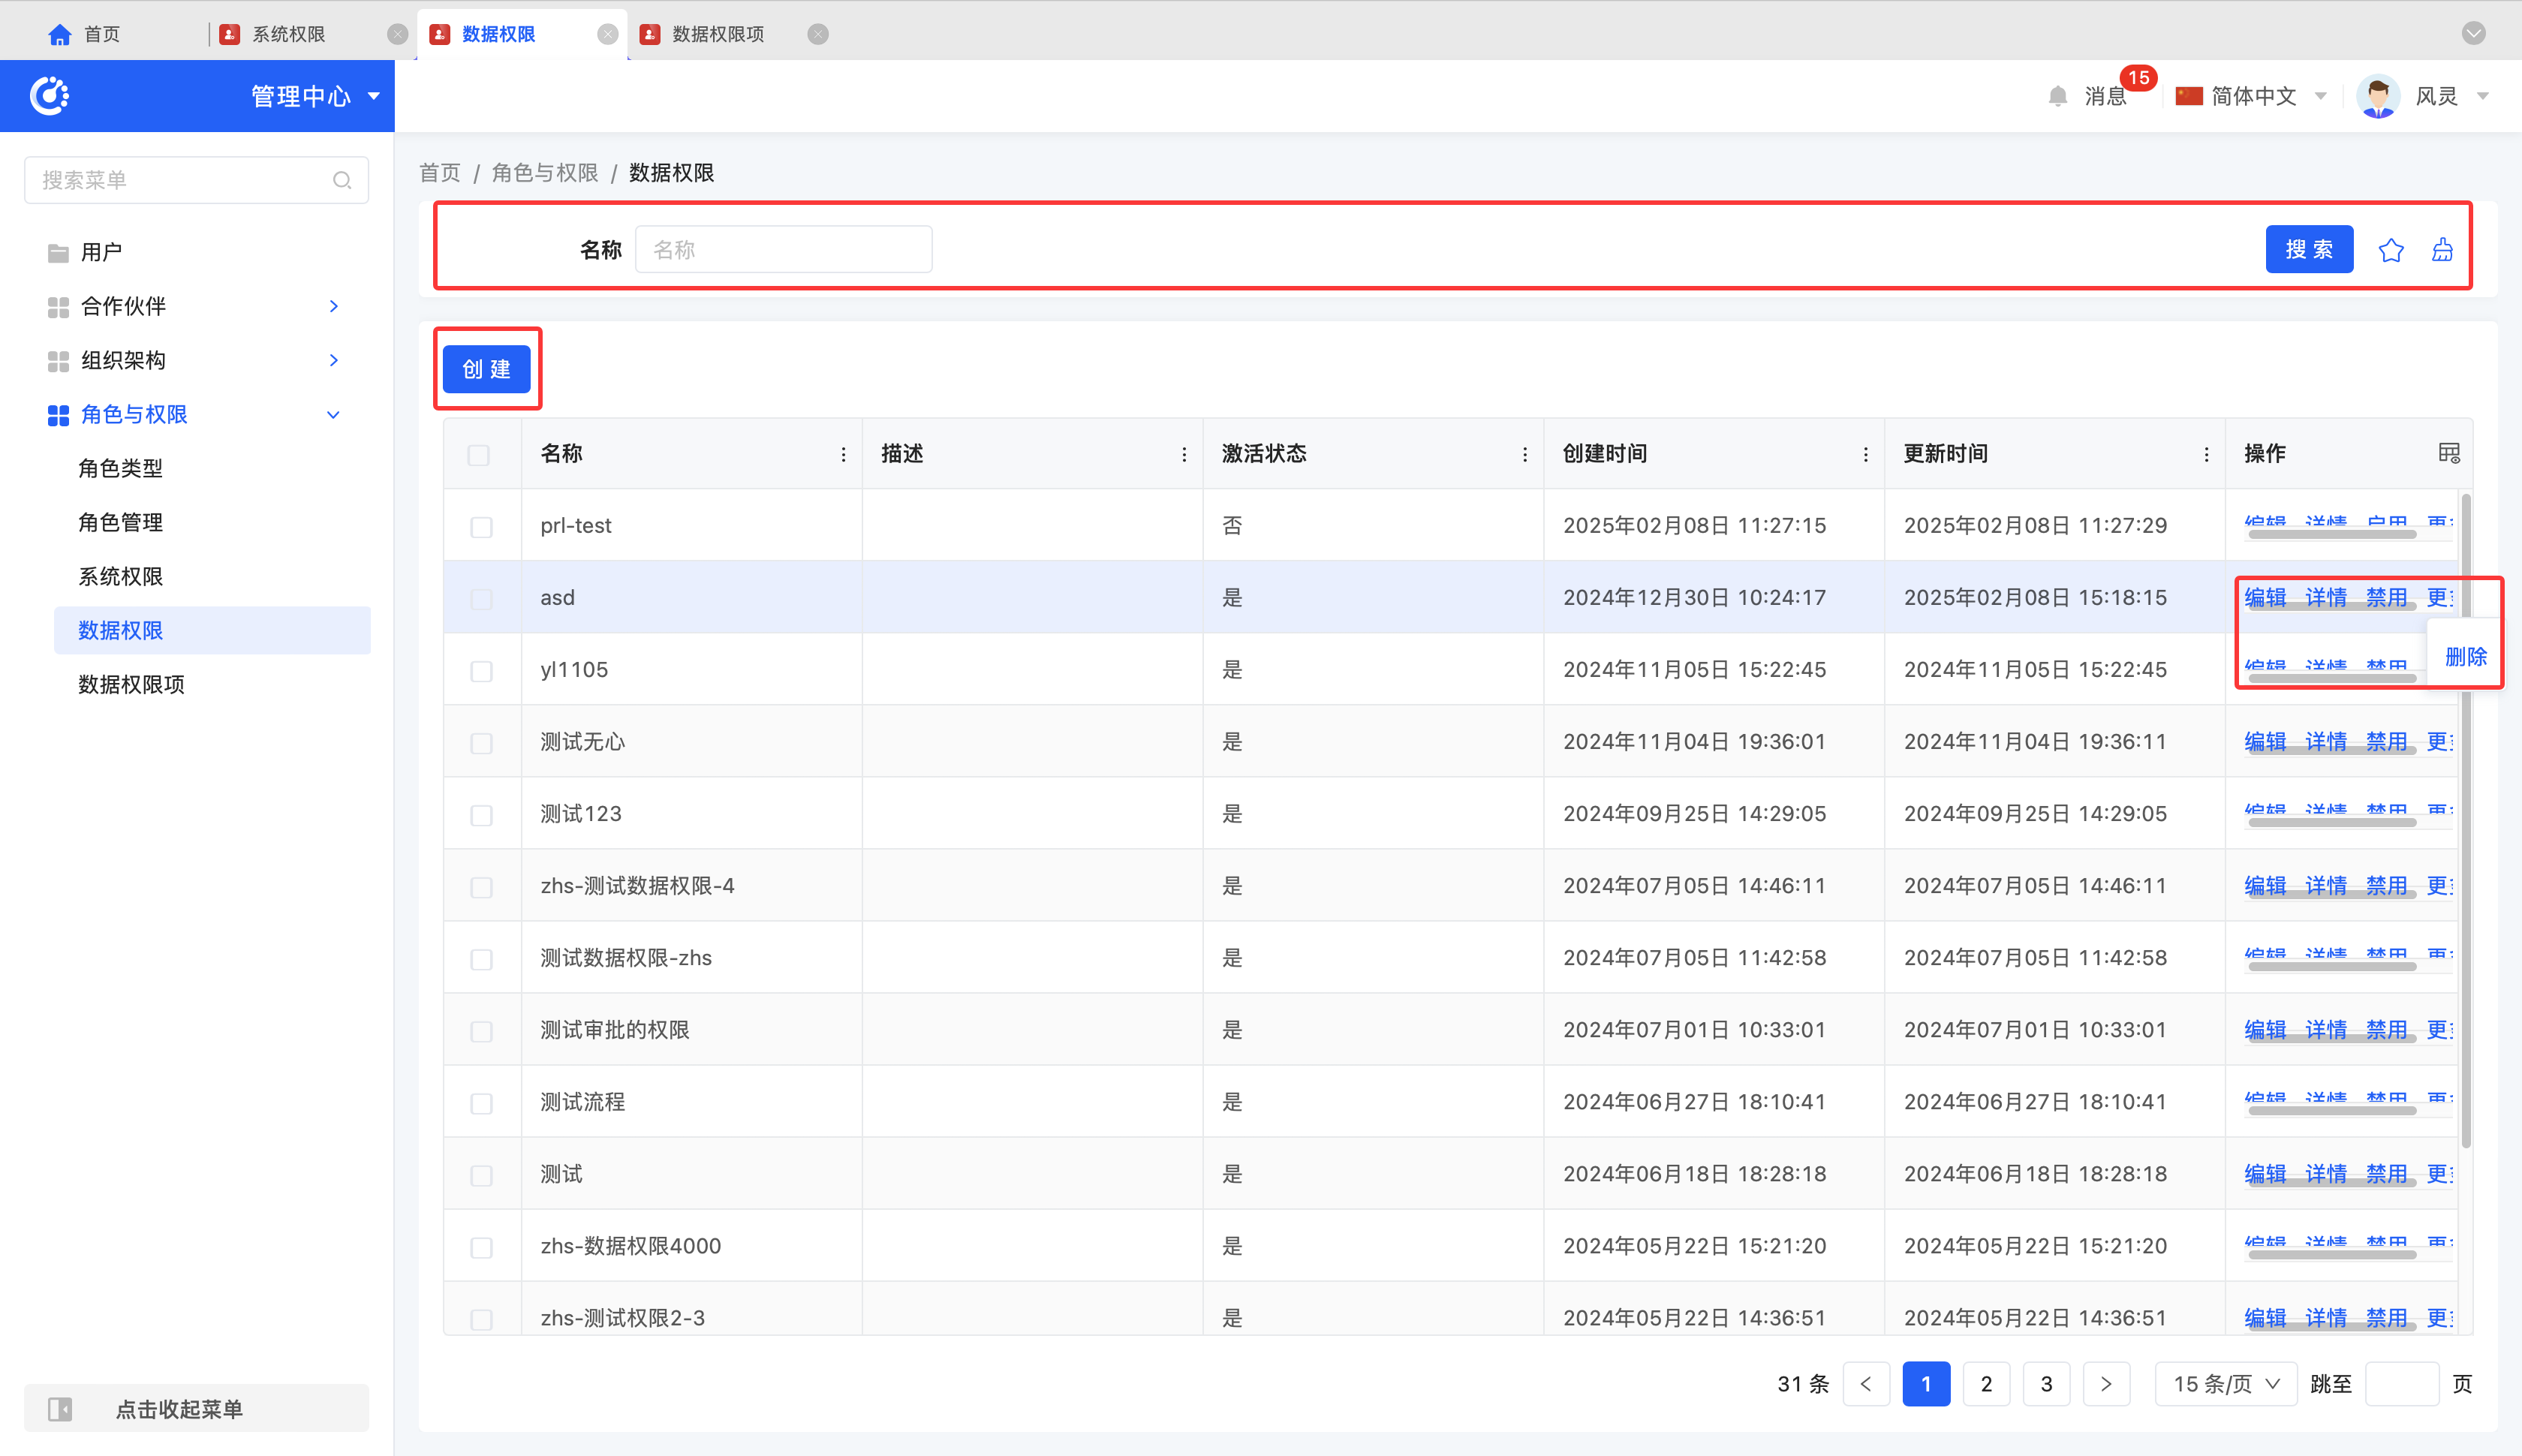
2. Operation Methods
- Filter: Enter or select the corresponding filter conditions according to the actual scenario requirements to filter data permissions.
- Add: Click "Create", enter the required configuration information, and save it to successfully create new data permissions.
- Edit: Click "Edit" to update or modify the relevant information of data permissions.
- Details: Click "Details" to view the detailed information of the selected data permissions.
- Disable/Enable: When data permissions are no longer in use, click "Disable" to deactivate them. When you need to use them again, click "Enable" to restore them.
- Delete: Select a data permission and click "Delete" to delete it.
V. Data Permission Items
1. Function Introduction
You can configure specific filtering conditions for fields in the model to determine their data permission scope.
2. Operation Methods
- Filter: Enter or select the corresponding filter conditions according to the actual scenario requirements to filter data permissions.
- Add: Click "Create", enter the required configuration information, and save it to successfully create new data permissions.
- Edit: Click "Edit" to update or modify the relevant information of data permissions.
- Details: Click "Details" to view the detailed information of the selected data permissions.
- Delete: Select a data permission and click "Delete" to delete it.

VI. Role Permission Example
Configure an "Administrator" role with the following functions:
- Ability to assign management permissions downward: Administrators can assign management permissions downward, including granting or revoking management permissions for a certain application, menu, or homepage to other roles.
- Access permissions: Administrators are granted access permissions to access specified applications, menus, or homepages in the platform.
Note
Administrators must have management permissions and access permissions for the "Management Center".
- Create a role named "Administrator"

- Bind the "Administrator" role to a user to enable them to have corresponding permissions

- Assign management permissions for a certain application to the "Administrator" (the same applies to access permissions)
- Method 1: Assign permissions through system permissions


- Method 2: Assign permissions through Role Management - Permission Configuration


Note
Both permission configuration methods can complete the permission setting, and you can choose according to your actual usage habits:
- When adding a new role, it is more efficient to operate through 「Role Management - Permission Configuration」;
- If the role configuration is basically finalized and only needs to add application or menu permissions, it is faster to use the 「System Permissions」 operation.
- Log in as the user belonging to the "Administrator" and continue to assign management permissions and access permissions downward

So far, the role permission configuration for the "Administrator" has been successfully completed. The "Administrator" can follow the same steps to continue assigning permissions downward.