Ⅰ、Overall Introduction to Asynchronous Tasks
In numerous application scenarios, the trigger and scheduling mechanisms of functions play a crucial role, and this is also a fundamental and core capability of the Oinone platform. Taking Oinone's process products as an example, when users define process trigger conditions, the system provides options to choose between model-based triggering or time-based triggering. This design fully leverages the triggering and scheduling capabilities of functions to meet the diverse needs of different business processes for trigger conditions, enabling users to flexibly and accurately set the timing for process initiation according to actual business scenarios, thereby enhancing the flexibility and adaptability of the product in process management. 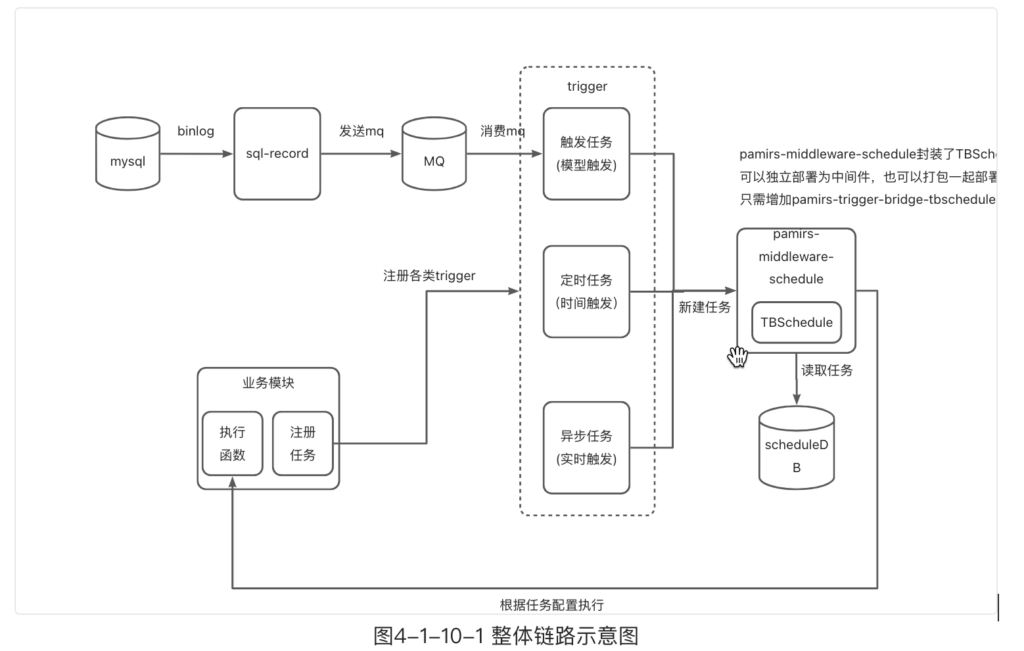
Ⅱ、Trigger Task (TriggerTaskAction)
- Creation Process of Trigger Task: The sql-record module is used to monitor binlog events of MySQL. Once related events are detected, a message containing changed data is sent via RocketMQ. Upon receiving this MQ message, the system immediately creates a TriggerAutoTask. This process realizes a series of automated workflows from database operation log monitoring, message transmission, to task creation, ensuring that trigger tasks can be generated in a timely manner based on database changes.
- Execution Process of Trigger Task: The TBSchedule tool is used to pull the created trigger tasks. After successfully pulling the tasks, the system executes the corresponding functions, completing the full closed-loop operation from task creation to execution of the trigger task, realizing automated processing of business logic.
(Ⅰ) Introducing Dependencies in the Project
- The project's API engineering introduces the pamirs-core-trigger module dependency.
<dependency>
  <groupId>pro.shushi.pamirs.core</groupId>
  <artifactId>pamirs-trigger-api</artifactId>
</dependency>- DemoModule adds
@Module(dependencies={TriggerModule.MODULE_MODULE})in the module dependency definition.
@Component
@Module(
    name = DemoModule.MODULE_NAME,
    displayName = "oinoneDemo Engineering",
    version = "1.0.0",
    dependencies = {ModuleConstants.MODULE_BASE, CommonModule.MODULE_MODULE, UserModule.MODULE_MODULE, TriggerModule.MODULE_MODULE}
)
@Module.module(DemoModule.MODULE_MODULE)
@Module.Advanced(selfBuilt = true, application = true)
@UxHomepage(PetShopProxy.MODEL_MODEL)
public class DemoModule implements PamirsModule {
    ……Other codes
}- The project's boot engineering introduces dependencies.
<dependency>
  <groupId>pro.shushi.pamirs.core</groupId>
  <artifactId>pamirs-trigger-core</artifactId>
</dependency>
<dependency>
  <groupId>pro.shushi.pamirs.core</groupId>
  <artifactId>pamirs-trigger-bridge-tbschedule</artifactId>
</dependency>
<dependency>
  <groupId>pro.shushi.pamirs.core</groupId>
  <artifactId>pamirs-sql-record-core</artifactId>
</dependency>(Ⅱ) Modifying the yml File (application-xxx.yml)
- Adjust the values of configuration parameters
pamris.event.enabledandpamris.event.schedule.enabledto true. - Add the following startup modules in
pamirs_boot_modules: trigger, sql_record.
pamirs:
  record:
    sql:
      # Modify to your own path
      store: /opt/pamirs/logs
...
event:
  enabled: true
  schedule:
    enabled: true
  rocket-mq:
    namesrv-addr: 127.0.0.1:9876
boot:
  init: true
  sync: true
  modules:
    - base
    -……
    - trigger
    - sql_record
-……Note: For more YAML configurations, please refer to Module API.
(Ⅲ) Creating a New Trigger Task
Create a class named PetTalentTrigger. This class is designed such that when a new data record is completed in the PetTalent model, the system will automatically trigger and execute a series of related transactions.
  package pro.shushi.pamirs.demo.core.trigger;

import pro.shushi.pamirs.demo.api.model.PetTalent;
import pro.shushi.pamirs.meta.annotation.Fun;
import pro.shushi.pamirs.meta.annotation.Function;
import pro.shushi.pamirs.meta.annotation.fun.extern.Slf4j;
import pro.shushi.pamirs.trigger.annotation.Trigger;
import pro.shushi.pamirs.trigger.enmu.TriggerConditionEnum;

@Fun(PetTalent.MODEL_MODEL)
@Slf4j
public class PetTalentTrigger {
    @Function
    @Trigger(displayName = "Trigger when PetTalent is created", name = "PetTalent#Trigger#onCreate", condition = TriggerConditionEnum.ON_CREATE)
    public PetTalent onCreate(PetTalent data) {
        log.info(data.getName() + " has been created");
        // Additional logic can be added here
        return data;
    }
}Ⅲ、Scheduled Tasks
Scheduled tasks are a very common pattern, so we won't introduce the concept here and directly jump into the example.
(Ⅰ) Creating PetTalentAutoTask to Implement ScheduleAction
- The setting of
getInterfaceName()needs to be consistent with the definition oftaskAction.setExecuteNamespace, both being the namespace of the function. taskAction.setExecuteFun("execute")needs to be consistent with the execution function nameexecute.TaskTypeshould be configured asCYCLE_SCHEDULE_NO_TRANSACTION_TASK, which can separate theschedulethread of the scheduled task. Otherwise, if there is a task with a long execution time, it will cause delays in all ordinary asynchronous tasks or trigger tasks.
package pro.shushi.pamirs.demo.core.task;

import org.springframework.beans.factory.annotation.Autowired;
import org.springframework.stereotype.Component;
import pro.shushi.pamirs.core.common.enmu.TimeUnitEnum;
import pro.shushi.pamirs.demo.api.model.PetTalent;
import pro.shushi.pamirs.meta.annotation.Fun;
import pro.shushi.pamirs.meta.annotation.Function;
import pro.shushi.pamirs.meta.annotation.fun.extern.Slf4j;
import pro.shushi.pamirs.meta.domain.fun.FunctionDefinition;
import pro.shushi.pamirs.middleware.schedule.api.ScheduleAction;
import pro.shushi.pamirs.middleware.schedule.common.Result;
import pro.shushi.pamirs.middleware.schedule.domain.ScheduleItem;
import pro.shushi.pamirs.middleware.schedule.eunmeration.TaskType;
import pro.shushi.pamirs.trigger.enmu.TriggerTimeAnchorEnum;
import pro.shushi.pamirs.trigger.model.ScheduleTaskAction;
import pro.shushi.pamirs.trigger.service.ScheduleTaskActionService;

@Slf4j
@Component
@Fun(PetTalent.MODEL_MODEL)
public class PetTalentAutoTask implements ScheduleAction {

    @Autowired
    private ScheduleTaskActionService scheduleTaskActionService;

    public void initTask() {
        ScheduleTaskAction taskAction = new ScheduleTaskAction();
        taskAction.setDisplayName("Scheduled Task Test"); // Description of the scheduled task
        taskAction.setDescription("Scheduled Task Test");
        taskAction.setTechnicalName(PetTalent.MODEL_MODEL + "#" + PetTalentAutoTask.class.getSimpleName() + "#" + "testAutoTask");       // Set the technical name of the scheduled task
        taskAction.setLimitExecuteNumber(-1);   // Set the number of executions
        taskAction.setPeriodTimeValue(1);       // Set the execution period rule
        taskAction.setPeriodTimeUnit(TimeUnitEnum.MINUTE);
        taskAction.setPeriodTimeAnchor(TriggerTimeAnchorEnum.START);
        taskAction.setLimitRetryNumber(1);      // Set the failure retry rule
        taskAction.setNextRetryTimeValue(1);
        taskAction.setNextRetryTimeUnit(TimeUnitEnum.MINUTE);
        taskAction.setExecuteNamespace(PetTalent.MODEL_MODEL);
        taskAction.setExecuteFun("execute");
        taskAction.setExecuteFunction(new FunctionDefinition().setTimeout(5000));
        taskAction.setTaskType(TaskType.CYCLE_SCHEDULE_NO_TRANSACTION_TASK.getValue()); // Set the scheduled task execution type
        taskAction.setContext(null);            // User-defined context parameters
        taskAction.setActive(true);             // Whether the scheduled task is active
        taskAction.setFirstExecuteTime(System.currentTimeMillis());
        scheduleTaskActionService.submit(taskAction); // Initialize the task, idempotent and repeatable
    }

    @Override
    public String getInterfaceName() {
        return PetTalent.MODEL_MODEL;
    }

    @Override
    @Function
    public Result<Void> execute(ScheduleItem item) {
        log.info("testAutoTask, last execution time " + item.getLastExecuteTime());
        return new Result<>();
    }
}(Ⅱ) Modifying DemoModuleBizInit for Scheduled Task Initialization
When the module is updated, call the petTalentAutoTask.initTask() method. Since initTask itself is idempotent, multiple calls are harmless. The "Module Lifecycle" article introduces InstallDataInit, UpgradeDataInit, and ReloadDataInit.
package pro.shushi.pamirs.demo.core.init;

import org.springframework.beans.factory.annotation.Autowired;
import org.springframework.stereotype.Component;
import pro.shushi.pamirs.boot.common.api.command.AppLifecycleCommand;
import pro.shushi.pamirs.boot.common.api.init.InstallDataInit;
import pro.shushi.pamirs.boot.common.api.init.ReloadDataInit;
import pro.shushi.pamirs.boot.common.api.init.UpgradeDataInit;
import pro.shushi.pamirs.demo.api.DemoModule;
import pro.shushi.pamirs.demo.api.enumeration.DemoExpEnumerate;
import pro.shushi.pamirs.demo.core.task.PetTalentAutoTask;
import pro.shushi.pamirs.meta.common.exception.PamirsException;

import java.util.Collections;
import java.util.List;

@Component
public class DemoModuleBizInit implements InstallDataInit,
UpgradeDataInit, ReloadDataInit {

    @Autowired
    private PetTalentAutoTask petTalentAutoTask;

    @Override
    public boolean init(AppLifecycleCommand command, String version) {
        // Logic for installation command execution
        initTask();
        return Boolean.TRUE;
    }

    @Override
    public boolean reload(AppLifecycleCommand command, String version) {
        // Logic for reload command execution
        initTask();
        return Boolean.TRUE;
    }

    @Override
    public boolean upgrade(AppLifecycleCommand command, String version, String existVersion) {
        // Logic for upgrade command execution
        initTask();
        return Boolean.TRUE;
    }

    @Override
    public List<String> modules() {
        return Collections.singletonList(DemoModule.MODULE_MODULE);
    }

    @Override
    public int priority() {
        return 0;
    }

    private void initTask() {
        petTalentAutoTask.initTask(); // Initialize the scheduled task for petTalent
    }
}