Before learning this article, you first need a preliminary understanding of Oinone's security-related content to facilitate understanding the customizations introduced in this article. Reference: Backend Framework - Security Introduction
Oinone adopts the standard RBAC (Role-Based Access Control) permission control system, which is a common permission system in most management information systems. Beyond access control for resources, Oinone also provides role-based data access control.
For administrative backends, using built-in permission operation pages for permission management is sufficient. However, in some special scenarios, we must modify permissions to meet actual business needs, such as:
- Permission control for To C mobile applications
- Using built-in "whitelists" to control permissions for specific pages
- Dynamically constructing permission trees for authorization
In summary, there are only two interfaces for permission extension: Permission Node Extension (PermissionNodeLoadExtendApi) and Permission Filter (AuthFilterService).
I. Concept Introduction
(Ⅰ) RBAC Permission Control System
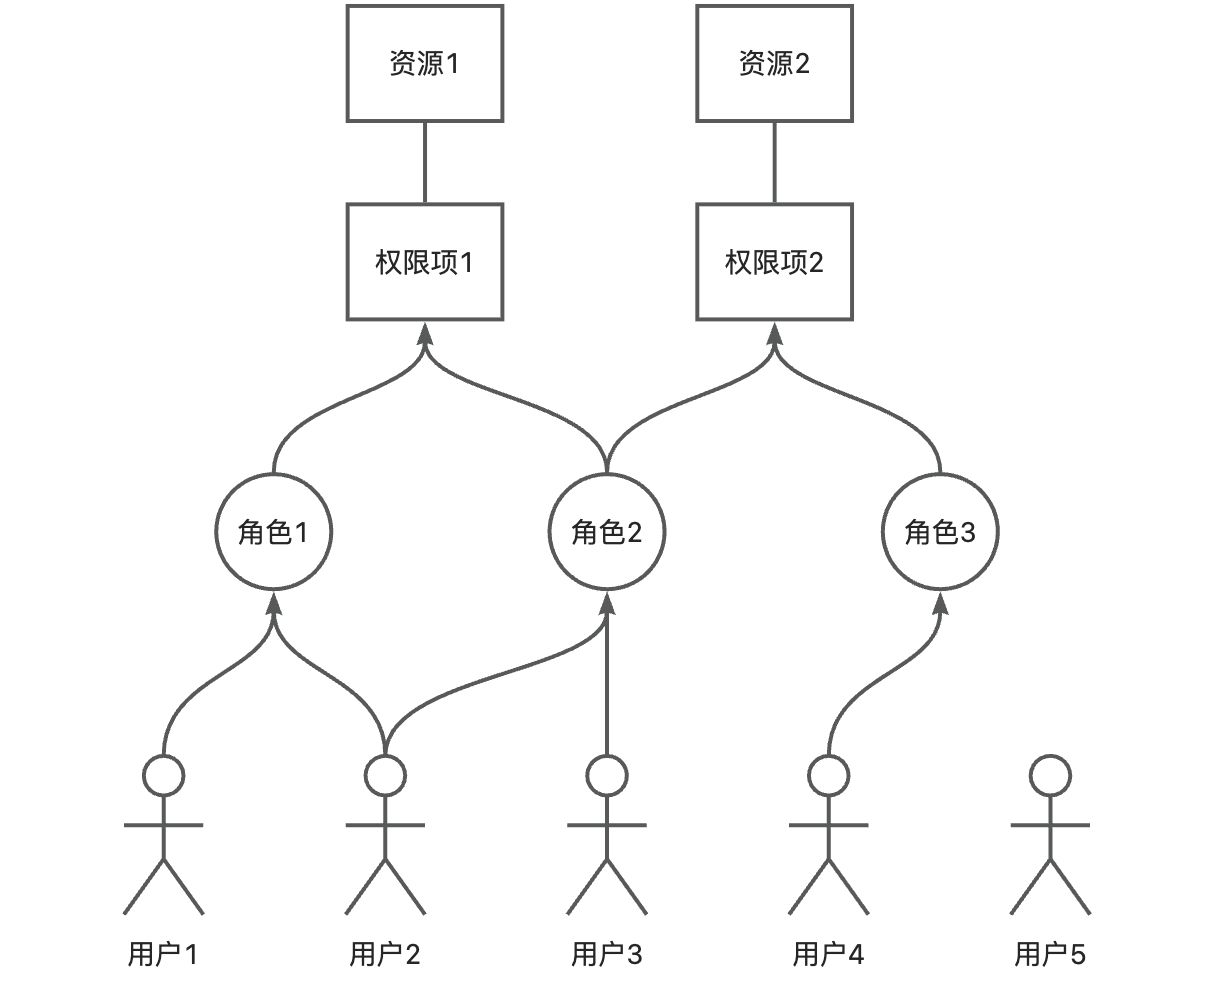
Role-Based Access Control (RBAC) is a common permission system including three entity models: users, roles, and resource items, as well as two entity relationship models (M2M): user-role relationships and role-resource item relationships. As shown below:
(Ⅱ) Resources and Permission Items
In Oinone, the following metadata are called resources, and each resource has corresponding permission items for standardized description:
- Resource Permission Items (AuthResourcePermission)
- Application (module)
- Menu (menu)
- Action (action)
- Function (function)
- Model Permission Items (AuthModelPermission)
- Model (model)
- Field Permission Items (AuthFieldPermission)
- Field (field)
- Row Permission Items (AuthRowPermission)
(Ⅲ) Permission Tree and Resource Access Path
As seen in previous tutorials, both the "System Permissions" page and the "Role Management - Permission Configuration" page use a "permission tree" starting from the application for permission configuration. This tree generates resource permission items based on the topological structure of page metadata, and each permission item has a corresponding resource access path. Only access paths conforming to the rules can be authenticated.
1. Permission Tree
On the "System Permissions" page, the tree hierarchy is composed of the following metadata:
- Application: Top-level tree node
- Homepage/Menu: Second-level tree node (self-associated)
- Permission Group - Action Permissions: All actions on the page, recursively parsing all navigation actions to form child nodes.
On the "Role Management - Permission Configuration" page, the tree hierarchy is composed of the following metadata:
- Application: Top-level tree node
- Homepage/Menu: Second-level tree node (self-associated)
- Actions: Third-level tree nodes, recursively parsing all navigation actions to form child nodes.
2. Resource Access Path
Let's look at the access path for a "Country Group - Create Action," as shown below:
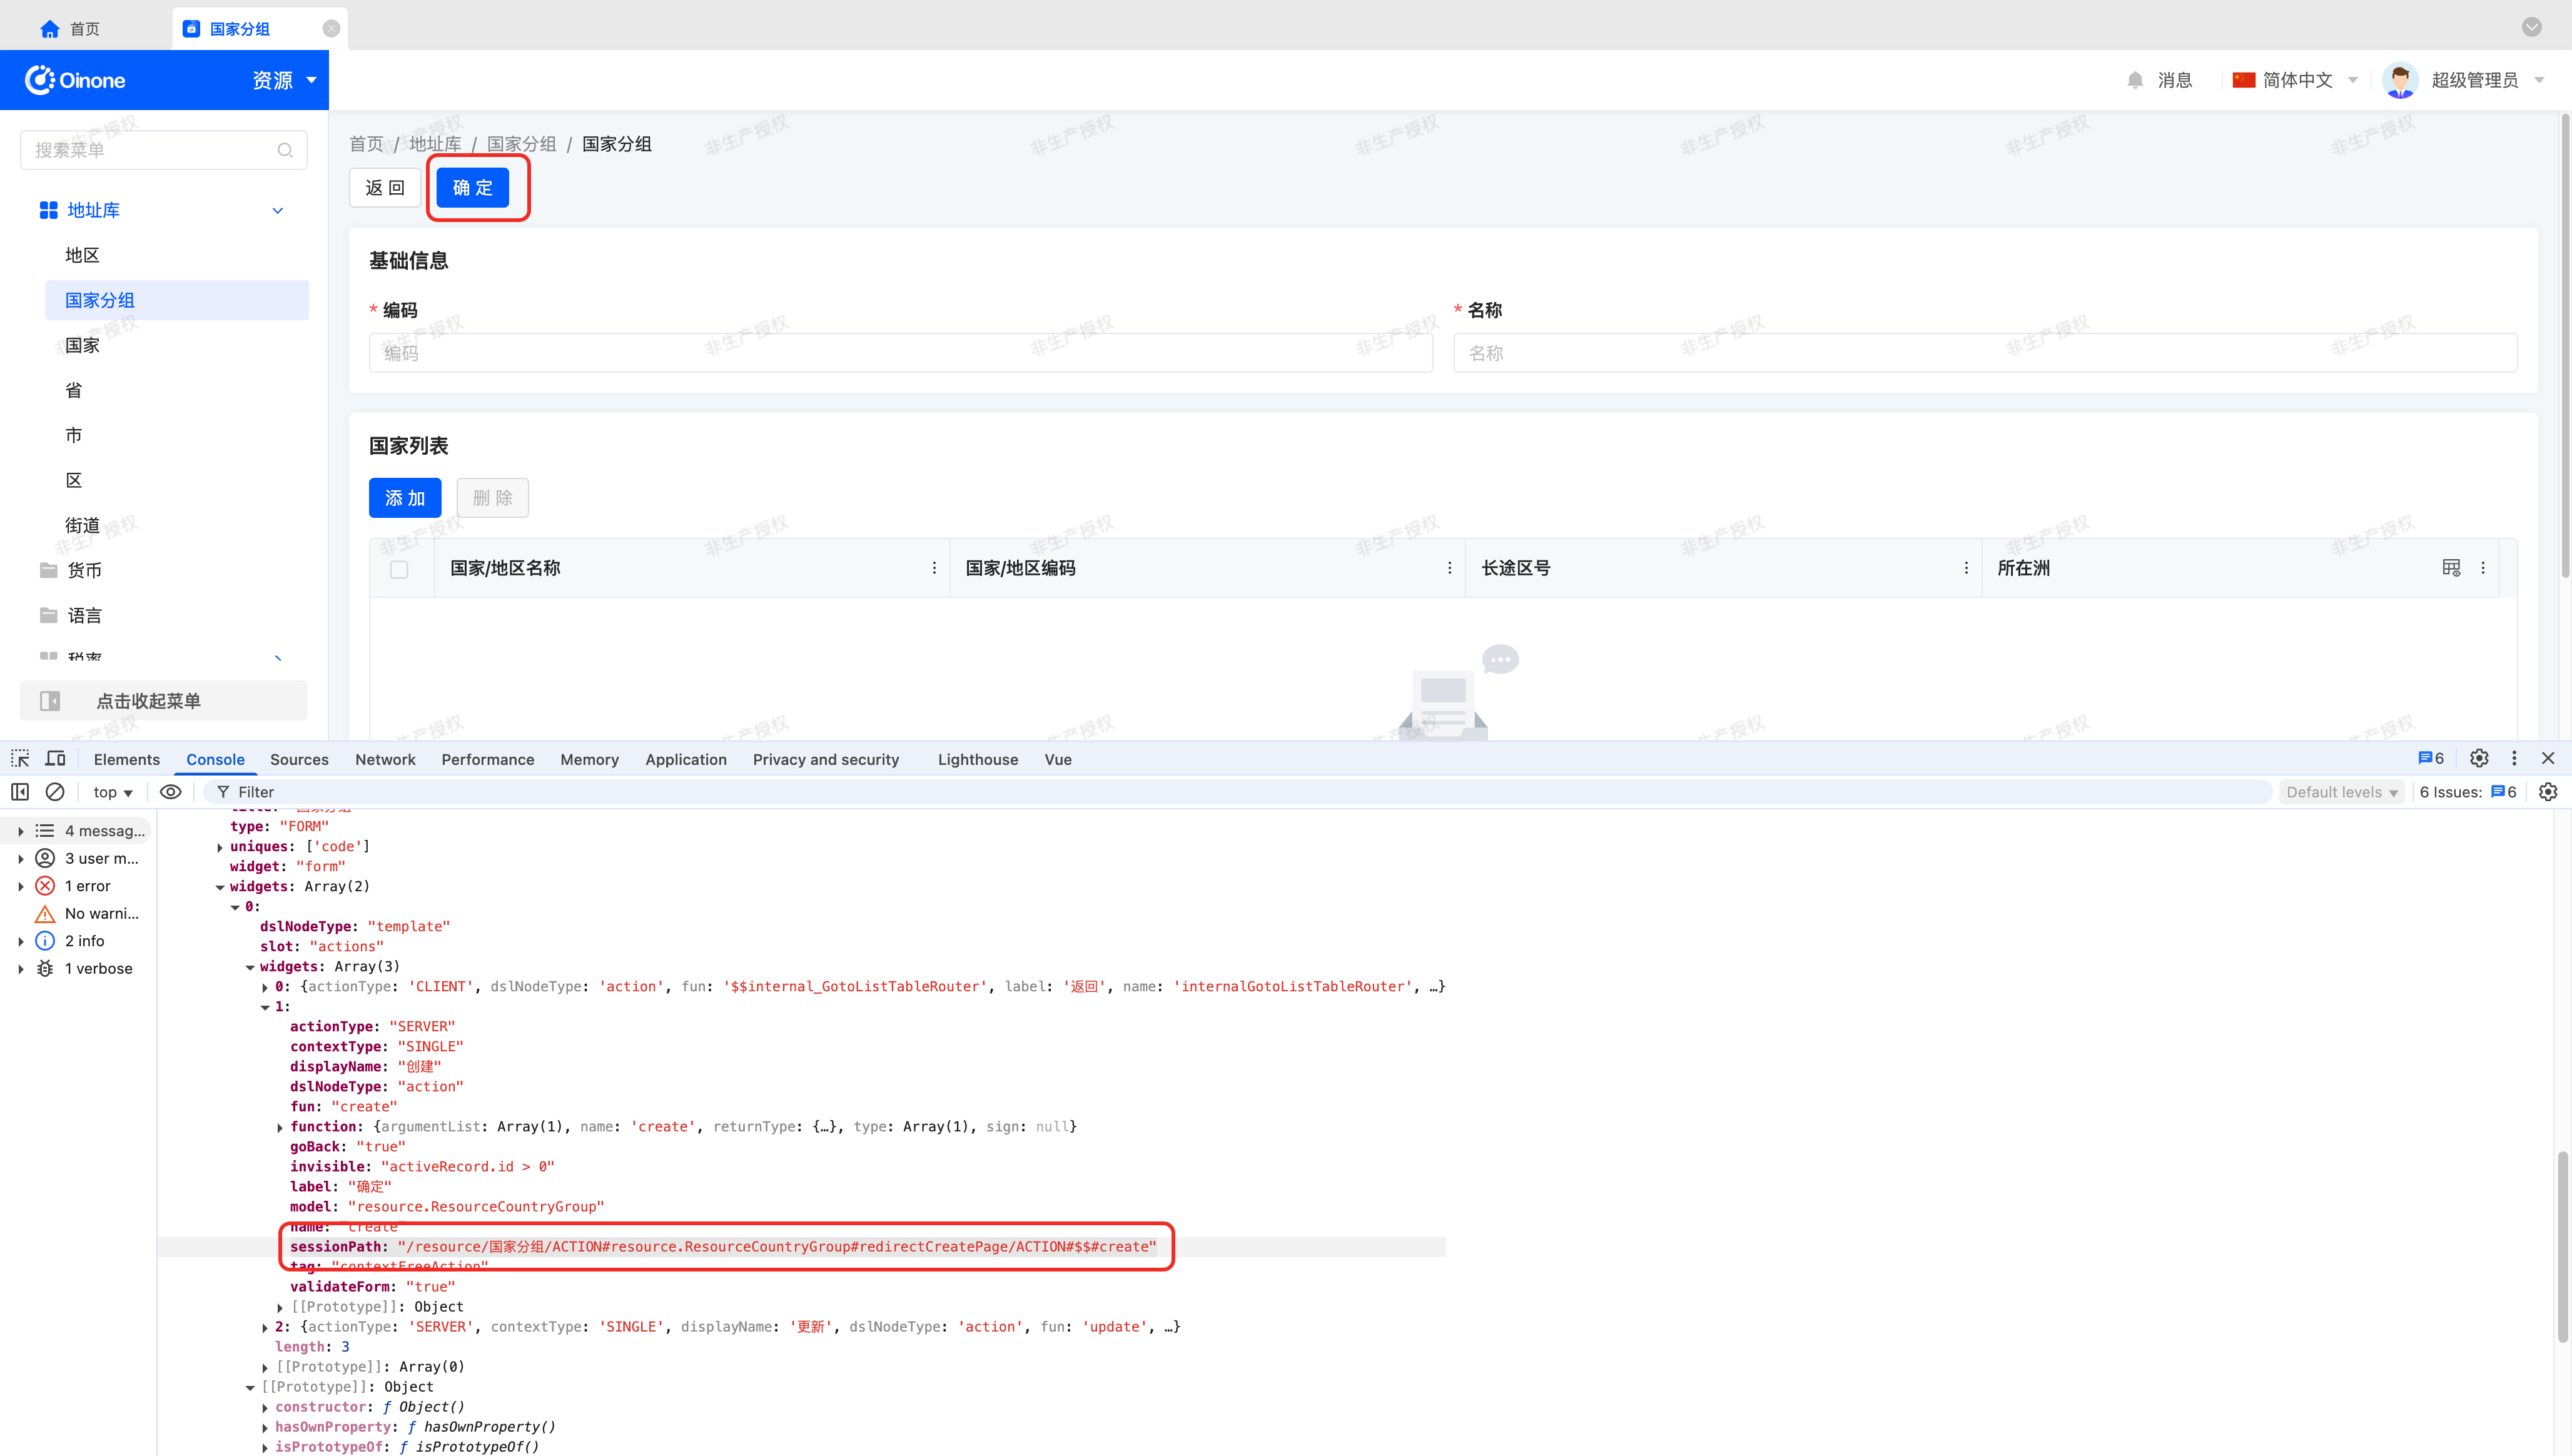
The sessionPath attribute in the DSL obtained through the viewAction#load interface:
/resource/国家分组/ACTION#resource.ResourceCountryGroup#redirectCreatePage/ACTION#$$#createDelimited by "/", we see a clear "resource access path" structure:
- resource: Resource module code.
- 国家分组: Menu name.
- ACTION#resource.ResourceCountryGroup#redirectCreatePage: "Create" navigation action on the table page.
- ACTION#$$#create: "Create" submission action on the create page.
PS: "$$" means the model code is the same as the previous level. Due to performance impacts of long paths on storage and requests, we simplify here.
3. Notes
Since resource permissions are authorized and authenticated based on resource access paths, note the following during development or iteration:
- When the relative path of an action changes, altering the resource access path, the corresponding action requires reauthorization for normal access.
- When the designer adds new actions to a page, authorization is needed for normal access.
II. Module Filtering
Take the scenario where a mobile module does not require authentication. Let's see how to set the entire module's access to be unauthenticated via the module code.
Goal: By the end of this section, you should have successfully filtered permissions for the entire mobile module and learned how to use the AccessResourceInfo object.
(Ⅰ) Preparation
1. Create a Mobile Application
Based on Oinone's module definition, we need to define the mobile application as a standalone application. This ensures that permission filtering for one module does not accidentally affect modules requiring permission control.
First, create a mobile_demo application through previous tutorial content. Reference: Backend Framework - Creating a New Application
Tip:
For modular design-related content, refer to: R&D Paradigm: Modular Design
2. Create a User and Corresponding Role
To see specific effects when customizing permissions, create a standalone user and role without granting any permissions to this role.
Logging in with this user will trigger an exception: "Entry application not found or no permission to access."
(Ⅱ) Filter by Module Code
Register the custom permission filter service as a Spring Bean and override the All Resource Access Control method to complete module filtering. For example:
@Order(88)
@Component
public class CustomAuthFilterService implements AuthFilterService {

    @Override
    public Boolean isAccessModule(String module) {
        if ("mobile_demo".equals(module)) {
            return true;
        }
        return null;
    }

    @Override
    public Boolean isAccessHomepage(String module) {
        return isAccessModule(module);
    }

    @Override
    public Boolean isAccessMenu(String module, String name) {
        return isAccessModule(module);
    }

    @Override
    public Boolean isAccessFunction(String namespace, String fun) {
        return isAccessMobileModule();
    }

    @Override
    public Boolean isAccessAction(String model, String name) {
        return isAccessMobileModule();
    }

    private Boolean isAccessMobileModule() {
        AccessResourceInfo accessInfo = AccessResourceInfoSession.getInfo();
        if (accessInfo == null) {
            return null;
        }
        return isAccessModule(accessInfo.getModule());
    }
}Return Value Description
- Returning
truemeans permission verification passes, and other resource access permissions are no longer verified. - Returning
falsemeans permission verification fails, and the user cannot access any resources under this module. - Returning
nullmeans passing to other permission filter services for continued judgment.
(Ⅲ) Verify User Login
Using the above module filtering, we find all interfaces in this module can be accessed without user login, which is clearly insecure.
Based on the previous example, require all interfaces in this module to require login:
@Override
public Boolean isAccessModule(String module) {
    if ("mobile_demo".equals(module)) {
        AuthVerificationHelper.checkLogin();
        return true;
    }
    return null;
}The AuthVerificationHelper#checkLogin method throws an exception with front-end-backend约定 (agreed) information when the user is not logged in. Upon receiving this exception, the front end automatically redirects to the login page.
(Ⅳ) AccessResourceInfo
You can obtain access resource information using the following method almost anywhere:
AccessResourceInfoSession.getInfo()In access resource information, for any current request, several key metadata items help judge permissions. Below are commonly used attributes:
- module: Module code of the current request.
- model: Model code.
- homepage: Homepage action name, same as the
ViewAction#nameattribute. - actionName: Action/function name of the current request interface.
- originPath:
variables#pathparameter passed in the request.
III. Action/Function Filtering
When certain actions/functions do not require authentication, we can filter them via yaml configuration. We divide these "whitelist" actions/functions into two categories: those accessible without login and those requiring login.
Goal: By the end of this section, you should have successfully configured permission filtering for specified actions/functions and learned how to use custom configurations to extend permission functions.
(Ⅰ) Access Without Login
Configure the pamirs.auth.fun-filter attribute in yaml to allow the "Country Group - Create" action to be accessed directly without login:
pamirs:
  auth:
    fun-filter:
     - namespace: resource.ResourceCountryGroup
fun: create(Ⅱ) Access Requiring Login
Configure the pamirs.auth.fun-filter-only-login attribute in yaml to allow the "Country Group - Create" action to be accessed after login without worrying about corresponding permission configuration:
pamirs:
  auth:
    fun-filter-only-login:
     - namespace: resource.ResourceCountryGroup
fun: create(Ⅲ) Custom "Blacklist"
Built-in whitelist configurations may not cover most business scenarios or may not be convenient to configure. For example, when using module filtering, how to require permission control for specified actions/functions in that module?
1. Use yaml to Configure Blacklist Actions or Functions
Use Spring Configuration to add configuration items to yaml: (We typically recommend managing configuration items this way, but other methods are also possible)
@Configuration
@ConfigurationProperties(prefix = "demo.auth.blacklist")
public class AuthBlacklistConfiguration {

    private List<AuthConfiguration.FunFilter> funFilter;

    public List<AuthConfiguration.FunFilter> getFunFilter() {
        return funFilter;
    }

    public void setFunFilter(List<AuthConfiguration.FunFilter> funFilter) {
        this.funFilter = funFilter;
    }
}2. Use Configurations in AuthFilterService
Let's try to implement the following:
- When the access module is
mobile_demo, use the blacklist for filtering. - Actions in the blacklist require permission configuration and verification on the page.
Below is an implementation of the filter service overriding some previous methods:
@Order(88)
@Component
public class CustomAuthFilterService implements AuthFilterService {

    @Autowired
    private AuthBlacklistConfiguration authBlacklistConfiguration;

    @Override
    public Boolean isAccessFunction(String namespace, String fun) {
        return isAccessMobileAction(namespace, fun);
    }

    @Override
    public Boolean isAccessAction(String model, String name) {
        return isAccessMobileAction(model, name);
    }

    private Boolean isAccessMobileAction(String model, String name) {
        AccessResourceInfo accessInfo = AccessResourceInfoSession.getInfo();
        if (accessInfo == null) {
            return null;
        }
        if (Boolean.TRUE.equals(isAccessModule(accessInfo.getModule()))) {
            if (authBlacklistConfiguration.getFunFilter()
                    .stream()
                    .anyMatch(v -> model.equals(v.getNamespace()) && name.equals(v.getFun()))) {
                // Pass to other permission filter services for continued judgment
                return null;
            }
            // Allow access to specified actions
            return true;
        }
        return null;
    }
}IV. Custom Permission Tree and Authorization via Pages
When the mobile module has no menus or actions added through code or the designer, how do we authenticate some server-side APIs?
We generally have two implementable solutions: (Other solutions can be imagined independently)
Solution 1: Expose required pages and actions for the mobile end through menus via the designer to enable authorization in the admin backend. Carrying the corresponding resource access path in requests allows smooth authentication.
Solution 2: Extend the permission tree for specified action authorization.
(Ⅰ) Solution 1: Use Built-in Authorization and Authentication
When using "Solution 1," the backend requires no special processing or modification. The frontend only needs to carry the corresponding resource access path, which is the commonly used "permission埋点 (permission instrumentation)" solution. This simple solution is not elaborated here.
(Ⅱ) Solution 2: Extend the Permission Tree
First, let's look at part of the PermissionNodeLoadExtendApi definition:
/**
 * Permission Node Extension API
 *
 * @author Adamancy Zhang at 09:21 on 2024-02-28
 */
@SPI(factory = SpringServiceLoaderFactory.class)
public interface PermissionNodeLoadExtendApi {

    /**
     * Load all permission item extensions
     *
     * @param loadContext Load context
     * @param nodes       Loaded node collection
     * @param roleIds     Role ID collection
     * @return Newly added node collection
     */
    default List<PermissionNode> buildAllPermissions(PermissionLoadContext loadContext, List<PermissionNode> nodes, Set<Long> roleIds) {
        return buildRootPermissions(loadContext, nodes);
    }

    /**
     * Load root permission item extensions
     *
     * @param loadContext Load context
     * @param nodes       Loaded node collection
     * @return Newly added node collection
     */
    default List<PermissionNode> buildRootPermissions(PermissionLoadContext loadContext, List<PermissionNode> nodes) {
        return null;
    }

    /**
     * Load next-level permission item extensions
     *
     * @param selected Selected node
     * @param nodes    Loaded node collection
     * @return Newly added node collection
     */
    default List<PermissionNode> buildNextPermissions(PermissionNode selected, List<PermissionNode> nodes) {
        return null;
    }
}- buildAllPermissions: Build a complete permission tree for constructing the permission tree in "Role Management - Permission Configuration."
- buildRootPermissions: Build the "Application-Menu" permission tree for constructing the permission tree in "System Permissions."
- buildNextPermissions: Build action permission items corresponding to menus for constructing the permission tree in "Permission Group - Action Permissions."
We need to override appropriate methods based on actual scenario requirements.
1. Display Specified Submission Actions Under the Application
Take the mobile_demo application as an example. To add corresponding submission actions under this application, process as follows:
@Order(88)
@Component
public class CustomPermissionNodeLoadExtend implements PermissionNodeLoadExtendApi {

    @Override
    public List<PermissionNode> buildRootPermissions(PermissionLoadContext loadContext, List<PermissionNode> nodes) {
        List<PermissionNode> newNodes = new ArrayList<>();

        final String module = "mobile_demo";
        ModulePermissionNode mobileDemoModuleNode = findModulePermissionNode(nodes, module);
        if (mobileDemoModuleNode == null) {
            return newNodes;
        }

        QueryActions<ServerAction> serverActionQuery = new QueryActions<>(ActionTypeEnum.SERVER);
        serverActionQuery.add(ResourceCountryGroup.MODEL_MODEL, "create");
        List<ServerAction> serverActions = serverActionQuery.query();

        for (ServerAction serverAction : serverActions) {
            PermissionNode node = AuthNodeHelper.createServerActionNode(module, serverAction, mobileDemoModuleNode);
            // The default action name is determined, but needs slight modification here
            node.setDisplayValue("国家分组 - 创建");
            AuthNodeHelper.addNode(newNodes, mobileDemoModuleNode, node);
        }

        return newNodes;
    }

    private ModulePermissionNode findModulePermissionNode(List<PermissionNode> nodes, String module) {
        for (PermissionNode node : nodes) {
            if (node instanceof ModulePermissionNode) {
                if (module.equals(((ModulePermissionNode) node).getModule())) {
                    return (ModulePermissionNode) node;
                }
            }
        }
        return null;
    }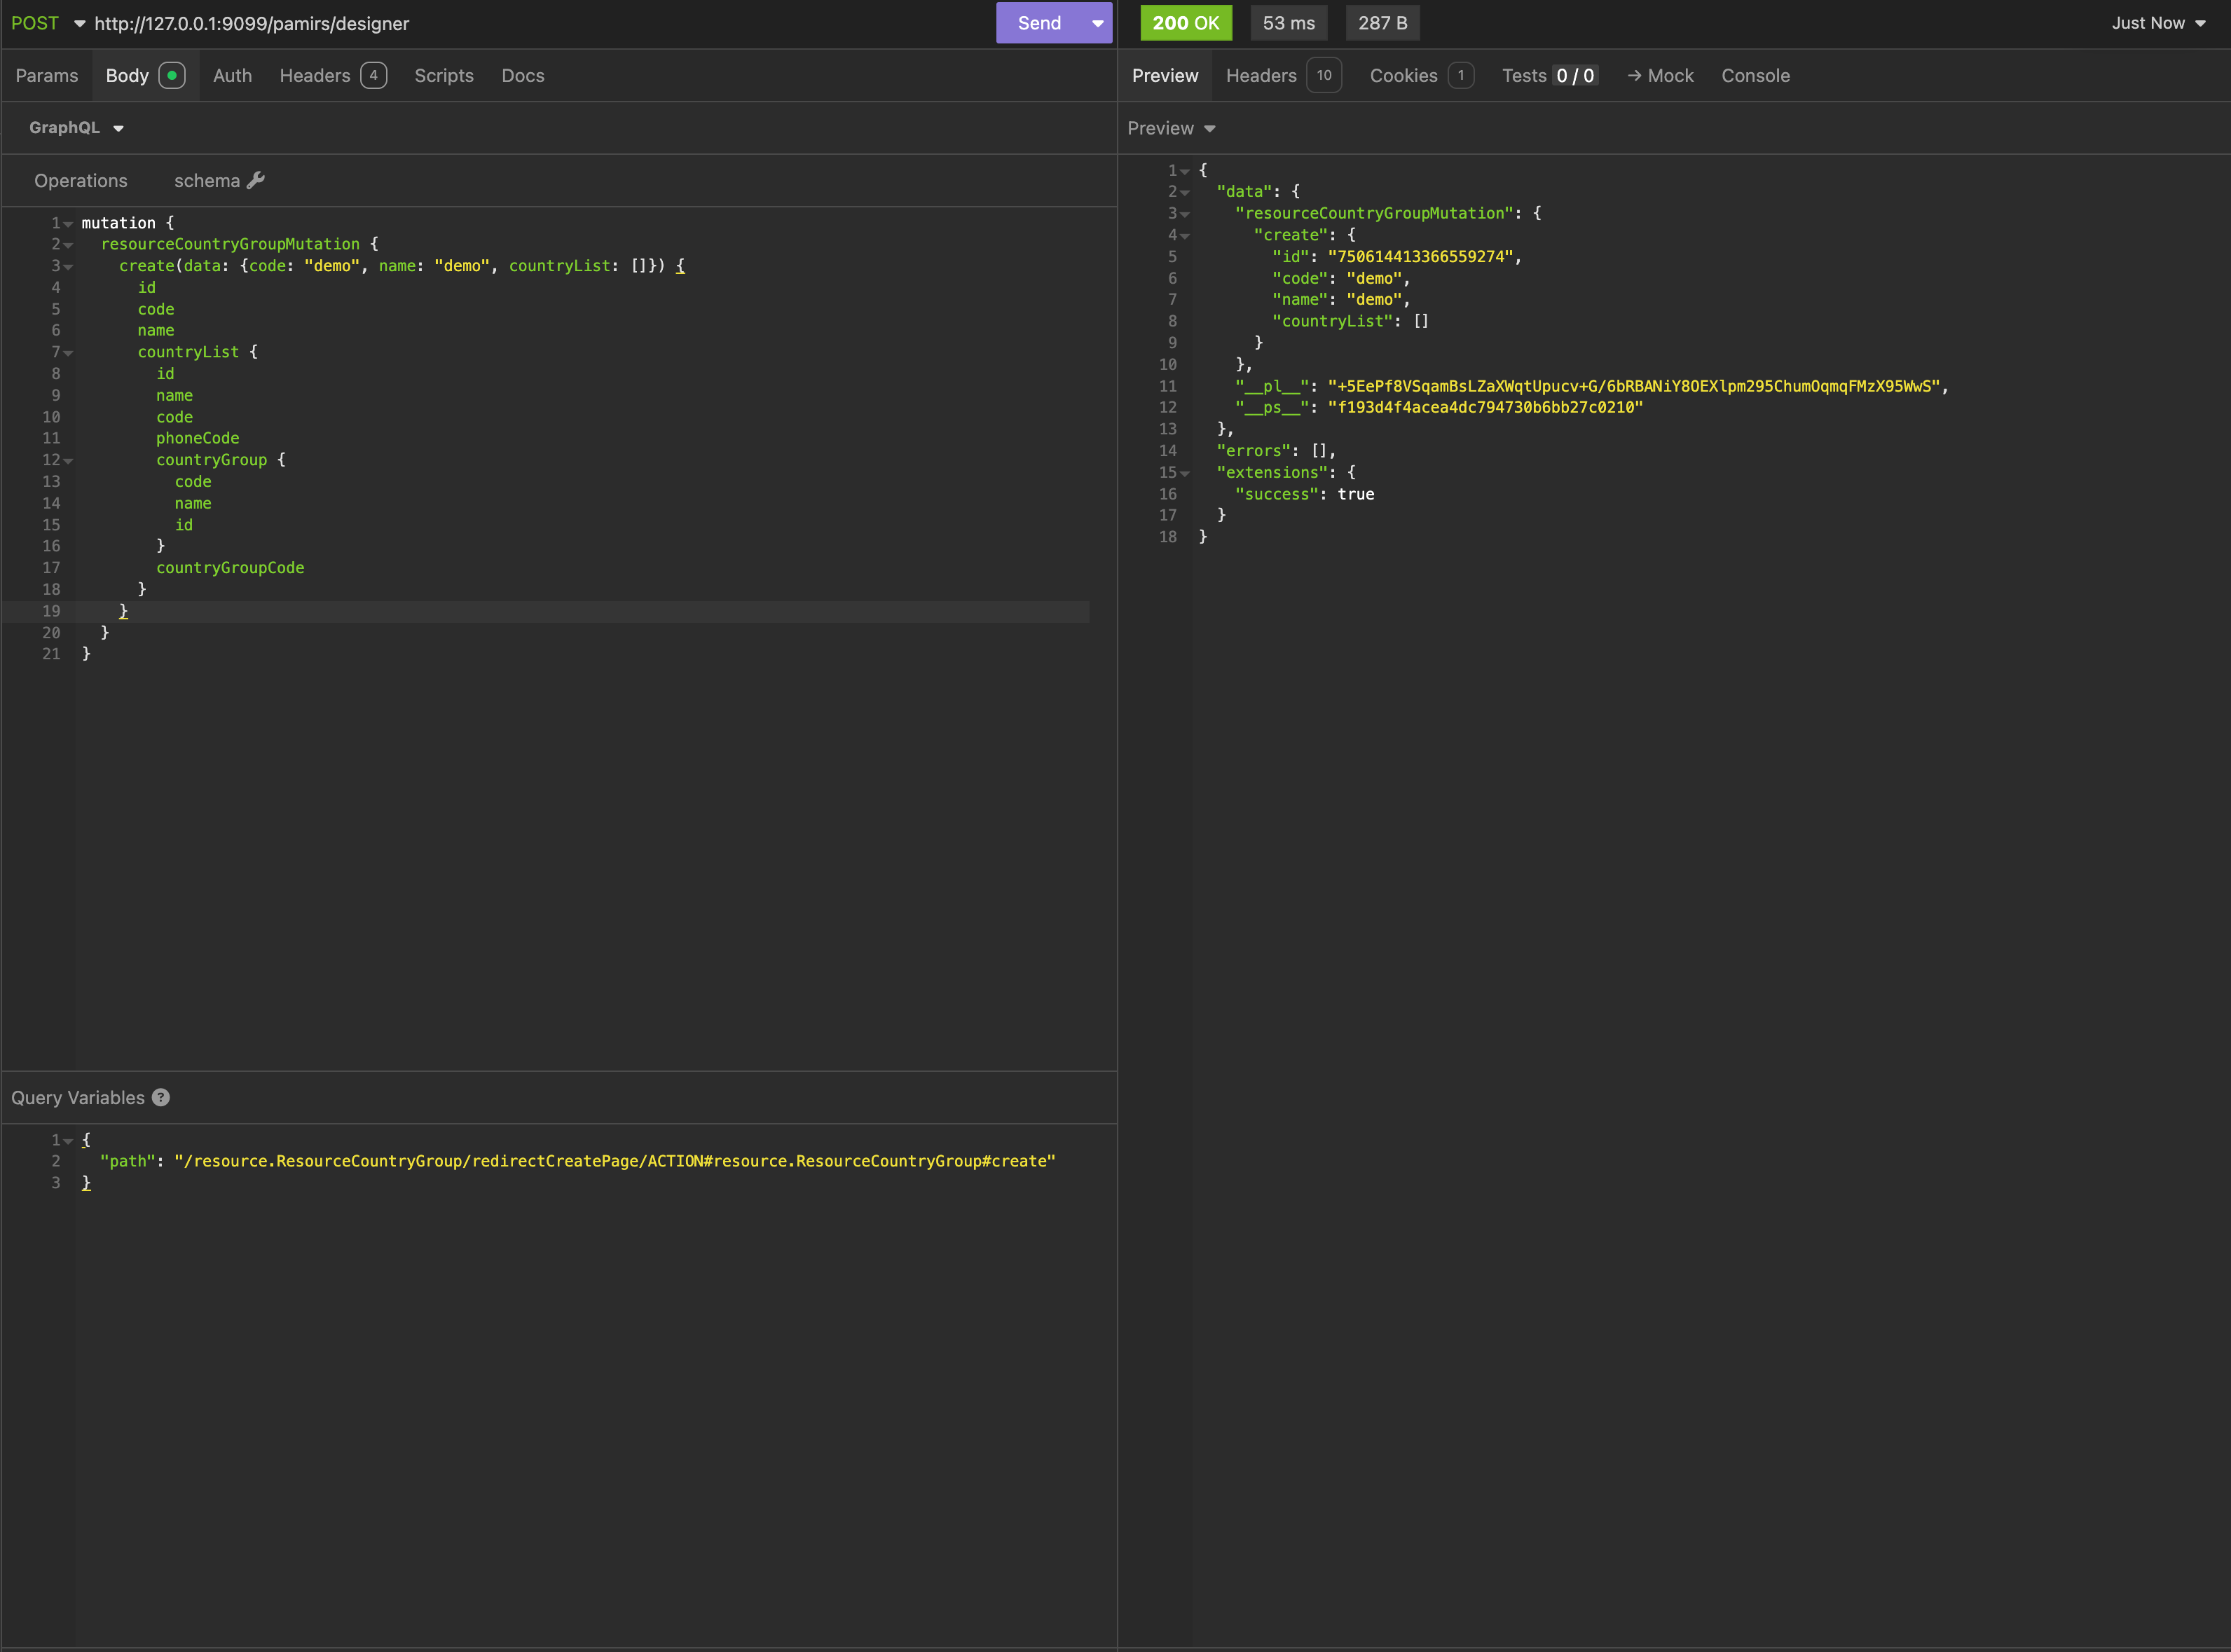
}For the "Country Group - Create" submission action added by the above code, the corresponding resource access path is:
/resource.ResourceCountryGroup/createDelimited by "/", we see a two-level "resource access path" structure:
- resource.ResourceCountryGroup: Model code
- create: Action name
When the frontend initiates a request, the variables do not need to pass any path parameters to complete permission authentication.
To simulate a frontend request, initiate this request via the GQL visualization tool, identical to an actual frontend request:

2. Display Specified Navigation Actions Under the Application
Similar to adding submission actions, we only need to change the action name to the corresponding navigation action name. Let's add the "Country Group - Create" navigation action to the node for authorization and see the difference in the resource access path.
@Override
public List<PermissionNode> buildRootPermissions(PermissionLoadContext loadContext, List<PermissionNode> nodes) {
    List<PermissionNode> newNodes = new ArrayList<>();

    final String module = "mobile_demo";
    ModulePermissionNode mobileDemoModuleNode = findModulePermissionNode(nodes, module);
    if (mobileDemoModuleNode == null) {
        return newNodes;
    }

    // Note the change in action type and name here
    QueryActions<ViewAction> viewActionQuery = new QueryActions<>(ActionTypeEnum.VIEW);
    viewActionQuery.add(ResourceCountryGroup.MODEL_MODEL, "redirectCreatePage");
    List<ViewAction> viewActions = viewActionQuery.query();

    for (ViewAction viewAction : viewActions) {
        PermissionNode node = AuthNodeHelper.createViewActionNode(module, viewAction, mobileDemoModuleNode);
        // The default action name is "Create," which needs slight modification here
        node.setDisplayValue("国家分组 - 创建");
        AuthNodeHelper.addNode(newNodes, mobileDemoModuleNode, node);
    }

    return newNodes;
}For the "Country Group - Create" navigation action added by the above code, the corresponding resource access path is:
/resource.ResourceCountryGroup/redirectCreatePageAccording to our path rules, the resource access path for the create submission action is:
/resource.ResourceCountryGroup/redirectCreatePage/ACTION#resource.ResourceCountryGroup#createDelimited by "/", we see a three-level "resource access path" structure:
- resource.ResourceCountryGroup: Model code.
- redirectCreatePage: "Create" navigation action name on the table page.
- ACTION#resource.ResourceCountryGroup#create: "Create" submission action on the create page.
Let's initiate this request via the GQL visualization tool:
Tip:
Note three issues here:
- When testing whether authentication passes, slightly modify the custom logic from previous sections to only filter applications, homepages, and menus, removing custom logic for actions and functions. Otherwise, you may not see the "No permission to perform this operation" exception, making it impossible to test if permission authorization is effective.
- When specified displayed actions change,原有 (original) permission authorizations are not automatically revoked, and users can still access via previous authorizations.
- Data created via interfaces is not automatically deleted. When continuously calling create interfaces with the same code, manually delete previously created data to avoid "Data duplication, business processing failed" exceptions, though this does not affect authentication testing.
3. Omit the Last-Level Action Name
In the previous section, we used the complete resource access path for requests. During authentication, the permission first validates the resource access path:
- The last-level action name must exactly match the current access action name.
- If the last-level action name does not match, the current access action name is forcibly appended to the path for validation.
Thus, a similar request could be:
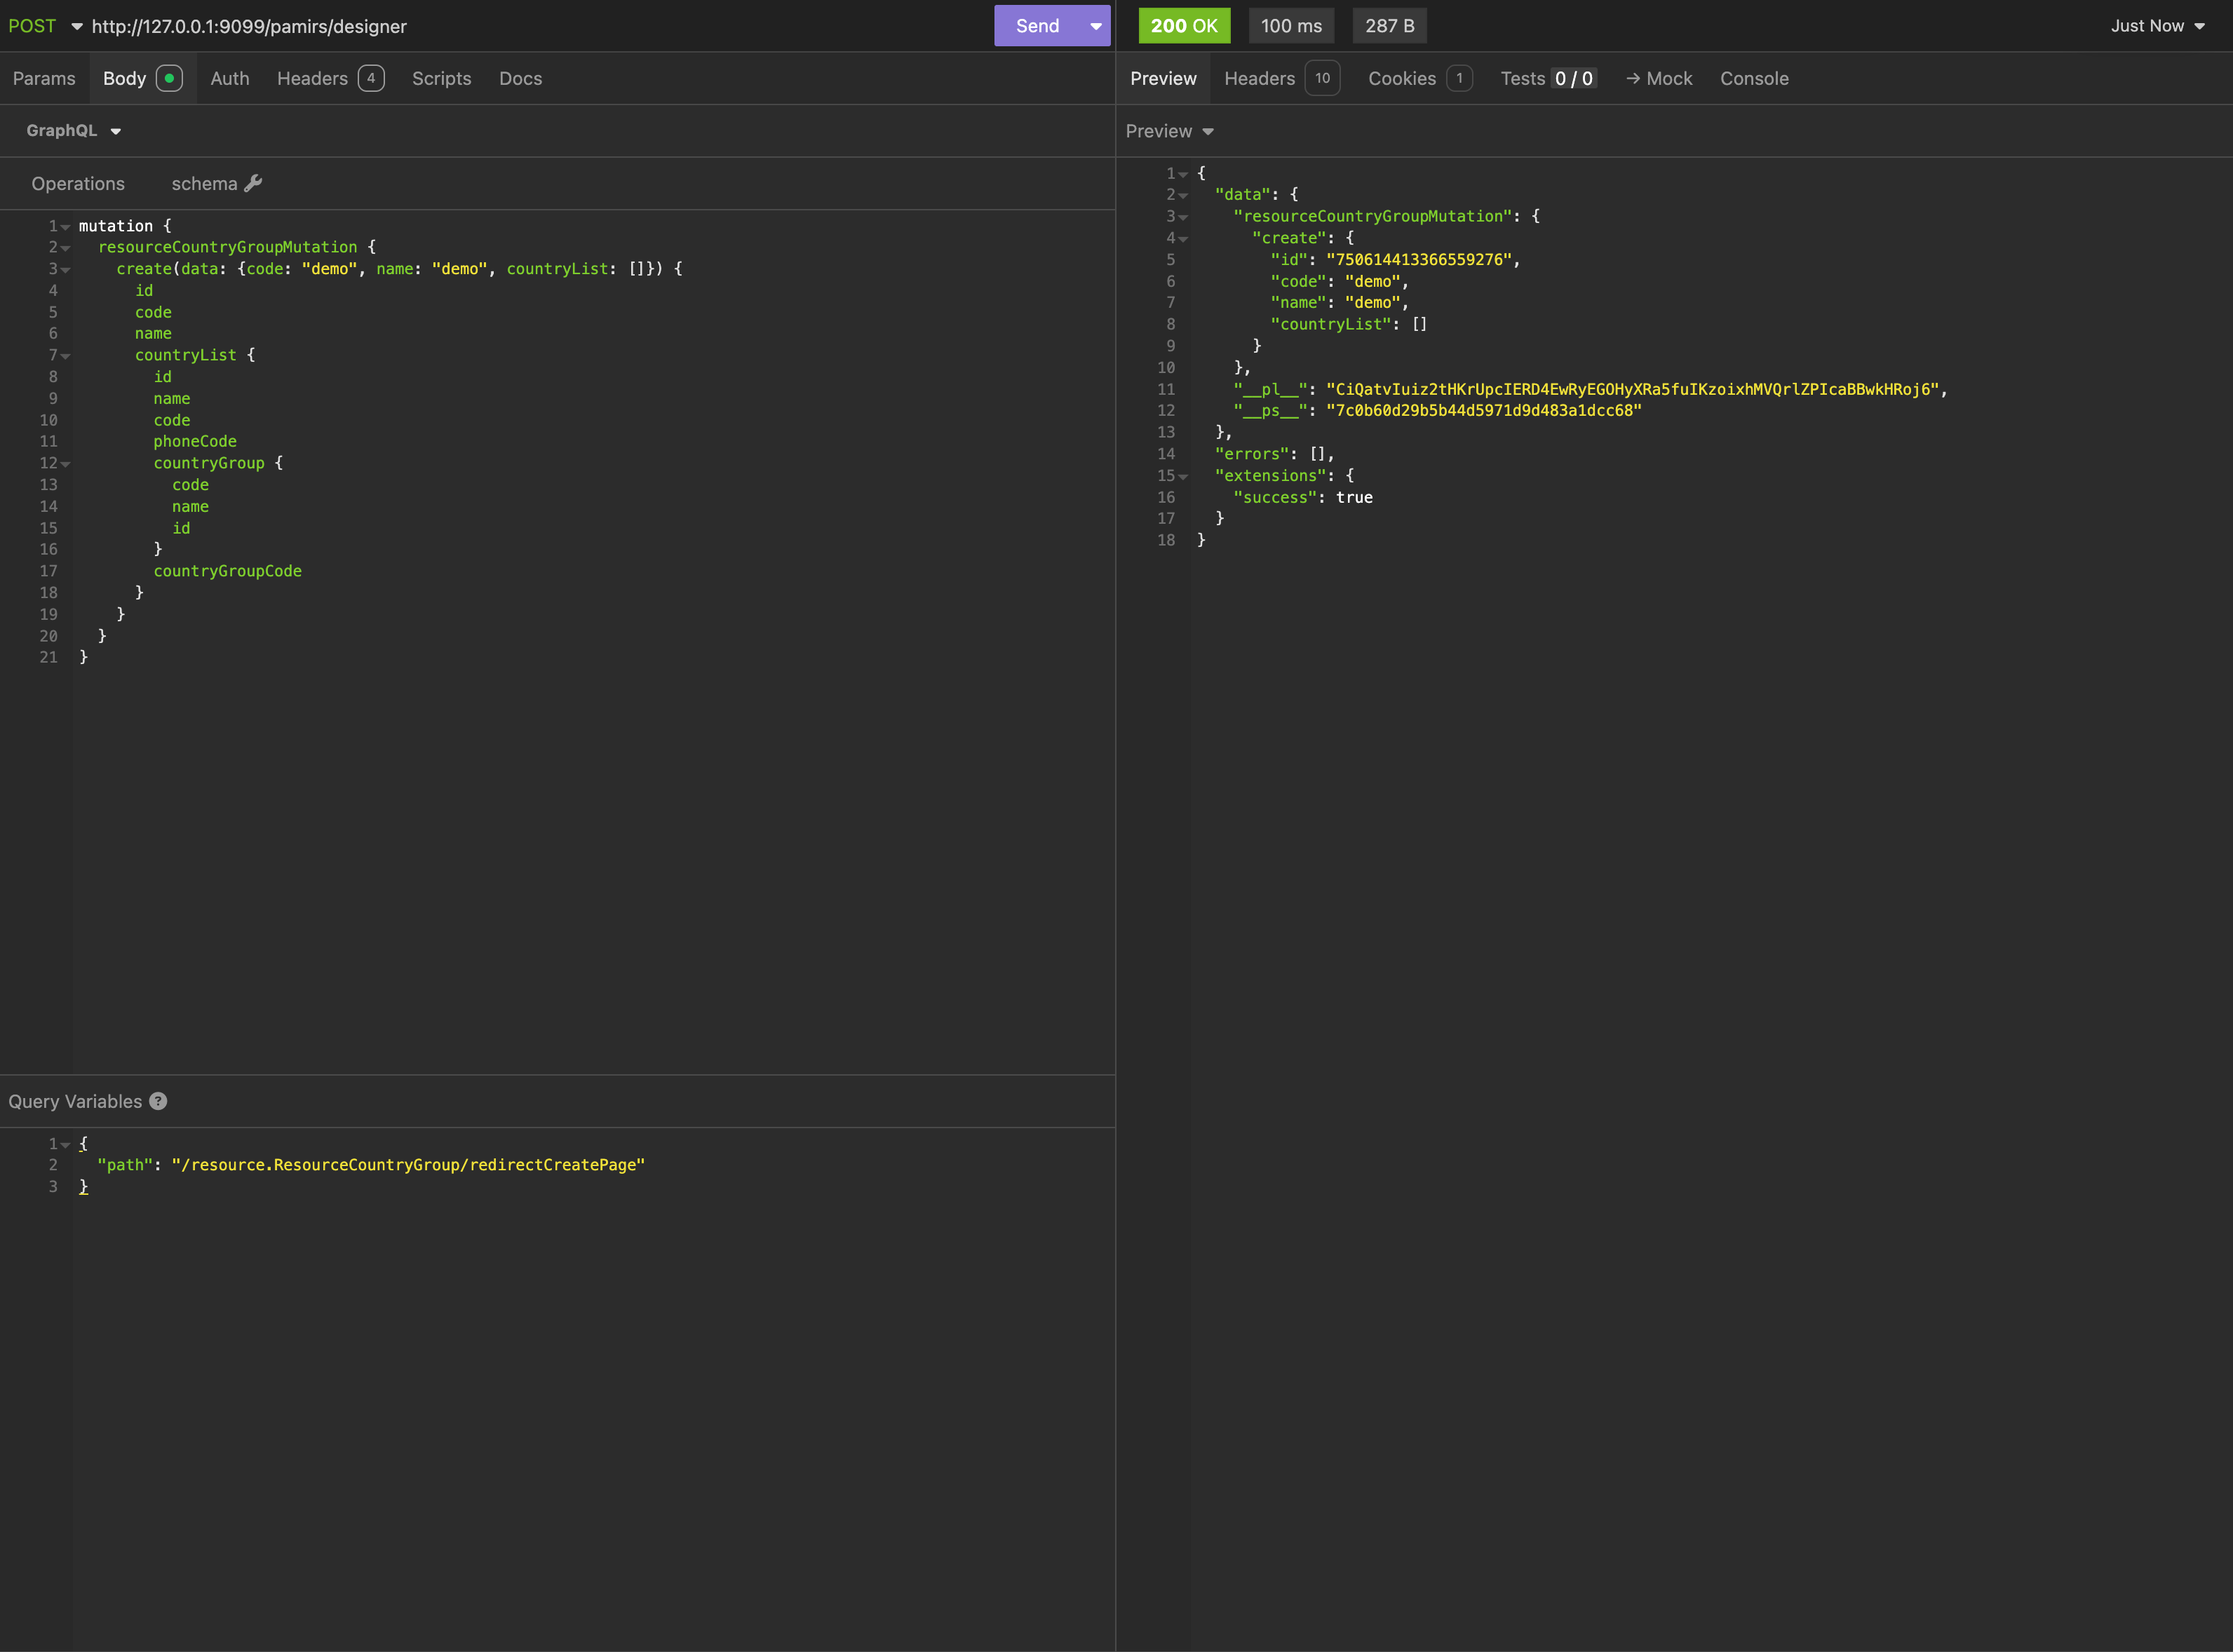
We can see that although we used this path, authentication still passes:
/resource.ResourceCountryGroup/redirectCreatePageV. Custom Data Filtering
Similar to action/function filtering, data filtering is still implemented via AuthFilterService. Let's try to implement the following requirements:
- Filter "Country Groups" by creator
- Users can only see data they created
Below is an implementation logic for reference:
@Order(88)
@Component
public class CustomAuthFilterService implements AuthFilterService {

    @Autowired
    private DefaultAuthFilterService defaultAuthFilterService;

    @Override
    public AuthResult<String> fetchModelFilterForRead(String model) {
        // Check if the user is logged in and get the user ID
        Long userId = PamirsSession.getUserId();
        if (userId == null) {
            return null;
        }
        if (ResourceCountryGroup.MODEL_MODEL.equals(model)) {
            // Get the configured filter conditions for the model
            AuthResult<String> result = defaultAuthFilterService.fetchModelFilterForRead(model);
            if (result.isFetch()) {
                String rsql = result.getData();
                // Append filter conditions
                if (StringUtils.isBlank(rsql)) {
                    rsql = "createUid == " + userId;
                } else {
                    rsql = "(" + rsql + ") and createUid == " + userId;
                }
                return AuthResult.success(rsql);
            }
            return result;
        }
        return null;
    }
}VI. Conclusion
Here, we conclude the introduction to custom permissions. In Oinone's permission system, there are undoubtedly only two concepts: authorization and authentication, both designed around the Role-Based Access Control (RBAC) system. By flexibly using the two interfaces (Permission Node Extension (PermissionNodeLoadExtendApi) and Permission Filter (AuthFilterService)), we can implement almost any business-form permission management solution.