Ⅰ. Overview
Note
This mode is only available for the open-source community edition. The enterprise edition supports installation via various other methods.
The basic requirement is to prepare a Linux server with 4 CPU cores and 16GB of memory. The recommended operating system is CentOS 7.6 64-bit, which comes pre-installed with all dependencies required by the Oinone framework, along with common and useful utility packages.
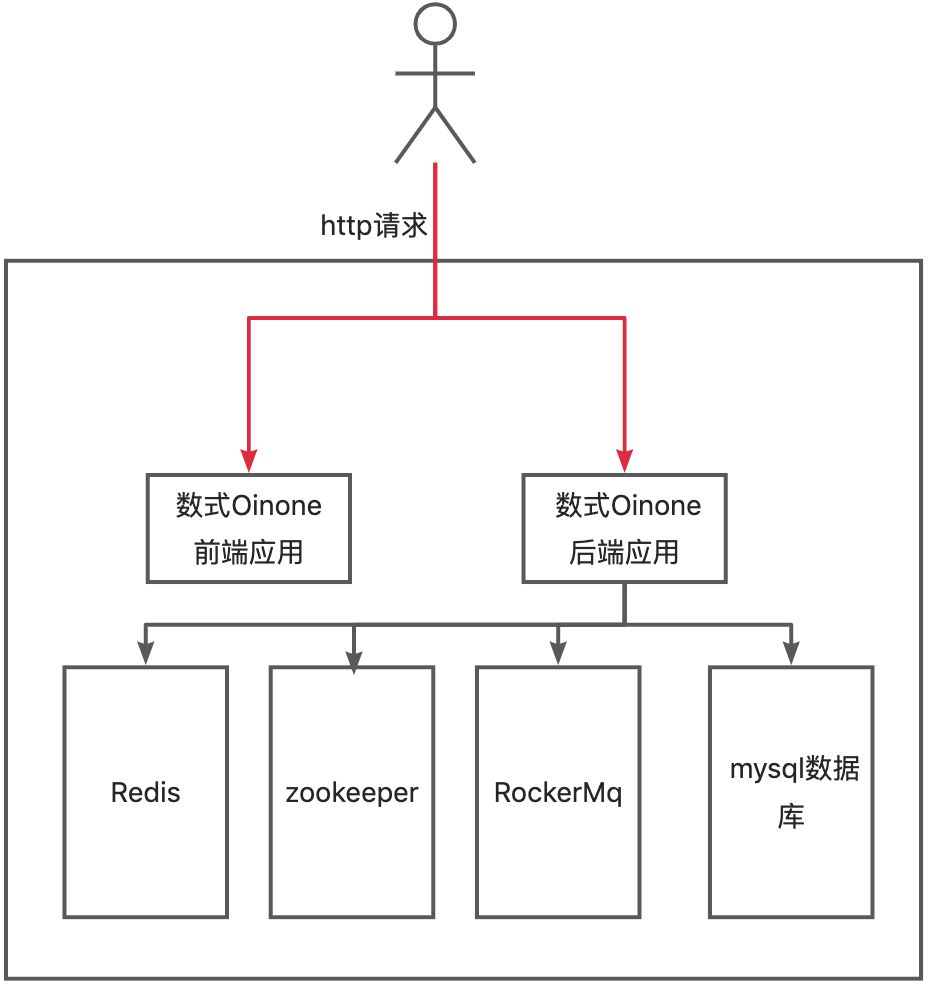
This approach offers greater flexibility. For instance, it allows specific modules to be run according to business requirements. It is sufficient for module development and can serve as a foundation for production deployment. In actual use, middleware services such as Redis, Zookeeper, and RocketMQ can be deployed on independent servers. The deployment architecture is shown below:
Tip
When modifying the Oinone framework source code during source code installation, you cannot directly switch from the community edition to the enterprise edition. However, for other versions, switching from the community edition to the enterprise edition is supported.
Ⅱ. Install MySQL Database
If you don't already have a database installed, you can download and install MySQL from the official website: https://dev.mysql.com/downloads/mysql/.
Refer to MySQL Installation and Precautions
Ⅲ. Deployment of Other Middleware
| Component | Required | Version |
|---|---|---|
| RocketMQ | Yes | Version 4.7.1 or higher |
| Redis | Yes | Version 5.0.2 or higher |
| Zookeeper | Yes | Version 3.5.8 or higher |
Ⅳ. Introduction to Code Repositories
| Description | Code Repository Path | Remarks |
|---|---|---|
| Quick Start | oinone/oinone-frontend-starter.git | One-click startup for web front-end |
| oinone/oinone-mobile-starter.git | One-click startup for mobile front-end | |
| oinone/oinone-backend-starter.git | One-click startup for back-end | |
| Tutorials | oinone/oinone-frontend-tutorials.git | Front-end tutorial project |
| oinone/oinone-backend-tutorials.git | Back-end tutorial project | |
| Examples | oinone/oinone-frontend-examples.git | Front-end sample project |
| oinone/oinone-backend-examples.git | Back-end sample project | |
| Documentation | oinone/oinone-docs | Technical documentation |
| Back-end Core Packages | oinone/oinone-pamirs/pamirs-spi.git | Back-end SPI basic functionality package |
| oinone/oinone-pamirs/pamirs-k2.git | Back-end metadata core functionality | |
| oinone/oinone-pamirs/pamirs-framework-commons.git | Back-end shared functionality core package | |
| oinone/oinone-pamirs/pamirs-framework.git | Back-end core functionality package | |
| oinone/oinone-pamirs/pamirs-framework-adaptor.git | Back-end core extension package | |
| oinone/oinone-pamirs/pamirs-boot.git | Back-end application bootstrap package | |
| Back-end Utility Package | oinone/oinone-pamirs/pamirs-core.git | Back-end basic utility package |
| Front-end Core Packages | oinone/oinone-kunlun/kunlun-engine.git | Front-end extended core functionality |
| oinone/oinone-kunlun/kunlun-framework.git | Front-end core functionality package | |
| oinone/oinone-kunlun/kunlun-boot.git | Front-end PC bootstrap project | |
| oinone/oinone-kunlun/kunlun-mobile-boot.git | Front-end mobile bootstrap project | |
| oinone/oinone-kunlun/kunlun-expression.git | Front-end expression component library | |
| oinone/oinone-kunlun/kunlun-vue.git | Front-end PC component library | |
| oinone/oinone-kunlun/kunlun-mobile-vue.git | Front-end mobile component library |
Tip: Differences between oinone-backend-starter.git and oinone-backend-tutorials.git:
starterdepends on alloinonemodules, whiletutorialsdepends on some modules.starterrequiresmysql,redis,zookeeper, andmq;tutorialsdepends onmysqlandredis, and other components will be gradually introduced when new features are added later.- Examples may be added to
oinone-backend-tutorialsin the future. Currently, we are quite hesitant about whether to include examples from the tutorials. The original intention of not adding examples now is to encourage learners to actually do it themselves.
Ⅴ. Obtain the Source Code
There are two ways to acquire the source code of Shushi Oinone: download the ZIP package or use Git. This documentation focuses on Git.
Tip
Please install Git. We recommend having basic knowledge of Git commands.
You can use either HTTPS or SSH to clone the Git repositories. HTTPS is recommended for most users. Use SSH if you want to contribute to the source code or follow the developer onboarding guide.
(Ⅰ) Front-end
# Clone using HTTPS
git clone https://github.com/oinone/oinone-frontend-starter.git

# Clone using SSH
git clone git@github.com:oinone/oinone-frontend-starter.git(Ⅱ) Back-end
# Clone using HTTPS
git clone https://github.com/oinone/oinone-backend-starter.git

# Clone using SSH
git clone git@github.com:oinone/oinone-backend-starter.gitⅥ. Run the Back-end
(Ⅰ) Modify the src/main/resources/config/application-dev.yml file
If MySQL, Zookeeper, Redis, and RocketMQ are not on the same machine, you need to find the relevant code and modify IP, port, username, password, etc.
MySQL
# Modify the MySQL connection information
pamirs:
  datasource:
    pamirs:
      driverClassName: com.mysql.cj.jdbc.Driver
      type: com.alibaba.druid.pool.DruidDataSource
      url: jdbc:mysql://192.168.0.129:3306/demo_pamirs?...
      username: root
      password: shushi@2019
    base:
      driverClassName: com.mysql.cj.jdbc.Driver
      type: com.alibaba.druid.pool.DruidDataSource
      url: jdbc:mysql://192.168.0.129:3306/demo_base?...
      username: root
password: shushi@2019Zookeeper
dubbo:
  application:
    name: pamirs-designer
    version: 1.0.0
  registry:
    address: zookeeper://127.0.0.1:2181
  protocol:
    name: dubbo
    port: 20880
    serialization: pamirs
  ...
pamirs:
  zookeeper:
    zkConnectString: 127.0.0.1:2181
    zkSessionTimeout: 60000
rootPath: /oinoneRedis
spring:
  redis:
    database: 0
    host: 127.0.0.1
    port: 6379
    timeout: 2000
    password: Abc@1234
    jedis:
      pool:
        max-idle: 16
        min-idle: 0
        max-active: 16
max-wait: 3000RocketMQ
spring:
  rocketmq:
name-server: 127.0.0.1:9876File Storage OSS
cdn:
  oss:
    name: MINIO
    type: MINIO
    bucket: pamirs
    uploadUrl: http://xxx.xxx.xxx.xxx:9000
    downloadUrl: http://xxx.xxx.xxx.xxx:9000
    accessKeyId: xxx
    accessKeySecret: xxx
    mainDir: upload/demo/
    validTime: 3600000
    timeout: 600000
    active: true
    referer:
localFolderUrl:Warning
For enterprise edition trials, Shushi provides default CDN configuration. In production environments, you must replace it with your own CDN server. The test server will be periodically cleared, and file loss may occur.
For more OSS configurations, see: File Storage Configuration
(Ⅱ) Start the Back-end Service
1. Use Maven
cd oinone-backend-starter/oinone-backend-starter-boot && \
mvn clean compile spring-boot:run \
-Dspring-boot.run.profiles=dev2. Use IntelliJ IDEA
Import the oinone-backend-starter project into IDEA and set pro.shushi.pamirs.starter.OinoneBackendStarterApp as the main class.
Successful startup message:
Oinone Backend Starter App started in 54.168926917 sⅦ. Run the Front-end
(Ⅰ) Configure API Endpoint
1. For Development Modify devServer.proxy.pamirs.target in vue.config.js
2. For Production Modify API_BASE_URL in .env
Method 1 has higher precedence than Method 2. To use Method 2, delete Method 1.
(Ⅱ) Static Resources
├── public
└────static.zipExtract static.zip into the public directory.
It is recommended to upload static resources to OSS and set
STATIC_IMGin.envto the OSS address.
(Ⅲ) Install Dependencies and Start
# initialize dependencies
npm i

# run application for development mode
npm run dev(Ⅳ) Directory Structure
├── public               Static resource directory (contains index.html)
│   └── static           Static assets
│
├── src                  Source code
│   └── main.ts          Entry file, registers `providers/application.ts`
├── .env                 Environment variables file
├── package.json         Project dependencies and scripts
├── tsconfig.json        TypeScript configuration
└── vue.config.js        Vue/Webpack configuration, including dev proxy