I. Overview
Note
This mode is only available for the Enterprise Edition. The open-source Community Edition can be installed through other modes.
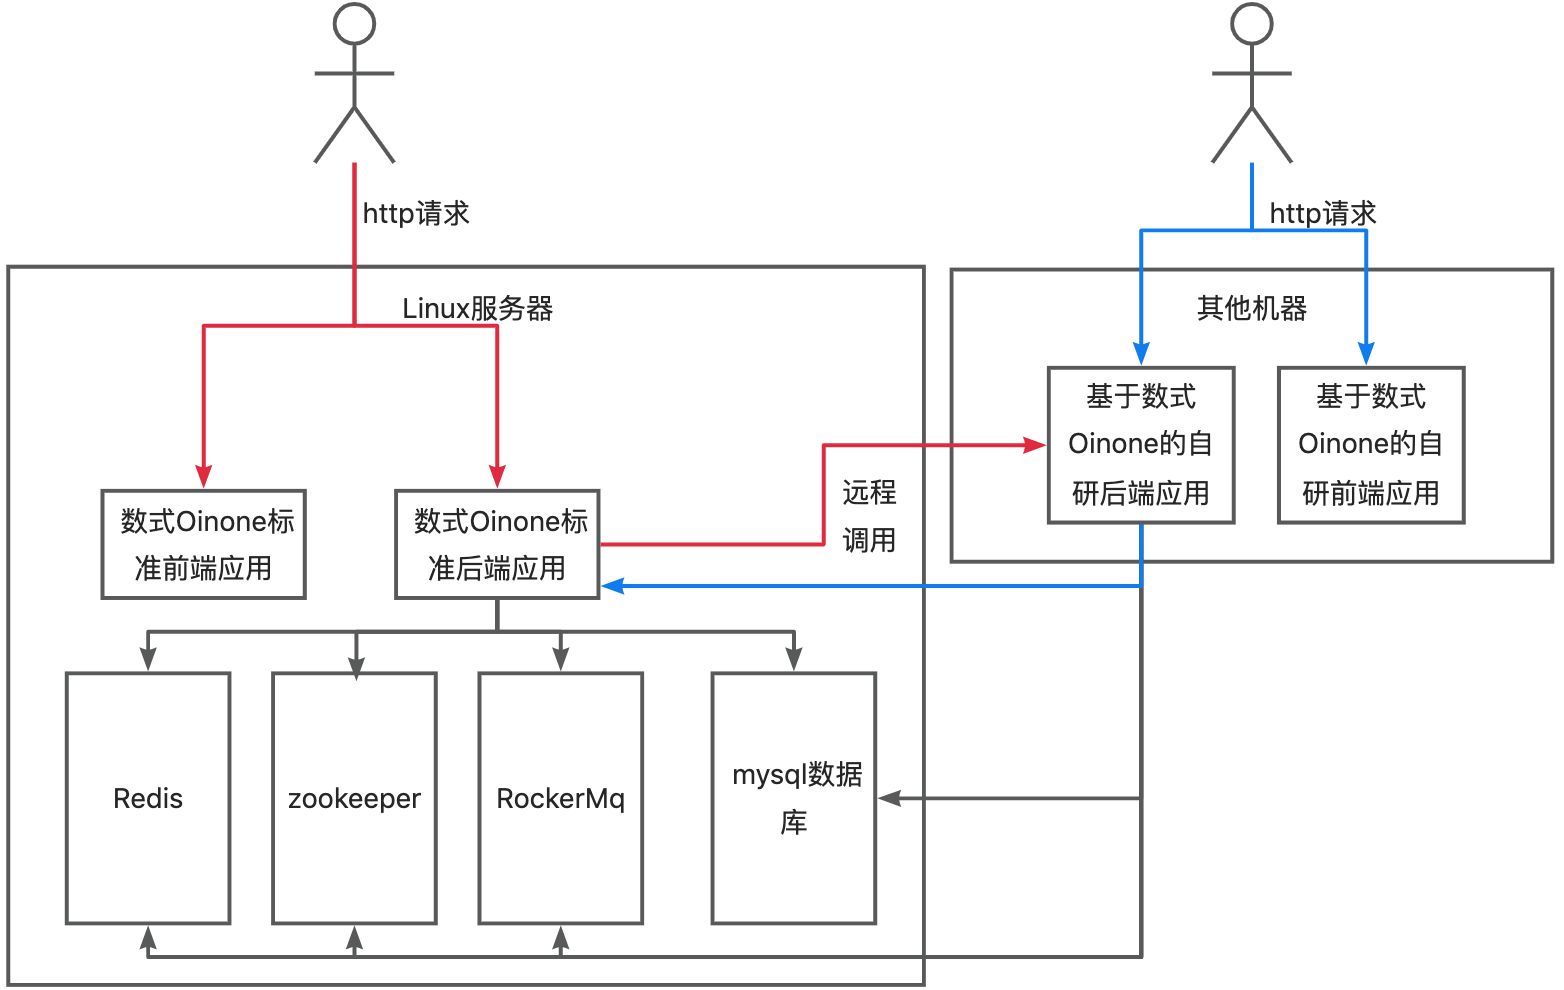
The foundation is to prepare a Linux server with 4 cores and 16GB of memory. CentOS 7.6 64-bit is recommended for the operating system, which has all the necessary dependencies for Oinone and common useful packages installed.
It is suitable for using Oinone in formal, R&D, and testing environments. After additional deployment and maintenance work, it can be used long-term. In practical use, middleware such as Redis, Zookeeper, and RocketMQ can be deployed on independent servers. The deployment structure is illustrated as follows:
Note: If experiencing with other environments, networks need to be interoperable
Can the local development IP communicate with the server IP? Execute the command locally: ping 192.168.0.121 (replace with your own server IP)
Can the host IP where Docker is deployed communicate with the local development IP? Enter the server and execute the command: ping 192.168.0.60 (replace with your own local IP)
II. Install MySQL Database
If there is no existing database, you can download and install it from the official website: https://dev.mysql.com/downloads/mysql/.
Refer to MySQL Installation and Precautions
III. Deploy Other Middleware
| RocketMQ | Mandatory | 4.7.1+ |
|---|---|---|
| Redis | Mandatory | 5.0.2+ |
| Zookeeper | Mandatory | 3.5.8+ |
IV. Download Oinone Running Package
Browse the official Oinone community (doc.oinone.top), check the release notes of the corresponding version, and download the JAR file for independent deployment of all designers (backend services, including all designers), such as: pamirs-designer-boot-v5.3-5.3.8.4.jar.
V. Run Oinone Standard Backend Application
(I) Download Oinone Exclusive Launcher
After the running package is encrypted, Oinone's exclusive launcher is required. After downloading oinone-boot-starter.zip
(II) Startup Script
Example:
Take the Linux platform as an example
Unzip the Oinone exclusive launcher zip file oinone-boot-starter.zip, and copy the Linux launcher
linux-bootto the user's home directory.In the user's home directory, create a startup.sh file and an oinone directory.
Find the following code in the startup.sh file and modify configuration items such as
subject,licensePath, andjarPath.
#startup.sh
#!/bin/bash
# Directory where the script is located
home=$(cd "$(dirname "$0")" && pwd)
# Path to the startup JAR
jarPath=$home/oinone/pamirs-designer-boot-v5.3-5.3.8.4.jar
# Configuration path
applicationPath=$home/oinone/config/application.yml
# License information
subject=
licensePath=
nohup $home/linux-boot java -Duser.timezone=GMT+08:00 -Dhttps.protocols=TLSv1.2 -Dfile.encoding=UTF-8 \
  -jar $jarPath \
  --spring.config.location=$applicationPath \
  -Psubject=$subject \
  -Plicense=$licensePath \
  -Plifecycle=INSTALL > $home/out.log 2>&1  &
sleep 1
tail -200f $home/out.logNote: Other Platform Support
The Linux (arm64 architecture) launcher is switched to: linux-boot-arm64.
The Mac OS launcher is switched to: darwin-boot
The Mac OS (arm64 architecture) launcher is switched to: darwin-boot-arm64
The Windows platform launcher is switched to: win-boot.exe
Tip
- The
java -jarcommand used above is exactly the same as the conventional usage. - The Oinone no-code designer does not support the use of the
javaagentparameter.
(III) Modify the application.yml File in the config Directory
Download the application.yml file to the specified location, such as the $home/oinone/config/ directory, and make corresponding modifications.
If Mysql, Zookeeper, Redis, and RocketMQ are not on the same host, find the following code in the file and modify the IP, port, username, password, and other configuration items.
- Mysql
# application.yml file
# Change to the IP, port (default port 3306, consistent with the port of MySQL on the server), username, password of the MySQL server
pamirs:
  datasource:
    pamirs:
      driverClassName: com.mysql.cj.jdbc.Driver
      type: com.alibaba.druid.pool.DruidDataSource
      url: jdbc:mysql://192.168.0.129:3306/demo_pamirs?useSSL=false&allowPublicKeyRetrieval=true&useServerPrepStmts=true&cachePrepStmts=true&useUnicode=true&characterEncoding=utf8&serverTimezone=Asia/Shanghai&autoReconnect=true&allowMultiQueries=true
      username: root
      password: shushi@2019
    base:
      driverClassName: com.mysql.cj.jdbc.Driver
      type: com.alibaba.druid.pool.DruidDataSource
      url: jdbc:mysql://192.168.0.129:3306/demo_base?useSSL=false&allowPublicKeyRetrieval=true&useServerPrepStmts=true&cachePrepStmts=true&useUnicode=true&characterEncoding=utf8&serverTimezone=Asia/Shanghai&autoReconnect=true&allowMultiQueries=true
      username: root
password: shushi@2019- Zookeeper
# application.yml file
dubbo:
  application:
    name: pamirs-designer
    version: 1.0.0
  registry:
    address: zookeeper://127.0.0.1:2181
  protocol:
    name: dubbo
    port: 20880
    serialization: pamirs
  consumer:
    timeout: 5000
  provider:
    timeout: 5000
  scan:
    base-packages: pro.shushi
  cloud:
    subscribed-services:
pamirs:
  zookeeper:
    zkConnectString: 127.0.0.1:2181
    zkSessionTimeout: 60000
rootPath: /oinone- Redis
# application.yml file
spring:
  redis:
    database: 0
    host: 127.0.0.1
    port: 6379
    timeout: 2000
    password: Abc@1234
    jedis:
      pool:
        # Maximum idle connections in the connection pool, default 8
        max-idle: 16
        # Minimum idle connections in the connection pool, default 0
        min-idle: 0
        # Maximum number of connections in the connection pool, default 8, negative value means no limit
        max-active: 16
        # Maximum blocking wait time for the connection pool (using negative value to indicate no limit), default -1
max-wait: 3000- RocketMQ
# application.yml file
spring:
  rocketmq:
name-server: 127.0.0.1:9876- File storage OSS
cdn:
  oss:
    name: MINIO
    type: MINIO
    bucket: pamirs
    uploadUrl: http://xxx.xxx.xxx.xxx:9000
    downloadUrl: http://xxx.xxx.xxx.xxx:9000
    accessKeyId: xxx
    accessKeySecret: xxx
    mainDir: upload/demo/
    validTime: 3600000
    timeout: 600000
    active: true
    referer:
localFolderUrl:Warning
When experiencing the Enterprise Edition, Oinone will provide default configurations, but note that the CDN in the formal environment needs to be replaced with your own server instead of using the test server provided by Oinone Technology. This server is cleaned regularly, leading to file loss.
For more OSS configurations, please refer to: File Storage Configuration
VI. Run Oinone Standard Frontend Application
VII. Common Issues
(I) How to handle the cannot execute binary file exception?
Problem Cause
The Oinone exclusive launcher is compiled and executed using Go language, and needs to be compiled separately for different operating system architectures.
Solution
- Install the
Go languageenvironment on thephysical machine. - Download the
boot.gofile and place it in therundirectory. (Need to askOinone customer servicefor the latestboot.gofile) - Enter the
rundirectory and execute the commandgo build -o "boot-starter" "boot.go". - Add
-v $home/run/boot-starter:/opt/pamirs/run/boot-starter \in thestartup.shcommand to mount the file to the container. - Delete the Docker container and then execute the
startup.shscript to restart the image.
(II) How to handle the failed to open elf at /lib64/ld-linux-x86-64.so.2 exception?
Problem Cause
The host with some arm64 architecture cannot be compatible with the linux-boot launcher compiled in the amd64 environment, and the launcher needs to be replaced with linux-boot-arm64.
Solution
- Download oinone-boot-starter.zip and unzip it to obtain the
linux-boot-arm64launcher. - Place the launcher in the
rundirectory. - Add
-v $home/run/linux-boot-arm64:/opt/pamirs/run/boot-starterin thestartup.shcommand to replace the launcher in the image. - Delete the Docker container and then execute the
startup.shscript to restart the image.