I. Confirm the JDK Version
Starting from v7.0, Oinone fully supports JDK 17 and restricts previous versions to using JDK 8.
- If you are using the latest version of Oinone or any version above v7.0, you should install JDK 17.
- If you are using a version prior to v7.0 or an earlier one, you should install JDK 8.
II. Download the Installation Package
Tip
You can choose to use Oracle, OpenJDK, or other JDK distributions. The version must be 1.8_221 or higher. It is recommended to use Oracle or OpenJDK distributions.
When downloading, please select the version that matches the CPU instruction set architecture of your current device (e.g., x86_64, arm64).
Download Oracle JDK:
- Download link for JDK 8: Java SE 8 (8u211 and later)
- Download link for JDK 17: Java SE 17 (17.0.13 and later)
Tip
Downloading Oracle JDK may require verifying your Oracle account.
III. Installation
Note
When configuring environment variables, the configuration path in the script needs to be replaced with the path of the profile file corresponding to your Shell:
- For Zsh, use
${HOME}/.zshrc. - For Bash, use
${HOME}/.bashrc.
(I) Install JDK on MacOS
PS: The installation steps for JDK 17 and JDK 8 are generally the same, except for the directory names.
1. Install via DMG
The directory information after installation is as follows:
JDK 8:
- Global installation directory for the DMG package:
/Library/Java/JavaVirtualMachines/jdk-1.8.jdk - User installation directory for the DMG package:
~/Library/Java/JavaVirtualMachines/jdk-1.8.jdk
JDK 17:
- Global installation directory for the DMG package:
<font style="color:#000000;">/Library/Java/JavaVirtualMachines/jdk-17.jdk</font> - User installation directory for the DMG package:
~/Library/Java/JavaVirtualMachines/<font style="color:#000000;">jdk-17.jdk</font>
2. Configure Environment Variables
# write properties to .zshrc
cat >> ~/.zshrc << EOF
export JAVA_HOME="/Library/Java/JavaVirtualMachines/jdk-17.jdk/Contents/Home"
export PATH=\$JAVA_HOME/bin:\$PATH
EOF

# refresh
source ~/.zshrc3. Verification
/usr/libexec/java_home -V

# --- output ---

Matching Java Virtual Machines (2):
    17.0.15 (arm64) "Oracle Corporation" - "Java SE 17.0.15" /Library/Java/JavaVirtualMachines/jdk-17.jdk/Contents/Home
1.8.0_451 (arm64) "Oracle Corporation" - "Java SE 8" /Library/Java/JavaVirtualMachines/jdk-1.8.jdk/Contents/Homejava -version
# --- output ---
# jdk 8
java version "1.8.0_451"
Java(TM) SE Runtime Environment (build 1.8.0_451-b10)
Java HotSpot(TM) 64-Bit Server VM (build 25.451-b10, mixed mode)
# jdk 17
java version "17.0.15" 2025-04-15 LTS
Java(TM) SE Runtime Environment (build 17.0.15+9-LTS-241)
Java HotSpot(TM) 64-Bit Server VM (build 17.0.15+9-LTS-241, mixed mode, sharing)(II) Install JDK on Windows
PS: The installation steps for JDK 17 and JDK 8 are generally the same, except for the directory names.
Default installation directory for the EXE file: C:\Program Files\Java\jdk-1.8\
Custom installation directory for the EXE file: Custom directory
Installation by unzipping the ZIP file: Custom directory
1. Configure Environment Variables
The following provides two ways to configure environment variables: visual interface configuration and command-line configuration. You can choose either way for configuration. There is no need to use both.
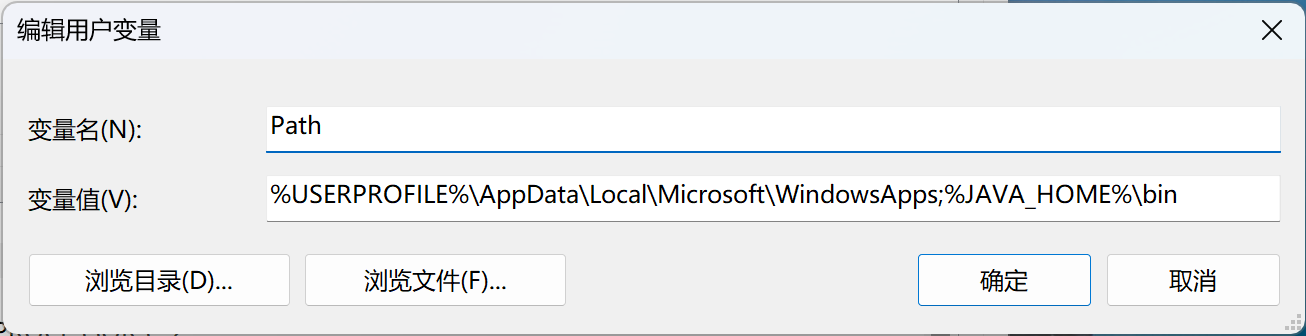
1.1 Set User-Level Environment Variables via the Visual Interface
Press Win + R on the keyboard to display the following interface.

Enter the following code and click OK.
rundll32.exe sysdm.cpl,EditEnvironmentVariablesSet JAVA_HOME to C:\Program Files\Java\jdk-1.8.

Append ;%JAVA_HOME%\bin to Path.
1.2 Set User-Level Environment Variables via the Command Line
Run CMD, Powershell, or Terminal.
# Set JAVA_HOME to the absolute path of the default installation directory or the absolute path of the custom directory.
setx "JAVA_HOME" "C:\Program Files\Java\jdk-1.8"setx "Path" "%Path%;%JAVA_HOME%\bin"2. Verification
Verify through CMD or Powershell.
java -version

# --- output ---

# jdk 8
java version "1.8.0_451"
Java(TM) SE Runtime Environment (build 1.8.0_451-b10)
Java HotSpot(TM) 64-Bit Server VM (build 25.451-b10, mixed mode)

# jdk 17
java version "17.0.15" 2025-04-15 LTS
Java(TM) SE Runtime Environment (build 17.0.15+9-LTS-241)
Java HotSpot(TM) 64-Bit Server VM (build 17.0.15+9-LTS-241, mixed mode, sharing)(III) Install JDK on Linux
PS: The installation steps for JDK 17 and JDK 8 are generally the same, except for the directory names.
In the Linux environment, Oracle provides installation packages in the form of rpm and tar.gz.
1. Install on Linux Distributions Using the RPM Package Format (Choose One)
rpm -ivh jdk-8u441-linux-aarch64.rpm # The specific file name will have an encoding.2. Install Using the tar.gz Package Format (Choose One)
tar zxvf jdk-8u441-linux-aarch64.tar.gz -C "Target installation directory"  # The specific file name will have an encoding.

# write properties to .bash_profile
cat >> .bash_profile << EOF
export JAVA_HOME="Specific JDK installation directory"
export PATH=\$JAVA_HOME/bin:\$PATH
EOF

# refresh
source .bash_profile3. Verification
java -version

# --- output ---

# jdk 8
java version "1.8.0_441"
Java(TM) SE Runtime Environment (build 1.8.0_441-b07)
Java HotSpot(TM) 64-Bit Server VM (build 25.441-b07, mixed mode)

# jdk 17
java version "17.0.15" 2025-04-15 LTS
Java(TM) SE Runtime Environment (build 17.0.15+9-LTS-241)
Java HotSpot(TM) 64-Bit Server VM (build 17.0.15+9-LTS-241, mixed mode, sharing)